1. Important Safety Instructions
Please read all instructions carefully before using the appliance. Keep this manual for future reference.
- Always ensure the appliance is placed on a stable, heat-resistant surface.
- Do not immerse the appliance, cord, or plug in water or other liquids.
- Close supervision is necessary when any appliance is used by or near children.
- Unplug from outlet when not in use and before cleaning. Allow to cool before putting on or taking off parts.
- Do not operate any appliance with a damaged cord or plug, or after the appliance malfunctions or has been damaged in any manner.
- Do not use attachments not recommended by the appliance manufacturer.
- Do not place on or near a hot gas or electric burner, or in a heated oven.
- Extreme caution must be used when moving an appliance containing hot oil or other hot liquids.
- To disconnect, turn any control to "off", then remove plug from wall outlet.
- Do not use appliance for other than intended use.
- Avoid contact with moving parts.
- Do not block any ventilation openings.
- Always ensure the water tank is filled with purified water for steam functions.
2. Product Overview
The CIARRA 25.4QT Nosh Oven Pro is a versatile 12-in-1 countertop appliance designed to simplify your cooking experience. It combines the functionalities of a steam oven, air fryer, convection toaster, and more, offering a wide range of cooking modes.

Figure 2.1: Front view of the CIARRA Nosh Oven Pro with a roasted chicken.
Key Features:
- 12-in-1 Cooking Modes: Convection, Steam, Rapid Steam, Air Fryer, Bake, Ferment, Dehydrate, Warm, Sterilize, Reheat, and Preset Menus.
- Adjustable Temperature: 85°F-430°F for precise cooking control.
- Large Capacity: 25.4QT interior, suitable for a whole chicken, pizza, or multiple servings.
- Efficient Heating: Rapid steam and efficient convection system for faster cooking and preheating.
- Self-Clean Function: Built-in steam clean for easy maintenance.
- Programmable Timer: 12-hour timer for delayed cooking.

Figure 2.2: All included accessories for the Nosh Oven Pro.
Included Components:
- 1 Nosh Oven Pro Unit
- 1 Air Fryer Basket
- 1 Baking Pan
- 1 Oven Rack
- 1 Water Tank
- 1 Oven Mitt
- 1 CIARRA Recipe Book
3. Setup
3.1 Unpacking and Placement
- Carefully remove the oven and all accessories from the packaging.
- Remove any protective film or packaging materials from the oven.
- Place the oven on a flat, stable, and heat-resistant countertop. Ensure there is adequate ventilation space around the oven (at least 4 inches on all sides).
- Do not place the oven directly against a wall or under cabinets that may be damaged by heat or steam.
3.2 Initial Cleaning
- Wipe the exterior of the oven with a damp cloth.
- Wash the air fryer basket, baking pan, and oven rack with warm, soapy water. Rinse thoroughly and dry completely.
- Run a preliminary steam cycle (refer to Section 4.2 for steam operation) with an empty oven to remove any manufacturing residues.
3.3 Water Tank Installation
- Locate the water tank at the bottom front of the oven.
- Pull out the water tank drawer.
- Fill the water tank with purified or distilled water up to the MAX fill line. Do not use tap water to prevent mineral buildup.
- Slide the water tank back into its position until it clicks securely.

Figure 3.1: Filling the 33.8oz water tank for steam functions.
4. Operating Instructions
The CIARRA Nosh Oven Pro features intuitive touch controls and a rotary knob for easy operation.
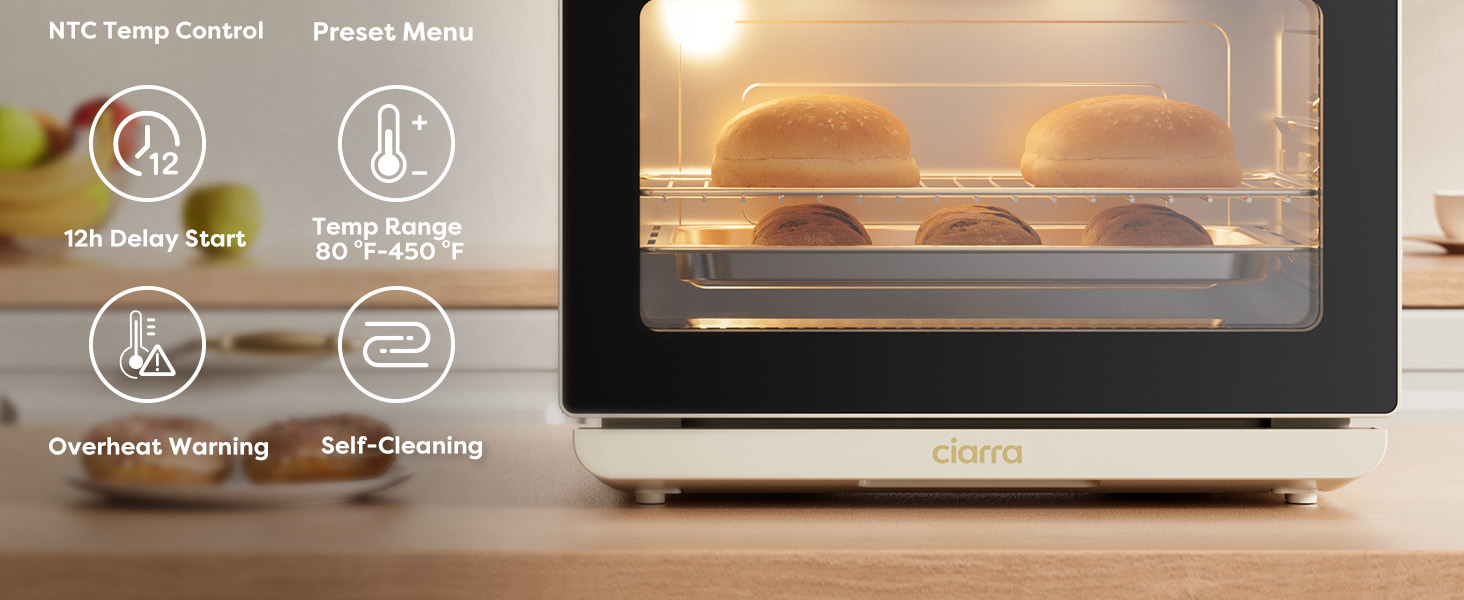
Figure 4.1: Overview of the control panel with various cooking modes.
4.1 Basic Operation
- Power On: Plug the oven into a grounded electrical outlet. The display will illuminate.
- Select Mode: Use the "Mode" button or rotary knob to cycle through the available cooking functions (Steam, Rapid Steam, Steam Convection, Air Fry, Bake, Dehydrate, Ferment, Warm, Sterilize, Reheat, Preset Menus).
- Adjust Temperature/Time: Once a mode is selected, use the temperature/time buttons or rotary knob to set the desired temperature and cooking duration.
- Start/Pause: Press the Start/Pause button to begin or temporarily stop the cooking process.
- Light: Press the light button to illuminate the oven interior for monitoring.
4.2 Cooking Modes Explained
- Steam: Ideal for vegetables, fish, and delicate foods, preserving moisture and nutrients.
- Rapid Steam: Delivers steam quickly for faster cooking or blanching.
- Steam Convection: Combines steam with hot air circulation for moist interiors and crispy exteriors, perfect for roasted meats and bread.
- Air Fry: Uses hot air circulation to cook foods with a crispy texture and less oil, suitable for fries, chicken wings, and more.
- Bake: Standard baking function for cakes, cookies, and casseroles.
- Ferment: Provides a controlled low-temperature environment for proofing dough or making yogurt.
- Dehydrate: Low-temperature setting for drying fruits, vegetables, and making jerky.
- Warm: Keeps cooked food at a serving temperature without overcooking.
- Sterilize: Uses steam to sanitize baby bottles, utensils, and other heat-resistant items.
- Reheat: Gently reheats leftovers, often with steam, to prevent drying out.
- Preset Menus: Pre-programmed settings for common dishes like pizza, whole chicken, etc. Consult the included recipe book for details.
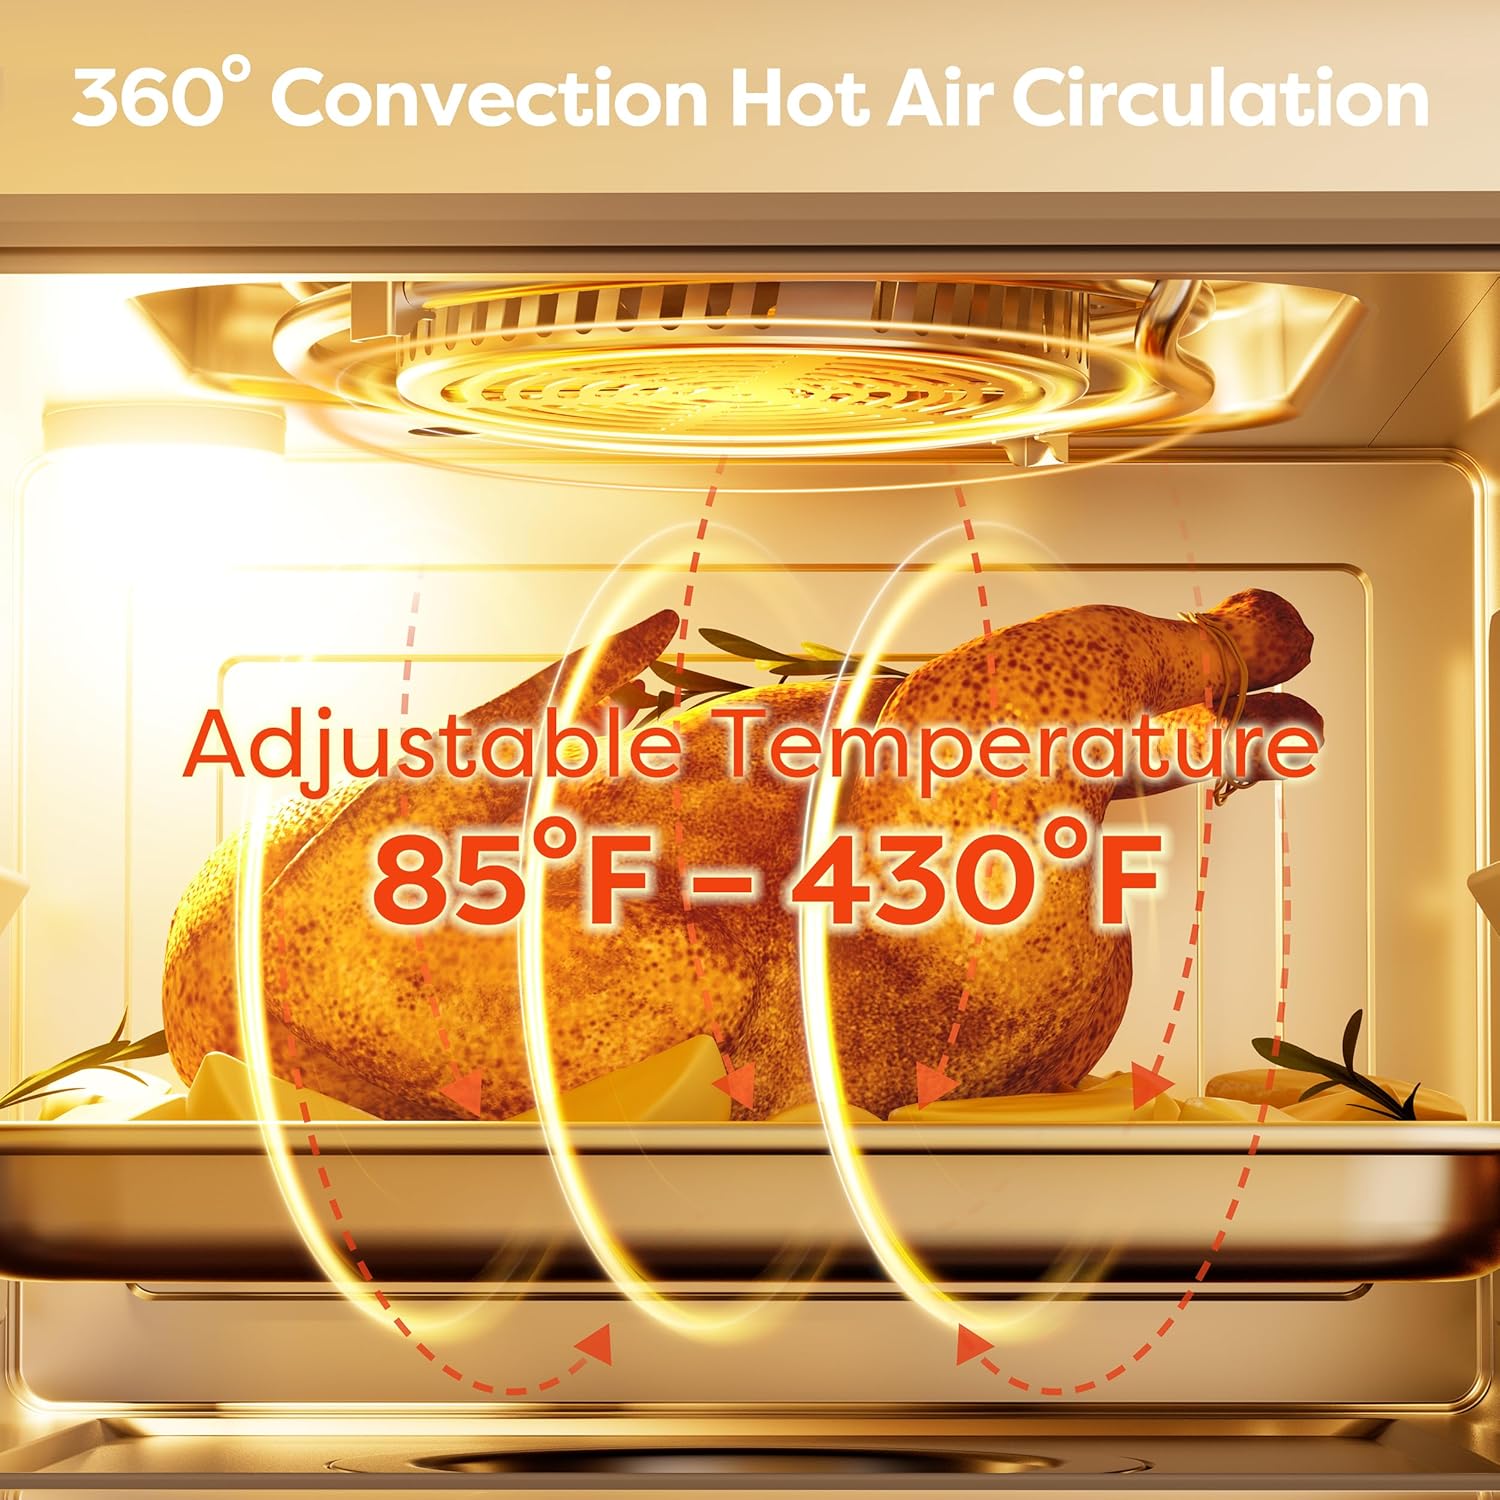
Figure 4.2: 360° Convection Hot Air Circulation for even cooking.
4.3 Using the 12-Hour Programmable Timer
The programmable timer allows you to set a delayed start for your cooking. This is useful for preparing meals in advance.
- Select your desired cooking mode, temperature, and time.
- Press the "Timer" button.
- Use the +/- buttons or rotary knob to set the delay time (up to 12 hours).
- Press Start/Pause to confirm. The oven will begin cooking after the set delay time.
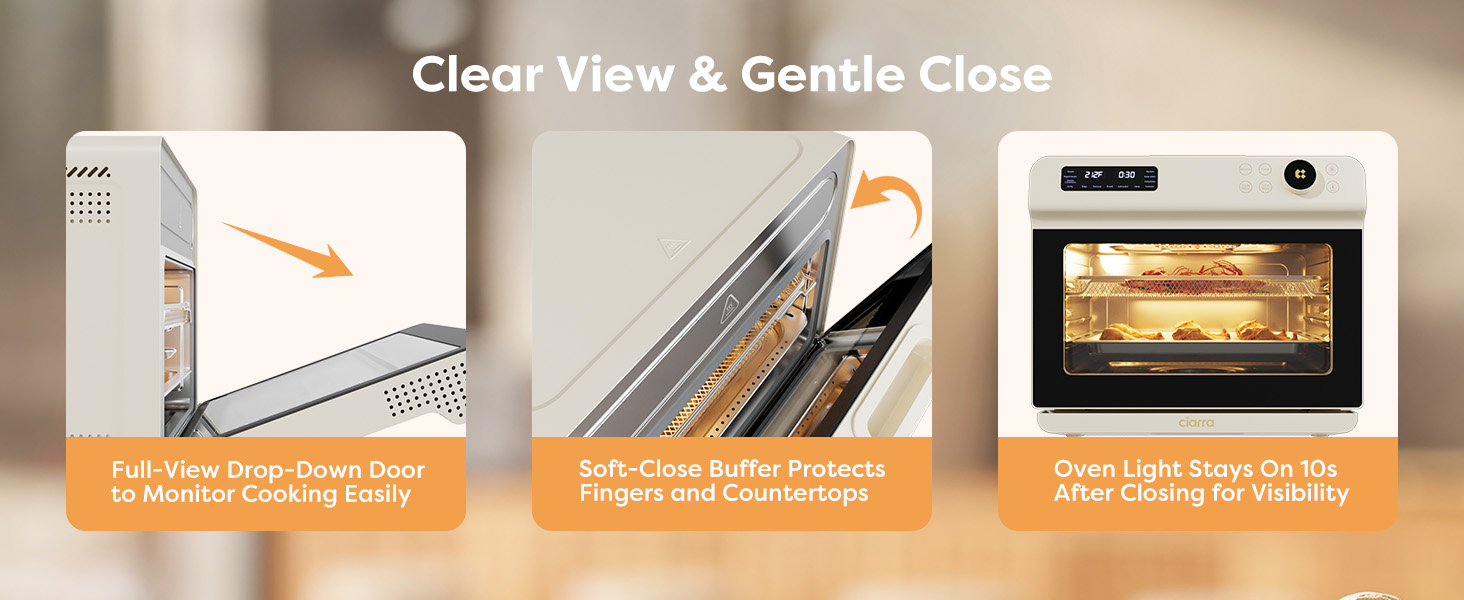
Figure 4.3: Smart Timing feature for scheduled cooking.
4.4 Door Operation
The oven features a full-view drop-down door with a soft-close buffer for safety and convenience.
- To open, gently pull the handle downwards. The door will open smoothly.
- To close, gently push the door upwards. The soft-close mechanism will engage to prevent slamming.
- The oven light stays on for 10 seconds after closing the door for improved visibility.

Figure 4.4: Features of the oven door for clear view and gentle close.
4.5 Official Product Videos
Watch these official videos for a visual guide on using your CIARRA Nosh Oven Pro:
Video 4.1: An overview of the CIARRA 24L Nosh Oven Pro's features and cooking capabilities.
Video 4.2: Demonstrating various uses and benefits of the CIARRA Nosh Oven Pro.
Video 4.3: A detailed look at the CIARRA 12-in-1 Nosh Oven Pro Countertop Oven.
5. Maintenance
5.1 Self-Cleaning Function
The oven features a convenient steam self-clean function to help remove grease and food residue.
- Ensure the water tank is filled with purified water.
- Remove all accessories (racks, pans, baskets) from the oven interior.
- Select the "Clean" mode on the control panel.
- Press Start/Pause to begin the steam cleaning cycle.
- Once the cycle is complete and the oven has cooled, wipe the interior with a soft, damp cloth to remove loosened residue.

Figure 5.1: Easy self-cleaning process with steam.
5.2 General Cleaning
- Always unplug the oven and allow it to cool completely before cleaning.
- Exterior: Wipe with a soft, damp cloth. Do not use abrasive cleaners or scouring pads.
- Interior: For stubborn stains, use a mild detergent and a non-abrasive sponge. Ensure all detergent residue is wiped away.
- Accessories: Wash the air fryer basket, baking pan, and oven rack with warm, soapy water. They are generally dishwasher safe, but hand washing is recommended for longevity.
- Water Tank: Periodically clean the water tank to prevent mineral buildup. Rinse with water and a small amount of vinegar if necessary.
6. Troubleshooting
If you encounter any issues with your CIARRA Nosh Oven Pro, please refer to the following common troubleshooting tips:
- Oven not turning on: Ensure the power cord is securely plugged into a working electrical outlet. Check your household circuit breaker.
- Steam function not working: Verify that the water tank is filled with purified water and correctly inserted.
- Food not cooking evenly: Ensure food is placed appropriately on the racks and not overcrowded. For convection modes, ensure proper air circulation.
- Error codes on display: Refer to the full user manual (if available from manufacturer) or contact customer support for specific error code interpretations.
- Excessive smoke: This may occur if there is food residue or grease buildup. Perform a thorough cleaning of the interior and accessories.
For further assistance, please contact CIARRA Customer Support.
7. Specifications
| Feature | Specification |
|---|---|
| Brand | CIARRA |
| Model Name | Steam Oven (CASO24-W) |
| Capacity | 25.4QT |
| Color | Cream |
| Product Dimensions | 14"D x 16"W x 17"H |
| Item Weight | 35.8 pounds |
| Material | Stainless Steel |
| Control Type | Touch and knob |
| Door Style | Dropdown Door |
| Power Source | Electric |
| Temperature Range | 85 to 430 °F Degrees Fahrenheit |
| Number of Shelves | 1 (multiple rack positions available) |
| Special Features | Self-Cleaning, Steam Feature, Sterilize, Temperature Control |
8. Warranty and Support
The CIARRA Nosh Oven Pro comes with a manufacturer's warranty. For detailed warranty information, including terms, conditions, and registration, please refer to the documentation included with your product or visit the official CIARRA website.
If you require technical support, have questions about operation, or need to make a warranty claim, please contact CIARRA Customer Service. Contact information can typically be found on the manufacturer's website or in your product packaging.
It is recommended to register your product upon purchase to facilitate any future support needs.