1. Introduction
This manual provides essential information for the safe operation, installation, maintenance, and troubleshooting of your Shinco 120 Pints Energy Star Dehumidifier. Please read this manual thoroughly before using the appliance and retain it for future reference. Proper use ensures optimal performance and extends the lifespan of your dehumidifier.
Safety Information
- Always operate the unit on a level surface to prevent water spillage.
- Ensure the power outlet matches the voltage requirements of the unit.
- Do not block air inlets or outlets. Maintain at least 8 inches (20 cm) clearance around the unit.
- Unplug the dehumidifier before cleaning or performing any maintenance.
- Keep children and pets away from the unit during operation.
2. Product Overview
The Shinco 120 Pints Energy Star Dehumidifier is designed to efficiently remove excess moisture from large spaces up to 6,000 Sq.Ft, helping to create a healthier and more comfortable environment. It features Wi-Fi connectivity for remote control, auto defrost, and continuous drainage options.

Figure 2.1: Shinco Dehumidifier with Wi-Fi connectivity and smartphone app interface.
Key Features
- High Capacity: Removes up to 120 pints of moisture per day (under 95°F, 90%RH conditions).
- Large Coverage Area: Suitable for spaces up to 6,000 Sq.Ft.
- Wi-Fi Smart Control: Remote operation via smartphone app.
- Adjustable Humidity: Settings from 30% to 80% in 5% increments.
- Multiple Drainage Options: Manual water tank (5L/1.32Gal) or continuous drainage with included hose.
- 24-Hour Timer: Programmable operation for energy efficiency.
- Auto Defrost: Prevents coil freezing in low temperatures.
- Child Lock: Disables control panel buttons to prevent accidental changes.
- Washable Filter: Easy to clean and maintain.
3. Setup
Unpacking and Placement
- Carefully remove the dehumidifier from its packaging.
- Place the unit upright on a firm, level surface.
- Ensure there is at least 8 inches (20 cm) of space around the unit for proper airflow. Do not place it against a wall or furniture that could obstruct the air intake or exhaust.
- Avoid placing the unit near heat sources or in direct sunlight.
Power Connection
Plug the power cord into a grounded electrical outlet. The unit will beep once, and the display will illuminate briefly.
Drainage Options
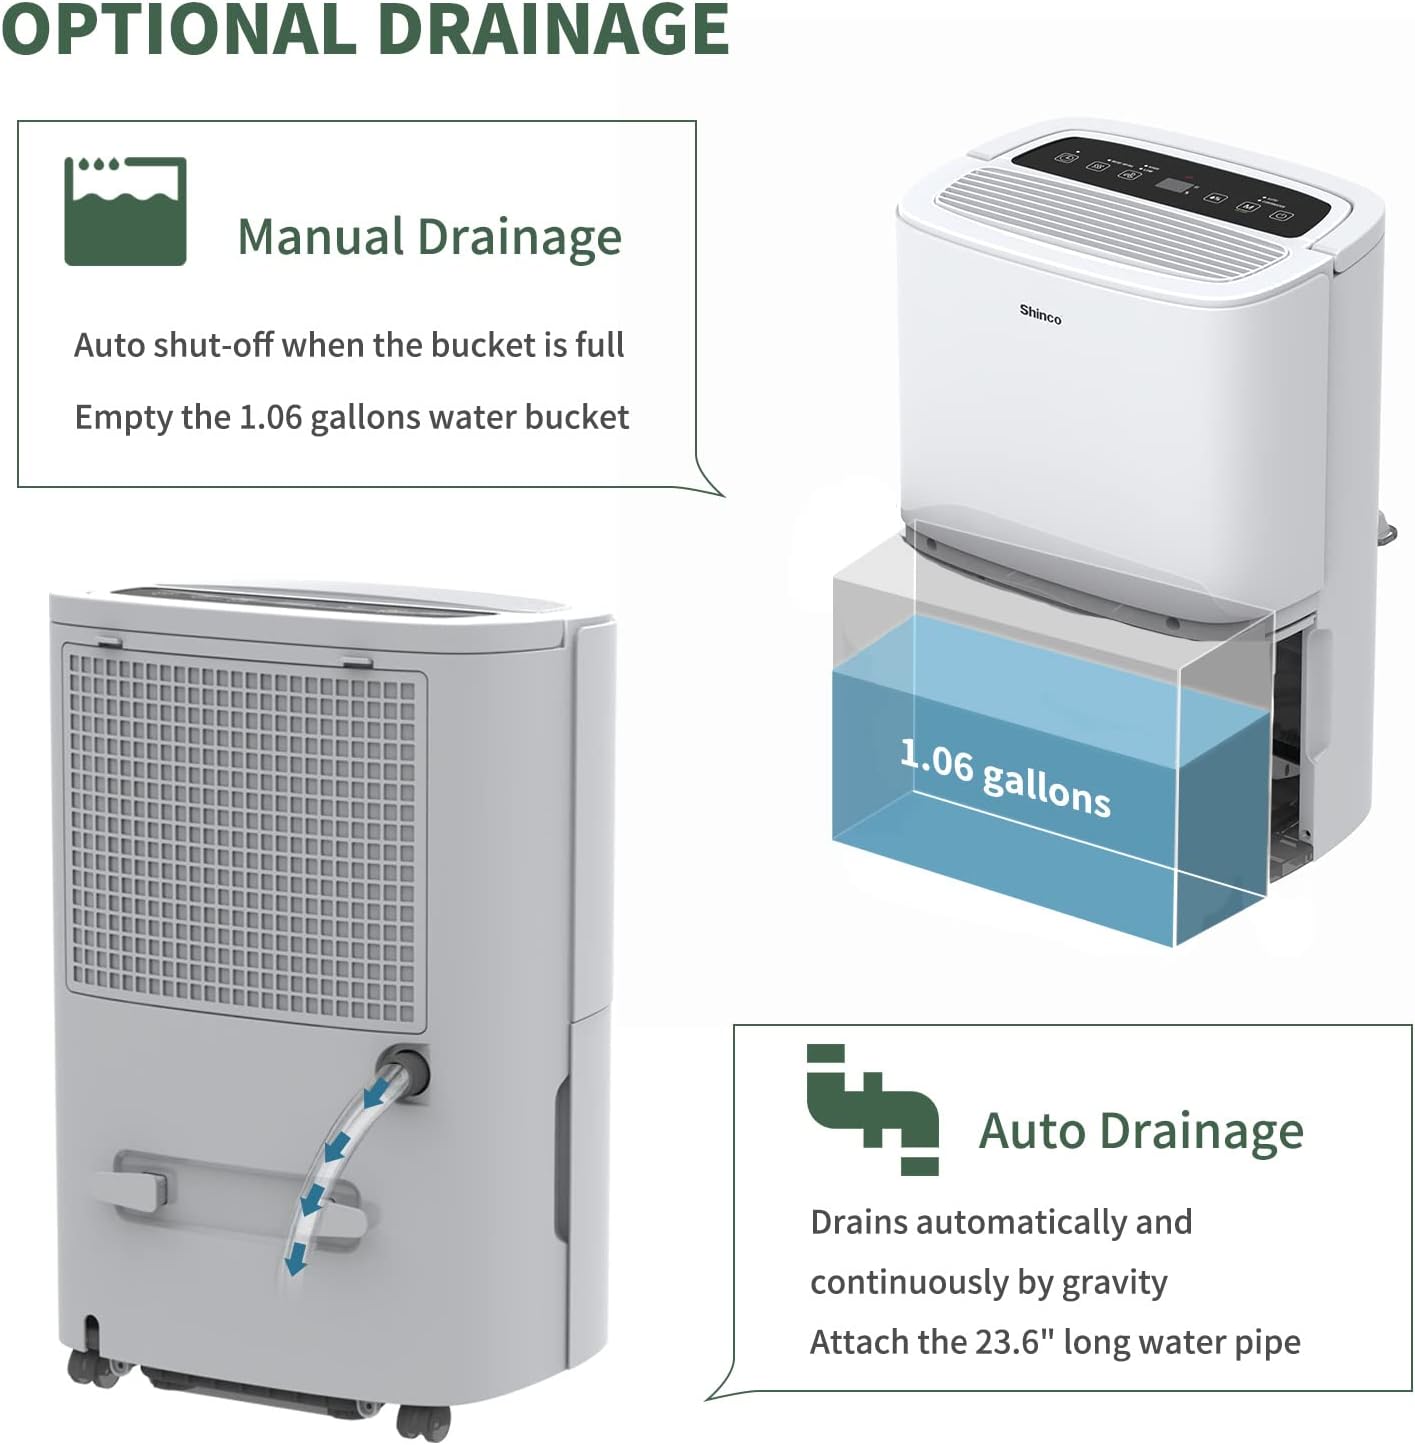
Figure 3.1: Manual and continuous drainage methods.
Your dehumidifier offers two methods for water removal:
- Manual Drainage (Water Tank): The unit collects water in its internal 5-liter (1.32-gallon) water tank. When the tank is full, the unit will automatically shut off, display "FL" (Full) on the screen, and an alarm will sound. The tank must be manually emptied.
- Continuous Drainage (Drain Hose): For extended operation without manual emptying, attach the included 23.6-inch drain hose to the continuous drain port on the back of the unit. Ensure the hose is sloped downwards to a suitable floor drain or larger container to allow gravity drainage. Do not elevate the hose above the drain port.
4. Operating Instructions
Control Panel Overview

Figure 4.1: Digital control panel layout.
- Power Button: Turns the unit ON or OFF.
- Mode Button: Cycles through operating modes (Auto, Continuous). Press and hold for 3 seconds to activate/deactivate Child Lock.
- Humidity Setting Buttons (%): Adjusts the desired humidity level (30% to 80%).
- Fan Speed Button: Selects fan speed (High, Low).
- Timer Button: Sets the auto-on or auto-off timer (1-24 hours).
- Inside Drying Button: Activates the internal drying function, useful before storage.
Setting Desired Humidity
- Press the Power button to turn on the unit.
- Use the Humidity Setting buttons (%) to select your desired humidity level. The display will show the target humidity. The unit will operate until the room humidity reaches this level, then cycle on and off to maintain it.
Fan Speed Adjustment
Press the Fan Speed button to toggle between High and Low fan speeds. Higher fan speed results in faster dehumidification.
Timer Function

Figure 4.2: 24-hour programmable timer function.
The timer allows you to set a specific duration (1-24 hours) for the unit to either turn on or turn off automatically.
- Auto-Off Timer: While the unit is running, press the Timer button and use the Humidity Setting buttons to set the desired number of hours until the unit turns off.
- Auto-On Timer: While the unit is off, press the Timer button and use the Humidity Setting buttons to set the desired number of hours until the unit turns on.
Operating Modes

Figure 4.3: Available operating modes and child lock feature.
- Auto Dehumidify Mode: The unit automatically senses the room's humidity and adjusts its operation to maintain the preset humidity level. If the humidity drops more than 5% below the target, the compressor and fan will stop. If it rises more than 5% above, they will resume.
- Continuous Dry Mode: The unit runs continuously regardless of the humidity level, providing maximum dehumidification. This mode is suitable for drying clothes or in very damp conditions.
Child Lock
To prevent accidental changes to settings, press and hold the Mode button for 3 seconds to activate or deactivate the Child Lock function. When active, all other buttons on the control panel will be unresponsive.
Wi-Fi Smart Control

Figure 4.4: Wi-Fi connectivity for remote control.
The dehumidifier can be controlled remotely using a smartphone app. Refer to the separate Wi-Fi setup guide for detailed instructions on connecting your device to your home Wi-Fi network and using the app to adjust settings, monitor humidity, and schedule operations.
5. Maintenance
Regular maintenance ensures the efficient and long-lasting operation of your dehumidifier.
Cleaning the Air Filter

Figure 5.1: Washable air filter location and other design elements.
The air filter should be cleaned every two weeks or more frequently depending on usage and air quality.
- Unplug the dehumidifier from the power outlet.
- Remove the filter from the back of the unit.
- Wash the filter with warm, soapy water. Rinse thoroughly.
- Allow the filter to air dry completely before reinstalling it. Do not use a dryer or direct heat.
Emptying the Water Tank
When the water tank is full, the unit will stop operating and display "FL".
- Gently pull out the water tank from the front of the unit.
- Carefully empty the collected water.
- Slide the empty water tank back into the unit until it clicks into place. The unit will resume operation if not in continuous drainage mode.
Cleaning the Unit Exterior
Wipe the exterior of the dehumidifier with a soft, damp cloth. Do not use harsh chemicals, abrasives, or solvents, as these can damage the surface.
Storage
If the unit will not be used for an extended period:
- Empty the water tank and ensure it is clean and dry.
- Press the "Inside Drying" button to run the internal drying function, which helps prevent mold and mildew growth inside the unit.
- Clean the air filter and reinstall it.
- Unplug the power cord and coil it neatly.
- Cover the unit with a plastic bag or its original packaging to protect it from dust.
- Store the dehumidifier in an upright position in a cool, dry place.
6. Troubleshooting
Before contacting customer support, please refer to the following troubleshooting guide for common issues.
| Problem | Possible Cause | Solution |
|---|---|---|
| Dehumidifier does not turn on. | No power; Power cord not plugged in; Child Lock active. | Ensure unit is plugged into a working outlet; Check circuit breaker; Deactivate Child Lock by pressing and holding Mode button for 3 seconds. |
| No water collected or insufficient dehumidification. | Humidity level already low; Air filter clogged; Room temperature too low; Air inlets/outlets blocked; Unit too small for space. | Adjust desired humidity lower; Clean air filter; Ensure room temperature is above 41°F (5°C); Clear obstructions; Consider a larger capacity unit if space exceeds 6,000 Sq.Ft. |
| "FL" code displayed and unit stops. | Water tank is full or improperly installed. | Empty the water tank; Reinstall the water tank correctly until it clicks into place. |
| Unit freezing up (ice on coils). | Low room temperature; Air filter clogged. | The unit has an Auto Defrost function. If freezing persists, ensure room temperature is not too low (below 41°F/5°C) and clean the air filter. You can also manually activate the "Inside Drying" function to help defrost. |
| Unit is noisy. | Unit not on a level surface; Air filter clogged; Loose parts. | Ensure unit is on a stable, level surface; Clean air filter; Check for any loose components. |
| Wi-Fi connectivity issues. | Incorrect Wi-Fi password; Router too far; App not updated. | Verify Wi-Fi password; Move unit closer to router; Update smartphone app; Refer to Wi-Fi setup guide. |
7. Specifications
Technical specifications for the Shinco 120 Pints Energy Star Dehumidifier (Model B0DZX4B1MK).
| Feature | Detail |
|---|---|
| Brand | Shinco |
| Model Name | B0DZX4B1MK |
| Dehumidification Capacity | 120 Pints/Day (under 95°F, 90%RH) / 50 Pints per Day (DOE Standard) |
| Floor Area Coverage | Up to 6,000 Square Feet |
| Tank Volume | 5 Liters (1.32 Gallons) |
| Product Dimensions | 9.45"D x 13.5"W x 20.1"H |
| Item Weight | 30.8 pounds |
| Color | White |
| Material | Plastic |
| Number of Speeds | 2 (High, Low) |
| Operation Mode | Continuous, Auto |
| Special Features | Adjustable Humidity Control, Anti-Spill, Automatic Defrost, Automatic Moisture Removal, Automatic Restart, Automatic Shutoff, Bucket Storage, Child Lock, Continuous Draining, Detachable, Digital Display, Ergonomic Handle, Portable, Quiet Operation, Removable Tank, Timer, Washable Filter, Wi-Fi |
| Included Components | Dehumidifier, Drain hose |
8. Warranty and Support
For warranty information and customer support, please refer to the documentation included with your product or contact Shinco customer service directly. Keep your purchase receipt as proof of purchase for warranty claims.


