1. Introduction
This manual provides detailed instructions for the operation and maintenance of your LIJIANI HRD-908 Emergency FM/AM/SW Weather Radio. This multi-functional device is designed to provide reliable communication and illumination in various situations, especially during emergencies. Please read this manual thoroughly before using the product to ensure proper function and longevity.

Figure 1: LIJIANI HRD-908 Emergency Weather Radio (Orange model shown)
2. Product Overview
2.1 Key Features
- Multi-band Radio: FM (87-108MHz), AM (520-1710KHz), SW (3.2-30MHz), WB (162.4-162.55MHz NOAA Weather Channels). Supports automatic and manual station search.
- NOAA Weather Alert: Automatically monitors NOAA Weather Band frequencies for emergency and weather alerts.
- Multiple Power Sources: Built-in 5000mAh rechargeable battery, Type-C USB charging, solar panel charging, and hand crank charging. Supports optional AA and 18650/14500 batteries (not included).
- Power Bank Function: USB output (5.0V) to charge mobile phones and other small devices.
- Illumination: Powerful 3W long-range flashlight (up to 100 meters) and 1.5W reading light.
- SOS Alarm: Loud alarm with flashing light for emergencies.
- Display & Audio: Large LCD display with digital tuner and a 24-inch large speaker for clear and loud audio.
- Additional Functions: Sleep timer, alarm clock, and built-in compass.

Figure 2: Overview of key features including flashlight, speaker, USB-C, alarm clock, sleep timer, SOS, solar charge, hand crank, and 5000mAh battery.
2.2 Package Contents
- LIJIANI HRD-908 Emergency Weather Radio
- USB Type-C Charging Cable
- User Manual
3. Setup
3.1 Initial Charging
Before first use, fully charge the radio's internal 5000mAh battery using the provided Type-C USB cable. Connect the cable to the Type-C input port on the radio and to a standard USB power adapter (not included).
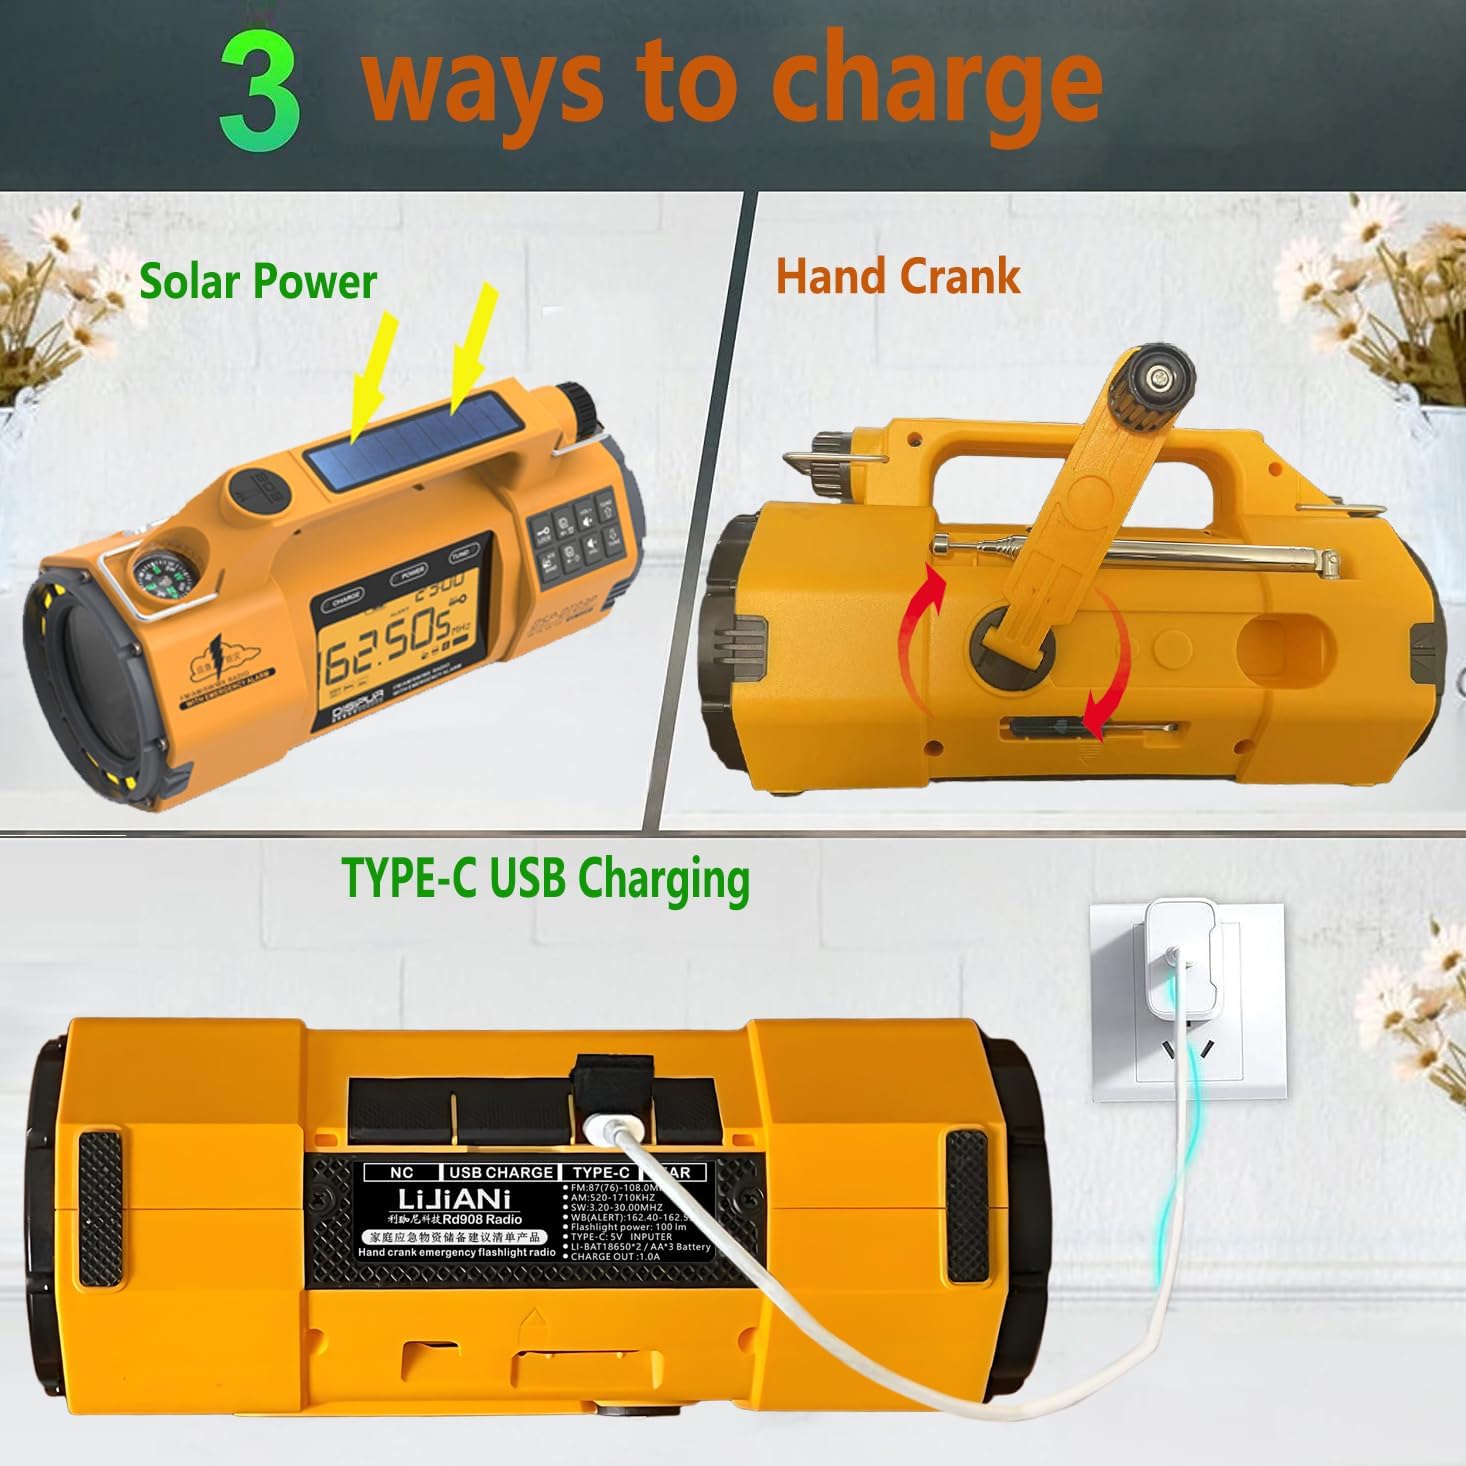
Figure 3: Illustration of the three primary charging methods: Solar Power, Hand Crank, and Type-C USB Charging.
3.2 Battery Installation (Optional)
The radio supports optional external batteries for extended use. To install, locate the battery compartment on the underside of the radio. This model features an innovative drawer-style battery box. You can insert:
- 3 x AA batteries (1.5V each)
- 1 x 14500 lithium battery (3.7V)
- 2 x 18650 lithium batteries (3.7V each)
Ensure correct polarity when inserting batteries. These optional batteries are not charged by the radio's internal charging mechanisms.

Figure 4: Diagram showing the drawer-style battery box and different battery configurations (AA, 14500, 18650).
4. Operating Instructions
4.1 Power On/Off
Press and hold the POWER button to turn the radio on or off. The LCD display will illuminate.
4.2 Radio Operation (FM/AM/SW/WB)
- Select Band: Press the BAND button repeatedly to cycle through FM, AM, SW, and WB (Weather Band) frequencies.
- Tuning:
- Manual Tuning: Use the TUNE + and TUNE - buttons to adjust the frequency incrementally.
- Automatic Scan: Press and hold the BAND button (or a dedicated scan button if available) to automatically scan and store available stations.
- Volume Control: Use the VOL + and VOL - buttons to adjust the audio volume.
- Antenna: Extend the telescopic antenna for optimal FM and SW reception. For AM, the internal ferrite bar antenna is used.

Figure 5: Close-up of the radio's LCD display showing frequency and band selection.
4.3 NOAA Weather Alert
When the radio is turned on or in standby mode, it automatically monitors NOAA Weather Band frequencies for emergency and weather alerts. If an alert is issued, the radio will sound an alarm and display the alert information.
4.4 Flashlight and Reading Light
The radio features a powerful front flashlight and a side-mounted reading light.
- Press the LIGHT button (or corresponding icon) once for the main flashlight.
- Press again for the reading light.
- Press a third time to turn off the lights.

Figure 6: Demonstrates the powerful flashlight illuminating a path and the reading light being used for nighttime reading.
4.5 SOS Alarm Function
In an emergency, activate the SOS alarm to attract attention.
- Press the SOS button to activate the loud siren and flashing light.
- Press the SOS button again to deactivate.
Figure 7: The radio's SOS alarm function, showing the flashing light and indicating a loud 116dB siren.
4.6 Charging the Radio
The HRD-908 offers multiple ways to charge its internal 5000mAh battery:
- USB Type-C Charging: Connect the provided USB-C cable to the radio's input port and a USB power source. This is the fastest charging method.
- Solar Charging: Place the radio with the solar panel facing direct sunlight. The solar indicator light will illuminate. This method is primarily for maintaining charge or slow charging in emergencies.
- Hand Crank Charging: Unfold the hand crank handle and rotate it clockwise or counter-clockwise at a steady pace (approx. 130-150 RPM). A red indicator light will show charging. Crank for at least 3-5 minutes to gain enough power for basic functions.
4.7 Power Bank Function (USB Output)
The radio can act as a power bank to charge external devices.
- Connect your device's USB charging cable to the radio's USB output port.
- The radio will begin charging your device. Ensure the radio has sufficient charge for this function.
Figure 8: The radio being used to charge a mobile phone via its USB output port.
4.8 Alarm Clock and Sleep Timer
Refer to the specific buttons on the control panel for setting the alarm clock and sleep timer. The LCD display will guide you through the settings.
Figure 9: The radio displaying time, indicating its alarm clock and sleep timer capabilities.
5. Maintenance
- Keep the radio dry and clean. Avoid exposure to extreme temperatures or direct sunlight for prolonged periods.
- Clean the exterior with a soft, damp cloth. Do not use harsh chemicals or abrasive cleaners.
- When not in use for extended periods, store the radio in a cool, dry place and ensure the internal battery is charged every 3-6 months to maintain battery health.
- If using optional external batteries, remove them if the radio will not be used for a long time to prevent leakage.
6. Troubleshooting
| Problem | Possible Cause | Solution |
|---|---|---|
| Radio does not turn on. | Battery is depleted. | Charge the internal battery via USB, solar, or hand crank. Check optional batteries if installed. |
| Poor radio reception. | Antenna not extended, weak signal, or interference. | Fully extend the telescopic antenna. Try repositioning the radio. Avoid large metal objects or electronic devices that may cause interference. |
| Flashlight/Reading light not working. | Battery is low or light function is off. | Charge the radio. Press the LIGHT button to cycle through modes. |
| Cannot charge external devices. | Radio battery is too low, or device is incompatible. | Ensure the radio has sufficient charge. Some high-power devices may not be fully supported. |
| Compass is inaccurate. | Internal interference or external magnetic fields. | The built-in compass may be affected by the radio's internal components. Use an external compass for precise navigation. |
7. Specifications
- Model: HRD-908
- Brand: LIJIANI
- Radio Bands: FM (87-108MHz), AM (520-1710KHz), SW (3.2-30MHz), WB (162.4-162.55MHz)
- Internal Battery: 5000mAh Lithium Battery
- Charging Inputs: Type-C USB, Solar Panel, Hand Crank
- USB Output: 5.0V
- Flashlight Power: 3W
- Reading Light Power: 1.5W
- Dimensions: Approximately 7.5 × 3.9 × 3 inches (19 x 10 x 7.6 cm)
- Weight: Approximately 1.1 pounds (0.5 kg)
- Included Components: Emergency Radio, USB Type-C Cable, User Manual
8. Warranty and Support
For warranty information and customer support, please refer to the contact details provided on the product packaging or the official LIJIANI website. Keep your purchase receipt for warranty claims.
For additional support, you may visit the LIJIANI Store on Amazon.


