1. Introduction
Thank you for choosing the DAMINY 52 inch Black Ceiling Fan with Lights. This manual provides essential information for the safe installation, operation, and maintenance of your new ceiling fan. Please read it thoroughly before beginning installation or use, and retain it for future reference.
Key Features:
- Two-Color Plywood Blades: Reversible blades with black and wood grain sides to match various home styles.
- Quiet DC Motor: Ensures a comfortable and quiet environment.
- Smart Control: Operable via remote control and mobile phone application.
- Adjustable Lighting: 6 color temperature modes (2700K-6000K) and 10%-100% dimming.
- Easy Installation: Designed for quick and convenient setup.
- Indoor/Outdoor Use: Suitable for various environments, excluding areas exposed to rain.

Image 1.1: The Daminy 52-inch DC Motors Ceiling Fan, highlighting its large air volume capability.
2. Safety Information
Please read and understand all safety instructions before attempting to assemble, install, or operate this ceiling fan. Failure to do so could result in electric shock, fire, or personal injury.
- Always disconnect power at the main circuit breaker before installation or maintenance.
- Ensure all electrical connections comply with local codes and ordinances.
- The mounting structure must be capable of supporting the weight of the fan (approximately 11.55 lbs).
- Maintain a minimum clearance of 7 feet from the floor to the fan blades.
- Do not operate the fan in an environment exposed to rain.
- Do not insert objects into the path of the fan blades.
3. Package Contents
Verify that all components are present and undamaged before beginning installation.
- Fan Motor Assembly
- Fan Blades (5)
- Blade Holders
- Canopy Housing
- Mounting Bracket
- LED Light Panel
- Lampshade
- Remote Control & Receiver Assembly
- Wiring Caps
- Screw Kit
- User Manual & Quick Installation Guide
Video 3.1: Unboxing and overview of the Daminy 52-inch ceiling fan components.
4. Setup and Installation
Follow these steps for proper installation. It is recommended to watch the provided installation video for visual guidance.
4.1. Prepare for Installation
- Loosen the two screws on the fan motor assembly and rotate to remove the mounting bracket.
- Remove the three larger screws from the motor to install the decorative cover.
4.2. Attach Fan Blades
- Install the fan blades onto the blade holders using the provided screws. Ensure all blades are oriented with the same color facing down for a consistent appearance.
- Attach the assembled blades to the fan motor using the screws.
4.3. Connect Light Panel
- Connect the wire terminals for the LED light panel.
- Carefully tidy up the wires of the light panel.
- Rotate the light panel and install it onto the motor.
- Install the lampshade by rotating it onto the light panel.
4.4. Mount to Ceiling
- Install the mounting bracket securely to the ceiling junction box.
- Connect the fan's wires to the household power supply wires using the provided wiring caps.
- Hang the canopy housing hole onto the hook of the bracket to support the fan during wiring.
- Connect the receiver wires to the corresponding fan wires and place the receiver into the mounting plate.
- Remove the fan from the hook and align the canopy housing L-slot with the bracket screws. Rotate to secure.
- Lock the remaining two screws to finalize the installation.

Image 4.1: Visual guide for the installation process, emphasizing ease of setup.

Image 4.2: Important note on wall switch compatibility. The fan is suitable for conventional wall switches, but dimmer switches or fan gear switches are not compatible.
Video 4.1: Detailed installation video for the Daminy 52-inch ceiling fan with light.
5. Operating Instructions
Your Daminy ceiling fan can be controlled using the included remote control or a mobile application (requires Bluetooth support).
5.1. Remote Control & App
The remote control allows easy adjustment of fan speed, light settings, and other functions. A mobile app is also available for convenient control.

Image 5.1: Remote control and app for smart control of the fan and light functions.
5.2. Fan Speed Adjustment
The fan features 6 adjustable speeds to suit your comfort needs:
- Levels 1-2: Low, comfortable wind.
- Levels 3-4: Medium, natural wind.
- Levels 5-6: High, cooling wind.

Image 5.2: Visual representation of the 6 adjustable fan speeds.
5.3. Light Settings
The integrated LED light offers versatile illumination options:
- 6 Color Temperatures: Choose from 2700K (warm) to 6000K (cool white).
- 10%-100% Dimmable: Adjust brightness to your preference.
- Night Light Mode: Provides a soft, low-level light.

Image 5.3: Illustration of the 6 color temperatures and dimming capabilities.
Important Note on Light Memory: To ensure the light stays at previous settings, turn off the light and wait for more than 10 seconds before turning it on again. If you turn the light on again within 10 seconds of turning it off, the color temperature of the light will switch.

Image 5.4: Instructions for maintaining desired light settings.
5.4. Reversible Function
The fan features a reversible motor for year-round comfort:
- Summer Mode: Downward airflow creates a cooling effect.
- Winter Mode: Upward airflow circulates warm air.

Image 5.5: Explanation of reversible fan function for seasonal use.
5.5. Timer Function
Set the fan to automatically turn off after 1, 2, 4, or 6 hours using the timer function on the remote control or app.

Image 5.6: Timer settings to automatically turn off the fan.
6. Maintenance
Regular maintenance ensures optimal performance and longevity of your ceiling fan.
- Cleaning: Use a soft, damp cloth to clean the fan blades and motor housing. Do not use abrasive cleaners or solvents.
- Blade Inspection: Periodically check that all blade screws are tight. Loose screws can cause wobbling and noise.
- Electrical Connections: Ensure all electrical connections remain secure.
7. Troubleshooting
If you experience issues with your fan, refer to the following common problems and solutions:
| Problem | Possible Cause | Solution |
|---|---|---|
| Fan does not start | No power to the fan; Loose wire connections; Remote control battery low. | Check circuit breaker; Verify all wire connections are secure; Replace remote control battery. |
| Light does not work | Loose wire connection to light kit; LED panel issue. | Check light kit wiring; Contact customer support if LED panel is faulty. |
| Fan wobbles | Loose blade screws; Improperly balanced blades; Loose mounting bracket. | Tighten all blade screws; Ensure blades are correctly installed; Verify mounting bracket is secure. |
| Noisy operation | Loose screws; Fan not properly secured; Internal motor issue. | Check all screws and mounting; Ensure fan is flush with ceiling; Contact customer support. |
8. Specifications
| Feature | Detail |
|---|---|
| Brand | DAMINY |
| Model Name | FJ1039A |
| Item Model Number | FJ1039A-5X52-B2-BL |
| Color | Black |
| Size | 52IN-FM-Modern (52 inch) |
| Product Dimensions | 52"D x 52"W x 10.39"H |
| Item Weight | 11.55 pounds |
| Number of Blades | 5 |
| Motor Type | Brushless DC |
| Power Source | DC |
| Voltage | 120 Volts (AC) |
| Wattage | 18 watts |
| Control Method | Remote, App (Bluetooth) |
| Special Features | 6CCT, Reversible, Dimmable, 6 Speeds, 1-8H Timer, Manual |
| Installation Type | Flush Mount, Self-install |
| Indoor/Outdoor Usage | Indoor (Note: Not suitable for use in an environment exposed to rain) |
| Manufacture Year | 2025 |
| Specification Met | FCC |
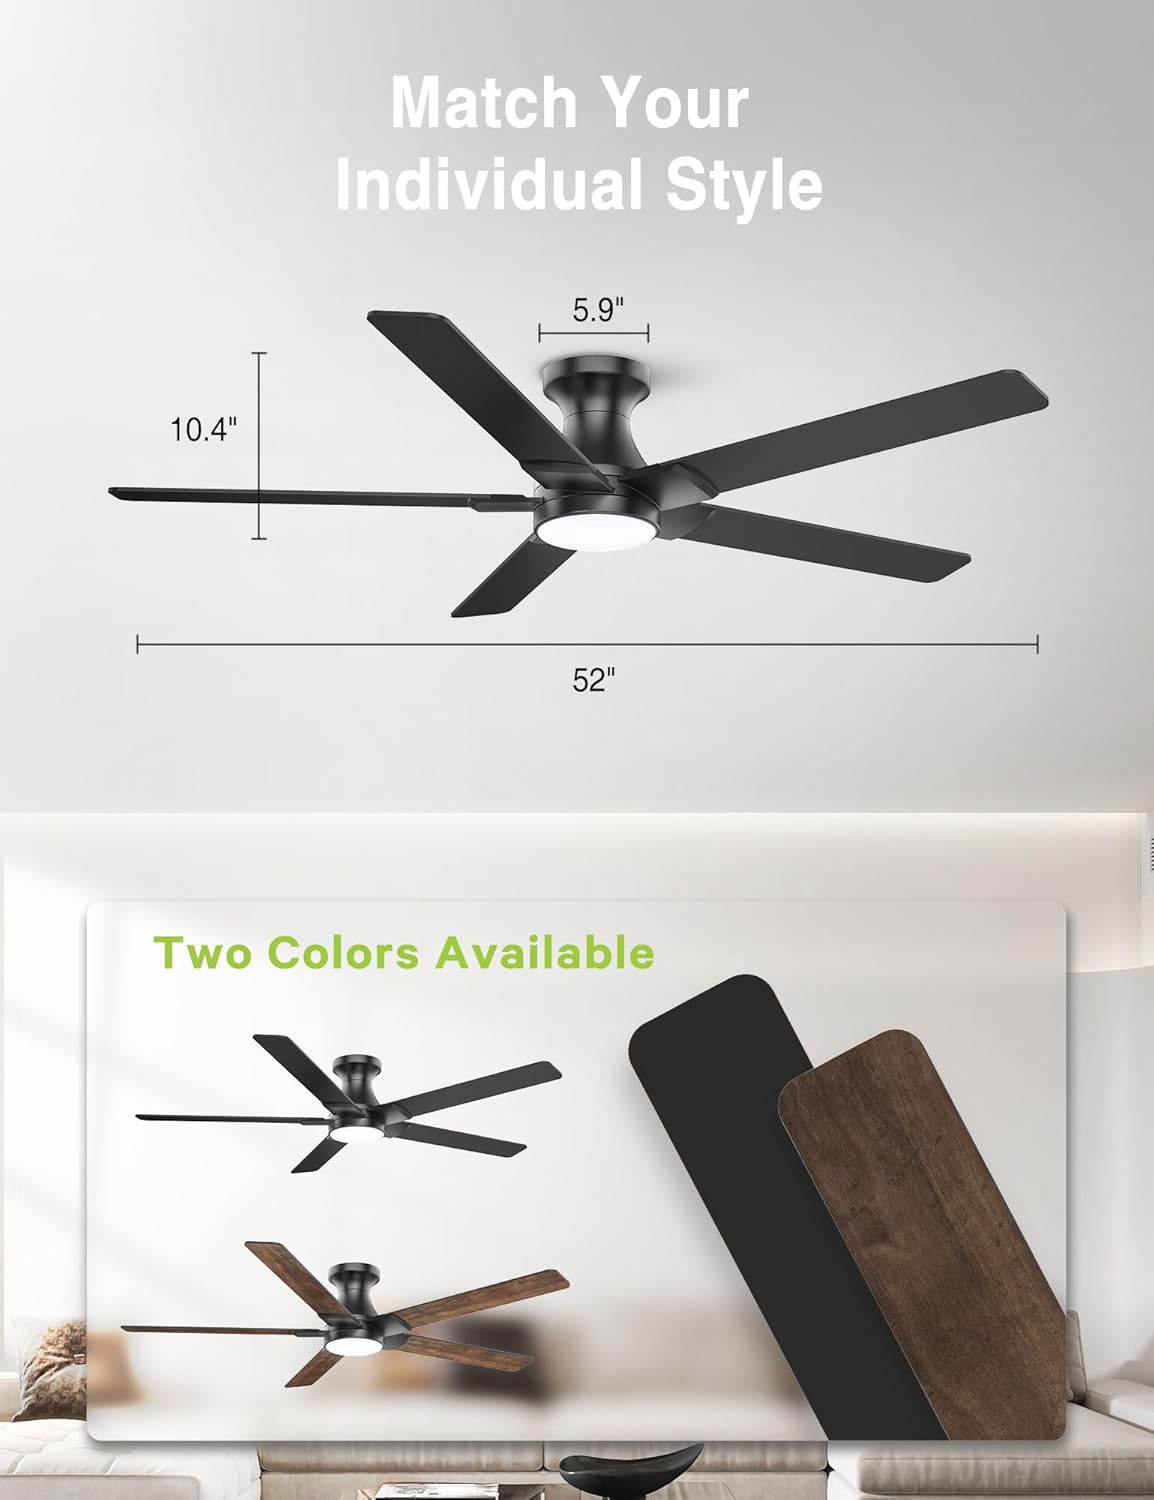
Image 8.1: Fan dimensions and dual-sided blade options.

Image 8.2: Recommended room sizes for optimal air circulation.
9. Warranty and Support
DAMINY is committed to providing quality products and customer satisfaction.
- Warranty: 2-year warranty.
- Returns: 30-day returnable policy.
- Customer Support: Support inquiries will be addressed within 12 hours.
For any questions or assistance, please feel free to contact us. We are dedicated to providing a satisfactory resolution.


