
1. Product Overview
The HM Portable EV Charger is designed for convenient and efficient charging of electric vehicles compatible with the European Standard (Type 2). This manual provides essential information for safe installation, operation, and maintenance of your charger.

Image 1: Overview of the HM Portable EV Charger, showing the control box, Type 2 charging cable, and power plug. The cable length is approximately 4.5 meters.
Key Features:
- Compatibility: Designed for General electric vehicles and plug-in hybrid vehicles (European Standard Type 2).
- LED Display: A 2.8-inch screen provides real-time charging status and error indications.
- Durability: Constructed from high-grade rugged materials with an IP55 protection level for the housing, making it rainproof, dustproof, and flame retardant.
- Portability: Features a 4.5-meter cable and comes with a bag for easy transport.
- Safety: Equipped with multiple protection functions including overvoltage, undervoltage, overcurrent, leakage, grounding, overtemperature, and lightning protection.
2. Safety Instructions
Please read and understand all safety instructions before using the charger. Failure to follow these instructions may result in electric shock, fire, or serious injury.
- Do not immerse the charging cable or control box in water.
- Do not use the device if it is damaged, worn, or has exposed wires.
- Ensure the power outlet is properly grounded and rated for the charger's specifications.
- Do not attempt to open, disassemble, or modify the charger.
- Keep children and pets away from the charging area.
- Always unplug the charger from the power source before cleaning or maintenance.
- Avoid using extension cords or adapters with the charger.

Image 2: Rear view of the charger's control box, displaying important warning labels and equipment parameters. Always refer to these labels for specific safety information.
3. Setup and Installation
- Unpack the Charger: Carefully remove the charger and all accessories from the packaging. Inspect for any signs of damage.
- Choose a Location: Select a dry, well-ventilated area near your electric vehicle and a suitable power outlet. Ensure the 4.5-meter cable can reach your vehicle's charging port without tension.
- Power Connection: Insert the charger's power plug into a compatible AC250V grounded electrical outlet. The charger's display should illuminate.
- Vehicle Connection: Open your vehicle's charging port cover. Insert the Type 2 charging connector firmly into the vehicle's charging inlet. Ensure a secure connection.

Image 3: Close-up of the Type 2 charging connector and the power plug, demonstrating the connection points for the EV and the power source.
Grounding Check: The charger's display will indicate whether it is properly grounded. Ensure a grounded connection for safe operation.
4. Operating Instructions
4.1 LED Display Overview
The 2.8-inch LED display provides real-time information about the charging process:

Image 4: Detailed view of the LED display, indicating charged capacity, charge time, current gear, real-time voltage, real-time current, and internal temperature of the charging box. It also shows grounding status.
- Charged Capacity: Displays the total energy delivered (kWh).
- Charge Time: Shows the duration of the current charging session.
- Current Gear: Indicates the selected charging current (e.g., 16A).
- Real-time Voltage: Shows the current voltage (V).
- Real-time Current: Displays the current amperage (A).
- Internal Temperature: Monitors the temperature of the charging box.
- Grounding Status: Indicates if the charger is properly grounded.
4.2 Adjusting Charging Current
The charger allows you to switch between different current settings to optimize charging speed based on your power supply and vehicle requirements. For the 3.5KW model, available current settings are 6A, 8A, 10A, 13A, and 16A.
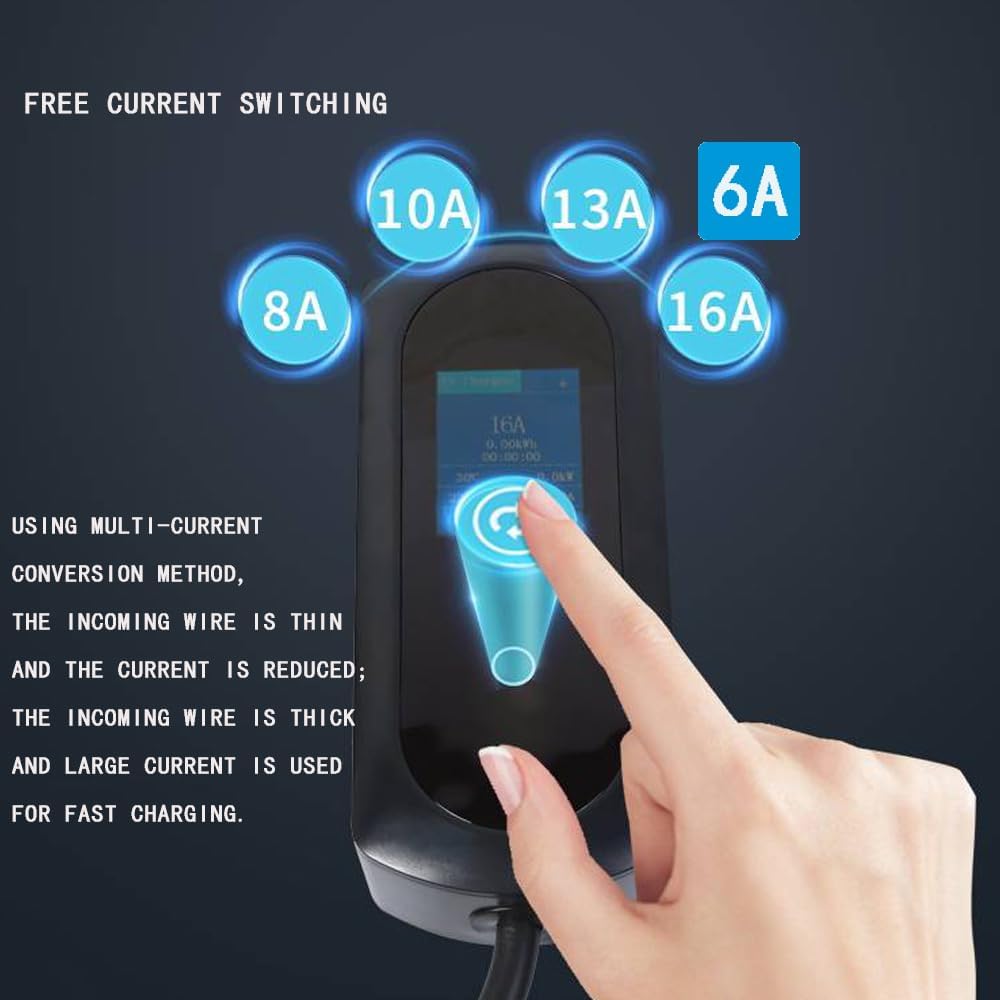
Image 5: Illustration of how to switch current settings on the charger's control box. Press the button to cycle through available amperage options.
- Ensure the charger is connected to the power source but not yet to the vehicle, or charging is paused.
- Press the button on the control box (usually indicated by a circle or similar icon) to cycle through the available current options (6A, 8A, 10A, 13A, 16A).
- Select the desired current. The display will show the chosen "Current Gear".
- Connect the charger to your vehicle to begin charging with the selected current.
4.3 Starting and Stopping Charging
- To Start: After connecting the charger to both the power outlet and your vehicle, charging should begin automatically. The LED display will show active charging data.
- To Stop: Disconnect the Type 2 connector from your vehicle first, then unplug the charger from the power outlet.
5. Maintenance
Proper maintenance ensures the longevity and safe operation of your EV charger.
- Cleaning: Wipe the charger's exterior with a soft, dry cloth. Do not use abrasive cleaners or solvents. Ensure the charger is unplugged before cleaning.
- Storage: When not in use, store the charger in a dry, cool place, away from direct sunlight and extreme temperatures. Use the provided bag for protection during transport or storage.
- Cable Inspection: Regularly inspect the charging cable and connectors for any signs of wear, cuts, or damage. Do not use if damage is observed.
- Environmental Conditions: The charger has an IP55 protection level, making it resistant to dust and water splashes. However, avoid prolonged exposure to heavy rain or immersion in water. Operating temperature range is -5°C to +50°C, and working humidity is 5% to 95% (non-condensing).
6. Troubleshooting
The LED display will indicate errors if a problem occurs during charging. Refer to the display for specific error codes or messages.
| Problem | Possible Cause | Solution |
|---|---|---|
| Charger not starting | Loose connection, no power, vehicle not ready to charge. | Ensure all connections are secure. Check power outlet. Verify vehicle charging settings. |
| Error message on display | Internal fault, overcurrent, overvoltage, grounding issue, overtemperature. | Note the error code. Disconnect and reconnect the charger. If the error persists, press the button on the control box for 5 seconds to reset the charging cable. If the issue continues, contact support. |
| Slow charging | Low current setting, vehicle limitation, power supply issue. | Adjust the current setting to a higher amperage (e.g., 16A) if your power supply and vehicle support it. Consult your vehicle's manual. |
| Charger feels hot | Normal operation under load, or potential overtemperature. | Some warmth is normal. If the display shows an overtemperature error, disconnect the charger and allow it to cool down in a well-ventilated area before attempting to charge again. |
7. Specifications
| Parameter | Value (3.5KW Model) |
|---|---|
| Model | 3.5KW |
| Display Mode | 2.8 inch screen |
| Input Voltage | AC250V |
| Rated Current | 6/8/10/13/16A (switchable) |
| Input Frequency | 50Hz ±10% |
| Cable Specifications | 3X2.5mm² + 1x0.75mm² |
| Total Cable Length | 4.5m |
| Insulation Resistance | >1000MΩ (DC500V) |
| Withstand Voltage | 2500V AC |
| Protection Level | IP55 (In working condition) |
| Protection Functions | Overvoltage, undervoltage, overcurrent, leakage, grounding, overtemperature, lightning protection |
| Insertion and Extraction Force | <100N |
| Working Temperature | -5°C to +50°C |
| Working Humidity | 5% to 95% (No condensation) |
| Product Dimensions (Control Box) | 1.6"D x 3.2"W x 9"H |
8. Warranty and Support
8.1 Warranty Information
This HM Portable EV Charger comes with a one-year warranty from the date of purchase. The warranty covers manufacturing defects and malfunctions under normal use conditions.
The warranty does not cover damage caused by:
- Improper installation or use.
- Unauthorized repairs or modifications.
- Accidents, abuse, or neglect.
- Natural disasters or external causes.
8.2 Customer Support
If you encounter any issues or have questions regarding your HM Portable EV Charger, please do not hesitate to contact our customer support team. We are committed to resolving any problems you may experience.
Please have your product model (3.5KW) and purchase information ready when contacting support.