
1. Introduction
This manual provides detailed instructions for the ARENTI 5-Inch Wireless Baby Monitor Display, designed as a dedicated parent unit for use with ARENTI AInanny A4 and D3 baby cameras. This display offers high-quality video monitoring, two-way audio, and various smart features to help you stay connected with your child.

Figure 1: ARENTI 5-Inch Wireless Baby Monitor Display (Parent Unit)
2. What's Included
Upon unboxing your ARENTI Baby Monitor Display, please ensure all the following components are present:
- 1 x ARENTI 5-Inch LCD Display (Parent Unit)
- 1 x ARENTI AInanny A4 or D3 Camera (depending on kit)
- 2 x Power Adapters
- 2 x USB-C Charging Cables (one long for camera, one for monitor)
- 1 x Camera Mounting Kit (screws and wall anchors)
- 1 x User Manual

Figure 2: Included components of the ARENTI Baby Monitor Kit
3. Setup
3.1 Powering On
- Connect one power adapter to the ARENTI camera using the longer USB-C cable. Plug the adapter into a power outlet.
- Connect the second power adapter to the 5-inch LCD Display (Parent Unit) using the shorter USB-C cable. Plug the adapter into a power outlet.
- Press and hold the 'OK' button on the parent unit to power it on. The display will show a battery charging icon if connected to power.
3.2 Initial Pairing
The camera and parent unit are designed to pair automatically upon initial power-up. Once both devices are powered on, the live video feed from the camera should appear on the display.
3.3 App Connection (Optional for Advanced Features)
To access advanced features and remote monitoring, download the ARENTI app:
- Scan the QR code provided in the user manual or search for 'ARENTI' in your smartphone's app store.
- Create an account or log in.
- In the app, select 'Add Device' and choose 'Baby Monitor'.
- Follow the on-screen instructions to connect your camera to your home Wi-Fi network (supports 2.4GHz and 5GHz dual-band).
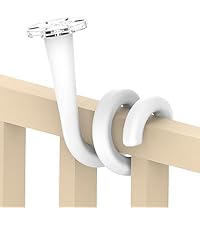
Figure 3: ARENTI App Download
3.4 Camera Placement
Position the camera in your child's room to ensure a clear view. The camera can be placed on a flat surface or mounted to a wall or ceiling using the provided mounting kit. The camera's pan and tilt features allow for flexible positioning.

Figure 4: Flexible Camera Placement Options
4. Operating the Monitor
4.1 Basic Navigation
Use the directional buttons (up, down, left, right) and the 'OK' button on the parent unit to navigate through menus and select options. The 'MENU' button accesses the main settings, and the 'Return' button goes back to the previous screen.
4.2 Live Video Feed
The parent unit displays a real-time video feed from the connected camera. You can switch between multiple cameras if more than one is paired.

Figure 5: Live Video Feed and Multi-Camera View
4.3 Pan, Tilt, and Zoom
Use the directional buttons on the parent unit to remotely pan (left/right) and tilt (up/down) the camera lens. Press the zoom button to digitally zoom in on the video feed (up to 4X).
4.4 Two-Way Audio
Press and hold the microphone button on the parent unit to speak to your child through the camera's speaker. Release the button to listen.

Figure 6: Two-Way Audio Communication
4.5 Lullabies and Night Light
Access the menu to select and play soothing lullabies through the camera. You can also control the camera's integrated night light, which can be set to different colors or a breathing mode to comfort your child.
4.6 Temperature and Humidity Monitoring
The monitor displays real-time temperature and humidity readings from your child's room. You can set custom ranges and receive alerts if conditions fall outside these parameters.
4.7 Feeding Reminders
Set up feeding reminders through the monitor's menu to help maintain a consistent feeding schedule.
4.8 VOX Mode and Crying Detection
In VOX mode, the monitor's screen will automatically activate when sound (e.g., crying) is detected, conserving battery life when your child is quiet. Crying detection provides alerts when your child's status changes.

Figure 7: VOX Mode and Crying Detection
4.9 Smart Auto Tracking & Motion Detection
The camera features smart auto-tracking, which enables the device to follow the movement of objects. Motion detection sends real-time notifications to your app when movement is detected.

Figure 8: Smart Auto Tracking and Motion Detection
4.10 Multi-Camera Support
The ARENTI system supports connecting up to four cameras, providing full coverage for your home. You can easily switch between camera views on the parent unit or view multiple feeds via the app.

Figure 9: Connect up to 4 Cameras
5. Maintenance
5.1 Battery Life and Charging
The parent unit is equipped with a high-capacity lithium-ion battery. For optimal performance, charge the unit overnight. Expected battery life is approximately 6 hours with the screen always on, or up to 3 days with audio only and the screen off.

Figure 10: Battery Life Overview
5.2 SD Card Usage
The camera supports local recording to a Micro SD card (up to 128GB, sold separately). Insert the SD card into the designated slot on the camera for continuous recording or event playback.

Figure 11: App Interface and SD Card Recording
5.3 Firmware Updates
Regularly check for and install firmware updates via the ARENTI app to ensure your device has the latest features and security enhancements.
5.4 Factory Reset
If you encounter persistent issues, a factory reset option is available in the monitor's settings menu. Refer to the user manual for specific steps.
6. Troubleshooting
- SD Card Not Detected: Ensure the Micro SD card is inserted correctly and is not damaged. Try reinserting or using a different compatible SD card.
- Device Offline: Check that both the camera and parent unit are powered on and within range of each other. If using the app, ensure the camera is connected to a stable Wi-Fi network.
- Poor Battery Life: Battery performance can decline over time with regular use. Ensure the monitor is fully charged before use. For extended monitoring, keep the parent unit plugged into power.
- No Video/Audio: Verify both devices are powered on and paired. Check volume settings on the parent unit. Ensure no obstructions are blocking the camera lens or microphone.
7. Specifications
| Feature | Description |
|---|---|
| Brand | ARENTI |
| Model | AInanny A4/D3 Parent Unit (Screen2) |
| Display Size | 5-inch LCD |
| Camera Resolution (App) | 3MP UHD |
| Camera Resolution (Monitor) | 720P |
| Connectivity Technology | Wireless (Wi-Fi 2.4GHz/5GHz Dual-Band), Powerline |
| Recommended Uses | Baby Monitoring |
| Storage | Supports up to 128GB Micro SD card (not included), 7-day free cloud storage for 6-second trigger events |
| Special Features | Two-way Audio, Motion Detection, Crying Detection, Auto-Tracking, Temperature & Humidity Sensor, Lullabies, Night Light, Feeding Reminder, VOX Mode, Easy to Install |
| Power Source | Corded Electric (camera), Rechargeable Battery (monitor) |
| Compatible Devices | Amazon Alexa, Google Assistant |
| Item Weight | 0.35 Kilograms (12.3 ounces) |
| Package Dimensions | 7.28 x 4.21 x 3.03 inches |
8. Warranty and Support
8.1 Warranty Information
The ARENTI 5-Inch Wireless Baby Monitor Display comes with a 1-Year Quality Warranty. This warranty covers manufacturing defects and ensures the product meets quality standards.

Figure 12: Warranty and Key Features
8.2 Return Policy
A 90-day refund/replacement policy is available for this product. Please refer to your purchase platform for specific return instructions.
8.3 Customer Support
For any technical assistance or inquiries, ARENTI provides a professional support team:
- Telephone Support: Available Monday-Friday, 9 AM - 5 PM (PT).
- Email Support: Contact support@arenti.com for assistance.
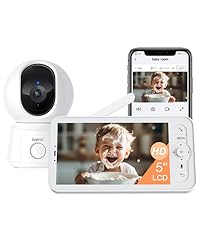
Figure 13: Professional Support Team


