
ORARAER WX-11
ORARAER Biometric Alarm Clock Safe WX-11 User Manual
Model: WX-11 | Brand: ORARAER
1. Introduction
This manual provides detailed instructions for the setup, operation, and maintenance of your ORARAER Biometric Alarm Clock Safe, Model WX-11. Please read this manual thoroughly before using the product to ensure proper function and safety.
2. Safety Information
- Keep backup keys in a secure location away from the safe and out of reach of children.
- Do not store the backup keys inside the safe.
- Ensure the safe is placed on a stable, level surface.
- Avoid exposing the safe to extreme temperatures or humidity.
- Do not attempt to disassemble or modify the safe, as this may void the warranty and compromise security.
- Use only the provided power adapter for wireless charging and clock functions.
3. Package Contents
Verify that all items are present in your package:
- ORARAER Biometric Alarm Clock Safe (WX-11)
- AC Adapter
- Watch Base
- User Manual (this document)
- Type-C Power Cord
- Steel Wire Rope
- Mounting Screws (x2)
- Expansion Tubes (x2)
- Backup Keys (x2)

Image: Overview of the ORARAER Biometric Alarm Clock Safe's dimensions and included accessories, such as the AC adapter, watch base, manual, Type-C power cord, steel wire rope, mounting screws, expansion tubes, and backup keys.
4. Product Features
The ORARAER Biometric Alarm Clock Safe WX-11 combines security with convenience, offering multiple access methods and integrated smart features.
- Biometric Fingerprint Access: High-resolution scanner with rapid response (under 500ms).
- Digital Keypad: 3- to 6-digit programmable code access.
- Backup Key Access: Two physical keys for emergency entry.
- Wireless Charging: Integrated pads for compatible smartphones and smartwatches.
- LED Display: Shows time, temperature, humidity, battery level, and lock status.
- Integrated Alarm Clock: Programmable alarm function.
- Adjustable Screen Luminance: Customize display brightness.
- Power Modes: Choose between power-saving and constant display modes.
- Silent Mode: Mute operational sounds for discreet access.
- Internal LED Light: Illuminates the interior upon opening.
- Durable Construction: Made from alloy steel.
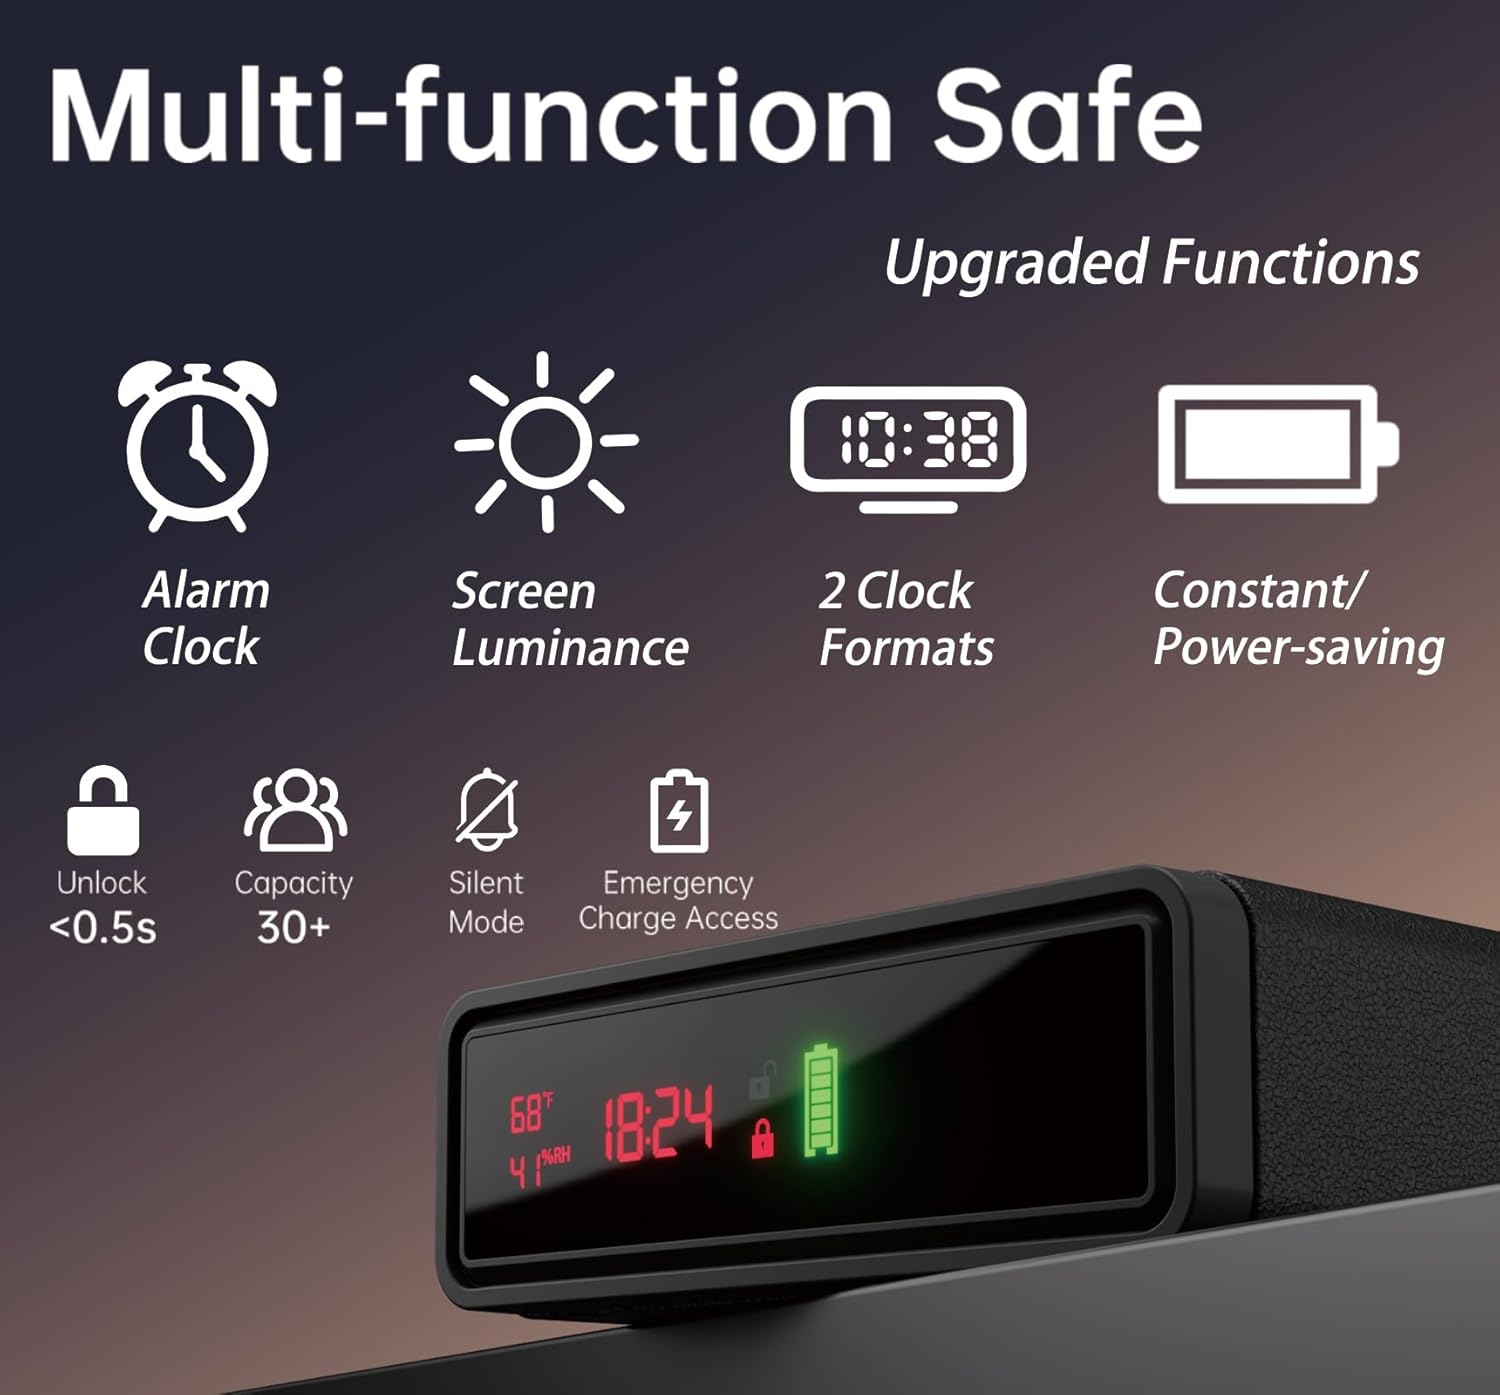
Image: Visual representation of the safe's multi-functional features, including alarm clock, screen luminance control, two clock formats, power-saving mode, quick unlock, capacity for over 30 fingerprints, silent mode, and emergency charge access.

Image: A close-up view highlighting the rapid biometric access and the backlit keypad for secure entry.
5. Setup Instructions
5.1 Initial Power-up and Connection
- Connect the provided AC adapter to the safe's adapter port and plug it into a power outlet.
- The LED display will activate, showing time, temperature, and humidity.
- Insert 4 AA batteries into the battery slot for backup power. Batteries are required but not included.

Image: Detailed view of the safe's rear panel, showing the USB interface (1), Type-C interface (2), Adapter port (3), Battery slot (4), Key slot (5), and Security cable hole (6). It also illustrates three simple steps for installation.
5.2 Setting Time and Date
Specific instructions for setting time and date are typically found using the internal setup buttons. Refer to the "Invisible Setup Buttons" section for button locations.
- Open the safe drawer using a backup key or the default code (if applicable).
- Locate the P1/P2 buttons inside the safe.
- Press P1 to enter time setting mode. Use the keypad to adjust the time.
- Press P2 to confirm and move to the next setting (e.g., date, clock format).
- Hold P1 for 5 seconds to confirm all settings and exit setup mode.
5.3 Fingerprint Enrollment
The safe can store over 30 unique fingerprints.
- Open the safe drawer.
- Locate the fingerprint and password setting buttons directly underneath the Number Key 4 on the keypad.
- Press the fingerprint setting button (usually marked with a fingerprint icon or 'F').
- Place your finger on the scanner. Lift and repeat several times until the safe confirms enrollment (e.g., with a beep or LED indicator change).
- Repeat for additional fingerprints.
5.4 PIN Code Setup
Set a 3- to 6-digit personal identification code.
- Open the safe drawer.
- Locate the fingerprint and password setting buttons directly underneath the Number Key 4 on the keypad.
- Press the password setting button (usually marked with a key icon or 'P').
- Enter your desired 3-6 digit code, then press the '#' key to confirm.
- Re-enter the code and press '#' again to verify.
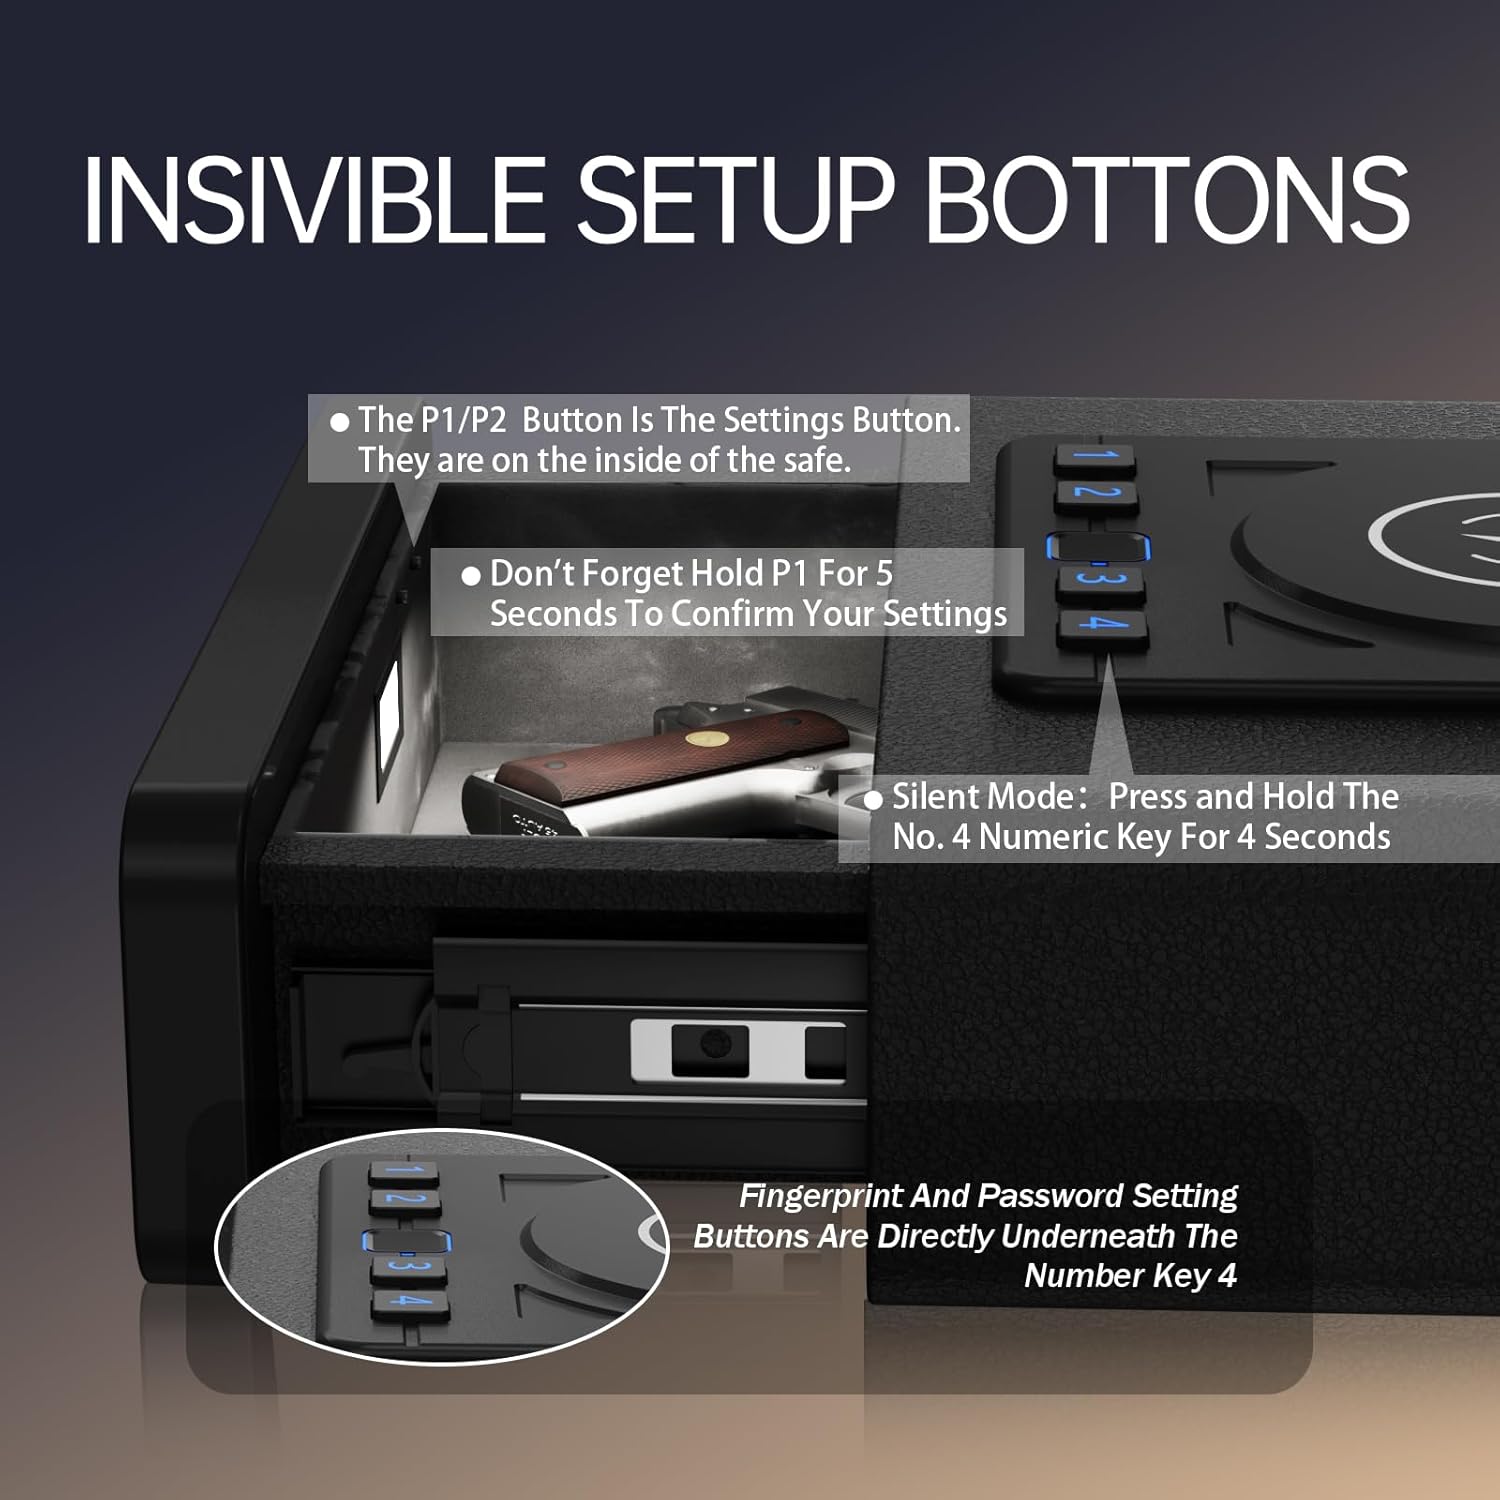
Image: Illustration showing the location of the P1/P2 setup buttons inside the safe and the fingerprint/password setting buttons beneath Number Key 4. It also indicates how to activate silent mode by pressing and holding the "4" key.
5.5 Wireless Charging Setup
Ensure the safe is connected to power via the AC adapter.
- Place your compatible smartphone or smartwatch on the designated wireless charging pad on top of the safe.
- Ensure the device is centered on the charging pad for optimal connection.
- A thick phone case may interfere with wireless charging. Remove the case if charging is unstable.

Image: A smartphone and smartwatch wirelessly charging on top of the safe, demonstrating the charging functionality. A note advises that thick phone cases can cause unstable charging connections.
5.6 Mounting the Safe
The safe can be secured using the provided steel wire rope or by mounting it with screws.
- Steel Wire Rope: Thread the steel wire rope through the security cable hole (labeled '6' in the back panel diagram) and secure it to a fixed object.
- Screw Mounting: Use the provided screws and expansion tubes to secure the safe to a suitable surface. Ensure the mounting location is sturdy enough to support the safe's weight and contents.
6. Operating Instructions
6.1 Unlocking the Safe
- Fingerprint Access: Place an enrolled finger on the biometric scanner. The safe will unlock if the fingerprint is recognized.
- PIN Code Access: Enter your 3-6 digit PIN code on the keypad, then press the '#' key. The safe will unlock if the code is correct.
- Backup Key Access: Insert one of the backup keys into the key slot and turn it to unlock the safe. This method is for emergencies or when batteries are depleted.
6.2 Silent Mode
To operate the safe without audible feedback:
- Press and hold the "4" key on the keypad for 4 seconds. The safe will enter silent mode, muting all beeps and sounds.
- Repeat the action to disable silent mode.
6.3 LED Display Functions
The front LED display provides real-time information:
- Time: Displays the current time (24/7).
- Temperature: Shows the ambient temperature (in Fahrenheit).
- Humidity: Displays the relative humidity percentage.
- Battery Life: Indicates the current battery level of the safe.
- Lock Status: Shows whether the safe is locked or unlocked.
To wake up the screen from power-saving mode, gently touch the screen.

Image: A close-up of the safe's LED display, clearly indicating the Fahrenheit temperature, humidity percentage, current time, lock/unlock status, and battery level. It also notes that touching the screen will wake it up.
6.4 Alarm Clock Function
The safe includes an alarm clock feature. Refer to the setup instructions for setting the time and alarm.
6.5 Screen Luminance Adjustment
Adjust the brightness of the LED display via the internal setup buttons (P1/P2). Follow the general setup procedure for accessing these settings.
6.6 Power-saving or Constant Mode
Toggle between power-saving mode (display turns off after a period of inactivity) and constant display mode using the internal setup buttons (P1/P2).
7. Maintenance
7.1 Battery Replacement
When the battery indicator on the LED display shows low power, replace the 4 AA batteries in the battery slot. Ensure the safe is connected to external power during battery replacement to maintain settings.
7.2 Cleaning
Wipe the safe's exterior with a soft, damp cloth. Do not use abrasive cleaners or solvents, as these can damage the finish or electronic components. Keep the fingerprint scanner clean and dry for optimal performance.
8. Troubleshooting
| Problem | Possible Cause | Solution |
|---|---|---|
| Safe does not open with fingerprint. | Finger not properly placed, unregistered fingerprint, dirty scanner, low battery. | Ensure finger covers the entire scanner. Re-enroll fingerprint. Clean scanner. Check battery level and replace if low. Try PIN or backup key. |
| Wireless charging is unstable or not working. | Device not centered, thick phone case, safe not powered, device not compatible. | Reposition device. Remove phone case. Ensure safe is connected to AC power. Verify device supports wireless charging. |
| LED display is off or dim. | Power-saving mode active, no power, low battery, luminance set too low. | Touch the screen to wake it up. Connect AC adapter. Check battery level. Adjust screen luminance in settings. |
| Cannot set time/date or other functions. | Incorrect button sequence, not holding P1 to confirm. | Refer to Section 5.2 and 5.4 for correct setup procedures. Ensure P1 is held for 5 seconds to confirm settings. |
| Safe is completely unresponsive. | No power (AC or battery), critical system error. | Connect AC adapter and ensure batteries are installed and charged. Use backup keys to open. Contact customer support if issue persists. |
9. Specifications
| Feature | Detail |
|---|---|
| Brand | ORARAER |
| Model Number | WX-11 |
| Product Dimensions | 12.8"D x 9.45"W x 3.07"H |
| Internal Capacity | 0.71 Cubic Feet (8.86"D x 7.28"W x 1.97"H) |
| Lock Type | Biometric Fingerprint, Electronic Combination Lock, Key |
| Material | Alloy Steel |
| Special Features | Biometric Fingerprint, Combination Lock, LED Display, Sensor Light, Wireless Charging |
| Mounting Type | Floor Mount (also suitable for desktop/drawer placement) |
| Item Weight | 1.76 ounces (Note: This weight may refer to a component, not the entire safe.) |
| Alarm | Audible |
| Batteries Required | Yes (4x AA, not included) |
10. Warranty and Support
ORARAER is committed to providing reliable products and customer satisfaction.
- Customer Support: Our dedicated support team is available to assist you with any setup or inquiries. We aim to respond within 48 hours.
- Money-Back & Replacement: Enjoy a 30-day money-back guarantee or product replacement.
- Warranty Service: A 365-day warranty covers manufacturing defects.
- After-Sales Service: Lifetime after-sales service is provided for all customers.
For support, please refer to the contact information provided with your purchase or visit the official ORARAER website.
Ask a question about this manual
Ask about setup, troubleshooting, compatibility, parts, safety, or missing instructions. Manuals+ will review the question and use this page’s manual context to help answer it.