
TOA Electronics BG-2060
TOA Electronics BG-2060 Mixer Amplifier User Manual
Model: BG-2060 | Brand: TOA Electronics
1. Introduction
This manual provides detailed instructions for the safe and efficient operation of the TOA Electronics BG-2060 5-Input Mixer Amplifier. The BG-2060 is designed for background music and general announcement applications, suitable for various commercial environments such as bars, retail stores, and banquet rooms. It features multiple inputs, flexible output options, and robust controls for optimal audio management.
2. Safety Information
Please read these safety instructions carefully before operating the unit. Keep this manual for future reference.
- Power Source: Connect the unit only to the specified power supply (120 V AC, 60 Hz).
- Ventilation: Ensure adequate ventilation. Do not block ventilation openings.
- Moisture: Do not expose the unit to rain or moisture to prevent fire or electric shock.
- Servicing: Refer all servicing to qualified service personnel. Do not attempt to service this product yourself.
- Placement: Place the unit on a stable, level surface. Avoid placing it near heat sources or in direct sunlight.
- Grounding: Ensure proper grounding to prevent electric shock.
3. Package Contents
Verify that all items listed below are included in the package:
- TOA Electronics BG-2060 Mixer Amplifier
- 5x Volume control cover YA-920
- 4x Removable terminal plug (2 pins)
- 2x Removable terminal plug (3 pins)
- 1x Removable terminal plug (4 pins)
- 1x Removable terminal plug (5 pins)
- User Manual (this document)
4. Product Overview
4.1 Front Panel

Figure 4.1: Front Panel Controls
This image displays the front panel of the TOA BG-2060 Mixer Amplifier. Key features visible include five input volume knobs (Mic, Line 1/Tel, Line 2, Line 3, Module), Bass and Treble tone controls, Signal, Peak, and Power LED indicators, and the main power switch. The overall design is a sleek black chassis.
- Input Volume Controls (MIC, LINE 1/TEL, LINE 2, LINE 3, MODULE): Adjust the volume level for each corresponding input channel.
- BASS Control: Adjusts the low-frequency response of the audio output.
- TREBLE Control: Adjusts the high-frequency response of the audio output.
- SIGNAL LED: Illuminates when an audio signal is present.
- PEAK LED: Illuminates when the output signal is clipping or nearing distortion.
- POWER LED: Indicates the power status of the unit (blue when ON).
- POWER Switch: Turns the unit ON or OFF.
4.2 Rear Panel
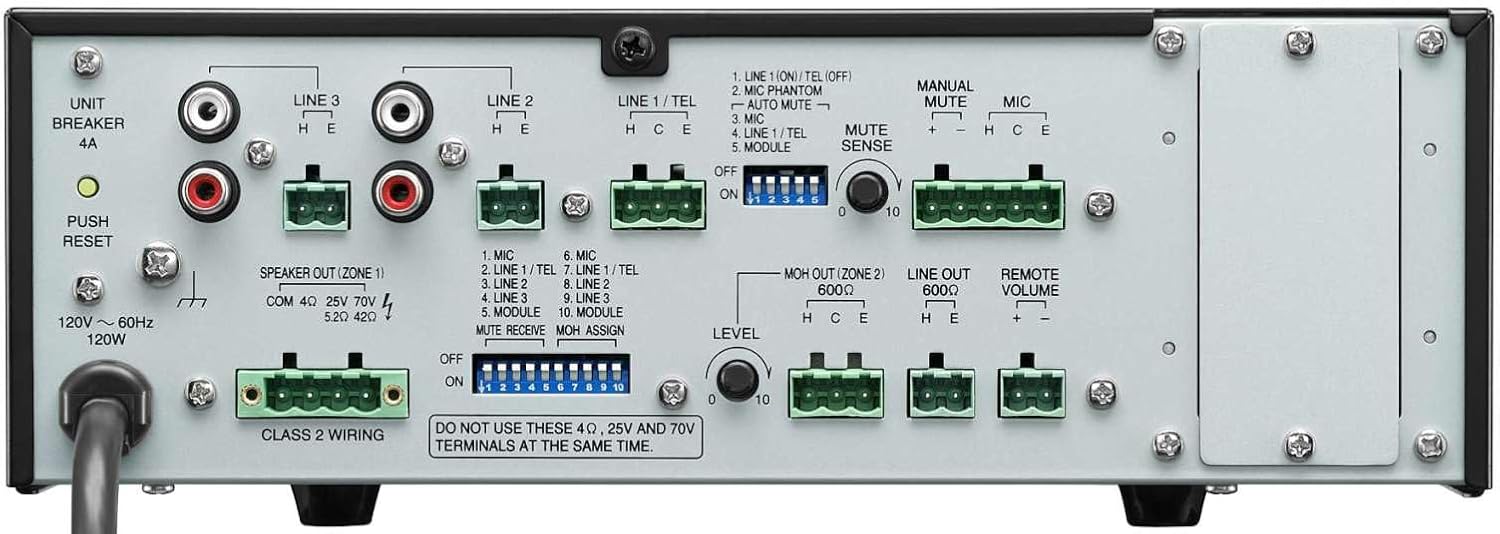
Figure 4.2: Rear Panel Connections
This image shows the rear panel of the TOA BG-2060 Mixer Amplifier, detailing its connectivity options. Visible are the power input, speaker outputs (4 Ohms, 25V, 70V), various input terminals (Mic, Line 1/Tel, Line 2, Line 3, Module), MOH output, Line output, Remote Volume control, and DIP switches for configuration.
- Power Input: AC power cord connection.
- UNIT BREAKER: Resettable circuit breaker.
- Speaker Output (ZONE 1): Terminals for connecting speakers (4 Ohms, 25V, or 70V). Note: Do not use 4 Ohms, 25V, and 70V terminals at the same time.
- Input Terminals:
- MIC: Balanced input for microphones, with +24V DC phantom power option.
- LINE 1/TEL: Selectable input for line-level devices or telephone paging.
- LINE 2, LINE 3: Unbalanced inputs for line-level devices (e.g., CD players, media players).
- MODULE: Input for optional modules.
- MOH OUT (ZONE 2): Music On Hold output, also assignable as a second zone output.
- LINE OUT: Unbalanced line-level output for connecting to external amplifiers or recording devices.
- REMOTE VOLUME: Terminals for connecting an optional remote volume control.
- DIP Switches: Configure various settings such as phantom power, input sensitivity, muting functions, and MOH assignment.
5. Setup
Follow these steps for initial setup of your BG-2060 Mixer Amplifier.
- Power Off: Ensure the unit's power switch is in the OFF position and the power cord is disconnected.
- Speaker Connection: Connect your speakers to the appropriate speaker output terminals (4 Ohms, 25V, or 70V) on the rear panel. Ensure correct polarity. Do not connect speakers to multiple output types simultaneously.
- Input Device Connection: Connect your audio sources (microphones, music players, etc.) to the desired input terminals (MIC, LINE 1/TEL, LINE 2, LINE 3, MODULE) using appropriate cables and terminal plugs.
- DIP Switch Configuration: Refer to the rear panel diagram and the detailed instructions in the full manual for setting the DIP switches according to your specific needs (e.g., phantom power for microphones, mute settings).
- Optional Connections: If using, connect to the MOH OUT, LINE OUT, or REMOTE VOLUME terminals.
- Power Connection: Once all connections are secure, plug the power cord into a suitable AC outlet.
6. Operation
Operating the BG-2060 is straightforward.
- Power On: Turn the POWER switch on the front panel to the ON position. The POWER LED will illuminate blue.
- Input Volume Adjustment: Slowly turn up the volume knob for the input channel you wish to use (MIC, LINE 1/TEL, etc.).
- Master Volume Adjustment: Adjust the master volume control (if applicable, or use individual input volumes) to achieve the desired overall output level.
- Tone Control: Use the BASS and TREBLE controls to fine-tune the audio's low and high frequencies to your preference.
- Monitoring: Observe the SIGNAL and PEAK LEDs. The SIGNAL LED indicates audio presence. If the PEAK LED illuminates frequently or stays lit, reduce the input volume to prevent distortion.
- Muting Function: If configured via DIP switches, utilize the manual or automatic mute functions as needed for paging or announcements.
7. Maintenance
Proper maintenance ensures the longevity and optimal performance of your mixer amplifier.
- Cleaning: Wipe the unit with a soft, dry cloth. Do not use abrasive cleaners, waxes, or solvents.
- Ventilation: Periodically check that ventilation openings are clear of dust and debris.
- Connections: Ensure all cable connections are secure and free from corrosion.
- Storage: If storing the unit for an extended period, disconnect it from power and store it in a cool, dry place.
8. Troubleshooting
Refer to the table below for common issues and their solutions.
| Problem | Possible Cause | Solution |
|---|---|---|
| No power | Power cord disconnected; Unit breaker tripped; Power outlet issue. | Check power cord connection; Press UNIT BREAKER button on rear panel; Test power outlet with another device. |
| No sound output | Input volume too low; Speaker connections incorrect; Mute function active; Incorrect input selected. | Increase input and master volumes; Verify speaker wiring and impedance; Check DIP switch settings for mute; Ensure correct input source is active. |
| Distorted sound | Input signal too high (PEAK LED on); Incorrect impedance matching; Faulty cable. | Reduce input volume; Ensure speaker impedance matches amplifier output; Replace cables. |
| Humming or buzzing noise | Ground loop; Loose connections; Interference from other electronics. | Ensure proper grounding; Check all cable connections; Move unit away from other electronic devices. |
9. Specifications
| Feature | Detail |
|---|---|
| Power Source | 120 V AC, 60 Hz |
| Rated Output | 60W |
| Inputs | Mic: -60 dB, 600 Ohms, balanced; Line 1/TEL: -10 dB/-20 dB, 10 kOhms, balanced; Line 2, 3: -10 dB, 10 kOhms, unbalanced; Modules |
| Outputs | Speaker: 4 Ohms, 25 V (10 Ohms), 70 V (83 Ohms), balanced; MOH: 0 dB, 600 Ohms, balanced; Line: 0 dB, 600 Ohms, unbalanced |
| Output Regulation | 2 dB or less, no load to full load (1 kHz) |
| Phantom Power | On/Off switch for Mic, +24 V DC |
| Tone Control | Bass: +/- 10 dB at 100 Hz; Treble: +/- 10 dB at 10 kHz |
| Muting | Manual mute/Automatic mute |
| Indicators | Power LED, Signal level LED, Peak LED |
| Dimensions (WxHxD) | 10.39 x 3.71 x 10.52 inches |
| Weight | 11.68 pounds |
10. Warranty and Support
For warranty information and technical support, please refer to the documentation provided with your purchase or visit the official TOA Electronics website.
Related documentsBG-2060


Ask a question about this manual
Ask about setup, troubleshooting, compatibility, parts, safety, or missing instructions. Manuals+ will review the question and use this page’s manual context to help answer it.