1. Introduction
This manual provides detailed instructions for the installation, operation, and maintenance of your Cabletech DVB-T2/C HEVC Tuner, Model URZ0336C. This device is designed to receive digital terrestrial (DVB-T2/T) and cable (DVB-C) television broadcasts, supporting HEVC H.265 video compression for high-quality viewing. Please read this manual thoroughly before using the product to ensure correct and safe operation.
2. Package Contents
Please check the box for the following items:
- Cabletech DVB-T2/C HEVC Tuner (Main Unit)
- Remote Control
- User Manual (this document)

Figure 2.1: Overview of the Cabletech DVB-T2/C HEVC Tuner, remote control, and packaging.
3. Product Overview
3.1 Front Panel

Figure 3.1: Front panel of the tuner.
- Power Button: Turns the tuner on or off (standby).
- M (Menu) Button: Accesses the main menu.
- USB Port: For connecting USB storage devices for media playback and PVR functions.
- LED Display: Shows channel number or time.
- V+/V- Buttons: Adjusts volume.
- OK Button: Confirms selections.
- </> Buttons: Navigates through channels or menu options.
3.2 Rear Panel
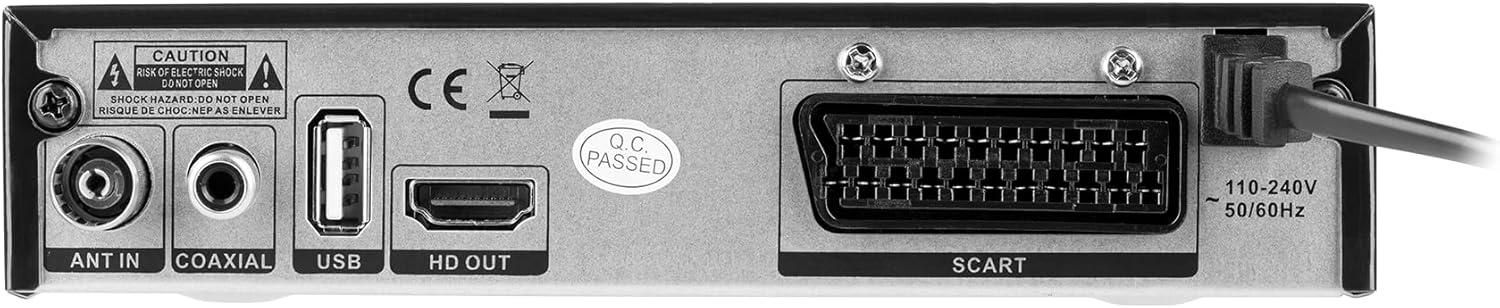
Figure 3.2: Rear panel of the tuner with connection ports.
- ANT IN: Connects to your terrestrial or cable antenna.
- COAXIAL: Digital audio output.
- USB: Additional USB 2.0 port for storage devices.
- HD OUT (HDMI 1.4b): Connects to your TV for high-definition video and audio.
- SCART: Connects to older TVs or VCRs.
- Power Input: Connects to the power supply (110-240V, 50/60Hz).
3.3 Remote Control

Figure 3.3: Remote control for the Cabletech DVB-T2/C HEVC Tuner.
The remote control requires 2 AAA batteries (not included). Familiarize yourself with the buttons for easy navigation and control of the tuner's functions.
4. Setup
4.1 Connecting the Antenna
- Connect your terrestrial or cable antenna cable to the ANT IN port on the rear panel of the tuner.
4.2 Connecting to Your TV
Choose one of the following connection methods:
- HDMI Connection (Recommended): Use an HDMI cable to connect the HD OUT port on the tuner to an HDMI input on your television. Select the corresponding HDMI input on your TV.
- SCART Connection: Use a SCART cable to connect the SCART port on the tuner to the SCART input on your television. Select the corresponding AV input on your TV.
4.3 Power Connection
- Connect the power cable to the Power Input on the rear panel of the tuner.
- Plug the other end of the power cable into a standard electrical outlet (110-240V, 50/60Hz).
- Press the Power button on the front panel or remote control to turn on the tuner.
4.4 Initial Setup and Channel Scan
Upon first power-on, the tuner will guide you through an initial setup process. Follow the on-screen prompts to:
- Select your preferred language.
- Initiate an Automatic Channel Search. This will scan for all available DVB-T2/T and DVB-C channels in your area. This process may take several minutes.
- Once the scan is complete, channels will be saved, and the tuner will display the first available channel.
You can also perform a Manual Channel Search via the menu if needed.
5. Operating Instructions
5.1 Basic Functions
- Power On/Off: Press the Power button on the remote or front panel.
- Channel Selection: Use the CH+/CH- buttons or the number buttons on the remote.
- Volume Control: Use the VOL+/VOL- buttons on the remote or front panel.
- Mute: Press the MUTE button on the remote to temporarily silence the audio.
5.2 Electronic Program Guide (EPG)
Press the EPG button on the remote control to access the 7-day Electronic Program Guide. This feature displays program schedules, allowing you to view upcoming shows and set reminders or recordings.
5.3 PVR (Personal Video Recorder)
To record programs, connect a USB storage device (formatted as FAT32 or NTFS) to one of the USB ports. Press the PVR button on the remote or navigate through the menu to access recording options. You can schedule recordings using the EPG or record instantly.
5.4 Timeshift
The Timeshift function allows you to pause live TV and resume watching later. Connect a USB storage device to enable this feature. Press the Timeshift button (if available on remote) or access it via the menu.
5.5 Media Playback
Insert a USB storage device containing media files (photos, music, videos) into a USB port. Navigate to the Media Player section in the main menu to browse and play your files. Supported formats include H.264, HEVC, MP3, MP4, MKV, JPEG, AVI.
5.6 Menu Navigation
Press the MENU button to access the main menu. Use the arrow keys (up/down/left/right) to navigate through options and the OK button to confirm selections. The EXIT button will return you to live TV or the previous menu level.
5.7 Parental Control
Access the Parental Control settings in the menu to set a password and restrict access to certain channels or programs based on age ratings.
5.8 Teletext
Press the TTX button on the remote control to access Teletext services, if available on the current channel.
5.9 Favorite Channels
You can create a list of your favorite channels for quick access. Refer to the menu settings for instructions on how to add and manage favorite channels.
6. Troubleshooting
If you encounter issues with your tuner, please consult the following common problems and solutions before contacting support:
- No Picture/Sound:
- Ensure all cables (antenna, HDMI/SCART, power) are securely connected.
- Verify your TV is set to the correct input source (e.g., HDMI1, AV).
- Check the tuner's power status.
- Poor Signal/Pixelation:
- Check antenna connection and position.
- Perform a channel scan again.
- Check signal strength and quality in the tuner's menu.
- Remote Control Not Working:
- Ensure batteries are correctly inserted and not depleted.
- Check for any obstructions between the remote and the tuner.
- USB Device Not Recognized:
- Ensure the USB device is formatted to FAT32 or NTFS.
- Try a different USB port or device.
7. Maintenance
To ensure the longevity and optimal performance of your Cabletech DVB-T2/C HEVC Tuner:
- Keep the device in a dry, well-ventilated area, away from direct sunlight, heat sources, and moisture.
- Clean the exterior with a soft, dry cloth. Do not use liquid or aerosol cleaners.
- Do not block the ventilation openings on the device.
- Avoid dropping or subjecting the device to strong impacts.
8. Specifications
8.1 System
- Processor: GX6706S5
- Internal Memory: 32 MB
- RAM: 512 MB DDR2
- Video Recording Resolution: 1920 x 1080 pixels
- Video Format: Auto, 16:9, 4:3LB, 4:3 CV
- Supported Video Codecs: MPEG-2, MPEG-4, H.264, H.265 (HEVC), AAC, HE-AAC, AC-3, DD+
- Supported Media Formats: H.264, HEVC, MP3, MP4, MKV, JPEG, AVI
- Supported Audio Formats: MPEG-1 Layer I/II, MPEG-2 Layer I/II, AAC, AAC+/HE-AAC/AC3, Dolby Plus
- Hard Drive Formatting (USB): FAT32, NTFS
8.2 Tuner
- Frequency Range (VHF): 177.5 ~ 236.5 MHz
- Frequency Range (UHF): 474 ~ 866 MHz
- Demodulation: QPSK, 16QAM, 64QAM, 256QAM
- Bandwidth: 7 MHz, 8 MHz
- Input Impedance: 75 Ohm
8.3 Inputs and Outputs
- HDMI: 1.4b
- USB Ports: 2 x USB 2.0
- Antenna Input: 1 x IEC connector (ANT IN)
- Coaxial Audio Output: 1
- SCART: 1
8.4 Power
- Input Voltage: 110-240 V, 50/60 Hz
- Remote Control Batteries: 2 x AAA (not included)
- Typical Power Consumption: Max 7.5 Watt
- Stand-by Power Consumption: Max 0.5 Watt
8.5 Physical Characteristics
- Dimensions (W x D x H): 167 x 94 x 35 mm
- Weight: 250 g
- Power Cable Length: 1 m
9. Warranty and Support
For warranty information and technical support, please refer to the documentation provided with your purchase or contact your retailer. Keep your proof of purchase for warranty claims.


