
1. Introduction
This manual provides comprehensive instructions for the ECONTROLLY AXD7668 replacement remote control. This infrared remote is designed to be compatible with various Pioneer AV Receiver models, offering a straightforward, pre-programmed solution for controlling your audio and video system. No additional programming is required for its operation.
2. Setup
2.1 Battery Installation
The AXD7668 remote control requires AAA ALKALINE batteries for operation. Rechargeable batteries are not recommended.
- Locate the battery compartment cover on the back of the remote control.
- Slide the cover downwards or press the latch to open it.
- Insert two (2) AAA ALKALINE batteries, ensuring the positive (+) and negative (-) terminals align correctly with the markings inside the compartment.
- Replace the battery compartment cover by sliding it back into place until it clicks securely.
Once batteries are installed, the remote is ready for use with compatible Pioneer AV Receivers without any additional programming.
3. Operating Instructions
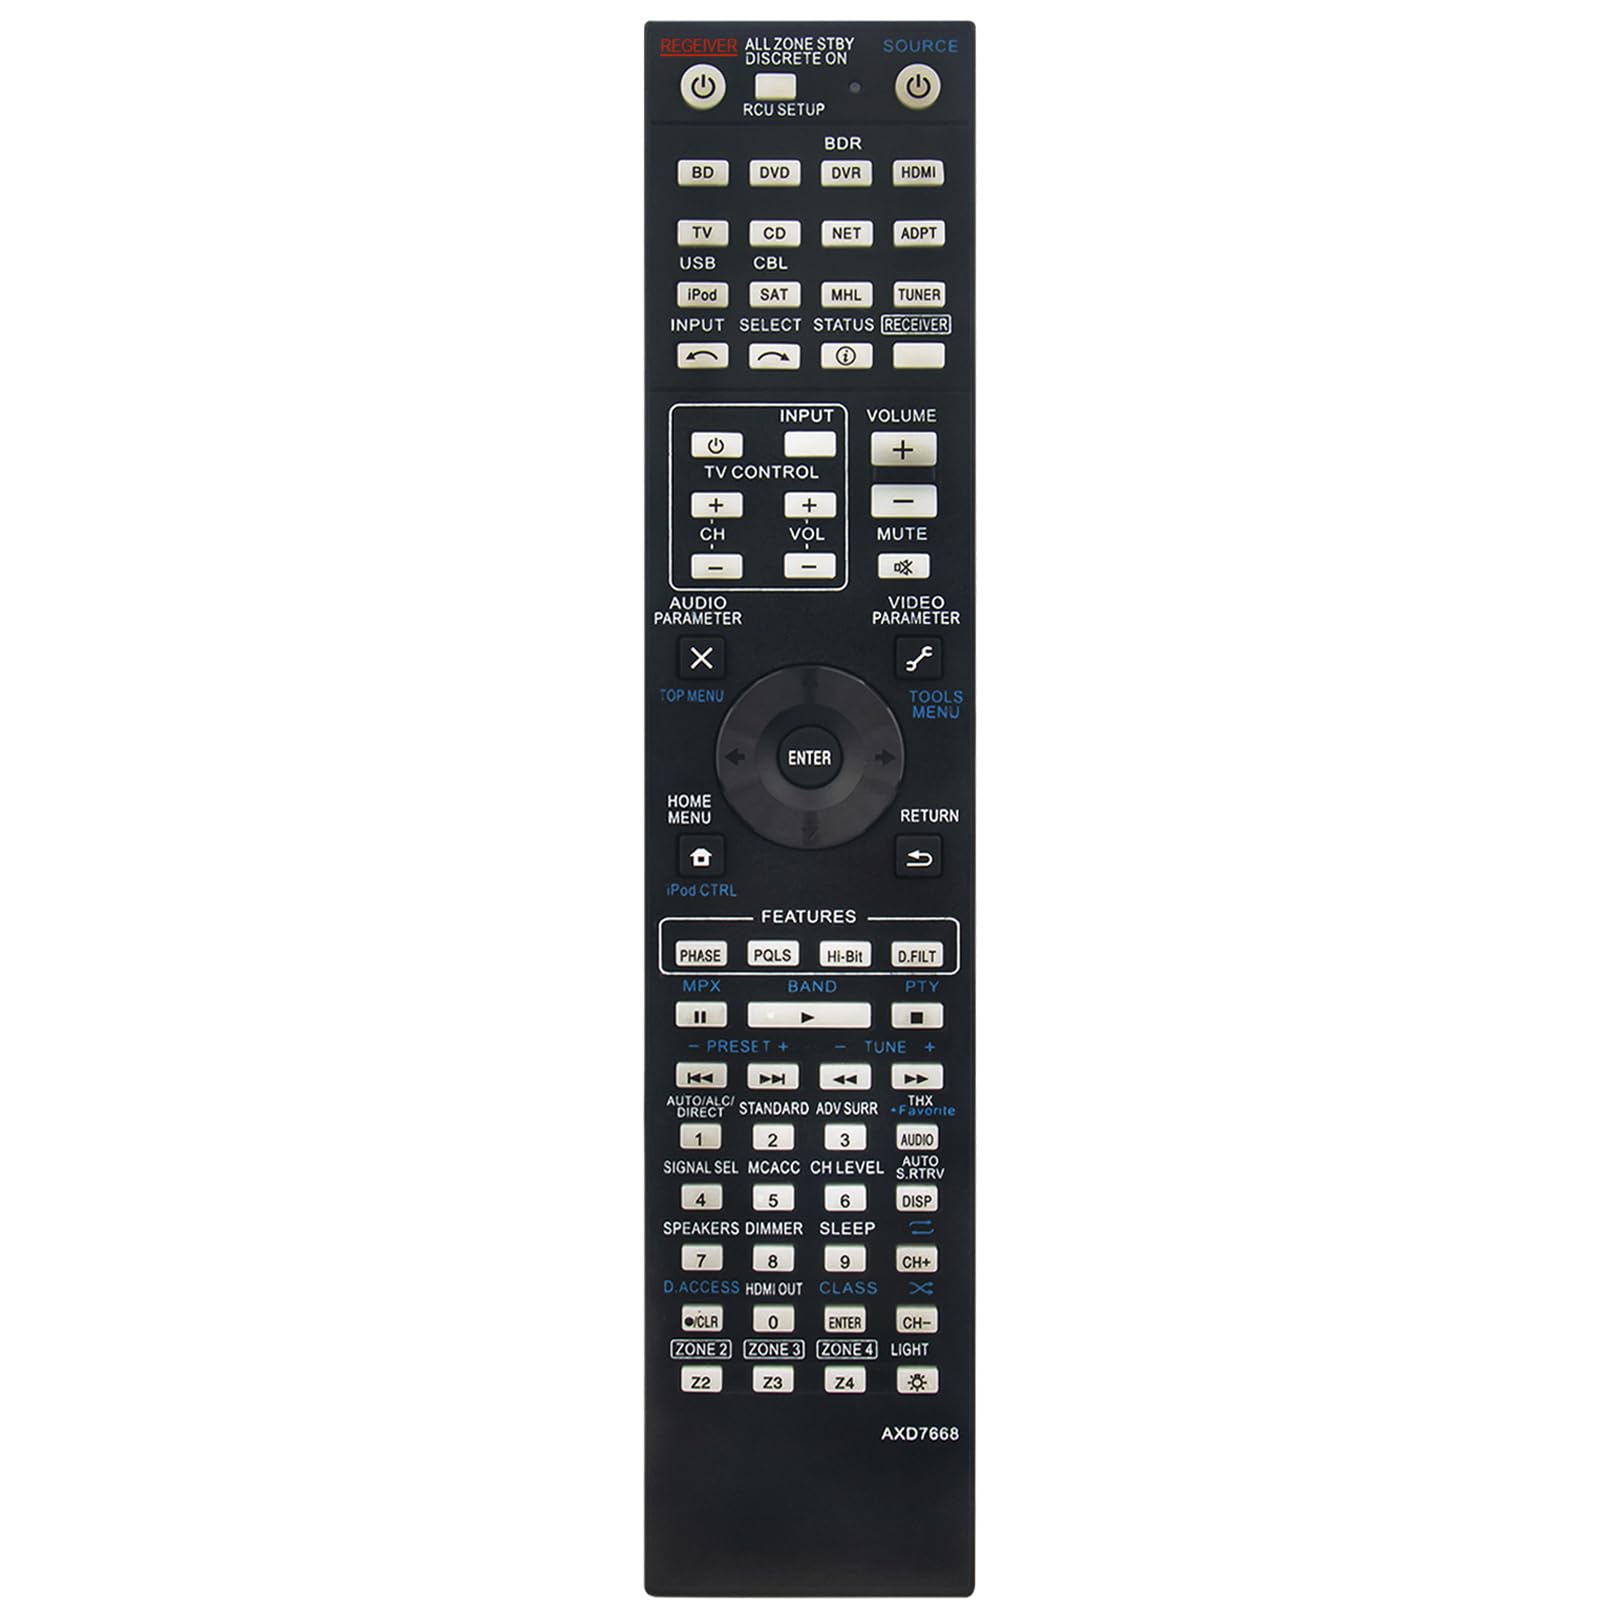
This remote control provides direct access to various functions of your Pioneer AV Receiver. Familiarize yourself with the button layout for optimal use.

3.1 Basic Functions
- POWER (⑂): Turns the AV Receiver on or off.
- INPUT Selectors (BD, DVD, CD, USB, CBL, SAT, NET, DVR, HDMI, TUNER): Press to select the desired input source connected to your receiver.
- VOLUME (+/-): Adjusts the master volume level of the receiver.
- MUTE (⑁): Temporarily silences the audio output. Press again to restore sound.
- TV CONTROL: Buttons for basic TV functions (CH+/-, VOL+/-).
3.2 Navigation and Menu Control
- HOME MENU: Accesses the main menu of the AV Receiver.
- ENTER: Confirms selections within menus.
- RETURN: Goes back to the previous menu or screen.
- TOP MENU: Accesses the top menu of a disc or source.
- TOOLS MENU: Opens a context-sensitive tools or options menu.
- Directional Buttons (▲, ▼, ◄, ►): Navigate through menu options.
3.3 Audio and Video Adjustments
- AUDIO PARAMETER: Accesses audio settings and adjustments.
- VIDEO PARAMETER: Accesses video settings and adjustments.
- FEATURES (PHASE, PQLS, HI-BIT, D.FILT): Buttons for specific audio processing features.
- BAND: Selects radio bands (e.g., AM/FM).
- TUNE (+/-): Adjusts radio frequency.
- PRESET (+/-): Navigates through saved radio presets.
- SIGNAL SEL: Selects signal modes.
- MCACC: Initiates or adjusts MCACC (Multi-Channel Acoustic Calibration System) settings.
- CH LEVEL: Adjusts individual speaker channel levels.
- AUDIO: Cycles through audio modes or settings.
- DISP: Changes the display information on the receiver.
3.4 System and Zone Control
- SPEAKERS: Toggles speaker settings.
- DIMMER: Adjusts the brightness of the receiver's display.
- SLEEP: Sets a sleep timer for the receiver.
- D.ACCESS: Direct access buttons for various functions.
- HDMI OUT: Selects HDMI output options.
- ZONE 2, ZONE 3, ZONE 4: Controls multi-zone audio output.
4. Maintenance
Proper maintenance ensures the longevity and reliable performance of your remote control.
- Cleaning: Use a soft, dry cloth to wipe the remote control. For stubborn dirt, slightly dampen the cloth with water or a mild cleaning solution, then wipe dry immediately. Avoid using abrasive cleaners, solvents, or alcohol, as these can damage the surface or markings.
- Battery Replacement: Replace batteries when the remote's range decreases or it becomes unresponsive. Always replace both batteries at the same time with new AAA ALKALINE batteries. Do not mix old and new batteries, or different types of batteries.
- Storage: If the remote control will not be used for an extended period, remove the batteries to prevent leakage, which can damage the remote. Store the remote in a cool, dry place away from direct sunlight and extreme temperatures.
- Avoid Drops and Impacts: Protect the remote from physical shock, as internal components can be damaged.
5. Troubleshooting
If you experience issues with your remote control, try the following steps:
- Remote Not Responding:
- Check the batteries. Ensure they are inserted correctly with the correct polarity (+/-).
- Replace the batteries with fresh AAA ALKALINE batteries.
- Limited Range or Intermittent Operation:
- Ensure there is a clear line of sight between the remote control and the AV Receiver's infrared sensor. Obstructions can block the signal.
- Move closer to the AV Receiver.
- Check for strong light sources (e.g., direct sunlight, fluorescent lights) that might interfere with the infrared signal.
- Specific Buttons Not Working:
- Clean the remote control, especially around the unresponsive buttons, to remove any dirt or debris that might be preventing proper contact.
- If only certain functions are affected, ensure your AV Receiver model is fully compatible with all features of this replacement remote.
If the issue persists after trying these steps, please refer to the Support section.
6. Specifications
| Feature | Detail |
|---|---|
| Brand | ECONTROLLY |
| Model | AXD7668 |
| Special Feature | Pre Programmed |
| Color | Black |
| Max Number of Supported Devices | 1 |
| Compatible Devices | Home Theater (Pioneer AV Receivers) |
| Connectivity Technology | Infrared |
| Button Quantity | 12 (This seems incorrect based on image, but is from provided data. User should refer to image for actual count.) |
| Controller Type | Button Control |
| Maximum Range | 33 Feet |
| Item Weight | 50 Grams |
| Item Dimensions (L x W x H) | 8.85" x 1.83" x 0.56" |

7. Warranty Information
This ECONTROLLY AXD7668 remote control comes with a 12-month warranty from the date of purchase. This warranty covers manufacturing defects under normal use. Please retain your proof of purchase for any warranty claims.
8. Support
For further assistance, troubleshooting not covered in this manual, or warranty inquiries, please contact the seller or manufacturer directly through your purchase platform. Provide your product model (AXD7668) and a detailed description of the issue for efficient support.
