
1. Introduction
This manual provides detailed instructions for the installation, operation, and maintenance of your Uckazy 12.3 Inch Car Stereo. This system is designed to upgrade the infotainment experience in specific Audi Q5 models, integrating modern features like Apple CarPlay and Android Auto while retaining original vehicle functionalities.
Compatibility: This unit is specifically designed for Audi Q5 Concert/Symphony models manufactured between 2009 and 2017. Before installation, it is crucial to identify your vehicle's MMI (Multi Media Interface) type. If you are unsure, please consult your vehicle's documentation or contact support with a photo of your car's interior and MMI version.

Figure 1.1: The Uckazy 12.3 Inch Car Stereo installed in an Audi Q5 dashboard, displaying a modern interface.
2. Setup and Installation
The Uckazy car stereo is designed for a plug-and-play installation, integrating seamlessly with your vehicle's existing systems. Careful attention to detail during installation is essential for optimal performance.
2.1 Package Contents
Before beginning installation, verify that all components are present:
- Ultra narrow 12.3" in-cell display screen
- Plug and play power Cable
- USB/AUX/RCA/AMI Cable
- Frame
- Installation tools and touch pen

Figure 2.1: Included components for the Uckazy 12.3 Inch Car Stereo system.
2.2 Compatibility Check
Ensure your Audi Q5 has either the Concert or Symphony MMI system. This unit is not compatible with Multimedia, Chorus, or CD Changer only systems.
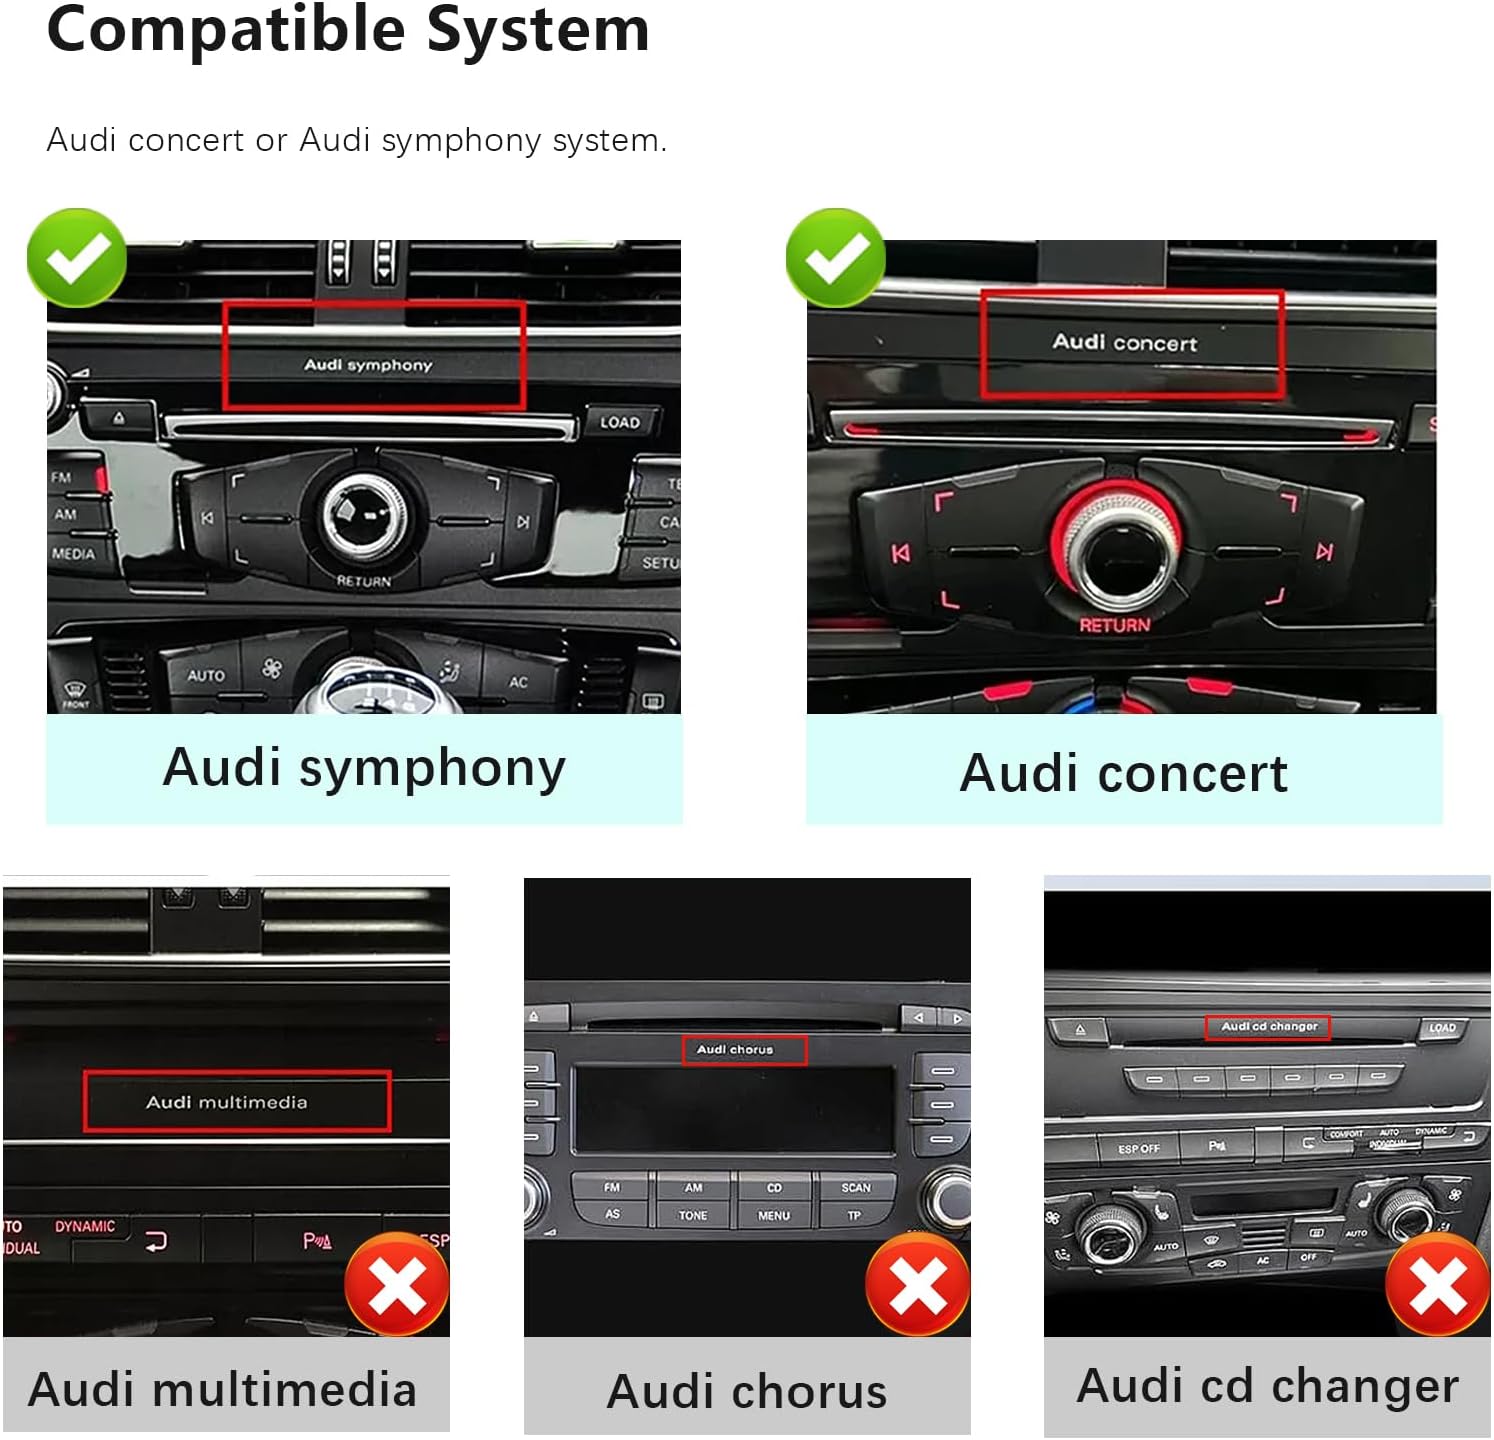
Figure 2.2: Visual guide for identifying compatible Audi MMI systems.
2.3 Wiring and Connections
Follow the provided wiring diagrams carefully. Ensure all connections are secure to prevent operational issues.

Figure 2.3: Wire definition and linking for the car machine system.
2.4 Specific Cable Requirements
- Your car must have an AUX or AMI output.
- If your car has an AMI output but no AUX, you will need to install the provided AMI Cable.
- If your car has the airbag button located under the hazard light button, you will need to install the dedicated airbag cable.

Figure 2.4: Important connection points for AMI, AUX, and airbag cable.
2.5 Fiber Optic Connection
To connect with fiber optic, unplug the 2P fiber optic harness from the original car CD and insert it into the Linux system harness.
2.6 Wired CarPlay/Android Auto Connection
For wired CarPlay or Android Auto, use USB1 (data link). USB2 is for read storage link only.

Figure 2.5: Connection details for fiber optic and wired smartphone integration.
3. Operating Instructions
Your Uckazy car stereo offers a dual-system experience, allowing you to switch between the new Linux-based system and your original Audi MMI system.
3.1 Dual System Switching
The unit features a one-click switch between the Linux system and the original car system. This allows you to retain all original functions while benefiting from the added features of the new system.

Figure 3.1: Seamless switching between the original and upgraded systems.
3.2 Core Features
The upgraded capacitive touch screen enhances your driving experience with:
- Wireless/Wired Apple CarPlay & Android Auto: Access navigation, phone contacts, email, notifications, and music via voice commands (Siri or Google Voice Assistant).
- Wireless Mirrorlink: For iOS and Android phones.
- Bluetooth & Wi-Fi Connectivity.
- Built-in DSP with 16 EQ segments: Customize audio output with various tuning methods and EQ presets for enhanced sound quality.

Figure 3.2: Overview of the Linux system interface and available functions.

Figure 3.3: Steps for connecting to wireless CarPlay.

Figure 3.4: CarPlay features including voice control, navigation, and music.
3.3 Retained Original Functions
The system retains full functionality of your original car features, including:
- Original car radio and amplifier function
- Factory steering wheel controls
- Original car mouse knob (iDrive control)
- Display of speed, fuel level, oil pressure, safety warnings
- Original reverse camera compatibility
- Sound from the original car stereo
- Ability to keep the original CD player

Figure 3.5: Supported original OEM system features.

Figure 3.6: Additional original system features supported by the unit.
3.4 Display Settings
The 12.3-inch IN-CELL screen features full lamination technology, reducing reflection by 75% and enhancing display clarity. It also supports automatic light sensitivity, adjusting day and night modes based on your car's original headlights.

Figure 3.7: Visual comparison of screen visibility and In-cell technology benefits.

Figure 3.8: Benefits of the In-cell screen technology, including reduced visual obstruction and improved clarity.

Figure 3.9: Automatic light-sensitive feature for optimal visibility.
3.5 System Settings
Access the system settings to configure various options:
- OEM Resolution: Navigate to image setup > car settings > original car screen resolution and select the correct resolution for your OEM display. Incorrect settings may prevent OEM car information from displaying correctly.
- OEM Cameras: Go to image setup > car settings > ReversingSettings > Camera Type and select 'Original' or 'Aftermarket' as appropriate.
- AUX Activation: In Car Settings, ensure 'AUX Activation' is enabled if you are using the AUX input. If using AMI, directly plug into AMI. If not confirming plug into the original AUX, go to settings and turn off the AUX automatic switching settings.

Figure 3.10: OEM Resolution and Camera Type settings.

Figure 3.11: AUX Activation setting in Car Settings.

Figure 3.12: AMI and AUX port identification and AUX activation settings.
4. Maintenance
To ensure the longevity and optimal performance of your Uckazy car stereo, follow these general maintenance guidelines:
- Screen Cleaning: Use a soft, lint-free cloth slightly dampened with water or a screen-specific cleaner. Avoid harsh chemicals or abrasive materials.
- Temperature: Avoid exposing the unit to extreme temperatures, both hot and cold, for extended periods.
- Dust and Debris: Regularly clean the surrounding area to prevent dust and debris from accumulating around the screen and buttons.
- Cable Connections: Periodically check all cable connections to ensure they remain secure.
5. Troubleshooting
If you encounter issues with your Uckazy car stereo, refer to the following common troubleshooting tips:
- No Power/Screen Blank: Ensure all power cables are securely connected. Check your vehicle's fuse box for any blown fuses related to the stereo system.
- No Sound: Verify that the AUX input is correctly activated in the system settings (refer to Section 3.5). Check speaker connections. Ensure the volume is not muted or set too low.
- Sound Noise/Distortion: If you experience distorted sound (noise) from CarPlay or Android Auto, ensure the 'AB' connection is properly made as indicated in the wiring diagram (Figure 2.5).
- CarPlay/Android Auto Not Connecting: Ensure Bluetooth is enabled on your phone and the stereo. For wireless connection, follow the steps in Section 3.2. For wired connection, ensure you are using USB1.
- Original Car Information Not Displaying: Verify that the correct OEM Resolution is selected in the system settings (refer to Section 3.5).
- Reverse Camera Not Working: Check the 'Camera Type' setting in the system settings (refer to Section 3.5) and ensure it matches your installed camera (Original or Aftermarket).
If problems persist after attempting these solutions, please contact Uckazy customer support for further assistance.
6. Specifications
| Feature | Specification |
|---|---|
| Screen Size | 12.3 inches |
| Resolution | 1920 x 720 (HD) |
| Screen Type | IN-CELL LCD, Full Lamination Technology |
| Operating System | Linux System |
| Connectivity | Bluetooth, Wi-Fi, USB, AMI, AUX |
| Special Features | Wireless/Wired Apple CarPlay, Wireless/Wired Android Auto, Wireless Mirrorlink, Built-in DSP (16 EQ segments), Automatic Light-sensitive |
| Compatible Devices | Smartphone |
| Audio Output Mode | Stereo |
| Video Encoding | H.264, H.265/HEVC |
| Product Dimensions | 16 x 20 x 22 inches (approximate packaging) |
| Item Weight | 4.49 pounds (2.04 Kilograms) |
| Model Number | 7bc655c6-1710-4cf7-bcca-bbaac9af236d |
7. Warranty and Support
For warranty information or technical support, please refer to the documentation included with your purchase or contact Uckazy customer service. You can also visit the official Uckazy Store on Amazon for more product information and support resources: Uckazy Store.