1. Important Safety Instructions
Please read all instructions carefully before installing or using this appliance. Keep this manual for future reference.
- Gas Safety: Ensure proper ventilation in the kitchen. Do not store flammable materials, aerosols, or cleaning agents near the hob. In case of a gas leak, immediately shut off the main gas supply, open windows and doors, and do not operate any electrical switches or appliances. Contact a qualified gas technician.
- Burn Hazard: The cooking surface, pan supports, and surrounding areas become extremely hot during and after use. Always use oven mitts or pot holders when handling hot items. Allow the appliance to cool completely before cleaning or maintenance.
- Children Safety: Keep children away from the appliance during operation and cooling. Never allow children to operate or play with the hob.
- Cleaning: Always ensure the appliance is cool and disconnected from the power supply before cleaning. Use only recommended cleaning agents and methods.
- Installation: Installation and gas connection must be performed by a qualified and certified technician in accordance with all local and national regulations. Incorrect installation can lead to serious injury or damage.
- General Use: Do not use the hob as a work surface or for storage. Do not leave cooking unattended. Avoid using oversized cookware that overhangs the hob edges.
2. Product Overview
The Bosch PNP6B6K40 Series 4 Gas Stove is a 60 cm gas hob designed for efficient and versatile cooking. It features a sleek black tempered glass surface, durable cast iron pan supports, and four high-performance gas burners.
Components
- Tempered Glass Cooking Surface
- Cast Iron Pan Supports (removable)
- Gas Burners (various sizes for different cooking needs)
- Control Knobs with integrated ignition
- Flame Failure Safety Device (automatically cuts off gas supply if flame extinguishes)
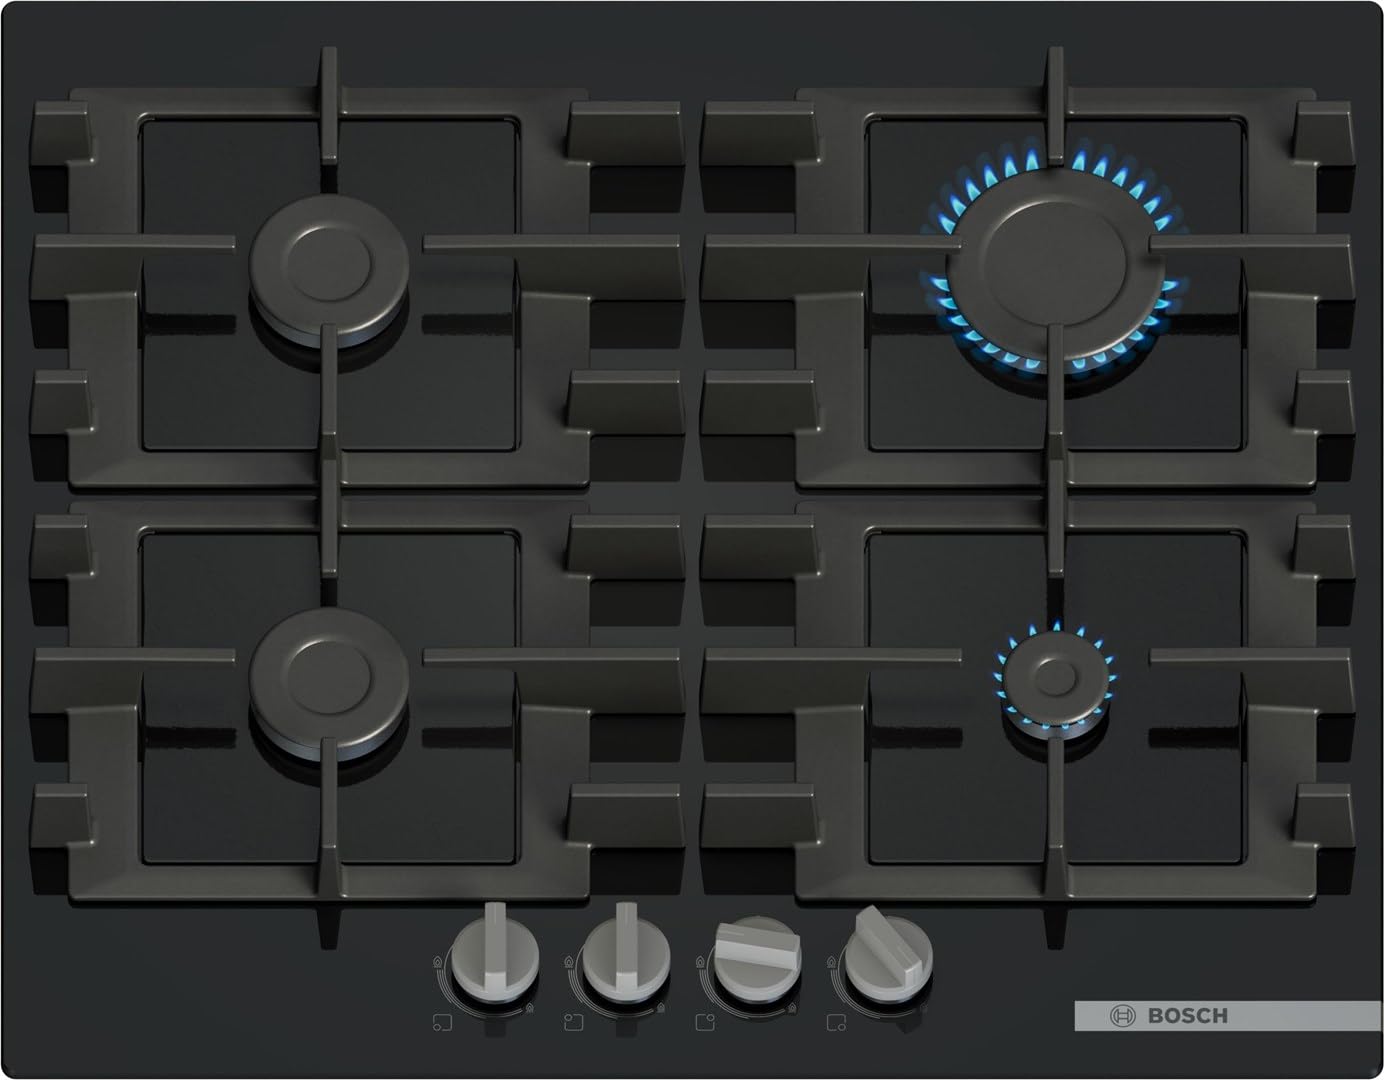
Figure 2.1: Top view of the Bosch PNP6B6K40 Gas Hob.

Figure 2.2: Detail of a gas burner and pan support.
3. Setup and Installation
This appliance must be installed by a qualified and authorized technician. Incorrect installation can void the warranty and pose safety risks.
3.1 Pre-Installation Checks
- Verify that the gas supply type (Natural Gas) matches the appliance's requirements.
- Ensure adequate ventilation in the installation area.
- Check that the countertop material is heat-resistant and suitable for hob installation.
- Confirm that the electrical supply for the ignition system is available and properly grounded.
3.2 Dimensions and Cutout Requirements
Refer to the diagram below for precise measurements for the countertop cutout and minimum clearances.

Figure 3.1: Installation dimensions and clearances (measurements in mm).
- Appliance Dimensions (approx.): 590 mm (W) x 520 mm (D) x 58 mm (H)
- Cutout Dimensions (approx.): 560 mm (W) x 480-490 mm (D)
- Minimum Distance from Rear Wall: 50 mm
- Minimum Distance from Side Walls: 100 mm
- Minimum Distance from Overhead Cabinet: 600 mm
3.3 Gas and Electrical Connection
- The gas connection point is indicated in the diagram. Ensure a flexible gas hose (if used) meets local standards and is correctly installed.
- After gas connection, perform a leak test using soapy water. Never use an open flame to check for leaks.
- Connect the appliance to a properly grounded electrical outlet for the ignition system.

Figure 3.2: Installed gas hob in a kitchen setting.
4. Operating Instructions
Familiarize yourself with the control knobs and burner layout before first use.
4.1 Igniting a Burner
- Place your cookware on the pan support over the desired burner.
- Push the corresponding control knob down firmly.
- While holding the knob down, turn it counter-clockwise to the large flame symbol (maximum setting). You will hear a clicking sound as the igniter sparks.
- Once the flame ignites, continue to hold the knob down for approximately 3-5 seconds. This activates the flame failure safety device.
- Release the knob. If the flame goes out, repeat steps 2-4.
4.2 Adjusting the Flame
After ignition, you can adjust the flame intensity:
- Turn the control knob further counter-clockwise towards the small flame symbol for a lower flame.
- Turn the control knob clockwise towards the large flame symbol for a higher flame.
- To turn off the burner, turn the control knob clockwise until it clicks into the 'off' position (dot symbol).

Figure 4.1: Control knobs with flame settings.
5. Maintenance and Cleaning
Regular cleaning and maintenance will ensure the longevity and optimal performance of your gas hob. Always ensure the appliance is cool before cleaning.
5.1 Cleaning the Tempered Glass Surface
- Wipe the glass surface with a soft cloth and a mild detergent solution after each use.
- For stubborn stains, use a specialized ceramic hob cleaner.
- Avoid abrasive sponges, scourers, or harsh chemical cleaners, as these can scratch or damage the glass.
- Dry the surface thoroughly to prevent water marks.
5.2 Cleaning Pan Supports and Burner Parts
- Cast Iron Pan Supports: The cast iron pan supports are dishwasher safe. Alternatively, they can be washed by hand with warm soapy water. Ensure they are completely dry before placing them back on the hob.
- Burner Caps and Rings: Remove the burner caps and rings. Wash them in warm soapy water. Ensure all parts are completely dry before reassembling them. Clogged burner holes can affect flame quality. Use a fine brush or needle to clear any blockages.
- Ensure burner caps and rings are correctly seated before using the hob again to ensure proper flame distribution.
6. Troubleshooting
Before contacting customer service, please refer to the following troubleshooting guide for common issues.
| Problem | Possible Cause | Solution |
|---|---|---|
| Burner does not ignite. | Gas supply is off. Power cut to the igniter. Burner parts are wet or clogged. | Check if the main gas valve is open. Check electrical supply. Ensure burner caps and rings are dry and clean. |
| Flame is uneven or yellow. | Burner parts are not seated correctly. Burner holes are clogged. Incorrect gas type. | Reassemble burner caps and rings correctly. Clean burner holes. Contact a qualified technician if gas type is suspected to be incorrect. |
| Gas smell detected. | Gas leak. | Immediately shut off the main gas supply. Open windows and doors. Do not operate any electrical switches. Contact a qualified gas technician immediately. |
| Flame extinguishes after releasing the control knob. | Flame failure safety device not activated. | Hold the control knob down for a longer period (3-5 seconds) after ignition to allow the safety device to heat up. |
7. Specifications
| Feature | Specification |
|---|---|
| Brand | Bosch |
| Model Number | PNP6B6K40 |
| Product Dimensions (D x W x H) | 20.47 x 23.23 x 1.77 inches (52 x 59 x 4.5 cm) |
| Item Weight | 33.4 pounds (15.15 kg) |
| Fuel Type | Natural Gas |
| Heater Surface Material | Tempered Glass |
| Control Type | Knob |
| Burner Type | Gas Burners (Coil type refers to electric, this is a gas hob) |
| Installation Type | Built-in Hob |
| Included Components | Gas plate, Cast Iron Pan Supports |
8. Warranty Information
This Bosch appliance is covered by a manufacturer's warranty. The specific terms and conditions of your warranty, including duration and coverage, are detailed in the warranty card provided with your product. Please retain your proof of purchase for any warranty claims.
For further details or to register your product, please visit the official Bosch website or contact Bosch customer service.
9. Customer Support
Should you require technical assistance, spare parts, or service for your Bosch PNP6B6K40 Gas Stove, please contact Bosch Customer Service. Have your model number (PNP6B6K40) and serial number ready when you call.
You can find contact information for your region, service center locations, and frequently asked questions on the official Bosch Home Appliances website: www.bosch-home.com


