1. Introduction
This CAMGEET USB C Dual Monitor KVM Switch allows two USB-C laptops to share two monitors and one set of wired or wireless keyboard and mouse. It features two USB-C MST inputs and two HDMI outputs, enabling seamless switching between work and personal laptops with a single button press. This device is designed to significantly enhance work efficiency and reduce desktop clutter.
2. Package Contents
Please verify that all items are present and in good condition upon opening the package:
- 1 x CAMGEET USB C Dual Monitor KVM Switch (Model Ca202TCC)
- 2 x USB-C Cables (1 meter each)
- 1 x Wired Remote Control (1.5 meters)
- 1 x HDMI Cable (1.5 meters)
- 1 x User Manual

3. Product Overview
The CAMGEET USB C Dual Monitor KVM Switch is designed with multiple ports for connecting your laptops, monitors, and USB peripherals. Familiarize yourself with the port layout for proper setup.

Front Panel:
- PC 1 / PC 2 PD IN: USB-C ports for Power Delivery input (up to 80W) to charge connected laptops.
- PC 1 / PC 2 USB-C IN: USB-C ports for connecting laptops, supporting video, data, and power.
- USB 3.1 Ports (3x USB-A, 1x USB-C): For connecting USB peripherals like keyboard, mouse, printer, U disk, etc.
- SELECT Button: Manual switch button to toggle between PC 1 and PC 2.
- LED Indicators: Show which PC is currently active (PC 1 or PC 2) and monitor resolution (4K or 1080P).
Rear Panel:
- HDMI OUT (4K, 1080P): HDMI outputs for connecting two monitors.
- Wired Control Port: For connecting the included wired remote control.
4. Setup Instructions
Follow these steps to connect your devices to the KVM switch:
- Connect Monitors: Use HDMI cables to connect your two monitors to the HDMI OUT ports on the KVM switch. Ensure you use high-quality HDMI 2.0 or higher cables, not exceeding 1.5 meters in length, for optimal 4K@60Hz performance.
- Connect Laptops: Connect each of your two USB-C laptops to the KVM switch using the provided USB-C cables. Connect one laptop to 'PC 1 USB-C IN' and the other to 'PC 2 USB-C IN'.
- Connect Power Delivery (Optional but Recommended): If your laptops require charging, connect your laptop's USB-C power adapters (not included) to the 'PC 1 PD IN' and 'PC 2 PD IN' ports on the KVM switch. The KVM switch supports up to 80W Power Delivery.
- Connect USB Peripherals: Connect your keyboard, mouse, printer, U disk, or other USB devices to the available USB 3.1 ports (USB-A or USB-C) on the front panel of the KVM switch.
- Connect Wired Remote Control: Plug the wired remote control into its dedicated port on the rear panel for convenient switching.

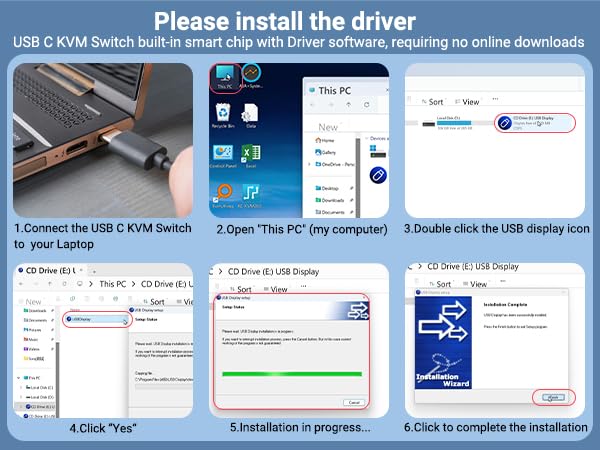
Driver Installation (for certain systems):
The KVM switch is generally driver-free for Windows, Mac OS, Linux, and Chrome OS. However, for some systems or specific functionalities, a built-in smart chip with driver software may require installation. Follow these steps if prompted or if display issues occur:
- Connect the USB C KVM Switch to your laptop.
- Open "This PC" (My Computer) on your laptop.
- Double-click the USB display icon that appears as a virtual drive.
- Click "Yes" to allow the installation.
- Wait for the installation to complete.
- Click to complete the installation wizard.
5. Operating Instructions
Switching Between Computers:
The KVM switch offers two convenient methods for switching between the connected computers:
- Panel Button: Press the 'SELECT' button on the front panel of the KVM switch to toggle between PC 1 and PC 2. The LED indicators will show which computer is currently active.
- Wired Remote Control: Use the included wired remote control to switch between computers. This allows for desktop control without reaching for the KVM switch itself.

Display Modes:
The KVM switch supports various display modes depending on your operating system:
- Windows Systems (MST Mode): Windows systems support Multi-Stream Transport (MST) mode. This allows the two connected monitors to display either identical content (mirror mode) or different content (extended mode), providing a versatile multi-display setup.
- macOS Systems (SST Mode): Mac M1 and M2 systems, and macOS in general, primarily support Single-Stream Transport (SST) mode for external displays. In SST mode, if you extend to two external monitors, they will display identical content.

USB 3.1 Data Transfer:
The KVM switch's USB 3.1 ports offer data transfer rates up to 10 Gbps, ensuring fast and efficient transfer of files between your peripherals and the active computer. These ports are backward compatible with USB 3.0 (5 Gbps) and USB 2.0 (480 Mbps) devices.

6. Specifications
| Feature | Specification |
|---|---|
| Model Number | Ca202TCC |
| Dimensions (L x W x H) | 11.5 x 6.9 x 1.4 cm (4.5 x 2.7 x 0.5 inches) |
| Weight | 350 grams |
| Material | Metal |
| Input Ports | 2 x USB-C (Full-featured, for PC 1 & PC 2) |
| Output Ports | 2 x HDMI (4K@60Hz, 1080P@120Hz) |
| USB Peripheral Ports | 3 x USB 3.1 Type-A, 1 x USB 3.1 Type-C |
| Data Transfer Rate | Up to 10 Gbps (USB 3.1) |
| Power Delivery | Up to 80W per USB-C input (requires external PD charger) |
| Video Resolution | Up to 4K@60Hz, backward compatible with 4K@30Hz, 2560*1440@60Hz, 1080P@120Hz |
| Compatibility | Windows, Mac OS, Linux, Chrome OS (driver-free) |
| Switching Methods | Panel button, Wired remote control |
7. Troubleshooting
If you encounter issues while using the KVM switch, please refer to the following common troubleshooting tips:
- No Display or Incorrect Resolution:
- Ensure all HDMI and USB-C cables are securely connected.
- Verify that your monitors, graphics cards, and cables support the desired resolution (e.g., 4K@60Hz).
- Use high-quality HDMI 2.0 or higher cables, with a length not exceeding 1.5 meters.
- Check your laptop's display settings to ensure the external monitors are detected and configured correctly (extended or mirror mode).
- USB Peripherals Not Working:
- Ensure the USB-C cables connecting your laptops to the KVM switch are full-featured and support data transfer.
- Try connecting the USB peripheral directly to your laptop to confirm it is functional.
- Reconnect the USB peripheral to a different USB port on the KVM switch.
- Laptop Not Charging:
- Ensure your laptop's power adapter is connected to the 'PD IN' port on the KVM switch.
- Verify that your power adapter provides sufficient wattage (up to 80W supported by the KVM switch).
- Switching Issues:
- Ensure the KVM switch has power (if applicable, though it's bus-powered via USB-C).
- Check the LED indicators to confirm which PC is active.
- Try both the panel button and the wired remote control to switch.
- Mac M1/M2 Dual Monitor Limitation:
- As noted in the display modes section, Mac M1/M2 systems support SST mode. This means that when extending to two external monitors, both monitors will display the same content. This is a limitation of the macOS system, not the KVM switch.
8. Maintenance
To ensure the longevity and optimal performance of your CAMGEET USB C Dual Monitor KVM Switch, follow these maintenance guidelines:
- Cleaning: Use a soft, dry cloth to clean the exterior of the device. Avoid using liquid cleaners or abrasive materials, as they may damage the finish or internal components.
- Storage: Store the KVM switch in a cool, dry place away from direct sunlight, extreme temperatures, and high humidity when not in use for extended periods.
- Handling: Handle the device with care. Avoid dropping it or subjecting it to strong impacts.
- Cable Management: Ensure cables are not excessively bent or tangled to prevent damage to the connectors and wires.
9. Warranty and Support
CAMGEET provides a 12-month warranty for this USB C Dual Monitor KVM Switch, covering manufacturing defects and malfunctions under normal use. Additionally, lifetime technical support is available to assist you with any questions or issues you may encounter.
For technical assistance, warranty claims, or any other inquiries, please do not hesitate to contact CAMGEET customer support. Our team is committed to providing prompt and helpful responses.


