1. Introduction
The ROCAM CR1027 Vibrating Alarm Clock is a portable and rechargeable device designed to provide a customizable wake-up experience. It features dual alarms, adjustable vibration and sound levels, and a long-lasting battery, making it suitable for heavy sleepers, individuals with hearing impairments, or those who prefer a discreet alarm. This manual provides detailed instructions for setup, operation, and maintenance of your alarm clock.

Image 1.1: The ROCAM CR1027 Vibrating Alarm Clock highlighting its cordless, dual alarm, 12/24H, vibrating, volume setting, and rechargeable features.
2. Package Contents
Please check the package for the following items:
- 1 x ROCAM CR1027 Vibrating Alarm Clock
- 1 x USB Charging Cable
- 1 x User Manual
- 1 x Wrist Strap

Image 2.1: The complete package contents of the ROCAM CR1027 Vibrating Alarm Clock.
3. Product Overview
3.1. Front Display
The front of the alarm clock features a clear digital display showing the time, AM/PM indicator, day of the week, DST status, alarm icons, and battery level. A speaker grille is located at the bottom of the front face.

Image 3.1: Front view of the ROCAM CR1027 Vibrating Alarm Clock.
3.2. Top Buttons
The top of the device houses the main control buttons:
- (1) Alarm 1 Button: Press to view/set Alarm 1.
- (2) Alarm 2 Button: Press to view/set Alarm 2.
- TIME/SNOOZE Button: Press to view/set current time, or to activate snooze during an alarm.
- (-) Minus Button: Decrease values during setting.
- (+) Plus Button: Increase values during setting.
3.3. Back Switches
The back of the device features several switches for advanced settings:
- ON/OFF Switch: To power the device on or off.
- LOCK/UNLOCK Switch: To prevent accidental button presses.
- Alarm 1 Day Setting Switch (MON-SUN, MON-FRI, SAT-SUN): Select the days for Alarm 1 to be active.
- Alarm 2 Day Setting Switch (MON-SUN, MON-FRI, SAT-SUN): Select the days for Alarm 2 to be active.
- Vibration Intensity Switch (H, M, L): Adjust the strength of the vibration (High, Medium, Low).
3.4. Side Port
The side of the device includes the USB-C charging port.
4. Setup
4.1. Charging the Device
Before first use, fully charge the alarm clock. Connect the provided USB charging cable to the USB-C port on the side of the device and plug the other end into a compatible USB power adapter (not included). The battery indicator on the display will show charging status. A full charge provides up to 160 days of standby time.

Image 4.1: The alarm clock connected to its USB-C charging cable.
4.2. Powering On/Off
Slide the ON/OFF switch on the back of the device to the 'ON' position to power it on. Slide it to 'OFF' to power down.
5. Operating Instructions
5.1. Setting the Current Time
- Press and hold the TIME/SNOOZE button until the hour digits flash.
- Use the (+) or (-) buttons to adjust the hour.
- Press the TIME/SNOOZE button again to confirm the hour and move to minute adjustment.
- Use the (+) or (-) buttons to adjust the minutes.
- Press the TIME/SNOOZE button again to confirm the minutes and move to day adjustment.
- Use the (+) or (-) buttons to adjust the day of the week.
- Press the TIME/SNOOZE button one last time to save all settings and exit.
5.2. Setting Alarms (Alarm 1 & Alarm 2)
The device supports two independent alarms.
- Press and hold the (1) Alarm 1 button (or (2) Alarm 2 button) until the hour digits flash.
- Use the (+) or (-) buttons to adjust the alarm hour.
- Press the corresponding alarm button again to confirm the hour and move to minute adjustment.
- Use the (+) or (-) buttons to adjust the alarm minutes.
- Press the corresponding alarm button again to confirm the minutes and move to alarm mode selection (sound/vibration).
- Use the (+) or (-) buttons to select the desired alarm mode: Buzzer + Shaker, Single Buzzer, or Single Shaker.
- Press the corresponding alarm button one last time to save settings and exit.
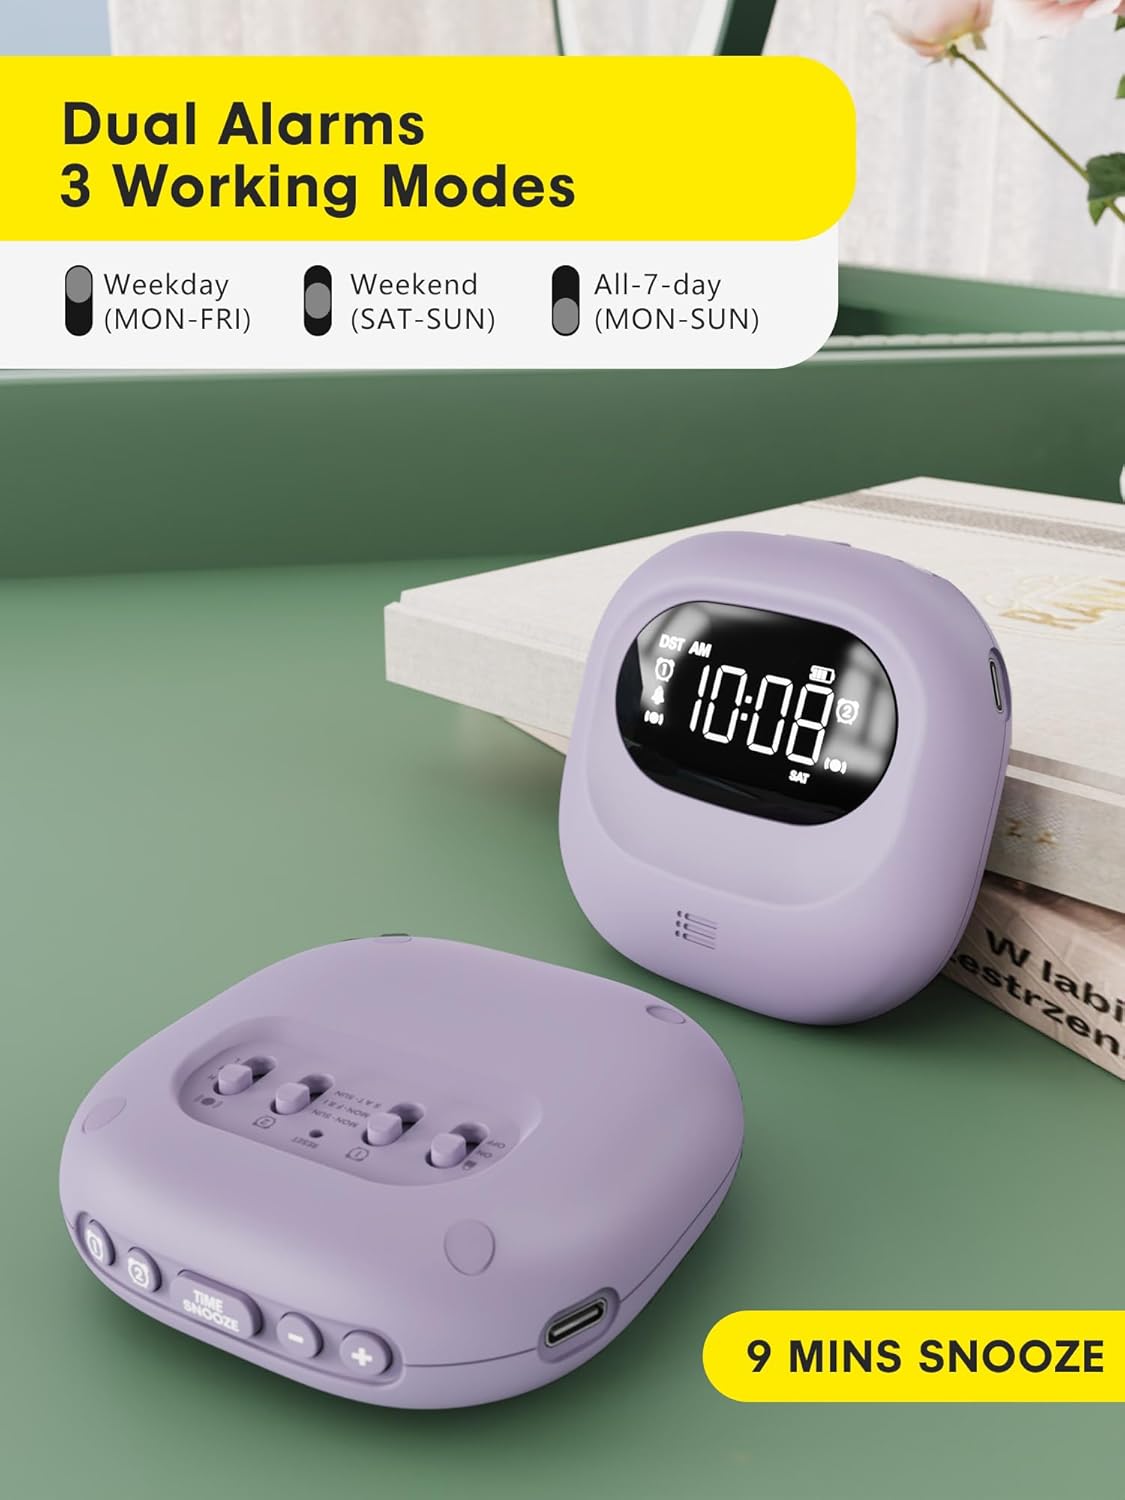
Image 5.1: Dual alarm settings displayed on the ROCAM CR1027.
5.3. Adjusting Alarm Day Settings
On the back of the device, locate the Alarm 1 and Alarm 2 day setting switches. Slide the switch to your preferred setting:
- MON-SUN: Alarm will activate every day.
- MON-FRI: Alarm will activate on weekdays only.
- SAT-SUN: Alarm will activate on weekends only.
5.4. Adjusting Vibration Strength
Use the Vibration Intensity Switch (H, M, L) on the back of the device to select your desired vibration strength: High, Medium, or Low.

Image 5.2: Illustration of the three wake-up modes available on the alarm clock.
5.5. Adjusting Volume Levels
The device offers 5 volume levels for the audible alarm. Adjust this during the alarm setting process using the (+) or (-) buttons when the volume icon is flashing.
5.6. Snooze Function
When an alarm sounds, press the TIME/SNOOZE button to activate the snooze function. The alarm will pause for 9 minutes and then sound again. This can be repeated up to 9 times.

Image 5.3: The snooze function of the alarm clock.
5.7. Child Lock Function
To prevent accidental changes to settings, slide the LOCK/UNLOCK switch on the back of the device to the 'LOCK' position. This will disable all buttons until unlocked.

Image 5.4: The child lock feature of the alarm clock.
5.8. Backlight Function
The digital screen lights up when in use and automatically turns off after 30 seconds of inactivity to conserve energy. Press any button to reactivate the backlight.
5.9. Time Format (12H/24H/DST)
The time display can be customized. During time setting, you can cycle through 12-hour, 24-hour, and Daylight Saving Time (DST) formats using the appropriate buttons.

Image 5.5: Customizable time formats on the alarm clock display.
6. Maintenance
- Keep the device clean by wiping it with a soft, dry cloth.
- Avoid using abrasive cleaners or solvents.
- Ensure the side sound hole is not covered to maintain normal volume levels.
- Store in a cool, dry place when not in use for extended periods.

Image 6.1: Important note regarding the side sound hole for optimal performance.
7. Troubleshooting
- Alarm not activating: Ensure the alarm is set correctly (time, AM/PM, days of the week) and the device is powered on. Check battery level.
- Vibration too weak/strong: Adjust the Vibration Intensity Switch (H, M, L) on the back.
- Display not visible: Press any button to activate the backlight. If the display remains off, check the battery level and charge the device.
- Buttons unresponsive: Check if the Child Lock function is activated. Slide the LOCK/UNLOCK switch to 'UNLOCK'.
8. Specifications
| Feature | Detail |
|---|---|
| Brand | ROCAM |
| Model Number | CR1027 |
| Color | Purple |
| Display Type | Digital |
| Power Source | Battery Powered |
| Battery Capacity | 3000mAh (1 Nonstandard Battery included) |
| Standby Time | Up to 160 Days |
| Product Dimensions | 3.34"W x 1.06"H |
| Item Weight | 6.7 ounces |
| Material | Plastic |
| Special Features | 160 Days-Standby, Adjustable Volume, Dual Alarm, Cordless, Rechargeable, Child Lock, Backlight |
9. Warranty & Support
This ROCAM product comes with an 18-month free replacement warranty. For any questions, technical assistance, or warranty claims, please refer to the contact information provided in your package or visit the official ROCAM support website.


