
1. Introduction
This manual provides essential instructions for the proper installation, operation, and maintenance of the Teltonika RUT241 Industrial 4G LTE Router. The RUT241 is a compact and rugged cellular router designed for industrial, IoT, and remote applications, offering reliable 4G LTE connectivity, dual Ethernet ports, and Wi-Fi capabilities.
Key features include:
- Reliable 4G LTE Cat 4 connectivity for fast and stable internet access.
- One LAN and one WAN Ethernet port, plus a 2.4GHz Wi-Fi hotspot.
- Compatibility with Teltonika's Remote Management System (RMS) for remote monitoring and configuration.
- Advanced security features including firewall, OpenVPN, IPsec, PPTP, and WireGuard VPN support.
- Industrial-grade durability for harsh environments.
- Wide power input range (9-30V) with digital I/O.

2. Setup
2.1. What's in the Box
Before proceeding with the installation, verify that all components are present:
- RUT241 Router
- Power Supply
- Ethernet Cable
- 2 x Mobile Antennas
- 1 x Wi-Fi Antenna
- SIM Adapter Kit

2.2. Hardware Overview
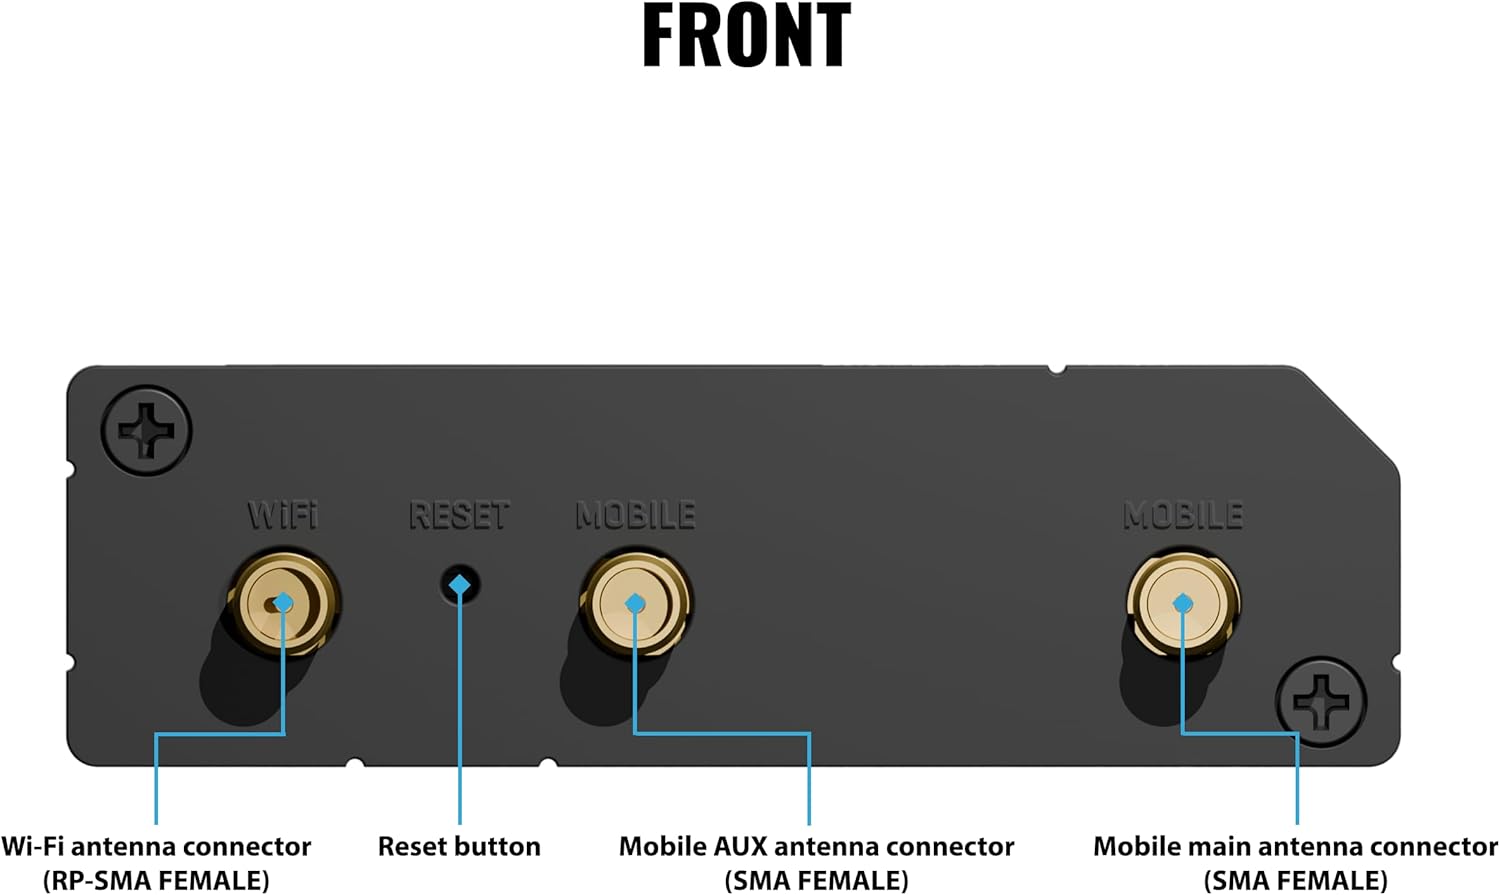
Familiarize yourself with the router's ports and indicators.

2.3. SIM Card Installation
- Ensure the router is powered off.
- Locate the SIM card slot on the back panel (refer to Figure 4).
- Insert your activated Mini-SIM card into the slot until it clicks into place. Use the provided SIM adapter if necessary.
2.4. Antenna Connection
- Attach the two mobile antennas to the 'MOBILE' connectors on the front panel (refer to Figure 3).
- Attach the Wi-Fi antenna to the 'WIFI' connector on the front panel.
- Ensure all antennas are securely tightened.
2.5. Power Connection
- Connect the power adapter to the 'POWER' socket on the back panel (refer to Figure 4).
- Plug the power adapter into a suitable power outlet. The Power LED should illuminate.
2.6. Initial Network Connection
You can connect to the router via Ethernet or Wi-Fi.
- Ethernet: Connect one end of the Ethernet cable to the 'LAN' port on the router and the other end to your computer's Ethernet port.
- Wi-Fi: The router broadcasts a default Wi-Fi network. The SSID and password are typically found on a label on the device or packaging.
3. Operating Instructions
3.1. Accessing the Web Interface
- Open a web browser on your connected computer.
- Enter the default IP address 192.168.1.1 into the address bar and press Enter.
- Log in using the default username and password (usually 'admin' for both, check device label for specifics). You will be prompted to change the password upon first login for security.
3.2. Basic Configuration
Within the web interface, you can configure various settings:
- WAN Settings: Configure your cellular connection (APN, authentication) and Ethernet WAN settings.
- LAN Settings: Adjust the router's internal IP address and DHCP server settings.
- Wi-Fi Settings: Change the Wi-Fi network name (SSID), password, and security protocols.
3.3. Remote Management System (RMS)
The RUT241 supports Teltonika's Remote Management System (RMS), allowing for centralized monitoring and management of your devices.

To use RMS:
- Register your device on the Teltonika RMS portal.
- Enable RMS connectivity in the router's web interface.
- Manage your router from any web browser via the RMS platform.
3.4. VPN Configuration
The router supports various VPN protocols for secure communication, including OpenVPN, IPsec, PPTP, and WireGuard. Detailed configuration guides for each protocol are available in the router's web interface documentation.
4. Maintenance
4.1. Firmware Updates
Regularly update the router's firmware to ensure optimal performance, security, and access to new features. Firmware updates can be performed via the router's web interface or remotely through the Teltonika RMS platform.
4.2. Cleaning
Clean the router's exterior with a soft, dry cloth. Do not use liquid cleaners or aerosols. Ensure ventilation openings are free from dust and obstructions.
4.3. Environmental Considerations
The RUT241 is designed for industrial environments. It can withstand temperatures up to 167°F (75°C) and down to -40°F (-40°C), and humidity levels between 10-90% (non-condensing). Ensure the router is installed in an environment within these specifications to maintain optimal performance and longevity.

5. Troubleshooting
5.1. Common Issues and Solutions
- No Internet Connection:
- Check SIM card insertion and activation status.
- Verify antenna connections.
- Confirm APN settings in the web interface.
- Check mobile network type and signal strength LEDs (refer to Figure 4).
- Wi-Fi Not Working:
- Ensure the Wi-Fi antenna is connected.
- Check Wi-Fi settings (SSID broadcast, password) in the web interface.
- Restart the router.
- Cannot Access Web Interface:
- Ensure your computer is connected to the router via Ethernet or Wi-Fi.
- Verify your computer's IP settings (should be set to obtain IP automatically).
- Try a different web browser.
5.2. Reset Button
The reset button (refer to Figure 3) can be used for two functions:
- Soft Reset: Press and hold for approximately 5 seconds to restart the router.
- Factory Reset: Press and hold for approximately 30 seconds until all LEDs flash, then release. This will restore the router to its factory default settings. Warning: A factory reset will erase all custom configurations.
6. Specifications
| Feature | Specification |
|---|---|
| Model Name | RUT241 |
| Product Dimensions | 3.26 x 2.91 x 0.98 inches |
| Item Weight | 4.3 ounces |
| Connectivity Technology | Ethernet, LTE, Wi-Fi |
| Wireless Communication Standard | 802.11n |
| Frequency Band Class | Dual-Band (2.4GHz Wi-Fi) |
| Special Features | 4G LTE, Wi-Fi, Auto Failover, RMS, VPN |
| Power Input Range | 9-30V DC |
| Antenna Type | Fixed (External) |
| Operating Temperature | -40°F to 167°F (-40°C to 75°C) |
| Operating Humidity | 10% to 90% non-condensing |
7. Warranty and Support
7.1. Warranty Information
Warranty terms and conditions for the Teltonika RUT241 router are provided by the manufacturer, Teltonika, or your authorized reseller. Please refer to the warranty card included with your product or visit the official Teltonika website for detailed information.
7.2. Technical Support
For technical assistance, firmware downloads, or additional documentation, please visit the official Teltonika Networks website or contact your product reseller. Online resources often include FAQs, knowledge bases, and community forums.


