1. Introduction
This manual provides essential information for the safe and efficient assembly, operation, and maintenance of your EUREKA ERGONOMIC Royal II Executive Office Chair. Please read these instructions thoroughly before assembly and retain this manual for future reference.

Image 1.1: The EUREKA ERGONOMIC Royal II Executive Office Chair, showcasing its design and presence in an office environment.
2. Safety Information
- Ensure all components are present and undamaged before assembly. Do not use if any parts are missing or defective.
- Follow assembly instructions carefully. Incorrect assembly can lead to instability and potential injury.
- Do not stand on the chair. Use it only for its intended purpose of seating.
- Do not exceed the maximum weight capacity of 300 pounds.
- Keep children and pets away from the chair during assembly.
- Periodically check all bolts and screws to ensure they remain tight. Retighten as necessary.
3. Package Contents
Verify that all the following components are included in your package:
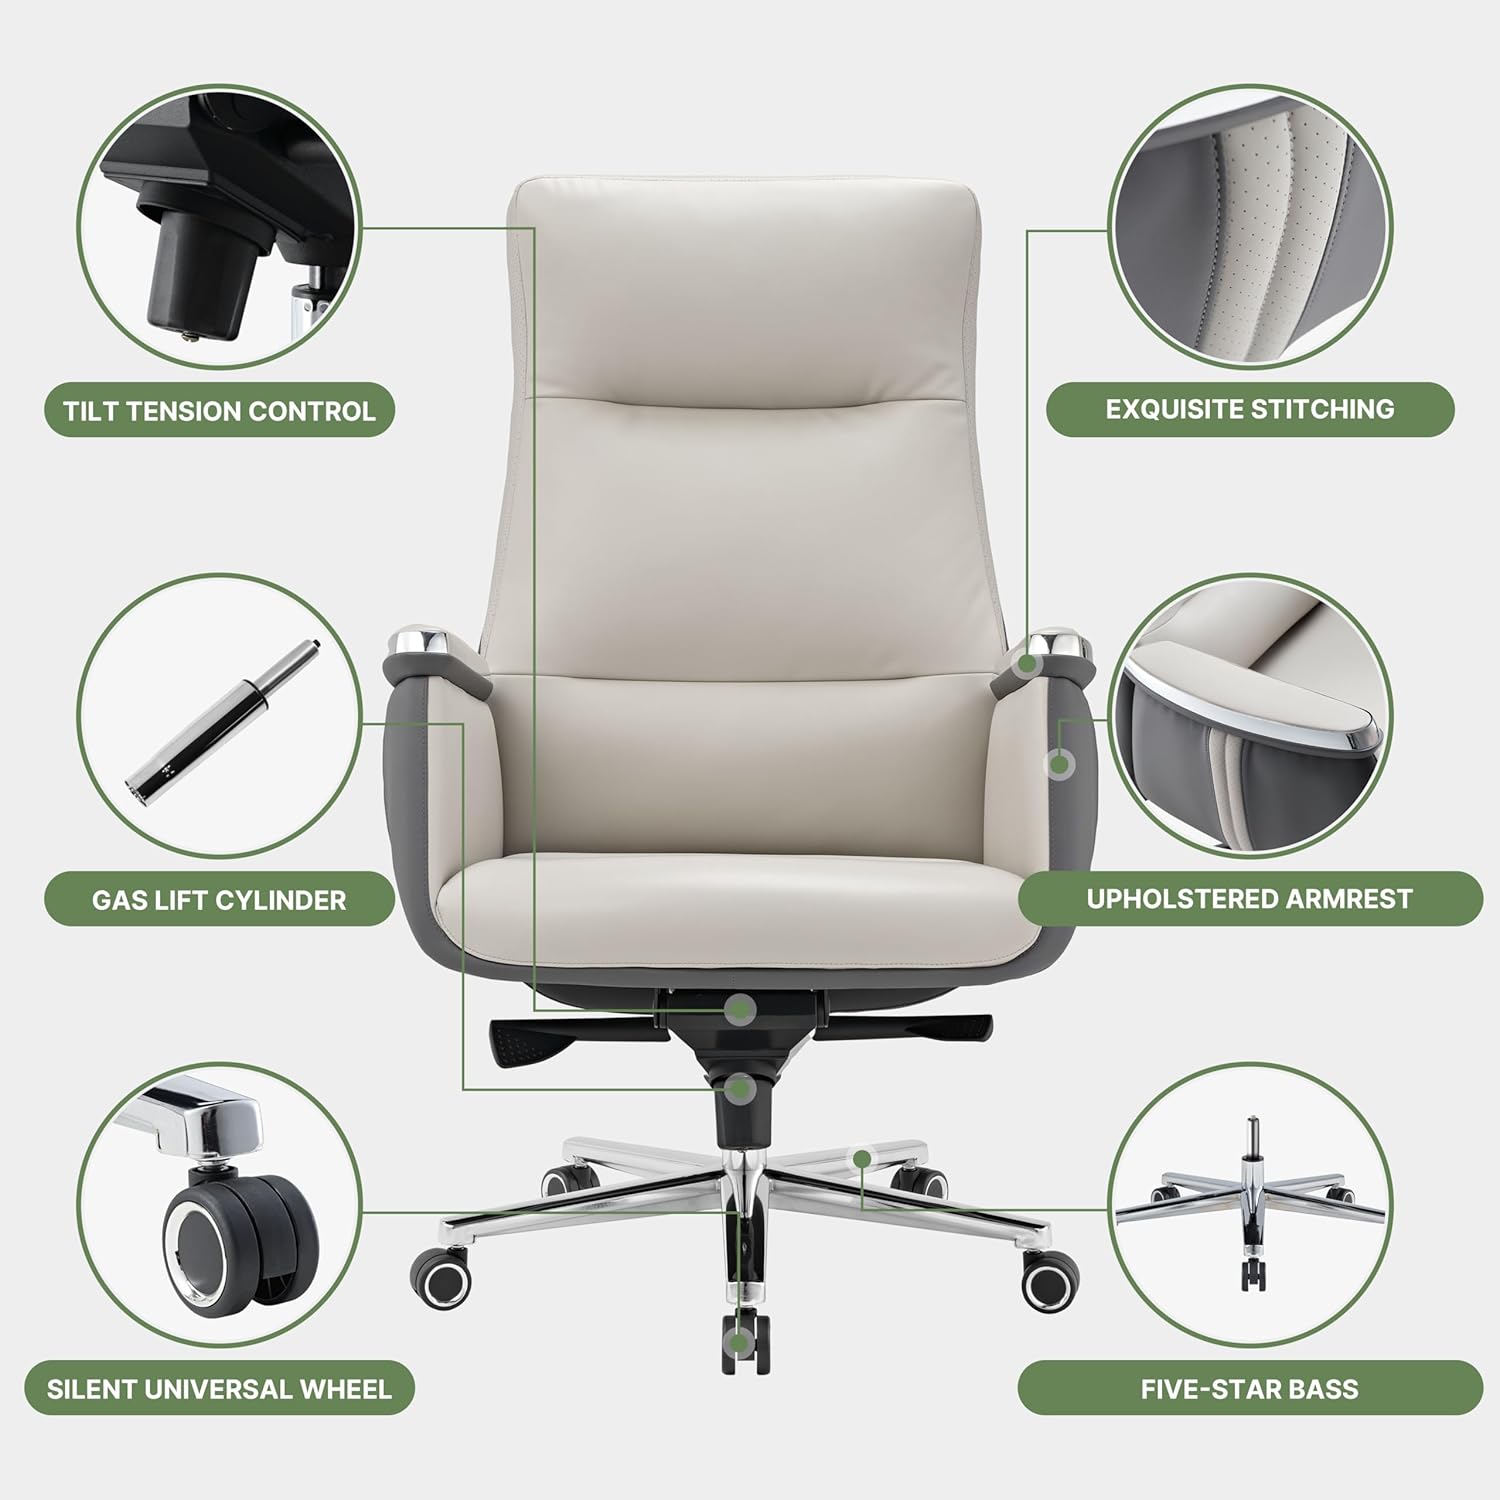
Image 3.1: Exploded diagram illustrating the various components of the Royal II Executive Office Chair.
- Backrest Assembly
- Seat Cushion Assembly with Armrests
- Five-Star Base
- Gas Lift Cylinder
- Casters (5 pieces)
- Mechanism Plate
- Hardware Pack (screws, washers, Allen wrench)
4. Assembly Instructions
Assembly typically requires one person and takes approximately 15-30 minutes. Tools are included.
- Attach Casters to Base: Insert each of the five casters into the holes at the end of each leg of the five-star base. Push firmly until they click into place.
- Install Gas Lift: Place the gas lift cylinder into the center hole of the assembled five-star base.
- Attach Mechanism Plate to Seat: Align the mechanism plate with the pre-drilled holes on the underside of the seat cushion. Secure it using the provided screws and Allen wrench. Ensure the front of the mechanism plate faces the front of the seat.
- Connect Backrest to Seat: Align the backrest assembly with the mounting points on the seat cushion. Secure with the designated screws.
- Place Seat Assembly onto Gas Lift: Carefully place the assembled seat and backrest onto the gas lift cylinder, ensuring the tapered end of the gas lift fits securely into the mechanism plate.

Image 4.1: Detailed view of the chair's metal five-star base, SGS certified gas lift, and 360-degree rotating silent wheels.
5. Operation and Adjustments
Your Royal II Executive Office Chair offers several adjustment features for personalized comfort.
5.1. Seat Height Adjustment
- To raise the seat: While seated, lift the right lever (typically located under the seat on the right side) and slightly lift your weight off the seat. The seat will rise. Release the lever at the desired height.
- To lower the seat: While seated, lift the right lever. The seat will lower under your weight. Release the lever at the desired height.
5.2. Tilt and Recline Function
- Recline Angle (90-135°): Pull the left lever (typically under the seat on the left side) outwards to unlock the recline function. Lean back to the desired angle (between 90 and 135 degrees). Push the lever inwards to lock the backrest in position.
- Rocking Function: When the recline is unlocked, the chair can rock back and forth. Adjust the tilt tension knob (located under the seat, usually at the front) to control the resistance of the rocking motion. Turn clockwise to increase tension, counter-clockwise to decrease.

Image 5.1: Illustration of the chair's adjustable height and rocking/recline capabilities, allowing for various working and resting positions.
5.3. Lumbar Support
The chair features an S-curve lumbar support design integrated into the backrest, providing ergonomic support to the lower back. This is a fixed ergonomic design and does not require manual adjustment.

Image 5.2: Visual representation of the chair's head and neck support and the ergonomic lumbar zone designed to relieve back pressure.
5.4. Armrests
The chair is equipped with fixed, upholstered armrests designed for comfort and support. These armrests are not adjustable in height or position.

Image 5.3: Detail of the integrated and padded armrests, providing soft support.
6. Care and Maintenance
Proper care will extend the life and appearance of your office chair.
- Cleaning: The silicone leather upholstery is stain-resistant and easy to clean. For general cleaning, wipe the surface with a soft, damp cloth. For spot cleaning, use a mild soap solution and a soft cloth, then wipe dry. Avoid harsh chemicals or abrasive cleaners.
- Inspection: Periodically inspect all moving parts, bolts, and connections. Tighten any loose fasteners to maintain stability and safety.
- Avoid Direct Sunlight: Prolonged exposure to direct sunlight can cause the upholstery to fade or crack.
- Weight Distribution: Distribute your weight evenly on the chair to prevent undue stress on components.
7. Troubleshooting
If you encounter issues with your chair, refer to the following common problems and solutions:
| Problem | Possible Cause | Solution |
|---|---|---|
| Chair wobbles or feels unstable | Loose bolts or connections. | Inspect and tighten all assembly bolts, especially those connecting the seat to the mechanism and the backrest. |
| Seat does not adjust height | Gas lift cylinder malfunction or lever not engaged. | Ensure the height adjustment lever is fully engaged. If the issue persists, the gas lift cylinder may need replacement. Contact customer service. |
| Backrest does not recline or lock | Recline lever not engaged or mechanism obstruction. | Ensure the recline lever is pulled out to unlock or pushed in to lock. Check for any obstructions under the seat mechanism. |
| Squeaking noises | Loose connections or friction between parts. | Tighten all bolts. Apply a small amount of silicone lubricant to moving parts if necessary, avoiding upholstery. |
8. Specifications

Image 8.1: Detailed product dimensions, including backrest height, seat width, and overall chair dimensions.
- Brand: EUREKA ERGONOMIC
- Model Name: Royal II
- Item Model Number: ERK-OC09-OW-1
- Color: Beige Gray
- Product Dimensions: 25.59"D x 29.13"W x 48.03"H
- Seat Depth: 26 inches
- Back Style: High Back
- Maximum Weight Recommendation: 300 Pounds
- Fill Material: Sponge
- Upholstery Material: Silicone Leather
- Special Features: Adjustable Backrest (tilt), Adjustable Height, Adjustable Lumbar (fixed ergonomic), Arm Rest (fixed), Ergonomic Design
- Furniture Base Movement: Swivel, 360-degree rotating silent wheels
- Certifications: BIFMA certified (for stability and durability), SGS standard tested gas rods
- Item Weight: 76.7 pounds
9. Warranty and Support
9.1. Limited Service Warranty
The EUREKA ERGONOMIC Royal II Executive Office Chair comes with a 2-Year Limited Service Warranty. This warranty covers manufacturing defects and significant malfunctions under normal use. Please retain your proof of purchase for warranty claims.
9.2. Customer Support
For any questions, assistance with assembly, troubleshooting, or warranty claims, please contact our customer service team. We provide helpful, prompt, and friendly 24-hour US-based customer service.
- Contact Information: Refer to the contact details provided on your purchase receipt or the official EUREKA ERGONOMIC website.