1. Introduction
The Kadision 4FT Linkable LED Linear Light is a high-performance, versatile lighting fixture designed for various indoor applications such as offices, retail spaces, and commercial environments. Featuring adjustable wattage, color temperature, and optional up/down lighting, this fixture provides customizable illumination to suit diverse needs. This manual provides essential information for the safe and efficient installation, operation, and maintenance of your new LED linear light.

Image: Overview of the Kadision 4FT Linkable LED Linear Light fixtures installed.
2. Safety Information
WARNING: Risk of Electric Shock. Installation should be performed by a qualified electrician.
- Always disconnect power at the circuit breaker before installing or performing any maintenance on the fixture.
- Ensure the fixture is properly grounded to avoid potential electric shock.
- Do not install in wet or damp locations. This product is designed for indoor use only.
- Do not modify the fixture or use it for purposes other than its intended use.
- Handle the fixture with care to prevent damage to components.
- Wear appropriate personal protective equipment (PPE) during installation.
3. Package Contents
Verify that all components are present before beginning installation. The package includes:
- Kadision 4FT LED Linear Light Fixture(s)
- Mounting Kit, which typically includes:
- Plastic Wall Anchors (x2)
- Self-tapping Screws (x2)
- Truss Head Machine Screws (x6)
- Wire Slings (x2 per fixture)
- Length Adjuster Bases (x2 per fixture)
- Hanging Splices (x2 per fixture, for linking)
Note: Input power cable is not provided and must be supplied by the installer.
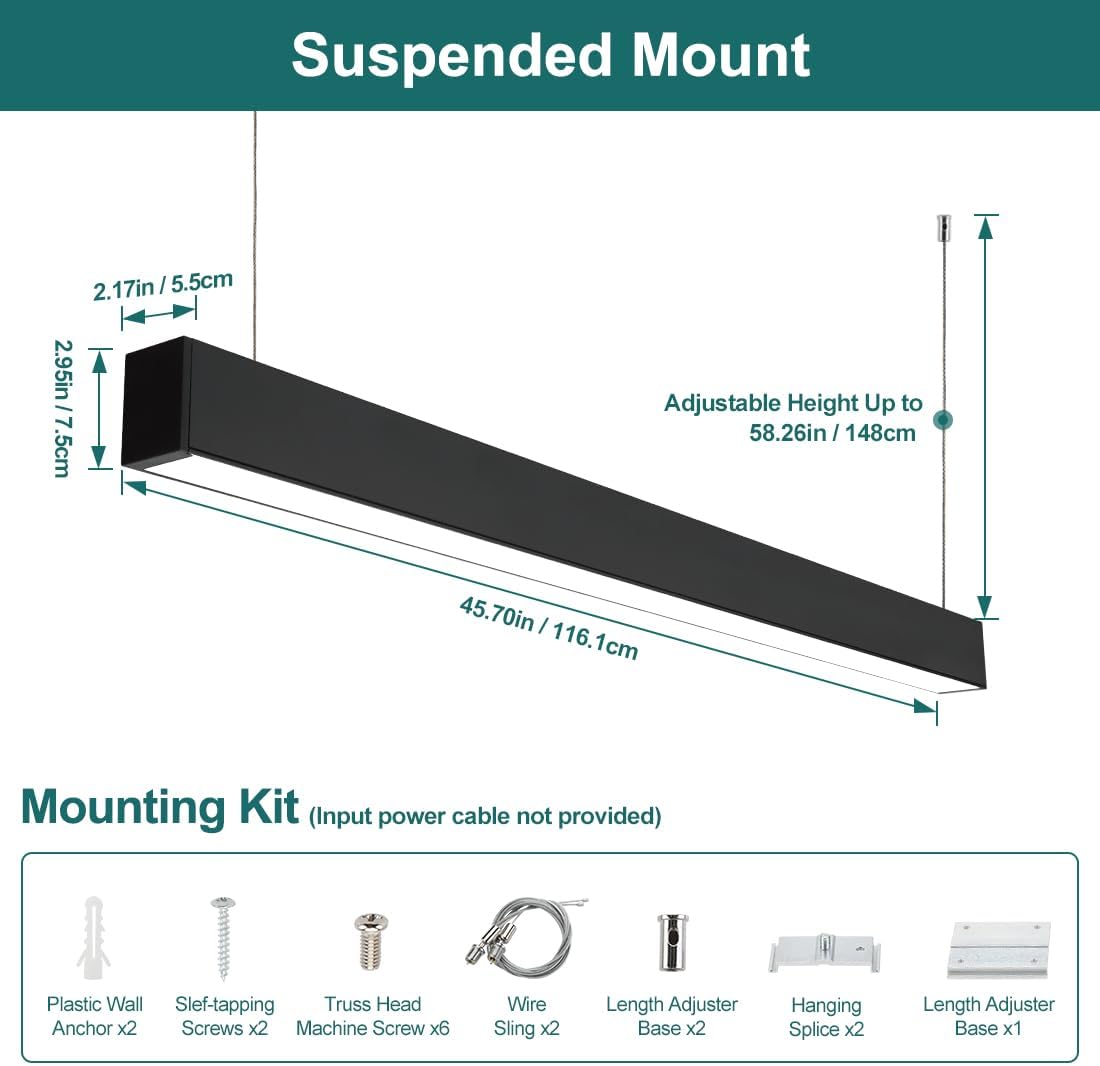
Image: Dimensions and included mounting kit components.
4. Product Features
- Contemporary Design: Streamlined aluminum fixture for modern aesthetics.
- Adjustable Up/Down Lighting: Choose between 100% downward illumination or a 70% down + 30% up light combination to brighten ceilings and reduce the "cave effect".
- 5 Selectable Wattage Levels: Easily adjust brightness with options for 50W, 45W, 40W, 35W, and 30W.
- 0-10V Dimmable: Compatible with 0-10V dimmers (dimmer not included) for precise light control.
- 3 Selectable Color Temperatures (CCT): Switch between 3000K (Warm White), 4000K (Natural White), and 5000K (Daylight) to create the desired ambiance.
- Seamless Connection: Unique quick-connect ends allow for continuous, wire-free runs for 4FT lights (8FT lights require separate wiring for each unit).
- Durable Construction: Made with a strong aluminum case and a frosted PC diffuser for even, glare-free light distribution.
- ETL-Listed: Ensures compliance with North American safety standards.

Image: Switches for adjusting wattage, color temperature, and uplighting.
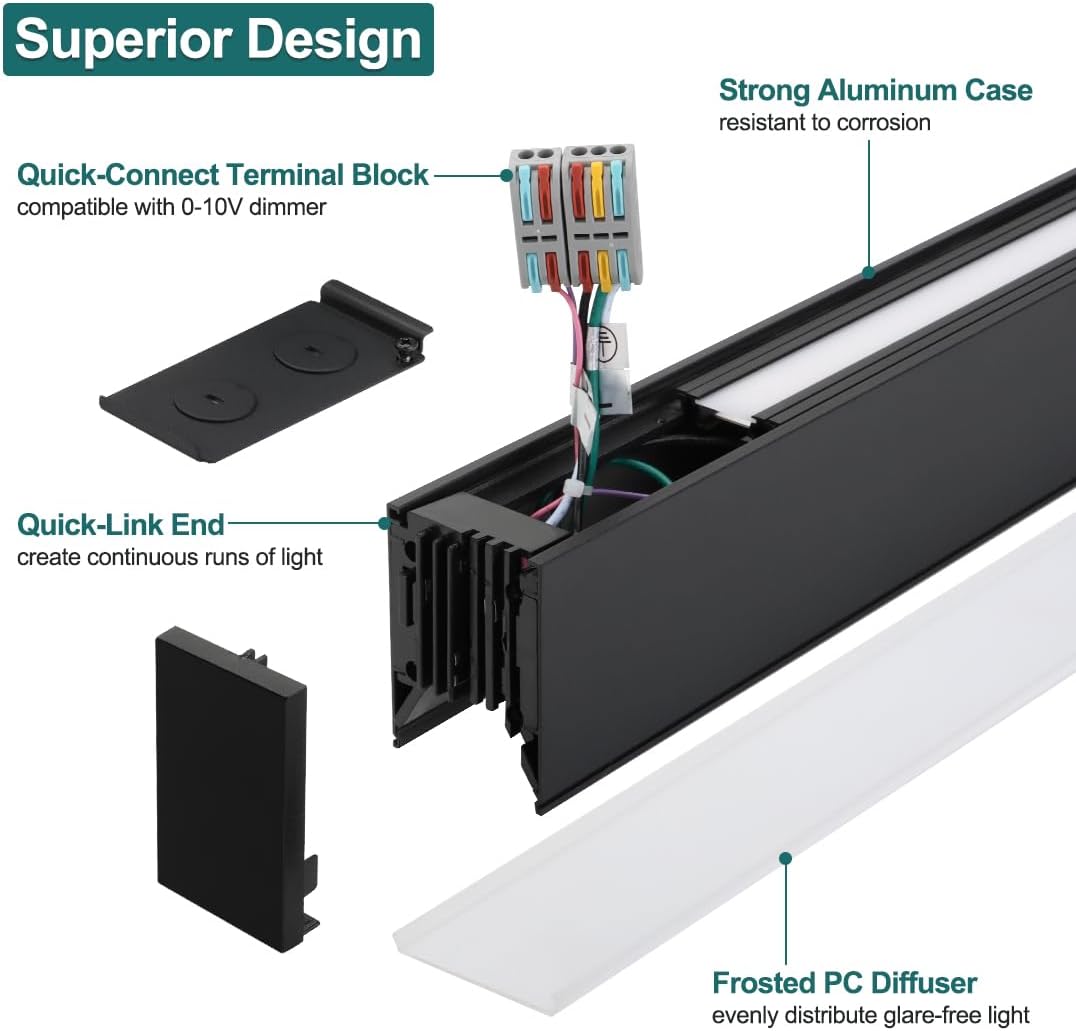
Image: Internal components and superior design features.
5. Setup and Installation
Follow these steps carefully for proper installation. It is recommended to have two people for installation due to the length of the fixture.
5.1. Prepare for Installation
- Turn off power at the circuit breaker before starting.
- Unpack the fixture and components. Inspect for any damage.
- Determine the desired mounting location and height. The adjustable wire slings allow for heights up to 58.26 inches (148 cm).
5.2. Suspended Mount Installation
- Install Ceiling Anchors: Mark the positions for the ceiling anchors according to the fixture's length. Drill pilot holes and insert the plastic wall anchors. Secure the length adjuster bases to the ceiling using the self-tapping screws.
- Attach Wire Slings: Connect the wire slings to the length adjuster bases on the ceiling.
- Connect to Fixture: Carefully attach the other end of the wire slings to the designated attachment points on the top of the linear light fixture. Ensure they are securely fastened.
- Adjust Height: Use the length adjusters to set the desired hanging height of the fixture. Press the button on the adjuster to release or tighten the wire.

Image: Suspended mount installation steps and height adjustment.
5.3. Electrical Connection
- Locate the quick-connect terminal block on the fixture.
- Connect the main power supply wires (Live, Neutral, Ground) to the corresponding terminals on the block. Ensure correct polarity (Black to Black, White to White, Green/Bare to Green/Ground).
- If using 0-10V dimming, connect the dimmer wires to the appropriate dimming terminals on the fixture.
- Ensure all connections are secure and insulated.
5.4. Seamless Connection (for multiple 4FT fixtures)
For continuous runs of 4FT fixtures, use the quick-link ends:
- Open End Cap: Remove the end cap from one end of the first fixture and the corresponding end of the next fixture.
- Quick Connect: Align and push the quick-link ends of the two fixtures together until they click into place, creating a seamless physical and electrical connection.
- Fasten Joint: Secure the joint using the provided screws or fasteners to ensure stability.
Note: Only 4FT suspended linear lights support single power feed connection for linked units (up to 10 lights). For 8FT lights, you will need to run separate power cables to each fixture.

Image: Steps for seamless connection of multiple fixtures.

Image: Wiring differences for 4FT and 8FT linked installations.
6. Operating Instructions
Once installed and powered, you can customize the light output using the integrated switches on the fixture.
6.1. Adjusting Wattage (Brightness)
Locate the wattage selection switch on the fixture. Slide the switch to select one of the five available wattage options:
- 50W (Highest Brightness)
- 45W
- 40W
- 35W
- 30W (Lowest Brightness)

Image: Visual representation of 3 color temperatures and 5 wattage options.

Image: Details on wattage options and other lighting characteristics.
6.2. Selecting Color Temperature (CCT)
Use the CCT selection switch to choose your preferred light color:
- 3000K (Warm White): For a cozy and inviting atmosphere.
- 4000K (Natural White): For efficient and natural lighting.
- 5000K (Daylight): For vibrant and attentive environments.

Image: Examples of different color temperatures in various settings.
6.3. Controlling Up/Down Lighting
The fixture offers flexibility in light distribution:
- 100% Downward Lighting: Provides focused illumination.
- 70% Down + 30% Up Lighting: Brightens the ceiling and upper walls, eliminating the "cave effect" and providing more balanced ambient light.
Use the dedicated switch on the fixture to toggle between these modes.

Image: Comparison of direct/indirect and direct lighting modes.
6.4. 0-10V Dimming
If connected to a compatible 0-10V dimmer (purchased separately), you can continuously adjust the light output from 100% down to 10% (or lower, depending on dimmer specifications).
7. Maintenance
The Kadision LED Linear Light requires minimal maintenance.
- Cleaning: Ensure the power is off before cleaning. Wipe the fixture with a soft, dry, or slightly damp cloth. Do not use abrasive cleaners or solvents, as they may damage the finish or electrical components.
- Inspection: Periodically check the mounting hardware and electrical connections to ensure they remain secure.
- LED Longevity: LEDs have a long lifespan and do not require bulb replacement.
8. Troubleshooting
If you encounter issues with your LED linear light, refer to the following common problems and solutions:
| Problem | Possible Cause | Solution |
|---|---|---|
| Light does not turn on. | No power supply. Loose wiring connection. Faulty switch/dimmer. | Check circuit breaker and wall switch. Verify all electrical connections are secure (ensure power is off first). Test the switch or dimmer. |
| Light flickers or dims unexpectedly. | Incompatible dimmer. Loose wiring. Voltage fluctuations. | Ensure 0-10V dimmer is compatible. Check all wiring connections. Consult an electrician if voltage issues are suspected. |
| Incorrect color temperature or brightness. | Switches set incorrectly. | Adjust the CCT and wattage selection switches on the fixture to desired settings. |
| Uplight not working. | Uplight switch is off. | Toggle the uplight ON/OFF switch on the fixture. |
If the problem persists after attempting these solutions, please contact Kadision customer support.
9. Specifications
| Attribute | Detail |
|---|---|
| Brand | Kadision |
| Model | 4FT Linkable LED Linear Light |
| Dimensions (L x W x H) | 45.67" x 2.95" x 2.17" (116.0 cm x 7.5 cm x 5.5 cm) |
| Material | Aluminum |
| Wattage Options | 30W / 35W / 40W / 45W / 50W (Selectable) |
| Brightness (Max) | 5500 Lumens (at 50W) |
| Color Temperature (CCT) | 3000K / 4000K / 5000K (Selectable) |
| Voltage | 120 Volts |
| Dimmability | 0-10V Dimmable (dimmer not included) |
| Installation Type | Suspended Mount |
| Indoor/Outdoor Usage | Indoor Use Only |
| Certifications | ETL-Listed |
10. Warranty and Support
Kadision stands behind the quality of its products.
- Warranty: This product is covered by a 3-year warranty from the date of purchase. This warranty covers defects in materials and workmanship under normal use.
- Customer Support: For technical assistance, troubleshooting beyond this manual, or warranty claims, please contact Kadision customer service directly via the Amazon Buyer-Seller Messaging Service or through the contact information provided on the Kadision brand store.
Please retain your proof of purchase for warranty purposes.