1. Introduction
This manual provides detailed instructions for the installation, configuration, and operation of your Serounder Wireless Print Server. This device enables sharing of up to four USB printers across a local area network (LAN) using either Ethernet or Wi-Fi connectivity. Please read this manual thoroughly before use to ensure proper setup and functionality.
2. Product Overview
2.1 Key Features
- Multi-Printer Sharing: Allows up to four USB printers to be shared across a network.
- Flexible Connectivity: Supports wired (Ethernet) and 2.4G wireless network modes, as well as a standalone mode.
- Web-Based Management: Easy configuration and management through a user-friendly web interface.
- Wide Operating System Compatibility: Compatible with Windows 7, 8, 10, 11, and OS X.
- High-Speed Ports: Features a 480Mbps USB 2.0 port and 100Mbps network bridge and LAN port for stable printing services.
2.2 Device Layout and Indicators

Image 2.2.1: Front view of the Serounder Wireless Print Server, showing the USB port on the left, a WPS button, and indicator lights for WLAN, LAN, BRIDGE, and SYS.
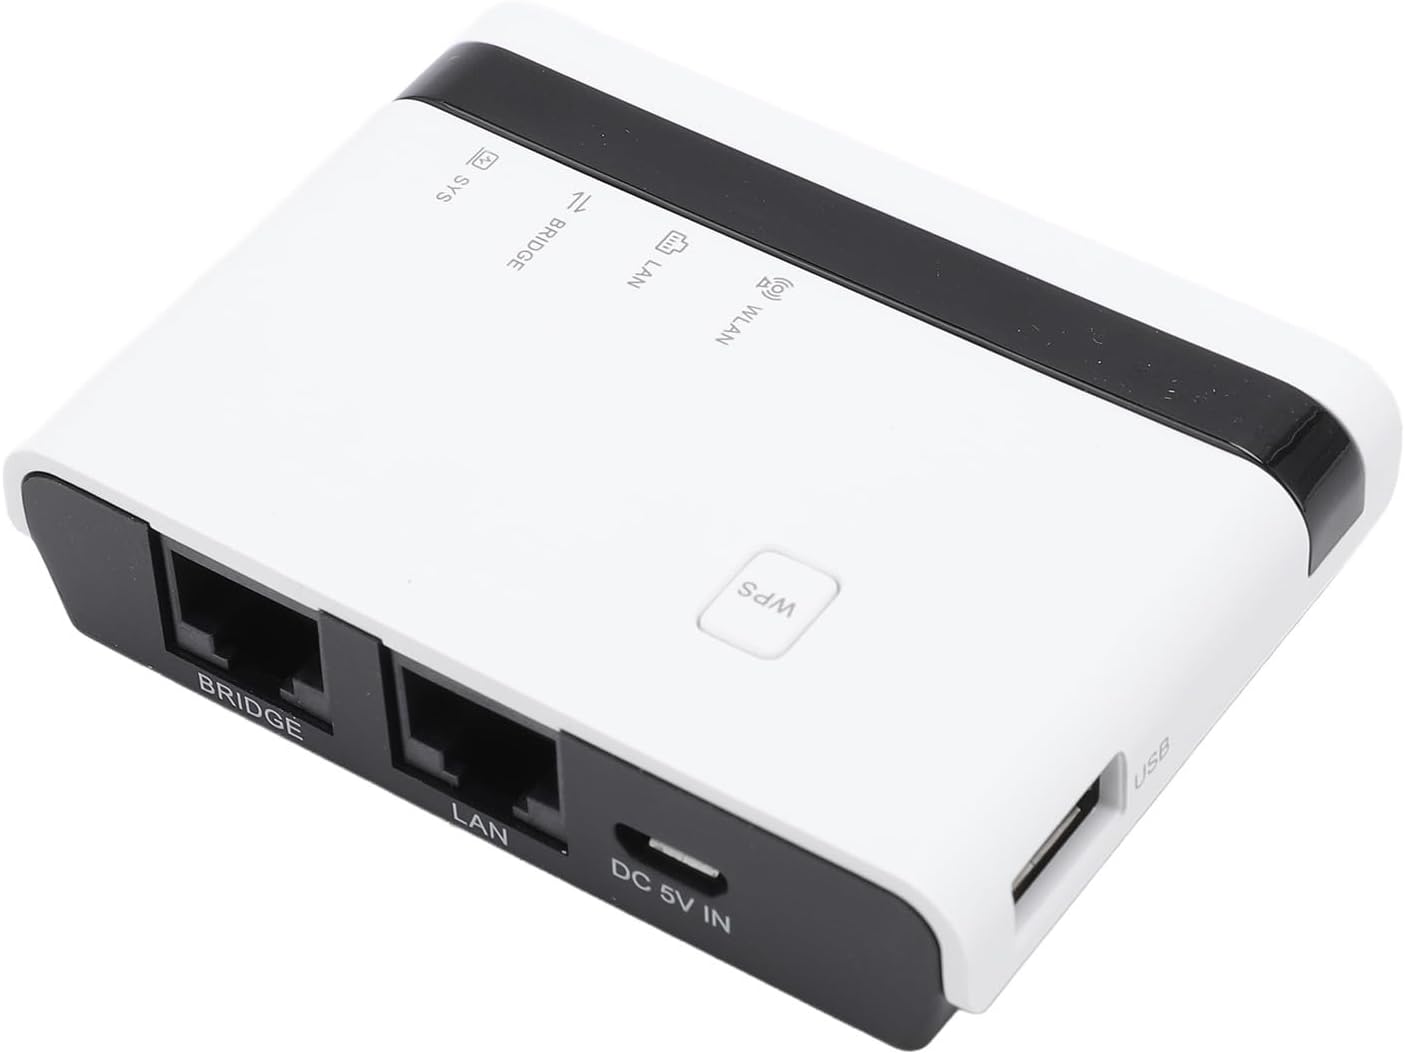
Image 2.2.2: Top-down view of the print server, highlighting the LAN port, Bridge port, DC 5V IN power input, and USB port.
- USB Port: Connects to your USB printer(s).
- WPS Button: For quick Wi-Fi Protected Setup.
- WLAN Indicator: Indicates wireless network activity.
- LAN Indicator: Indicates local area network (Ethernet) activity.
- BRIDGE Indicator: Indicates bridge mode status.
- SYS Indicator: System status indicator.
- LAN Port: Connects to your router or network switch via Ethernet cable.
- BRIDGE Port: Additional Ethernet port for network bridging.
- DC 5V IN: Power input port.
3. Package Contents
Verify that all items are present in the package:
- 1 x Serounder Wireless Print Server
- 1 x Power Cord (US Plug)
- 1 x RJ45 Ethernet Cable
- 1 x Power Adapter
- 1 x User Manual (This document)

Image 3.1: All components included in the Serounder Wireless Print Server package.
4. Setup Instructions
The Serounder Wireless Print Server supports multiple operating modes. Choose the mode that best suits your network environment.

Image 4.1: Visual representation of the three primary setup modes: Wired, Wireless, and Standalone.
4.1 Wired Mode Setup
In Wired Mode, the print server connects to your router via an Ethernet cable.
- Connect one end of the provided RJ45 Ethernet cable to the LAN port on the print server.
- Connect the other end of the Ethernet cable to an available LAN port on your wireless router.
- Connect your USB printer(s) to the USB port(s) on the print server using a USB cable.
- Connect the power adapter to the DC 5V IN port on the print server and plug it into a power outlet.
- Ensure the SYS and LAN indicators on the print server are active.
- Install the necessary printer drivers on each computer that will access the shared printer.
4.2 Wireless Mode Setup
In Wireless Mode, the print server connects to your existing Wi-Fi network.
- Connect your USB printer(s) to the USB port(s) on the print server.
- Connect the power adapter to the DC 5V IN port on the print server and plug it into a power outlet.
- Access the print server's web management interface (refer to Section 5 for details).
- Navigate to the wireless settings and connect the print server to your 2.4G Wi-Fi network. You may use the WPS button for quick setup if your router supports it.
- Ensure the SYS and WLAN indicators on the print server are active.
- Install the necessary printer drivers on each computer that will access the shared printer.
4.3 Standalone Mode Setup
In Standalone Mode, the print server broadcasts its own Wi-Fi signal, allowing direct connection from devices.
- Connect your USB printer(s) to the USB port(s) on the print server.
- Connect the power adapter to the DC 5V IN port on the print server and plug it into a power outlet.
- The print server will broadcast its own Wi-Fi network (SSID).
- Connect your computer or device directly to this Wi-Fi network.
- Access the print server's web management interface (refer to Section 5 for details) to configure network settings if needed.
- Ensure the SYS and WLAN indicators on the print server are active.
- Install the necessary printer drivers on each computer that will access the shared printer.
5. Web Management Interface
The print server features a web-based management interface for easy configuration and monitoring.

Image 5.1: The print server, designed for simple web-based management.
- Ensure your computer is connected to the same network as the print server (either wired or wirelessly).
- Open a web browser (e.g., Chrome, Firefox, Edge).
- Enter the IP address of the print server into the browser's address bar. The default IP address is usually provided in a sticker on the device or in a quick start guide. If not, you may need to use a network scanning tool to find it.
- Log in using the default username and password (refer to the quick start guide or device label for default credentials).
- From the web interface, you can:
- Configure Wi-Fi settings (SSID, password, security type).
- View connected printers.
- Manage network settings (IP address, subnet mask, gateway).
- Update firmware.
- Change login credentials.
Note: It is recommended to change the default login credentials for security purposes.
6. Operating Instructions
Once the print server is set up and configured, you can begin printing from your network-connected devices.
- Install Printer Drivers: On each computer that will print, install the manufacturer's drivers for the specific USB printer(s) connected to the print server. Do not connect the printer directly to the computer during driver installation unless instructed by the printer manufacturer.
- Add Network Printer:
- Windows: Go to "Settings" > "Devices" > "Printers & scanners" > "Add a printer or scanner". If the printer is not automatically detected, choose "The printer that I want isn't listed" and select "Add a printer using a TCP/IP address or hostname". Enter the IP address of the print server.
- macOS: Go to "System Preferences" > "Printers & Scanners". Click the "+" button to add a printer. Select "IP" tab, choose "HP Jetdirect - Socket" or "LPD" for protocol, and enter the IP address of the print server. Select the appropriate printer driver.
- Print: Once the printer is added, you can select it from any application and print as usual.
7. Compatibility
The Serounder Wireless Print Server is designed for broad compatibility:
- Operating Systems: Supports Windows 7, Windows 8, Windows 10, Windows 11, and OS X.
- Printers: Compatible with most mainstream USB interface printers.
- Network: Works with standard 10/100Mbps Ethernet networks and 2.4G Wi-Fi networks.
Note: Some specialized printers or multi-function devices with advanced features (e.g., scanning, faxing) may have limited functionality through a print server. Basic printing functions are generally supported.
8. Specifications
| Feature | Specification |
|---|---|
| Model Number | Serounderze1atr0un3-11 |
| Network Speed | 10/100Mbps |
| Operating Modes | Wired, 2.4G Wireless Network, Standalone Mode |
| Maximum Supported Printers | 4 USB Printers |
| USB Port Speed | 480Mbps (USB 2.0) |
| Compatible Systems | Windows 7, 8, 10, 11, OS X |
| Power Input | DC 5V |
| Item Weight | 7.1 ounces (approx. 201 grams) |
| Package Dimensions | 6.69 x 3.94 x 1.97 inches |
| Manufacturer | Serounder |
9. Troubleshooting
If you encounter issues with your print server, refer to the following common troubleshooting steps:
- No Power:
- Ensure the power adapter is securely connected to the print server and a working power outlet.
- Check if the SYS indicator light is on.
- Cannot Connect to Network (Wired):
- Verify the Ethernet cable is properly connected to both the print server's LAN port and your router.
- Check if the LAN indicator light is active.
- Ensure your router is functioning correctly.
- Cannot Connect to Network (Wireless):
- Confirm the print server is within range of your 2.4G Wi-Fi network.
- Double-check the Wi-Fi SSID and password entered in the web management interface.
- Ensure the WLAN indicator light is active.
- Try restarting both the print server and your wireless router.
- Printer Not Detected:
- Ensure the USB printer is powered on and properly connected to the print server's USB port.
- Verify that the correct printer drivers are installed on your computer.
- Check the print server's web management interface to see if the printer is listed as connected.
- Try connecting the printer directly to a computer to confirm it functions independently.
- Printing Errors or Slow Printing:
- Ensure the print server has a stable network connection.
- Update printer drivers to the latest version.
- Check for any pending print jobs in the print queue on your computer.
- Restart the print server and the printer.
- Cannot Access Web Management Interface:
- Verify your computer is on the same network as the print server.
- Confirm the print server's IP address. You may need to use a network scanner tool or check your router's DHCP client list.
- Try clearing your browser's cache or using a different browser.
10. Maintenance
To ensure optimal performance and longevity of your Serounder Wireless Print Server, follow these maintenance guidelines:
- Keep Clean: Regularly wipe the device with a soft, dry cloth. Avoid using liquid cleaners or abrasive materials.
- Ventilation: Ensure the print server is placed in a well-ventilated area to prevent overheating. Do not block ventilation openings.
- Firmware Updates: Periodically check the manufacturer's website for firmware updates. Updating firmware can improve performance, add features, and fix bugs.
- Power Cycle: If the device becomes unresponsive or exhibits unusual behavior, perform a power cycle by disconnecting the power adapter for 10 seconds and then reconnecting it.
- Environmental Conditions: Operate the device within recommended temperature and humidity ranges. Avoid extreme conditions.
11. Warranty and Support
For warranty information and technical support, please refer to the documentation included with your purchase or visit the official Serounder website. Keep your purchase receipt as proof of purchase for warranty claims.
Manufacturer: Serounder
Model: Serounderze1atr0un3-11
ASIN: B0DY7CWKZH


