1. Product Overview
The Proster Digital Multimeter (Model PST316-US) is a high-precision, multi-functional instrument designed for various electrical measurements. It features a 9999-count display with True RMS (TRMS) capability, providing accurate readings for both AC and DC parameters.

Figure 1.1: Proster Digital Multimeter and included accessories.
Key Features:
- 9999-Count Display with True RMS: Provides high-resolution and accurate measurements for non-sinusoidal waveforms.
- Low Impedance (LoZ) Measurement: Prevents false readings caused by ghost voltages.
- HFE Test: For testing transistor gain.
- Non-Contact Voltage (NCV) Detection: Safely detects the presence of AC voltage without direct contact.
- Comprehensive Measurement Functions: Includes AC/DC Voltage, AC/DC Current, Resistance, Capacitance, Frequency, Duty Cycle, Temperature, Diode, and Continuity.
- Jack Reminder: Illuminates the correct input jacks based on the selected measurement function for enhanced safety.
- Large Backlit LCD Screen: Ensures easy readability in various lighting conditions.
- Built-in Stand and Hanging Slot: For convenient placement and hands-free operation.
- Overload Protection Circuit: Incorporates built-in double safety fuses for enhanced protection.
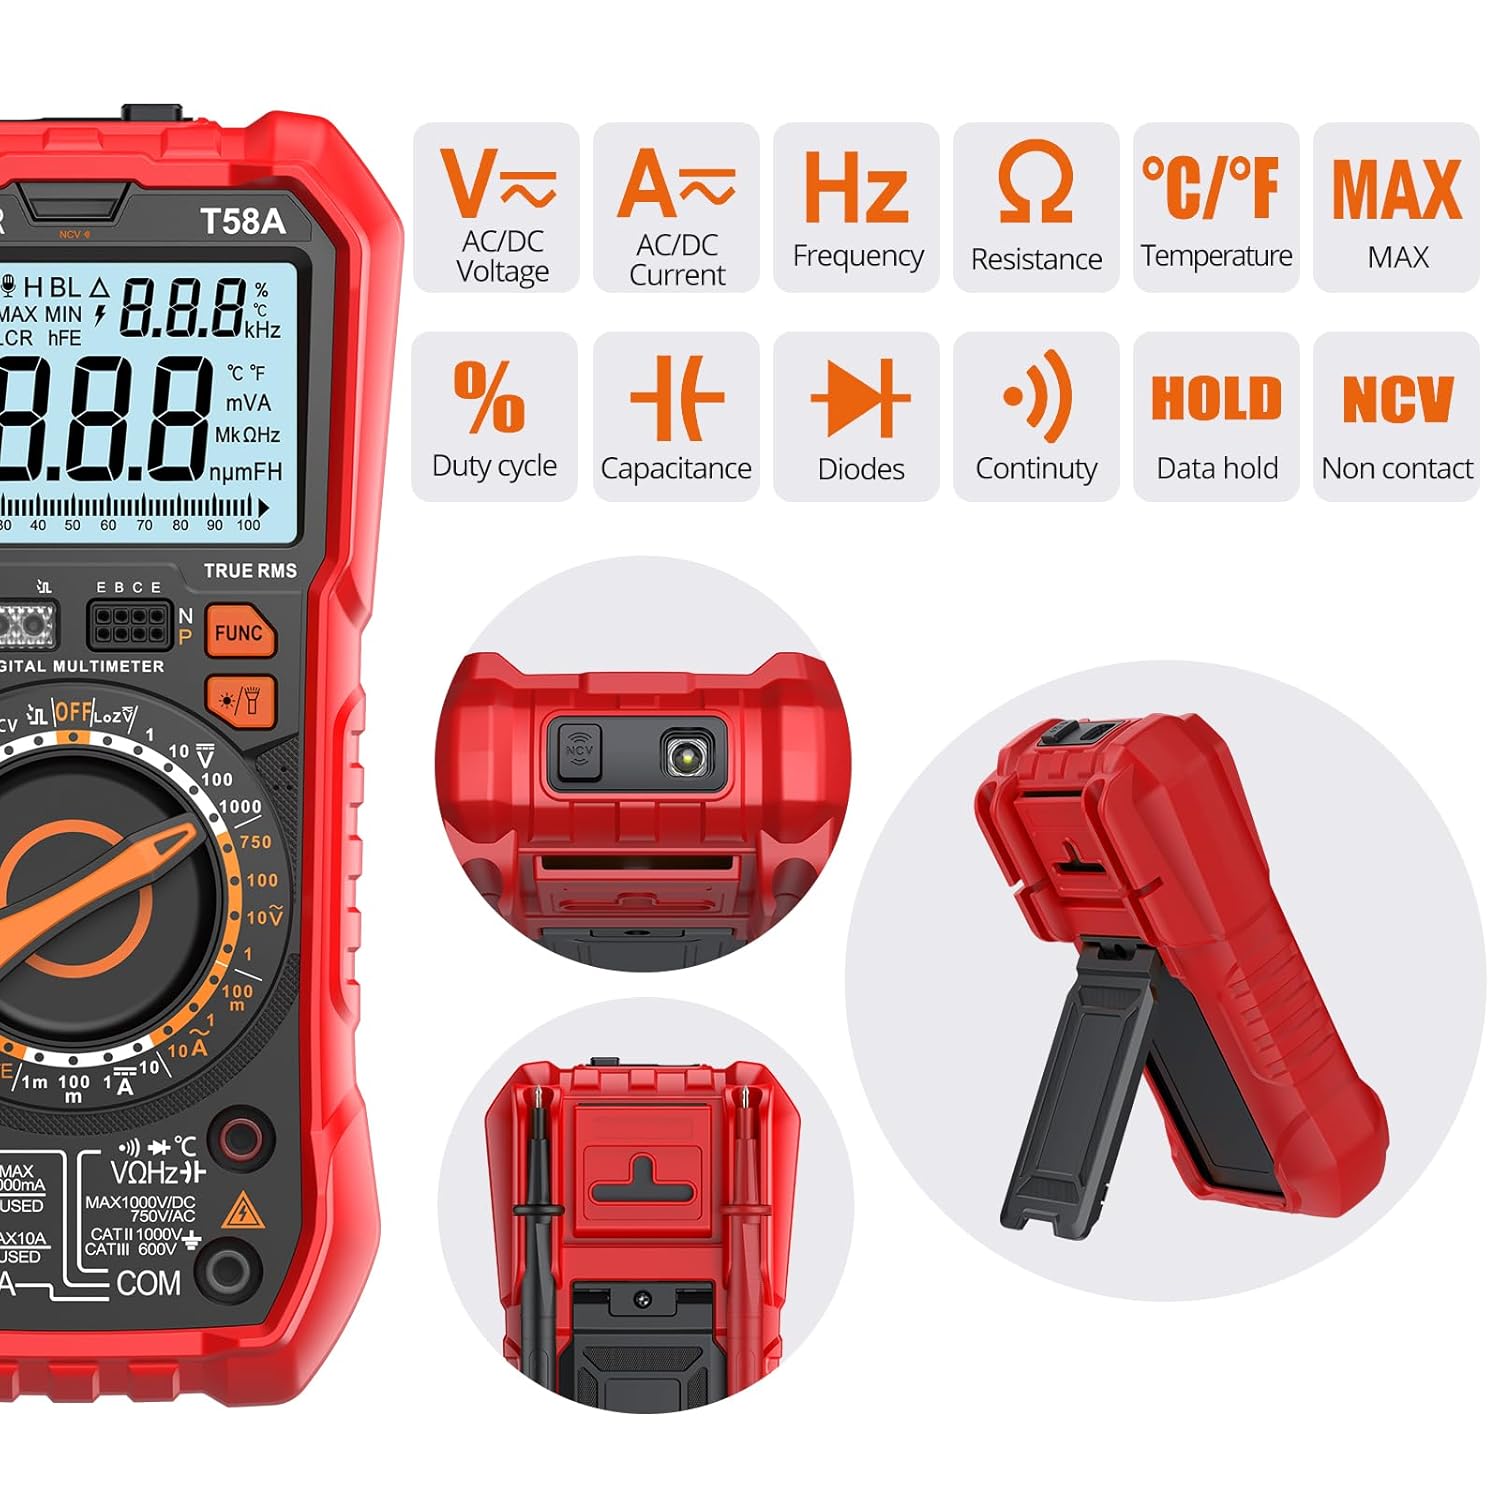
Figure 1.2: Overview of the multimeter's measurement capabilities.
2. Safety Information
Always adhere to safety precautions when using any electrical testing equipment. Failure to do so may result in electric shock, injury, or damage to the meter or equipment under test.
- Do not exceed the maximum input values specified for each range.
- Ensure the test leads are properly connected and the function switch is set to the correct range before making any measurements.
- Do not use the meter if it appears damaged or if the test leads are damaged.
- Exercise extreme caution when working with voltages above 30V AC RMS, 42V peak, or 60V DC. These voltages pose a shock hazard.
- Always disconnect power to the circuit and discharge all high-voltage capacitors before measuring resistance, continuity, diodes, or capacitance.
- Replace batteries as soon as the low battery indicator appears to ensure accurate readings.
- The meter is equipped with internal fuses for protection. Do not bypass these fuses.

Figure 2.1: Smart protection circuit with built-in double safety fuses.
3. Setup and Battery Installation
The Proster Digital Multimeter comes with all necessary accessories for immediate use, including test leads, alligator clips, a screwdriver, and AAA batteries.
3.1 Unpacking and Inspection
Upon receiving your multimeter, carefully unpack all components and inspect them for any signs of damage. The package should contain:
- Proster Digital Multimeter (Model PST316-US)
- Test Leads (Red and Black)
- Alligator Clips
- Screwdriver
- Two Fuses (Spares)
- Cloth Bag for Storage
- Temperature Probe
- 3 AAA Batteries (Pre-installed or included separately)

Figure 3.1: All items included in the multimeter set.
3.2 Battery Installation
The multimeter requires 3 AAA batteries. If not pre-installed, follow these steps:
- Ensure the multimeter is turned off.
- Locate the battery compartment on the back of the unit.
- Use the provided screwdriver to loosen the screw securing the battery cover.
- Remove the battery cover.
- Insert 3 AAA batteries, observing the correct polarity (+/-) as indicated inside the compartment.
- Replace the battery cover and tighten the screw.
The back of the multimeter also features a convenient kickstand for desktop use and a jack for hanging on a nail or hook.
4. Operating Instructions
This section details the operation of the Proster Digital Multimeter for various measurement functions.
4.1 General Operation
- Power On/Off: Rotate the central dial to any function to turn the meter on. Rotate to "OFF" to turn it off.
- Function Selection: Rotate the central dial to select the desired measurement function (e.g., V~ for AC Voltage, V- for DC Voltage, Ω for Resistance).
- Input Jacks: The meter features a "Jack Reminder" function, illuminating the correct input jacks for the selected measurement, ensuring proper lead connection.
- Backlight: The large LCD screen has a backlight for easy reading in dark environments.
- Data Hold (HOLD): Press the "HOLD" button to freeze the current reading on the display. Press again to release.
- MAX/MIN: Press the "MAX/MIN" button to record the maximum or minimum values during a measurement.
- FUNC Button: Used to switch between different sub-functions within a single dial position (e.g., AC/DC current, Diode/Continuity).

Figure 4.1: The large backlit LCD screen provides clear readings from any angle.
4.2 Specific Measurement Functions
4.2.1 Voltage Measurement (AC/DC)
To measure voltage:
- Insert the red test lead into the "VΩHz" jack and the black test lead into the "COM" jack.
- Rotate the dial to the "V~" (AC Voltage) or "V-" (DC Voltage) position.
- Connect the test leads in parallel across the circuit or component to be measured.
- Read the voltage value on the display.

Figure 4.2: Measuring AC Voltage. Ensure proper lead connection and function selection.
4.2.2 Non-Contact Voltage (NCV) Detection
The NCV function allows for safe detection of live AC voltage without direct contact with conductors.
- Rotate the dial to the "NCV" position.
- Move the top tip of the multimeter close to the object suspected of having AC voltage (e.g., an electrical outlet, insulated wire).
- The meter will emit an audible beep and the NCV indicator will light up if AC voltage is detected. The frequency of beeps and light intensity will increase with stronger signals.

Figure 4.3: Using the NCV function to detect live voltage.
4.2.3 Temperature Measurement
To measure temperature:
- Insert the temperature probe into the appropriate jacks (usually VΩHz and COM, or dedicated temperature jacks if present and indicated by the jack reminder).
- Rotate the dial to the "°C/°F" temperature position.
- Place the tip of the temperature probe on or in the object whose temperature is to be measured.
- Read the temperature value on the display.

Figure 4.4: Measuring temperature using the included probe.
4.2.4 Other Functions (Current, Resistance, Capacitance, Diode, Continuity, HFE, LoZ)
For other measurements, rotate the dial to the corresponding function. Always ensure the test leads are connected to the correct input jacks as indicated by the "Jack Reminder" feature.
- Current (A~ / A-): For current measurements, the meter must be connected in series with the circuit. Ensure the correct current input jack (mA or 10A) is used and the circuit is de-energized before connecting.
- Resistance (Ω): Measure resistance only on de-energized circuits.
- Capacitance (F): Discharge capacitors before measuring.
- Diode Test (→|): Used to check the forward voltage drop of diodes.
- Continuity Test (•)): An audible tone indicates a continuous circuit.
- HFE Test: For measuring the DC current gain of transistors.
- LoZ (Low Impedance): This function helps eliminate false readings caused by ghost voltages in circuits.
5. Maintenance
Proper maintenance ensures the longevity and accuracy of your Proster Digital Multimeter.
5.1 Cleaning
Wipe the case with a damp cloth and mild detergent. Do not use abrasives or solvents. Keep the input terminals free from dirt and moisture.
5.2 Fuse Replacement
If the current measurement function stops working, the fuse may need replacement. Refer to the specifications for the correct fuse type and rating. Always replace with a fuse of the same type and rating.
- Ensure the multimeter is turned off and all test leads are disconnected.
- Open the battery compartment as described in Section 3.2.
- Locate the fuse(s) inside the compartment.
- Carefully remove the old fuse and insert a new one.
- Replace the battery cover and tighten the screw.
5.3 Battery Replacement
Replace the batteries when the low battery indicator appears on the display to ensure accurate operation. Follow the steps outlined in Section 3.2.
6. Troubleshooting
If the multimeter is not functioning as expected, review the following common issues before seeking professional assistance.
- No Display/Meter Not Turning On: Check battery installation and ensure batteries are not depleted. Replace if necessary.
- Incorrect Readings:
- Ensure test leads are correctly inserted into the appropriate jacks for the selected function.
- Verify the function dial is set to the correct measurement type and range.
- Check for damaged test leads or poor connections.
- Ensure the circuit under test is de-energized for resistance, continuity, and capacitance measurements.
- Current Measurement Not Working: Check and replace the internal fuse if blown.
- NCV Not Detecting: Ensure the NCV function is selected and the meter's tip is brought close enough to the AC voltage source.
For issues not resolved by these steps, contact Proster customer support or consult the official product website for further assistance.
7. Specifications
The following table outlines the key specifications for the Proster Digital Multimeter (Model PST316-US).
| Specification | Value |
|---|---|
| Model Number | PST316-US |
| Display Count | 9999 Counts |
| True RMS | Yes |
| Product Dimensions | 7.36 x 3.74 x 2.17 inches |
| Item Weight | 1.35 Pounds (611 Grams) |
| Power Source | 3 AAA batteries (included) |
| Manufacturer | Proster |
| Country of Origin | China |
| Color | Red |
8. Warranty and Support
For detailed warranty information and customer support, please refer to the official Proster website or the warranty card included with your product. Keep your purchase receipt as proof of purchase for any warranty claims.
For technical assistance or inquiries, please contact Proster customer service through their official channels.