
HART HGCS041
HART 20-Volt Pruning Shears Instruction Manual
Model: HGCS041
1. Important Safety Information
Read and understand all safety warnings, instructions, illustrations, and specifications provided with this power tool. Failure to follow all instructions listed below may result in electric shock, fire, and/or serious injury.
General Power Tool Safety
- Keep work area clean and well lit. Cluttered or dark areas invite accidents.
- Do not operate power tools in explosive atmospheres, such as in the presence of flammable liquids, gases, or dust. Power tools create sparks which may ignite the dust or fumes.
- Keep children and bystanders away while operating a power tool. Distractions can cause you to lose control.
- Dress properly. Do not wear loose clothing or jewelry. Keep your hair and clothing away from moving parts. Loose clothes, jewelry, or long hair can be caught in moving parts.
- Avoid accidental starting. Ensure the switch is in the off-position before connecting to battery pack, picking up or carrying the tool.
- Do not overreach. Keep proper footing and balance at all times. This enables better control of the power tool in unexpected situations.
- Use safety equipment. Always wear eye protection. Dust mask, non-skid safety shoes, hard hat, or hearing protection must be used for appropriate conditions.
Battery Tool Use and Care
- Recharge only with the charger specified by the manufacturer. A charger that is suitable for one type of battery pack may create a risk of fire when used with another battery pack.
- Use power tools only with specifically designated battery packs. Use of any other battery packs may create a risk of injury and fire.
- When battery pack is not in use, keep it away from other metal objects, like paper clips, coins, keys, nails, screws or other small metal objects, that can make a connection from one terminal to another. Shorting the battery terminals together may cause burns or a fire.
- Under abusive conditions, liquid may be ejected from the battery; avoid contact. If contact accidentally occurs, flush with water. If liquid contacts eyes, additionally seek medical help. Liquid ejected from the battery may cause irritation or burns.
- Do not use a battery pack or tool that is damaged or modified. Damaged or modified batteries may exhibit unpredictable behavior resulting in fire, explosion or risk of injury.
2. Package Contents
Verify that all items listed below are included in your package. If any parts are missing or damaged, contact customer service.
- HART 20-Volt Pruning Shears (Model: HGCS041)
- 2.0 Ah Lithium-Ion Battery
- Battery Charger
- Instruction Manual
3. Product Overview
The HART 20-Volt Pruning Shears are designed for efficient trimming of smaller branches and stems. This section provides an overview of the tool's components.
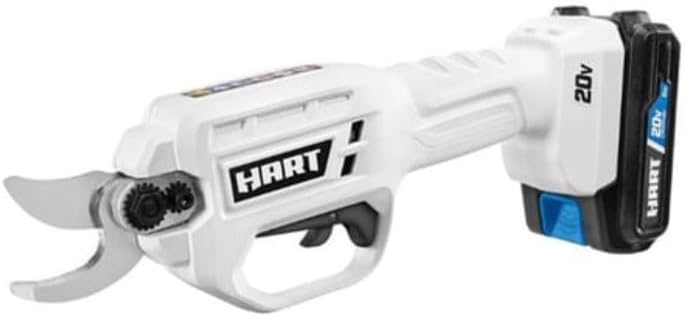
Figure 3.1: HART 20-Volt Pruning Shears with 20V battery installed. The shears feature a white body with a black trigger and a black and blue battery pack.
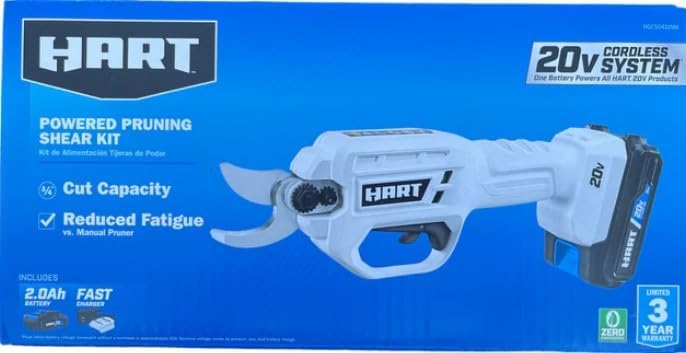
Figure 3.2: The retail packaging for the HART 20-Volt Powered Pruning Shear Kit, highlighting its 3/4 inch cut capacity and reduced fatigue compared to manual pruners.
Key Features:
- 3/4 inch Cut Capacity: Capable of trimming branches and stems up to 0.75 inches in diameter.
- Bypass-Cutting Action: Provides precise and clean cuts, promoting plant health.
- Tooled Blade Change: Facilitates fast and easy installation and removal of blades for maintenance.
- Ergonomic Grip: Designed for comfortable use, even during extended periods.
- Lightweight Design: Weighs approximately 1.7 lbs (tool only), reducing user fatigue.
- 20V Lithium-Ion Battery System: Utilizes the HART 20V battery platform, ensuring consistent performance and compatibility with other HART 20V tools.
4. Setup
4.1 Charging the Battery
- Connect the charger to a standard electrical outlet.
- Slide the 2.0 Ah Lithium-Ion battery pack onto the charger. Ensure it is fully seated.
- Allow the battery to charge until the indicator lights on the charger confirm a full charge. Refer to the charger's specific instructions for light indications.
- Once charged, remove the battery from the charger.
Note: Always charge the battery in a well-ventilated area. Do not charge a damaged battery. If the charger indicates a faulty battery, do not attempt to use or recharge it; dispose of it properly.
4.2 Installing the Battery
- Ensure the pruning shears are turned off and the trigger is locked (if applicable).
- Align the charged 20V Lithium-Ion battery pack with the battery port on the rear of the pruning shears.
- Slide the battery pack firmly into the port until it clicks into place. Ensure it is securely latched.
- To remove the battery, press the release button(s) on the battery pack and slide it out.
5. Operating Instructions
5.1 Powering On and Off
- To Power On: With the battery installed, press and hold the power button (if present) or activate the safety switch, then press the trigger. The blades will typically open to the ready position.
- To Power Off: Release the trigger. Ensure the safety switch is engaged to prevent accidental operation. For extended storage, remove the battery.
5.2 Pruning Techniques
- Inspect the Branch: Identify the branch or stem to be cut. Ensure it is within the tool's 3/4 inch cutting capacity. Attempting to cut larger branches can damage the tool or cause injury.
- Position the Shears: Place the open blades around the branch, ensuring the branch is fully seated within the cutting area.
- Make the Cut: Press the trigger firmly and smoothly. The bypass-cutting action will close the blades, making a clean cut.
- Avoid Twisting: Do not twist or pry with the shears while cutting, as this can damage the blades or mechanism.
- Repetitive Cuts: For continuous pruning, maintain a steady grip and rhythm. The ergonomic design helps reduce fatigue.
Caution: Always keep hands and body parts clear of the blades. The blades are sharp and can cause severe injury.
6. Maintenance
Regular maintenance ensures the longevity and optimal performance of your HART Pruning Shears.
6.1 Cleaning the Blades
- Before Cleaning: Always remove the battery pack from the tool to prevent accidental activation.
- Remove Debris: Use a stiff brush or cloth to remove sap, dirt, and plant debris from the blades after each use.
- Clean with Solvent: For stubborn sap, use a mild solvent or blade cleaner. Ensure the blades are thoroughly dried afterward to prevent rust.
- Lubricate: Apply a light coat of lubricating oil to the blades and pivot points to ensure smooth operation and prevent corrosion.
6.2 Blade Replacement
The pruning shears feature a tooled blade change mechanism. Refer to the detailed instructions provided with replacement blades or consult the manufacturer's website for specific steps. Always ensure the battery is removed before attempting blade replacement.
6.3 Storage
- Store the pruning shears in a dry, secure location, out of reach of children.
- Always remove the battery pack before storing the tool for extended periods.
- Ensure blades are clean and lightly oiled before storage.
7. Troubleshooting
| Problem | Possible Cause | Solution |
|---|---|---|
| Tool does not power on. | Battery not installed correctly. Battery is discharged. Faulty battery. | Ensure battery is fully seated. Charge the battery. If battery shows "FAULTY" on charger, replace the battery. |
| Blades do not cut cleanly or get stuck. | Blades are dull or dirty. Attempting to cut material exceeding capacity. | Clean and lubricate blades. Replace blades if dull. Ensure material is within 3/4 inch capacity. |
| Battery does not charge. | Charger not plugged in. Faulty battery. Faulty charger. | Check power connection. If battery is faulty, replace it. If charger is faulty, contact customer support. |
8. Specifications
| Feature | Detail |
|---|---|
| Model Number | HGCS041 |
| Voltage | 20 Volts |
| Cut Capacity | 0.75 Inches (3/4 inch) |
| Blade Material | High Carbon Steel |
| Blade Type | Parrot Beak (Bypass) |
| Handle Material | Plastic, Rubber, Silicone |
| Item Weight (Tool Only) | Approximately 1.7 lbs |
| Item Weight (Package) | 3.69 pounds |
| UPC | 840092604638 |
| Manufacturer | RYOBI |
9. Warranty and Support
For detailed warranty information, please refer to the warranty card included with your product or visit the official HART Tools website. Keep your purchase receipt as proof of purchase for any warranty claims.
For technical support, replacement parts, or service inquiries, please contact HART customer service through their official channels.
Ask a question about this manual
Ask about setup, troubleshooting, compatibility, parts, safety, or missing instructions. Manuals+ will review the question and use this page’s manual context to help answer it.