1. Introduction
The CMSTEDCD HDMI Extender allows for the transmission of high-definition video and audio signals over long distances using a single Cat5e/6/7 Ethernet cable. This device supports resolutions up to 1080p and 3D, extending your HDMI signal up to 196 feet (60 meters). It features Power Over Cable (POC) technology, requiring only one power adapter for the transmitter unit, and an EDID copy function for enhanced compatibility. This manual provides detailed instructions for proper installation, operation, and troubleshooting.
2. Package Contents
Please check the package contents upon opening to ensure all items are present and undamaged:
- 1 x HDMI Extender Transmitter (TX) Unit
- 1 x HDMI Extender Receiver (RX) Unit
- 1 x 5V DC Power Adapter
- 1 x User Manual

Image: The package includes one HDMI Extender Transmitter (TX), one HDMI Extender Receiver (RX), a 5V power adapter, and a user manual.
3. Product Overview
The CMSTEDCD HDMI Extender system consists of two main units: a Transmitter (TX) and a Receiver (RX). Both units are compact and designed for easy integration into your setup.
3.1 Transmitter (TX) Unit
The TX unit connects to your HDMI source device. It features an HDMI input, a DC5V power input, an RJ45 output port for the Ethernet cable, and an EDID button.

Image: Front and back view of the Transmitter (TX) unit, highlighting the HDMI Input, DC5V power port, Network cable output port, and EDID button.
3.2 Receiver (RX) Unit
The RX unit connects to your display device. It features an HDMI output and an RJ45 input port for the Ethernet cable. Due to Power Over Cable (POC) technology, the RX unit does not require a separate power supply.

Image: Front and back view of the Receiver (RX) unit, highlighting the Network cable input port and HDMI Output. Note that the RX unit does not require external power.
4. Setup Instructions
Follow these steps to set up your HDMI Extender:
- Connect the HDMI Source to the TX Unit: Use an HDMI cable to connect your HDMI source device (e.g., PC, DVD player, game console) to the HDMI IN port on the Transmitter (TX) unit.
- Connect the Display to the RX Unit: Use an HDMI cable to connect your display device (e.g., TV, monitor, projector) to the HDMI OUT port on the Receiver (RX) unit.
- Connect TX and RX Units with Ethernet Cable: Connect the RJ45 OUT port on the TX unit to the RJ45 IN port on the RX unit using a single Cat5e, Cat6, or Cat7 Ethernet cable. Ensure the cable is properly terminated and securely latched. For optimal performance and distance, use high-quality oxygen-free copper cables.
- Apply Power to the TX Unit: Connect the provided 5V DC power adapter to the DC5V port on the Transmitter (TX) unit, then plug the adapter into a power outlet. The TX unit will power on, and the RX unit will receive power through the Ethernet cable (POC).
- Verify Connection: Once all connections are made and power is supplied, the indicator lights on both units should illuminate, and your display should show the signal from the HDMI source.
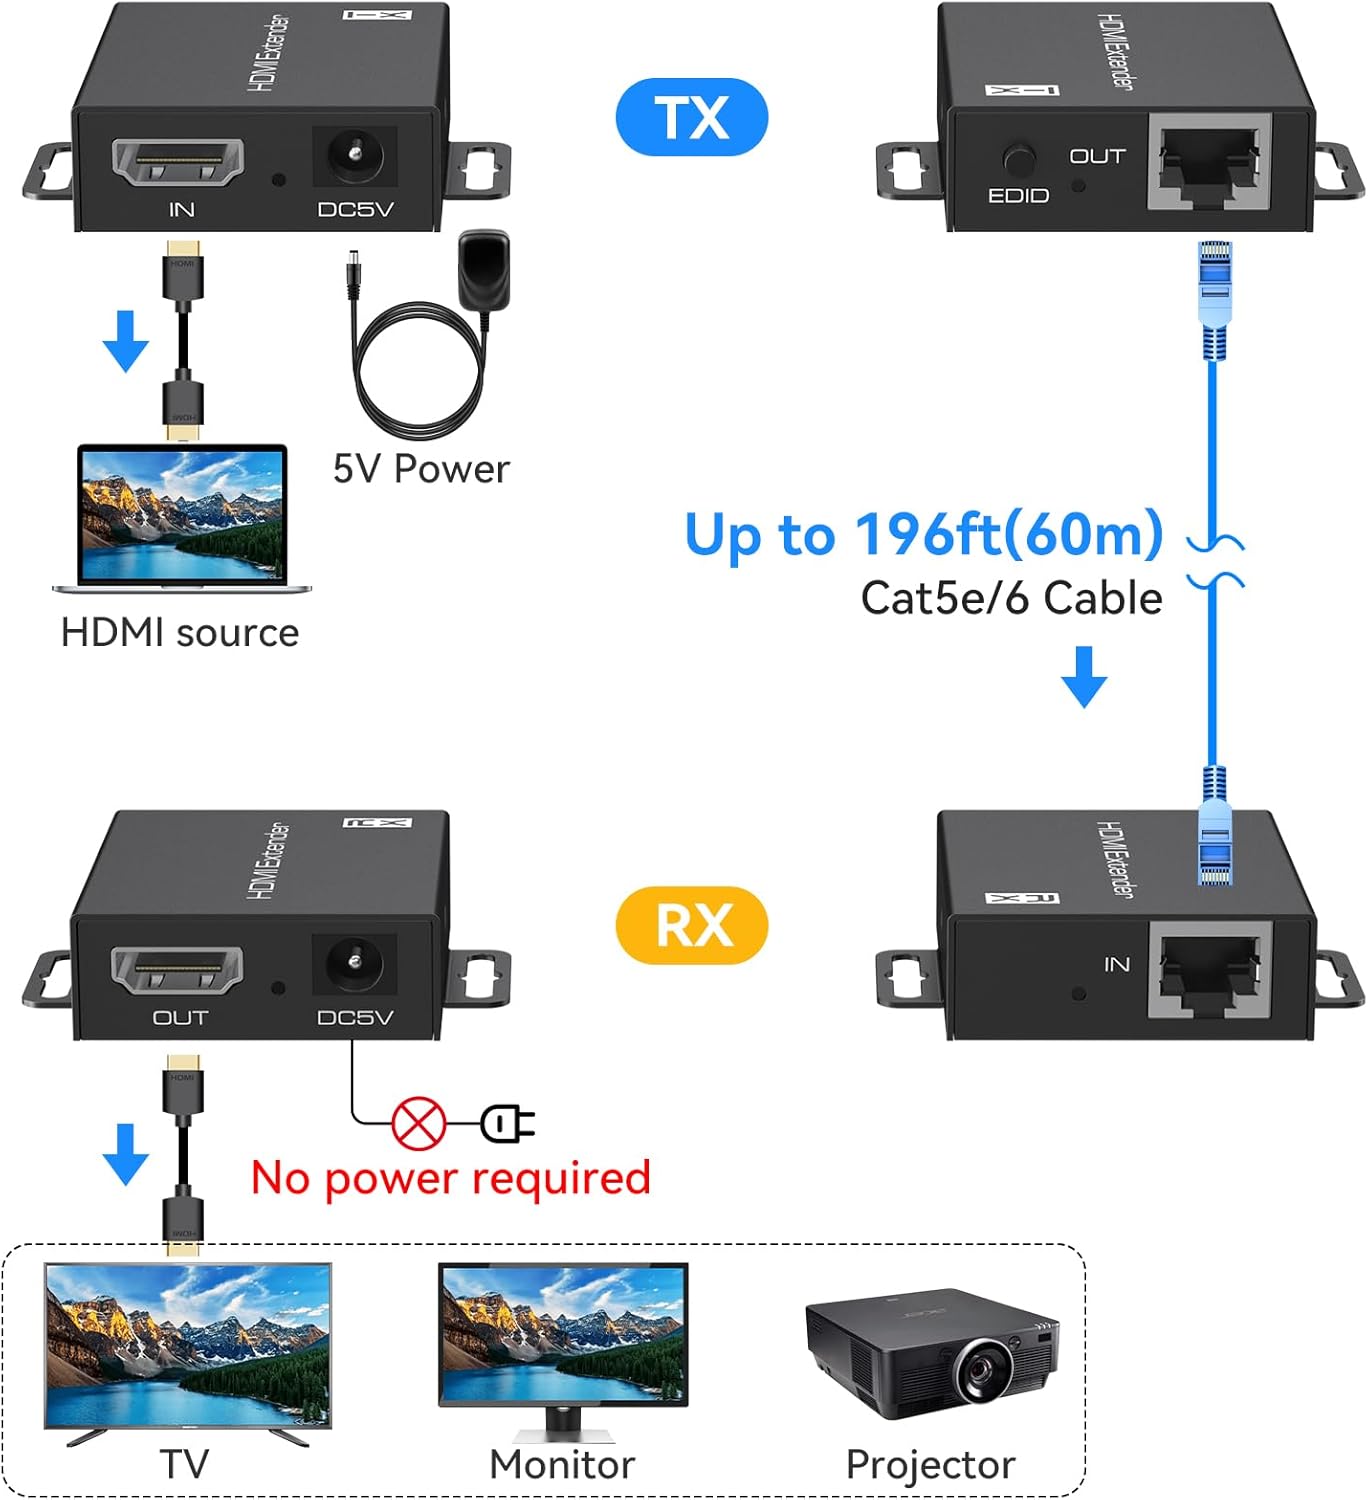
Image: Step-by-step connection diagram for the HDMI Extender, illustrating the flow from HDMI source to TX, through a Cat5e/6 cable to RX, and finally to the display. Power is supplied only to the TX unit.

Image: Power Over Cable (POC) feature, showing that only the Transmitter (TX) unit needs a 5V power adapter, while the Receiver (RX) unit receives power via the Ethernet cable.
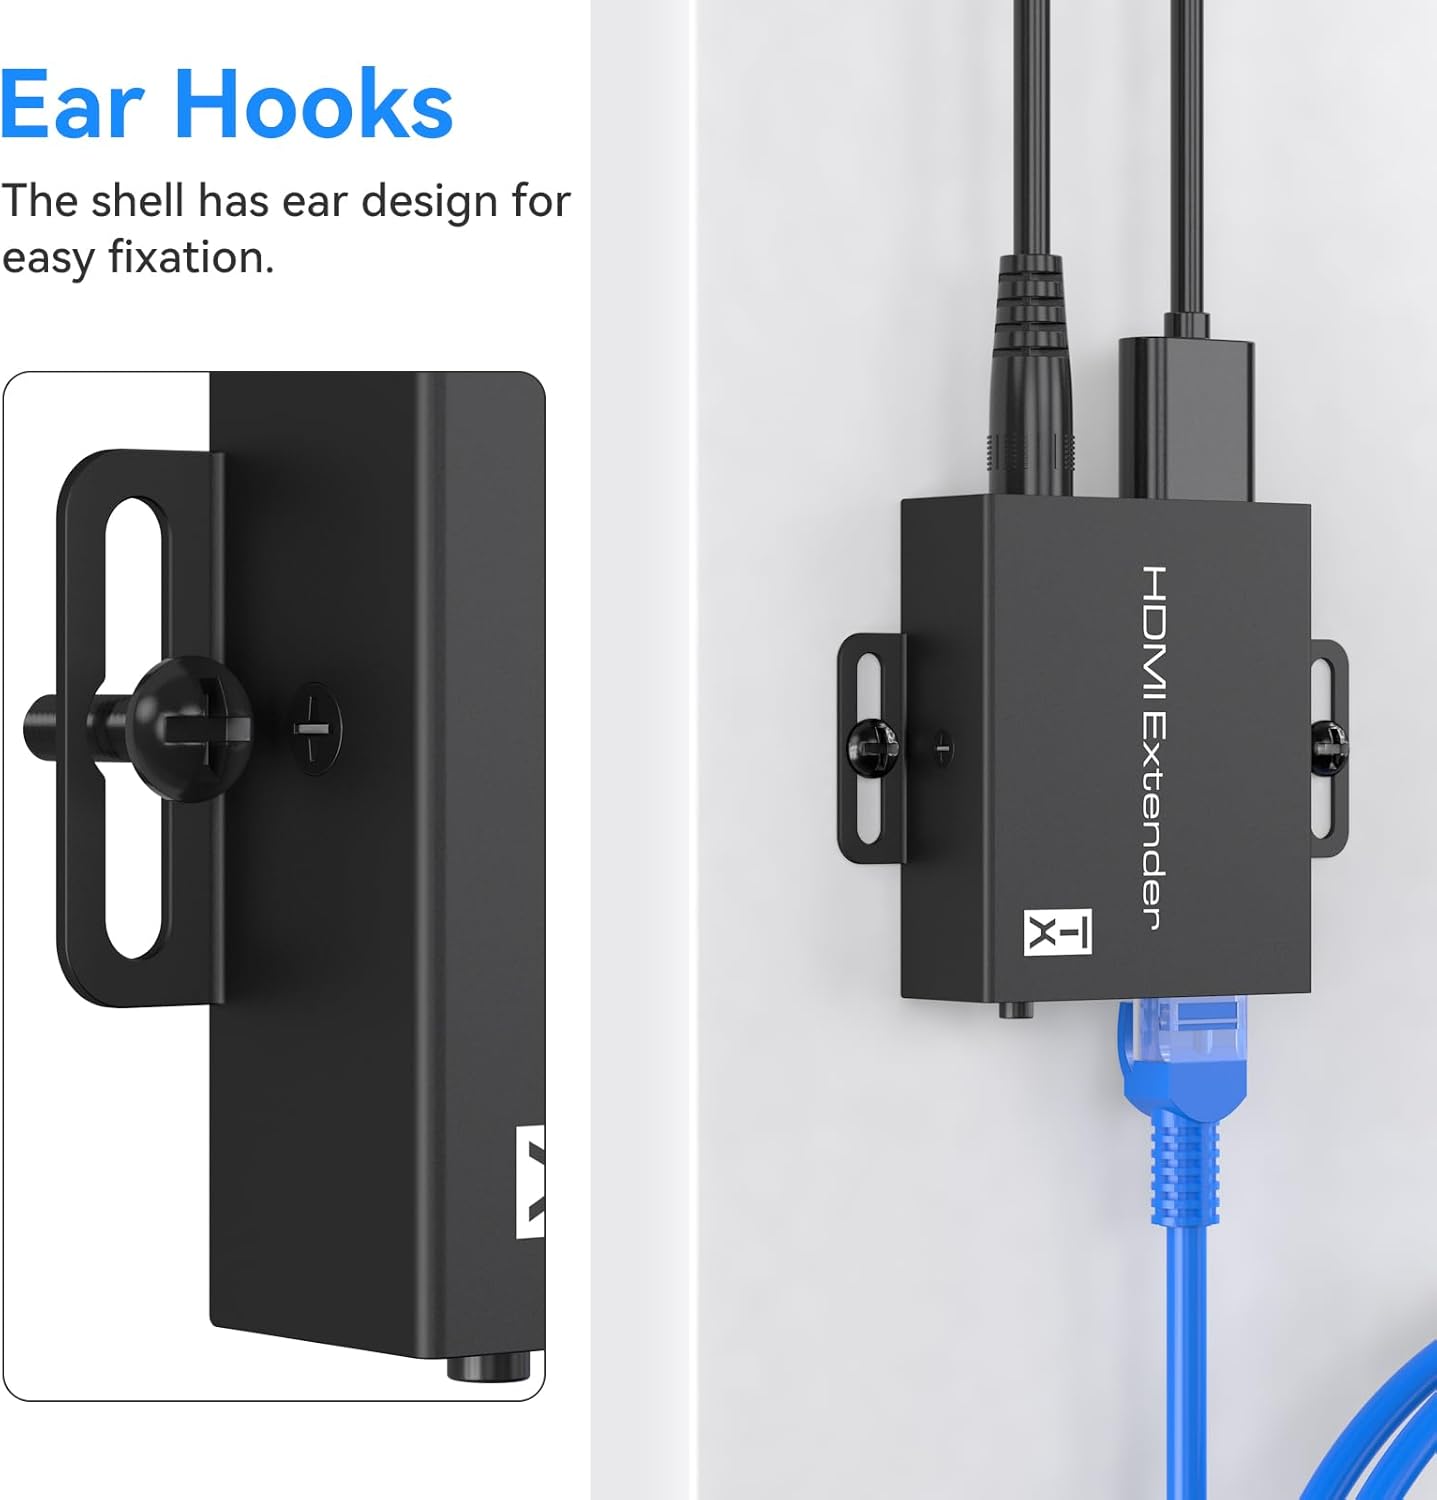
Image: The extender units feature ear hooks for convenient wall mounting or other fixed installations, helping to keep your setup tidy.
5. Operating Instructions
5.1 EDID Copy Function
The EDID (Extended Display Identification Data) copy function ensures optimal compatibility between your HDMI source and display. It allows the extender to learn and store the display's preferred video and audio settings.
- To Copy EDID: Connect the display directly to the HDMI input port of the TX unit. Press the EDID button on the TX unit. The extender will copy the EDID content from the connected display.
- To Reset EDID: Press and hold the EDID button for 3 seconds. This will reset the EDID to a default 1080p 3D stereo setting.
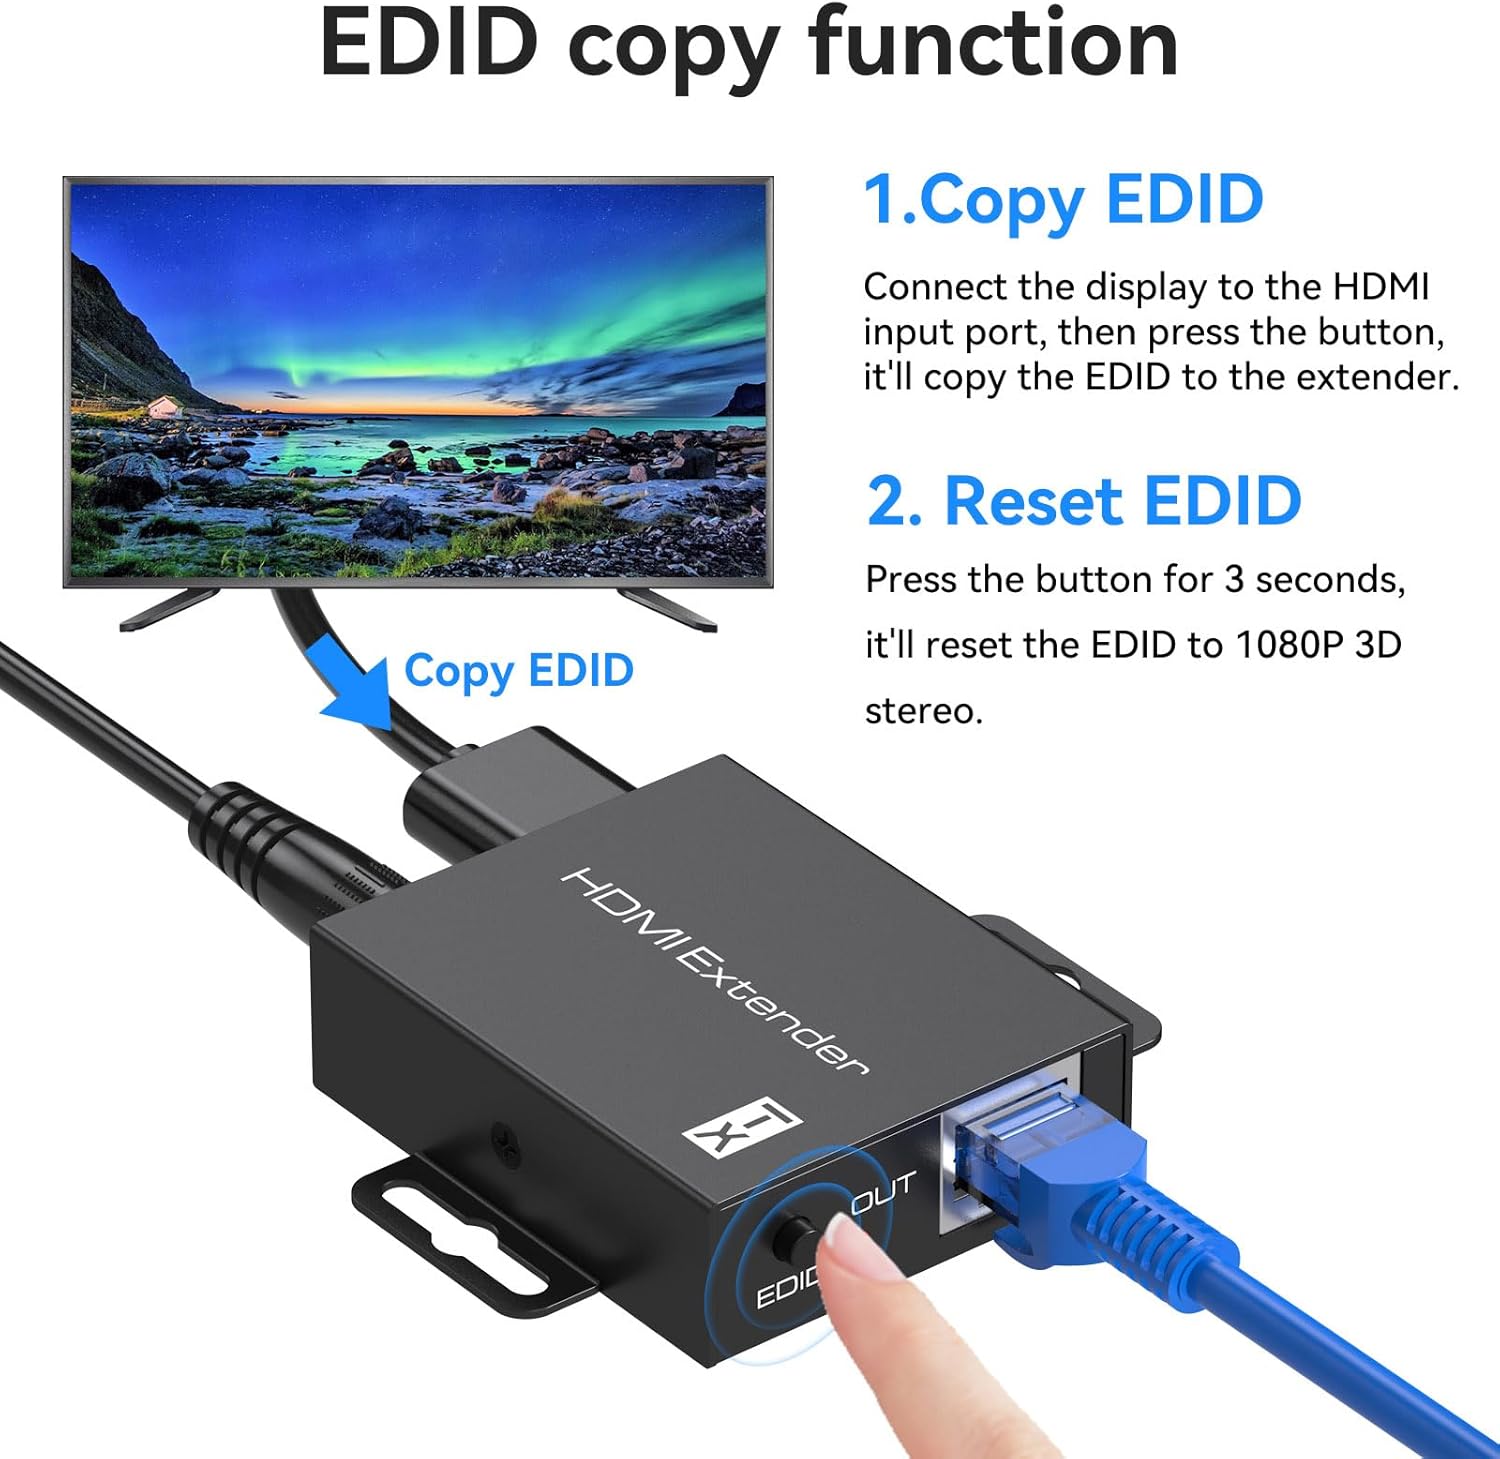
Image: Instructions for using the EDID copy function. Connect the display to the HDMI input, press the EDID button to copy, or press for 3 seconds to reset to 1080p 3D stereo.
5.2 Power Over Cable (POC)
The POC feature simplifies installation by eliminating the need for a separate power adapter at the receiver end. Power is transmitted from the TX unit to the RX unit via the Ethernet cable.
- Ensure the 5V power adapter is securely connected to the TX unit.
- The RX unit will automatically power on once the Ethernet cable is connected and the TX unit is powered.
6. Maintenance
To ensure the longevity and optimal performance of your HDMI Extender, follow these maintenance guidelines:
- Cleaning: Use a soft, dry cloth to clean the units. Avoid using liquid or aerosol cleaners, as they may damage the components.
- Ventilation: Ensure the units are placed in a well-ventilated area to prevent overheating. The metal casing is designed for efficient heat dissipation.
- Cable Management: Keep cables organized and avoid sharp bends or excessive tension, which can damage the cables or ports.
- Environmental Conditions: Store and operate the extender in a dry environment, away from extreme temperatures and humidity.
7. Troubleshooting
If you encounter issues with your HDMI Extender, refer to the following troubleshooting steps:
7.1 No Image on Display
- Check Power: Ensure the 5V power adapter is correctly connected to the TX unit and plugged into a working power outlet. Verify the power indicator light on the TX unit is on.
- Verify HDMI Connections: Ensure all HDMI cables are securely connected between the source and TX, and between the RX and display. Try using different HDMI cables if possible.
- Check Ethernet Cable: Ensure the Cat5e/6/7 cable is securely connected to both the TX and RX units. Verify that the cable is not damaged and meets the required specifications (e.g., TIA/EIA-568B wiring standard).
- EDID Compatibility: Use the EDID copy function to ensure the extender has the correct display information. Connect the display directly to the TX unit and press the EDID button.
- Source/Display Settings: Confirm that your HDMI source is outputting a compatible resolution (up to 1080p) and that your display is set to the correct HDMI input.
7.2 Unstable Ethernet Connection
- Cable Latching: Ensure the Ethernet cable's RJ45 connectors are fully inserted and securely latched into both the TX and RX ports. A loose connection can cause signal drops.
- Cable Quality: Use a high-quality Cat5e/6/7 cable. Poor quality or damaged cables can lead to an unstable connection.
- Cable Length: While the extender supports up to 196ft, ensure the cable length is appropriate for your setup and within the recommended limits for your specific cable type.
7.3 Video Flickering or Distortion
- Cable Integrity: Inspect all HDMI and Ethernet cables for damage. Replace any faulty cables.
- Resolution Mismatch: Ensure the output resolution of your source device is compatible with your display and the extender (up to 1080p).
- Interference: Keep the extender units and cables away from strong electromagnetic interference sources.
- EDID Reset: Try resetting the EDID to default 1080p 3D stereo settings by holding the EDID button on the TX unit for 3 seconds.
8. Specifications
| Product Dimensions | 2.4 x 2 x 0.7 inches |
| Item Weight | 4.8 ounces |
| Model Number | JHS-UK-EX701N-A |
| Compatible Devices | DVD players, game console, Blu-ray player, media player, Satellite Box, etc. |
| Connector Type | HDMI |
| Color | Black |
| Manufacturer | CMSTEDCD |
| Transmission Distance | Up to 196ft (60m) over Cat5e/6/7 cable |
| Supported Video Resolution | 1920x1200@60Hz, 1080p, 1080i, 720p, 576i, 480p |
| Supported Audio Formats | DTS-HD/Dolby-true HD/DTS/Dolby-AC3/DSD |
| Features | POC (Power Over Cable), HDCP, EDID Copy, Zero Video Latency, ESD Protection |
9. Official Product Video
Video: This official product video from JHS-US demonstrates the CMSTEDCD HDMI Extender Over Ethernet Cat5e/6, showcasing its features and connectivity.
10. Warranty and Support
CMSTEDCD is committed to providing high-quality products and excellent customer service. Our products are backed by a comprehensive after-sales service system.
- For technical assistance, troubleshooting, or warranty inquiries, please contact our support team.
- We offer 24/7 online support to ensure you receive the assistance you need.
- Contact Email: vpfetus@163.com
Please retain your proof of purchase for warranty claims.


