1. Introduction
Thank you for choosing the Minifire MFG25X1 Pro 24.5-inch FHD 300Hz IPS Gaming Monitor. This manual provides essential information for setting up, operating, and maintaining your monitor to ensure optimal performance and longevity. Please read this manual thoroughly before use and retain it for future reference.

Figure 1.1: Front view of the Minifire MFG25X1 Pro Gaming Monitor.
2. Product Overview
2.1 Key Features
- Display: 24.5-inch Full HD (1920x1080) Fast IPS Panel.
- Refresh Rate: Native 300Hz for ultra-smooth visuals.
- Response Time: 1ms MPRT (Moving Picture Response Time) to eliminate ghosting.
- Adaptive Sync: Supports Adaptive Sync technology for tear-free and stutter-free gaming.
- Color Performance: DCI-P3 90% / sRGB 120% wide color gamut, 1000:1 contrast ratio, 300cd/m² brightness, 16.7 million colors (8-bit).
- HDR Support: Enhances dynamic range for more realistic images.
- Connectivity: 2x HDMI 2.0 (up to 240Hz), 2x DisplayPort 1.4 (up to 300Hz), 3.5mm audio output.
- Audio: Built-in 2W speakers.
- Eye Care: Features Low Blue Light technology and Flicker-Free design to reduce eye strain.
- Ergonomics: Tilt adjustment (-5° to +15°).
- Mounting: VESA 75mm x 75mm compatible.
2.2 Package Contents
Verify that all items are present and in good condition. If any items are missing or damaged, please contact customer support.
- Minifire MFG25X1 Pro Monitor
- Power Adapter
- DisplayPort Cable
- Stand Base and Neck
- User Manual (this document)
- Warranty Card

Figure 2.1: Included accessories and components.
3. Setup Instructions
3.1 Assembling the Stand
- Place the monitor face down on a soft, clean surface to prevent scratches.
- Attach the stand neck to the monitor. Ensure it clicks into place securely.
- Attach the stand base to the stand neck. Secure it with the provided screw.
- Carefully lift the monitor and place it on a stable, flat surface.

Figure 3.1: Stand assembly steps.
3.2 VESA Mounting
The monitor supports VESA 75mm x 75mm mounting. Use M4 x 8mm screws for VESA mounting. Ensure the VESA mount is securely attached to a wall or desk arm capable of supporting the monitor's weight.

Figure 3.2: VESA mounting points and tilt range.
3.3 Connecting to a Power Source
Connect the power adapter to the monitor's DC input port, then plug the adapter into a power outlet.
4. Operating Instructions
4.1 Power On/Off
Press the power button located on the back of the monitor to turn it on or off. The monitor will enter standby mode when no signal is detected.
4.2 OSD Menu Navigation
The monitor features a 5-way joystick for navigating the On-Screen Display (OSD) menu. Press the joystick to open the OSD menu. Use the joystick to move up/down/left/right to select options and adjust settings. Press the joystick again to confirm selections or exit sub-menus.

Figure 4.1: Monitor control buttons and input ports.
4.3 Refresh Rate and Response Time
The monitor supports a 300Hz refresh rate and 1ms MPRT response time for a fluid gaming experience. Ensure your connected device (PC, console) and cable support these specifications to achieve the maximum performance.

Figure 4.2: Visual comparison of different refresh rates.

Figure 4.3: Benefit of 1ms MPRT response time.
4.4 Adaptive Sync
Adaptive Sync technology synchronizes the monitor's refresh rate with your graphics card's frame rate, eliminating screen tearing and minimizing stuttering for smoother gameplay.

Figure 4.4: Adaptive Sync in action.
4.5 Tilt Adjustment
The monitor stand allows for tilt adjustment from -5° to +15°. Gently hold both sides of the monitor and tilt it to your desired viewing angle. The monitor will hold its position once adjusted.
5. Connections
The Minifire MFG25X1 Pro offers multiple connectivity options for various devices.
- DisplayPort 1.4 (x2): Recommended for achieving the full 300Hz refresh rate.
- HDMI 2.0 (x2): Supports up to 240Hz refresh rate. Compatible with PCs, PS5, Xbox, and Nintendo Switch.
- 3.5mm Audio Out: Connect external headphones or speakers.
- DC Power Input: For connecting the power adapter.

Figure 5.1: Available input and output ports.
5.1 Input Switching
Use the OSD joystick to quickly switch between connected input sources (DP1, DP2, HDMI1, HDMI2).

Figure 5.2: Input switching and display modes.
6. Display Settings
The OSD menu allows you to customize various display settings.
- Brightness/Contrast: Adjust the overall luminance and contrast of the display.
- Color Settings: Fine-tune color temperature, hue, and saturation.
- Picture Modes: Select from predefined modes (e.g., Standard, Game, Movie, FPS, RTS, sRGB) optimized for different content types.
- HDR: Enable or disable High Dynamic Range for compatible content.
- Low Blue Light: Reduce blue light emission to minimize eye strain.
- Black Level: Adjust black levels for improved visibility in dark game scenes.
- Crosshair: Enable an on-screen crosshair for improved aiming in games.
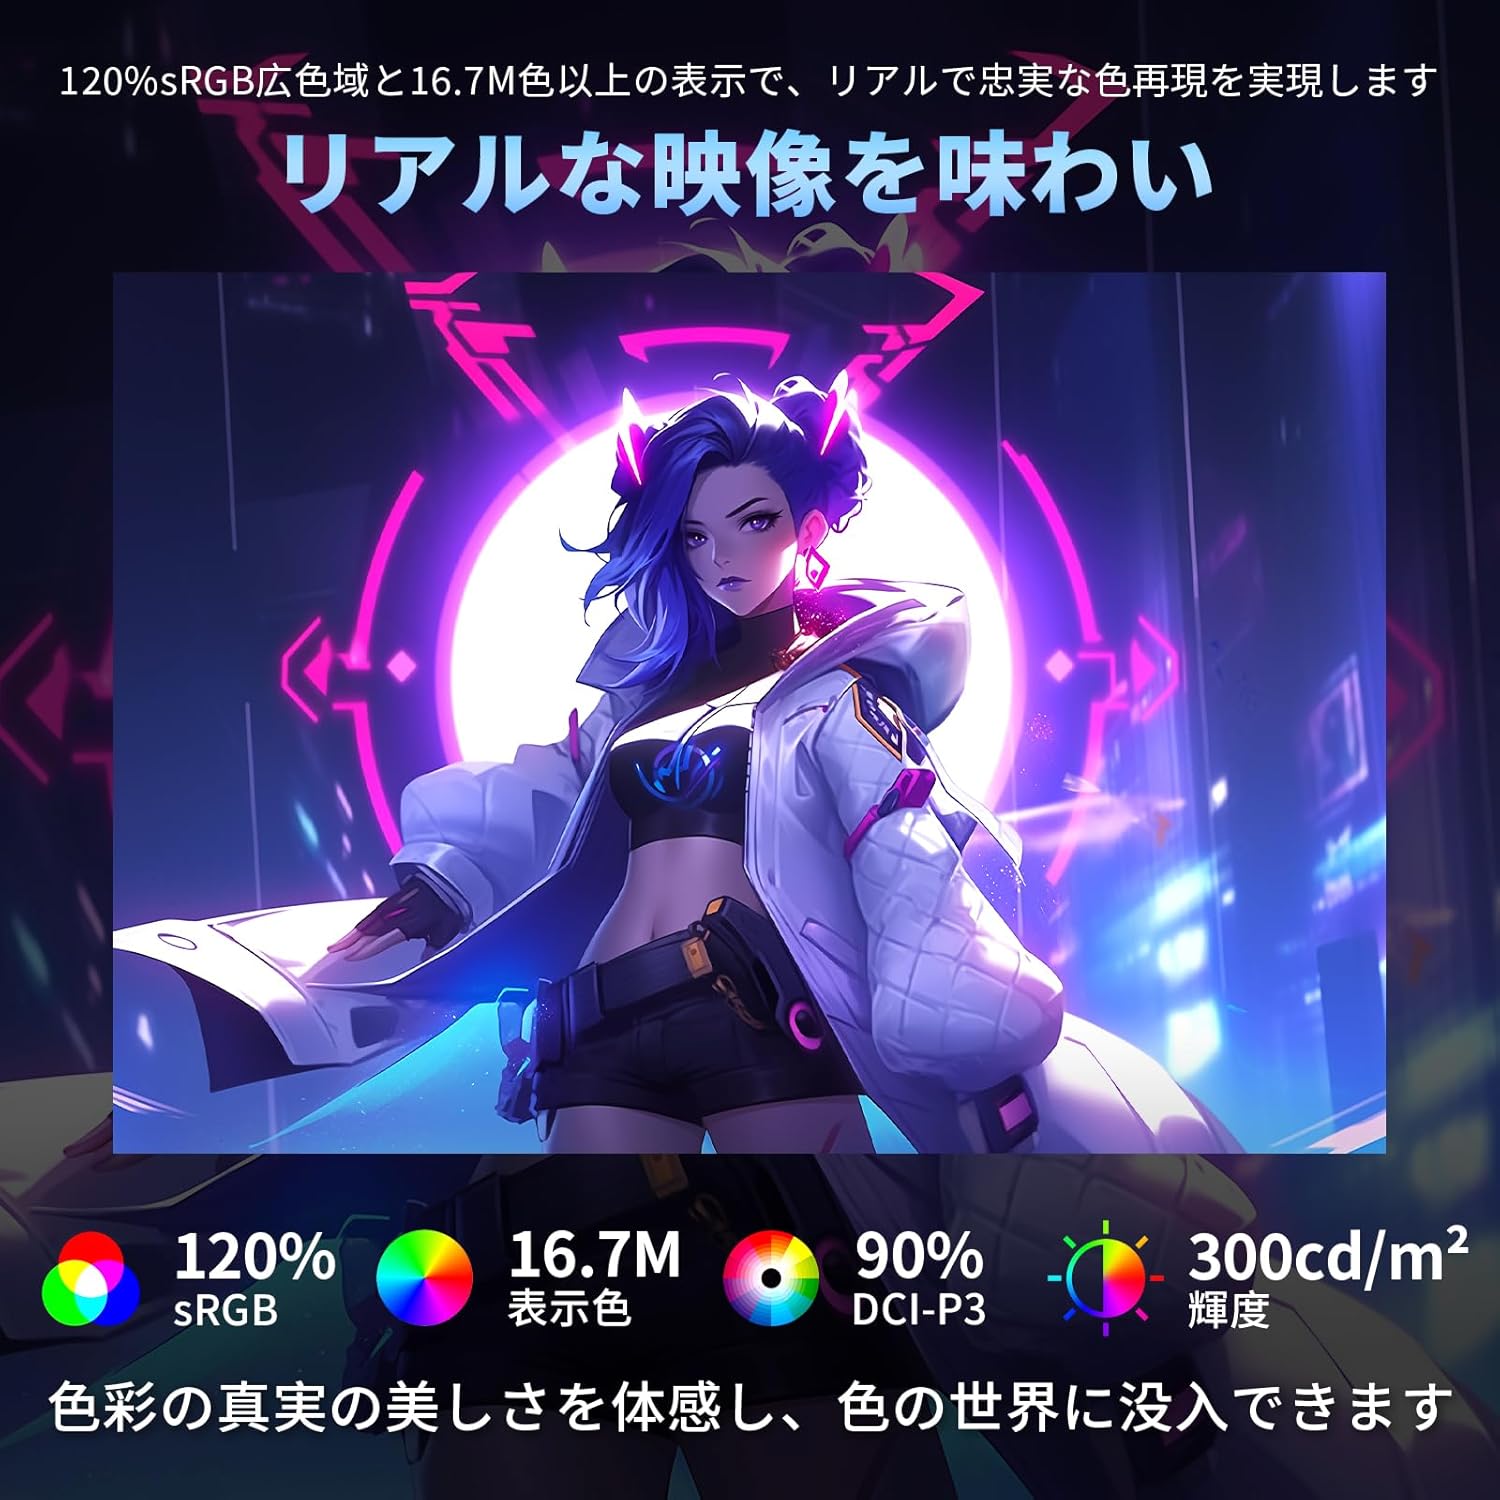
Figure 6.1: Monitor color performance and brightness.

Figure 6.2: Black level and crosshair features.
7. Maintenance
To ensure the longevity and optimal performance of your monitor, follow these maintenance guidelines:
- Cleaning the Screen: Use a soft, lint-free cloth lightly dampened with water or a specialized screen cleaner. Do not spray cleaner directly onto the screen.
- Cleaning the Casing: Use a soft, dry cloth to wipe the monitor casing. Avoid using abrasive cleaners or solvents.
- Ventilation: Ensure proper ventilation around the monitor. Do not block the ventilation openings.
- Power Off: Always turn off the monitor and unplug it from the power outlet before cleaning or if it will be unused for an extended period.
8. Troubleshooting
If you encounter any issues with your monitor, refer to the following common problems and solutions:
| Problem | Possible Cause | Solution |
|---|---|---|
| No image on screen | No power, incorrect input selected, loose cable connection. | Check power cable, select correct input source, ensure video cables are securely connected. |
| Image is blurry or distorted | Incorrect resolution, faulty cable, graphics card driver issues. | Set display resolution to 1920x1080, try a different cable, update graphics drivers. |
| Screen tearing or stuttering | Adaptive Sync not enabled, refresh rate mismatch. | Enable Adaptive Sync in OSD and graphics card settings. Ensure refresh rate is set correctly. |
| No sound from speakers/headphones | Volume too low, incorrect audio output selected, faulty audio cable. | Adjust volume, select monitor as audio output in OS settings, check audio cable. |
| Monitor not reaching 300Hz | Connected device or cable does not support 300Hz. | Ensure you are using a DisplayPort 1.4 cable and your graphics card supports 300Hz at 1920x1080. For HDMI, max is 240Hz. |
If the problem persists after trying these solutions, please contact Minifire customer support.
9. Specifications
| Feature | Specification |
|---|---|
| Model Name | MFG25X1 Pro |
| Panel Size | 24.5 inches |
| Panel Type | Fast IPS |
| Resolution | 1920 x 1080 (FHD) |
| Aspect Ratio | 16:9 |
| Refresh Rate | 300Hz (DisplayPort), 240Hz (HDMI) |
| Response Time | 1ms MPRT |
| Brightness | 300 cd/m² |
| Contrast Ratio | 1000:1 |
| Color Gamut | DCI-P3 90% / sRGB 120% |
| Viewing Angle | 178° (H) / 178° (V) |
| Connectivity | 2x HDMI 2.0, 2x DisplayPort 1.4, 1x 3.5mm Audio Out |
| Speakers | 2W x 2 (Built-in) |
| VESA Mount | 75mm x 75mm (M4 x 8mm screws) |
| Tilt Adjustment | -5° to +15° |
| Dimensions (with stand) | 557 x 419 x 191 mm |
| Weight (monitor only) | 2.8 kg |
| Power Consumption | <42W |
| Power Input | 100V |

Figure 9.1: Monitor dimensions.
10. Warranty and Support
Minifire is committed to providing excellent customer service.
- Warranty: 5-year free repair warranty from the date of purchase.
- Exchange Policy: Free exchange within 1 month of purchase if any issues arise.
- Dead Pixel Policy: 1-year warranty against dead pixels on the screen.
- Technical Support: Lifetime technical support is provided. Please contact us if you have any questions or concerns about the product.
For support, please refer to the contact information on your warranty card or visit the official Minifire website.
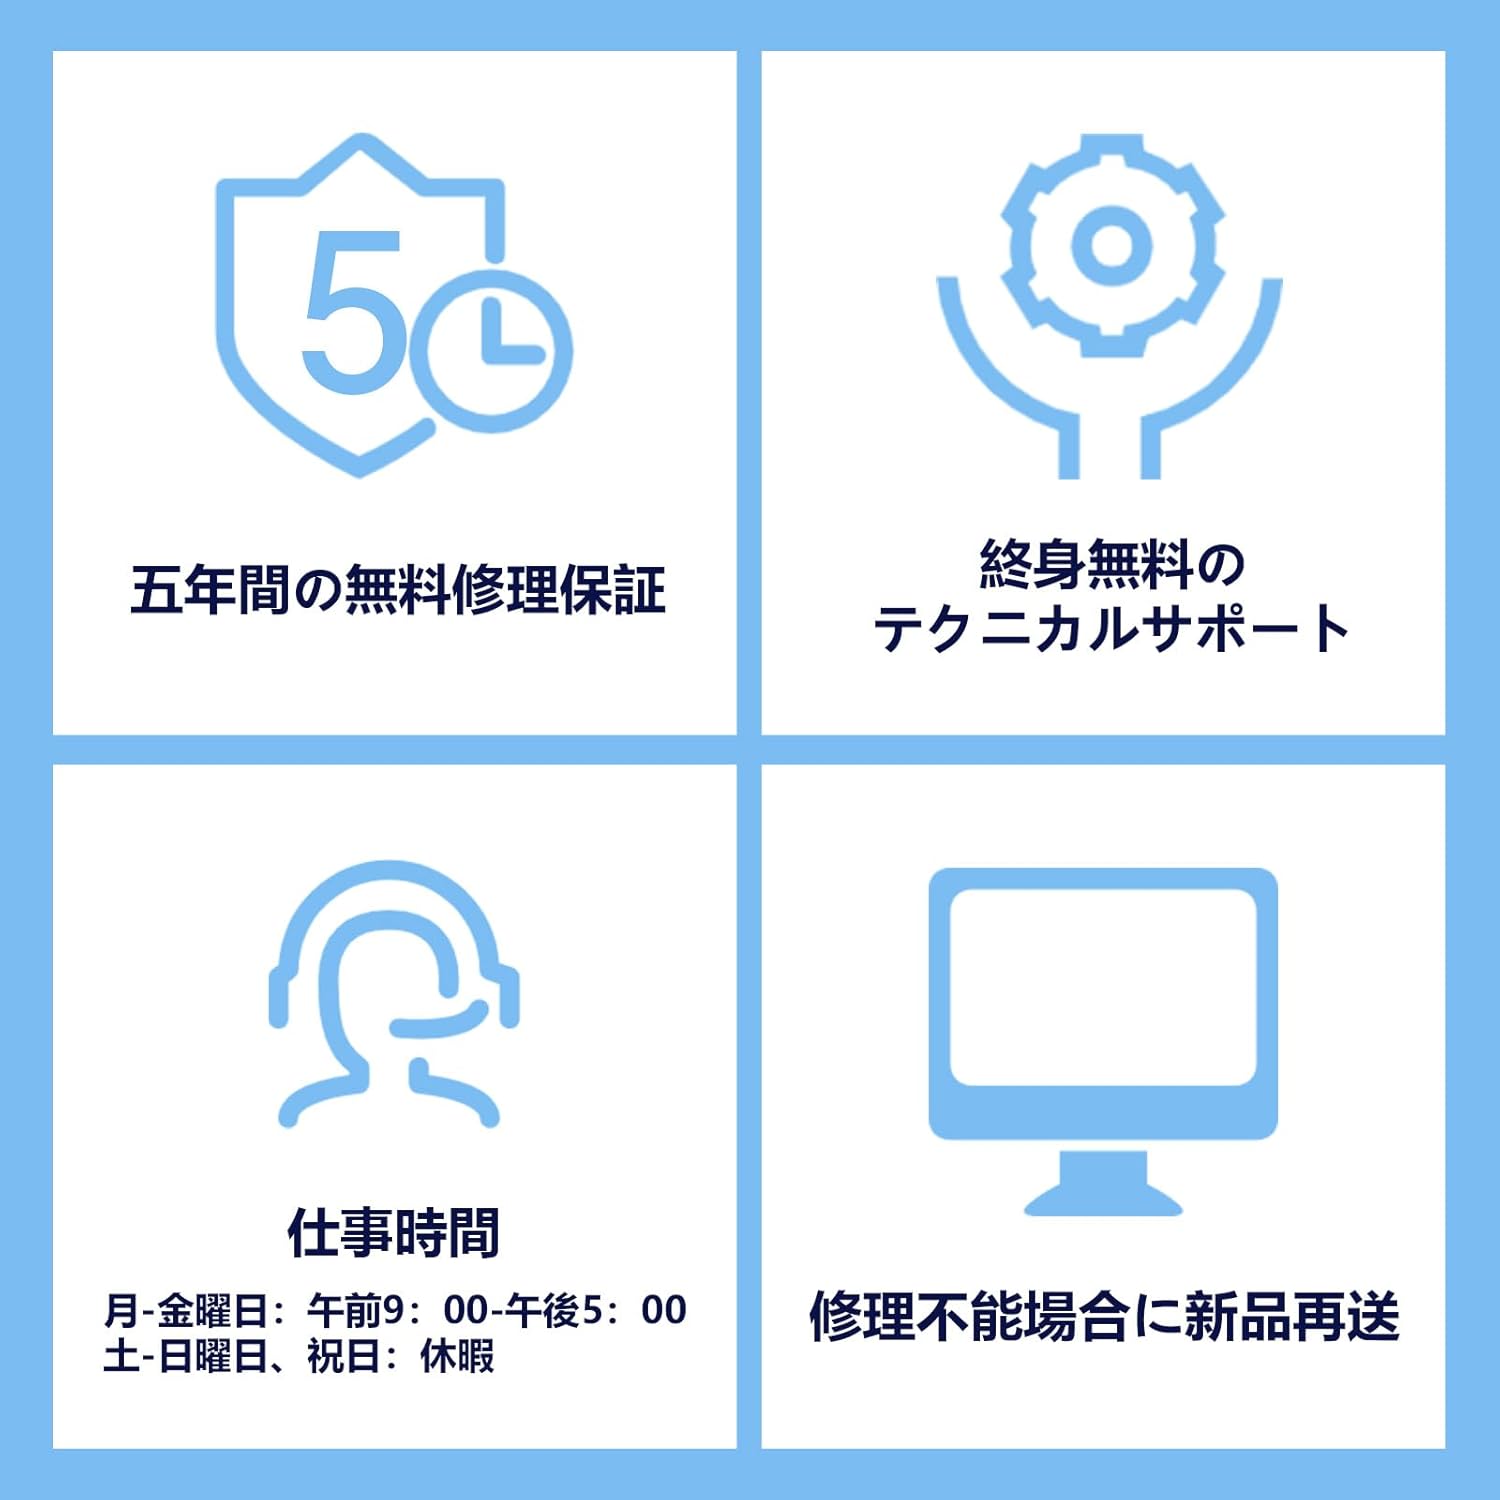
Figure 10.1: Warranty and support details.
11. Important Notes
- The 300Hz refresh rate is the maximum supported by this product and depends on the specifications of the connected device. If your device does not support 300Hz, the actual refresh rate will be limited by your device's maximum capability. Refresh rate settings may need to be adjusted on the connected device.
- Recommended connection for 300Hz: DisplayPort cable. (HDMI connection supports a maximum of 240Hz).
- For PlayStation 4/5 connections, the maximum output refresh rate is 120Hz. Some game titles may operate at a 60Hz limit. Even with 120fps compatible games, the standby screen may display at 60Hz, dynamically switching to 120Hz during high-load battle scenes.
- Actual operating frequency may vary due to complex factors such as game engine, GPU load, and resolution settings.
- For optimal performance, we recommend using a DisplayPort 1.4 compliant GPU and a gaming PC.


