1. Introduction
This manual provides detailed instructions for the assembly, operation, and maintenance of your VASAGLE Pantry Cabinet, Model UBBK391W01. This cabinet is designed to offer organized storage with integrated lighting and a charging station, enhancing functionality in your kitchen, dining area, or living space. Please read all instructions carefully before beginning assembly and retain this manual for future reference.

Image 1.1: VASAGLE Pantry Cabinet, Model UBBK391W01, showcasing its design and functionality in a kitchen environment.
2. Safety Information
Adherence to the following safety guidelines is crucial for preventing injury and damage to the product.
- Anti-Tip Kit: Always secure the cabinet to the wall using the included anti-tip kit to prevent accidental tipping. Failure to do so can result in serious injury.
- Power Strip: When the integrated power strip is not in use, turn off its on-off switch to ensure electrical safety.
- Weight Capacity: Do not exceed the maximum weight capacity of 53 kg (116.8 lbs) for the entire unit. Distribute weight evenly across shelves and drawers.
- Assembly: Assembly should ideally be performed by two adults. Ensure all parts are correctly aligned and fasteners are tightened securely before use.
- Placement: Place the cabinet on a flat, stable surface. Avoid placing it in areas with high humidity or direct sunlight to prevent material degradation.
3. Package Contents
Before beginning assembly, verify that all components and hardware are present and undamaged. Refer to the included assembly manual for a complete list of parts. In general, your package should contain:
- Cabinet panels (particleboard, MDF, acrylic)
- Hardware kit (screws, dowels, cam locks, etc.)
- Adjustable shelves and shelf pins
- Sliding door mechanisms
- Integrated LED lighting strip
- Integrated charging station with power strip
- Anti-tip kit
- Assembly instructions
4. Assembly Instructions
Assembly of the VASAGLE Pantry Cabinet requires careful attention to detail. Follow the step-by-step instructions provided in the separate assembly manual included with your product. All parts are labeled for easy identification.
- Unpack and Identify: Carefully unpack all components and lay them out on a clean, soft surface to prevent scratches. Identify each part using the labels and the assembly manual diagram.
- Frame Assembly: Begin by assembling the main frame of the cabinet, ensuring all connections are secure.
- Drawer and Door Installation: Install the drawers and cabinet doors according to the instructions. Ensure smooth operation of sliding doors and drawers.
- Shelf Placement: Insert the adjustable shelves into your desired positions.
- Electrical Components: Install the LED lighting strip and charging station. Ensure all electrical connections are properly made and secured.
- Secure to Wall: Crucially, attach the anti-tip kit to the top rear of the cabinet and secure it to a wall stud. This step is essential for stability and safety.
While assembly is designed to be straightforward, having a second person can make the process smoother and faster.
5. Operating Instructions
5.1 Adjustable Lighting
The cabinet features an integrated LED lighting strip with adjustable color hues and dimmable brightness.
- Color Hue Adjustment: Tap the touch control button to cycle through three color hues: 6000K (Cool Light), 4000K (Natural Light), and 3000K (Warm Light).
- Brightness Adjustment: Touch and hold the touch control button to dim or brighten the light to your preferred level.
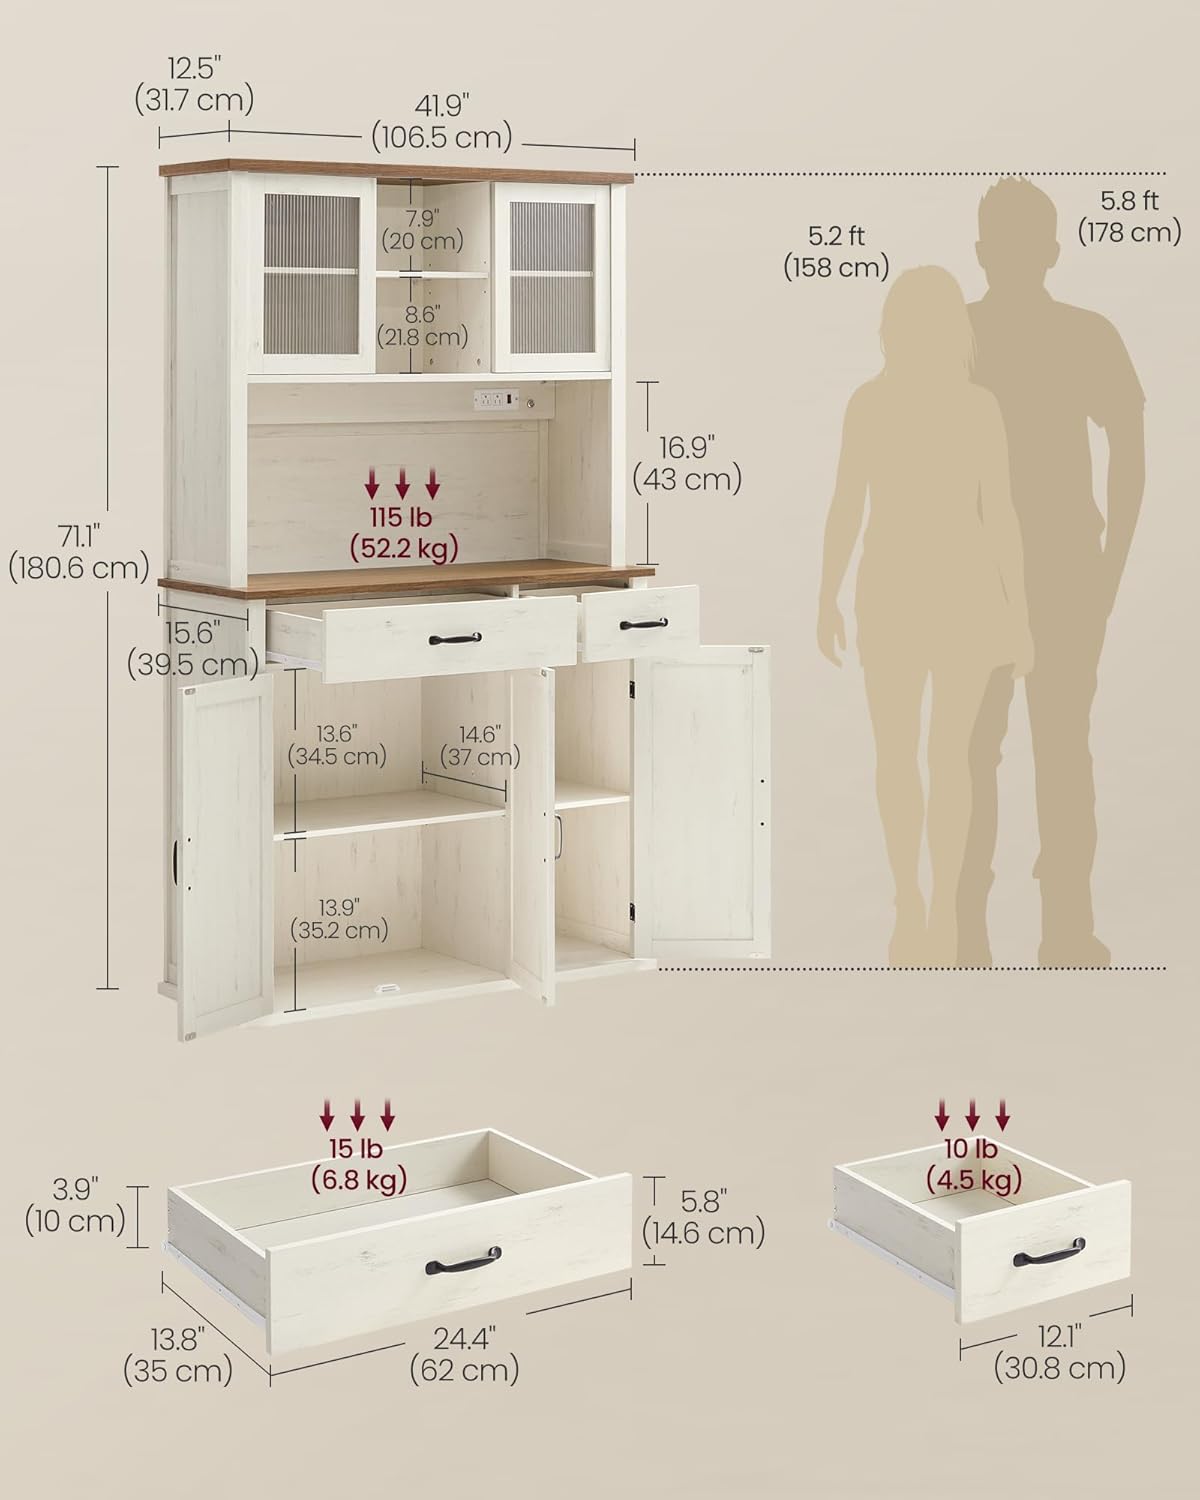
Image 5.1: Illustration of the adjustable light feature, demonstrating three color temperatures and touch control for brightness and hue.
5.2 Charging Station
The cabinet includes a built-in power strip for convenient access to electrical outlets.
- AC Outlets: The charging station provides two 125V/15A AC outlets, suitable for powering kitchen appliances or charging devices.
- On-Off Switch: A dedicated on-off switch controls power to the outlets. Always turn this switch off when the charging station is not in use to conserve energy and enhance safety.
- Power Cord: The unit comes with a 6.6 ft (2 m) power cord for connection to a wall outlet.

Image 5.2: Detailed view of the integrated charging station, highlighting the on-off switch and two AC outlets.
5.3 Adjustable Shelves
The cabinet features adjustable shelves to accommodate items of various heights.
- Upper Section: Each middle shelf in the upper section has 3 height settings, allowing for flexible storage between 6.6 inches (16.8 cm) and 9.8 inches (25 cm) in height.
- Lower Cabinets: Each lower cabinet has an adjustable shelf with 5 height options, providing storage flexibility between 11 inches (28.1 cm) and 16.4 inches (41.6 cm) in height.
- Adjustment: To adjust a shelf, remove any items, lift the shelf, reposition the shelf pins to the desired height, and then place the shelf back onto the pins.

Image 5.3: Visual guide to the adjustable shelves, showing minimum and maximum height settings for both upper and lower compartments.
6. Maintenance
Regular maintenance will help preserve the appearance and functionality of your cabinet.
- Cleaning: Wipe surfaces with a soft, damp cloth. Avoid harsh chemicals or abrasive cleaners, which can damage the finish.
- Spills: Clean spills immediately to prevent staining or moisture damage.
- Hardware: Periodically check all screws and fasteners to ensure they remain tight. Retighten as necessary.
- Electrical Components: Ensure the power cord is not pinched or damaged. Do not attempt to repair the charging station or lighting yourself; contact qualified personnel if issues arise.
7. Troubleshooting
This section addresses common issues you might encounter with your cabinet.
- Assembly Difficulty: If you encounter difficulty during assembly, double-check the part labels against the assembly manual diagrams. Ensure all pieces are oriented correctly. Do not force parts together. Contact customer support if a part appears defective or missing.
- Light Not Working: Verify that the cabinet is plugged into a functional wall outlet and that the on-off switch for the charging station is in the 'on' position. Check the touch control button for responsiveness. If the issue persists, contact customer support.
- Drawers or Doors Stick: Ensure all hardware for drawers and doors is installed correctly and tightened appropriately. Check for any obstructions in the tracks or hinges.
- Cabinet Wobbles: Confirm the cabinet is placed on a level surface. If wobbling persists, ensure all assembly fasteners are tight and that the anti-tip kit is securely installed to the wall.
8. Specifications
| Feature | Detail |
|---|---|
| Brand | VASAGLE |
| Model Number | UBBK391W01 |
| Color | Rustic White |
| Product Dimensions (D x W x H) | 39.5 x 106.5 x 180.6 cm (15.6 x 41.9 x 71.1 inches) |
| Item Weight | 53 kg (116.8 lbs) |
| Maximum Weight Capacity | 53 kg (116.8 lbs) |
| Material | Particleboard, MDF (Medium Density Fiberboard), Acrylic |
| Special Features | Adjustable Light, With Charging Station, Adjustable Shelves, Storage Aplenty |
| Charging Station | 2 AC Outlets (125V/15A), Max. Power 1875 Watts, 6.6 ft (2 m) Power Cord, On-Off Switch |
| Lighting | Adjustable Light, 3 Color Hues (6000K, 4000K, 3000K), Dimmable, Touch Control |
| Mounting Type | Floor Mount (with anti-tip kit for wall attachment) |

Image 8.1: Comprehensive dimensions of the pantry cabinet, including overall height, width, depth, and internal compartment measurements.
9. Warranty and Support
For any questions, missing parts, or issues not covered in this manual, please contact VASAGLE customer support. Your product is eligible for return or refund within 30 days of receipt. Please refer to your purchase documentation for specific warranty details and contact information.
Customer Support: For assistance, please visit the VASAGLE Store on Amazon or refer to the contact details provided with your purchase.


