1. Introduction
This manual provides essential information for the safe and efficient operation of your EARNMee 120A MPPT Solar Charge Controller. This device is designed for solar off-grid power generation systems, automatically regulating battery charging and discharging. It utilizes an advanced tracking algorithm to maximize power extraction from solar modules and features Low Voltage Disconnect (LVD) to prevent battery over-discharging. Comprehensive self-test and electronic protection functions are integrated to prevent damage from installation errors and system failures.
2. Safety Instructions
- Read Entire Manual: Before installation and operation, thoroughly read and understand all instructions in this manual.
- Qualified Personnel: Installation and maintenance should only be performed by qualified personnel familiar with solar power systems and electrical safety procedures.
- Electrical Shock Hazard: Solar panels can produce high voltages even in low light conditions. Always disconnect all power sources (solar array and battery) before working on the controller.
- Battery Safety: Work with batteries carefully. Wear eye protection and remove jewelry. Batteries can produce explosive gases. Ensure adequate ventilation.
- Correct Wiring: Ensure all wiring is correct and connections are tight. Incorrect polarity can damage the controller and other components.
- Ventilation: Install the controller in a well-ventilated area to ensure proper heat dissipation.
- Overcurrent Protection: Install appropriate circuit breakers or fuses for all lines (PV, battery, load) as per local electrical codes.
- Grounding: Ensure the controller is properly grounded.
3. Product Overview
The EARNMee 120A MPPT Solar Charge Controller is a robust device designed for optimal performance in off-grid solar systems. It features advanced Maximum Power Point Tracking (MPPT) technology to efficiently harvest energy from your solar panels.
3.1 Key Features
- High Efficiency MPPT: Advanced tracking algorithm ensures maximum power extraction from solar modules.
- Wide Battery Compatibility: Supports 12V/24V/36V/48V/60V/72V/84V/96V lithium-ion and lead-acid batteries (GEL, LiFePO4, Li-ion, user-defined).
- Comprehensive Protection: Includes overcharge, overcurrent, overheating, short circuit, and lithium battery activation functions.
- Full Power Input: Provides stable and sufficient power, ideal for high-power and complex demand scenarios.
- LCD Display: Clear LCD for monitoring system status and parameters.
3.2 Component Identification

Figure 1: Front view of the EARNMee 120A MPPT Solar Charge Controller, showing the LCD display and control buttons.
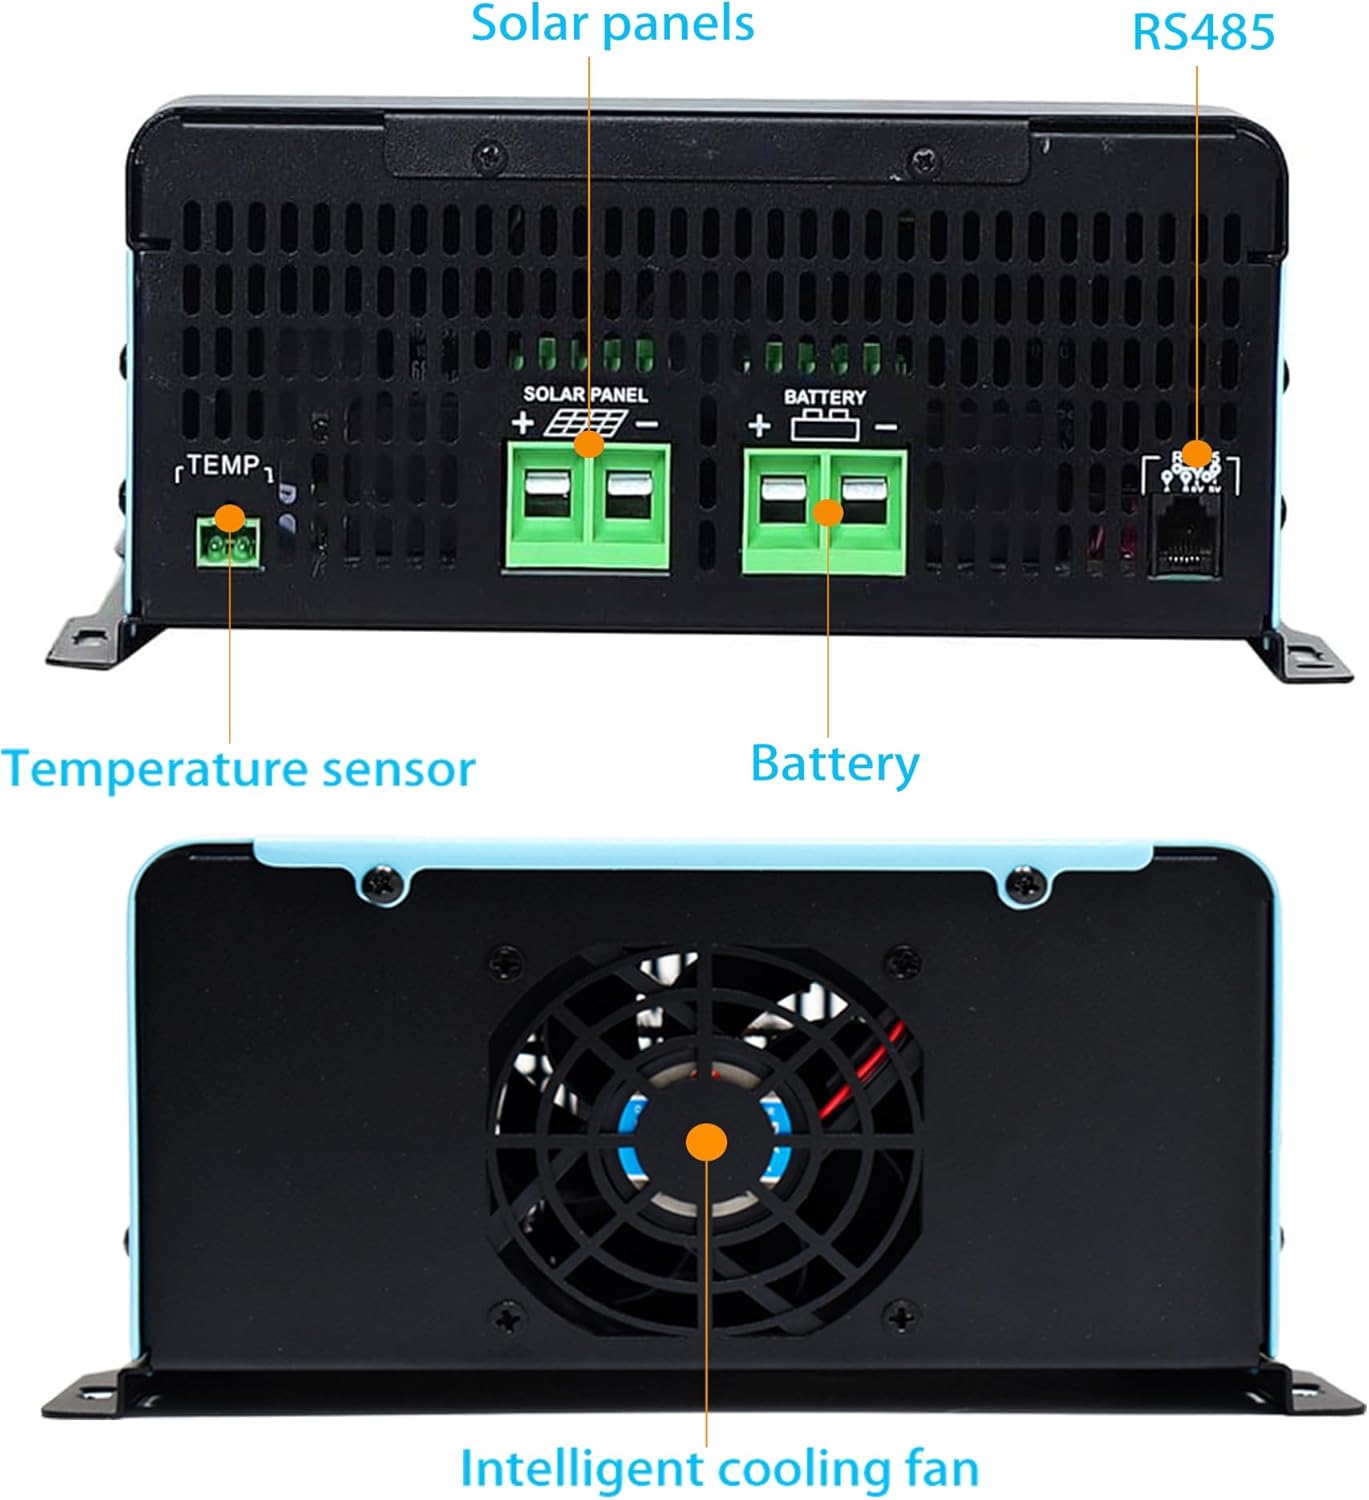
Figure 2: Back view of the controller, highlighting the solar panel input terminals, battery terminals, RS485 communication port, and temperature sensor port. An intelligent cooling fan is also visible.

Figure 3: Overview of the 8-in-1 multiple protection features, including over-current, over-voltage, over-charging, over-temperature, over-load, under-voltage, fault alarm, and short-circuit protection.
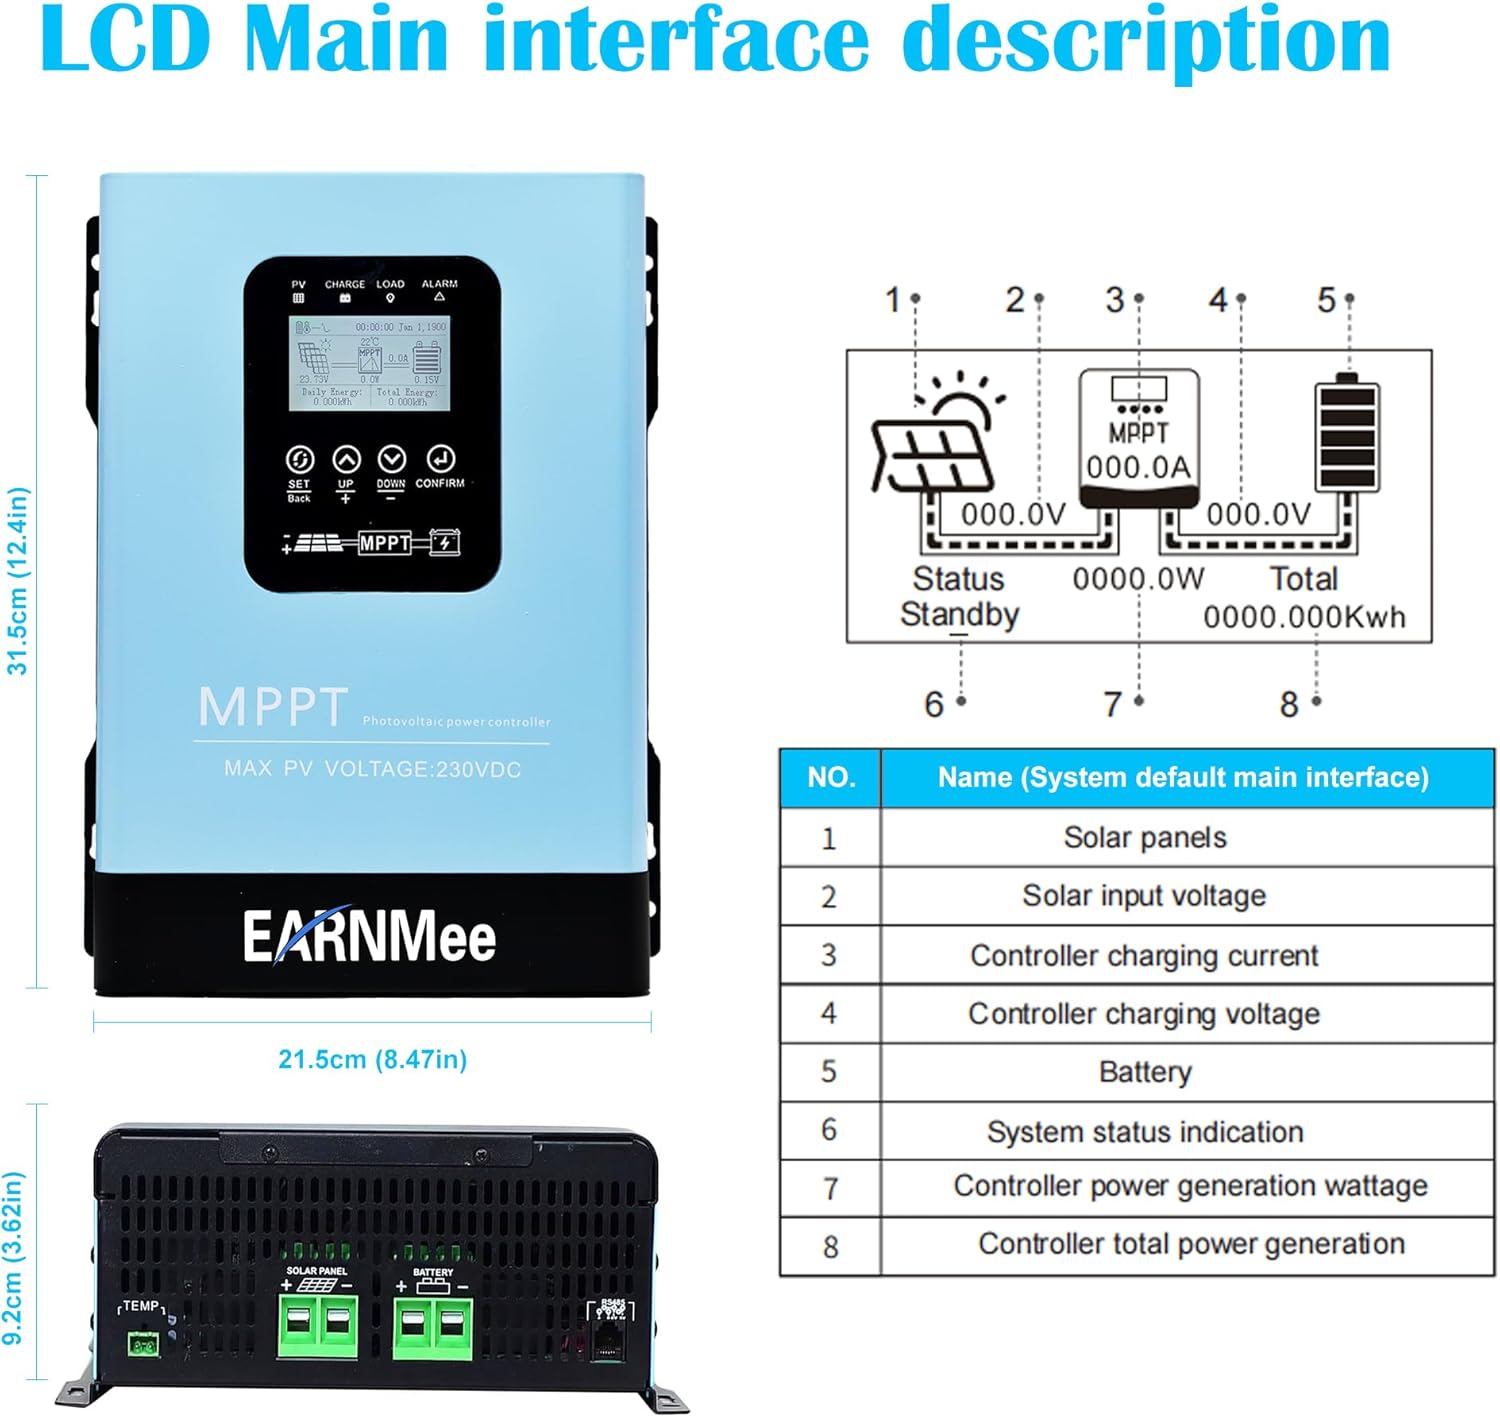
Figure 4: Detailed description of the LCD main interface, indicating solar panels, solar input voltage, controller charging current, controller charging voltage, battery, system status indication, controller power generation wattage, and total power generation.
4. Specifications
| Parameter | Value |
|---|---|
| Model | 120A MPPT |
| System Voltage | 12V/24V/36V/48V/60V/72V/84V/96V (Automatic Recognition) |
| Max PV Input Voltage (VOC) | 230V |
| Charging Current | 120A |
| Max PV Power (12V Battery) | 1440W |
| Max PV Power (24V Battery) | 2880W |
| Max PV Power (36V Battery) | 4320W |
| Max PV Power (48V Battery) | 5760W |
| Max PV Power (60V Battery) | 7200W |
| Max PV Power (72V Battery) | 8640W |
| Max PV Power (84V Battery) | 10080W |
| Max PV Power (96V Battery) | 11520W |
| Compatible Battery Types | Sealed Lead Acid (GEL, Flooded), Lithium (LiFePO4, Li-ion, User-defined) |
| Display Type | LCD |
| Product Dimensions | 8.46"L x 3.62"W x 12.4"H |
| Item Weight | 8.82 pounds |
| Material | Metal |
5. Setup and Installation
Follow these steps for proper installation of your MPPT solar charge controller. Ensure all safety precautions are observed.
5.1 Mounting the Controller
- Select a suitable mounting location that is dry, well-ventilated, and protected from direct sunlight and moisture.
- Ensure there is sufficient clearance around the controller for proper airflow and heat dissipation.
- Mount the controller securely to a vertical surface using appropriate screws.
Video 1: Installation Guide for a similar MPPT Controller. This video demonstrates the physical mounting process and initial wiring steps. (Source: Y-SOLAR, Seller)
5.2 Wiring Connections
Connect the components in the following order to prevent damage:
- Connect the Battery: First, connect the positive and negative terminals of the battery to the corresponding battery terminals on the charge controller. Ensure correct polarity.
- Connect the Solar Panels: Next, connect the positive and negative leads from your solar panel array to the PV input terminals on the controller. Verify polarity.
- Connect the Load (Optional): If using a DC load directly from the controller, connect it to the load terminals.
- Connect Temperature Sensor: Plug in the temperature sensor to the designated port for accurate battery temperature compensation.
- Connect RS485 Communication Line (Optional): For monitoring or parallel communication, connect the RS485 cable.
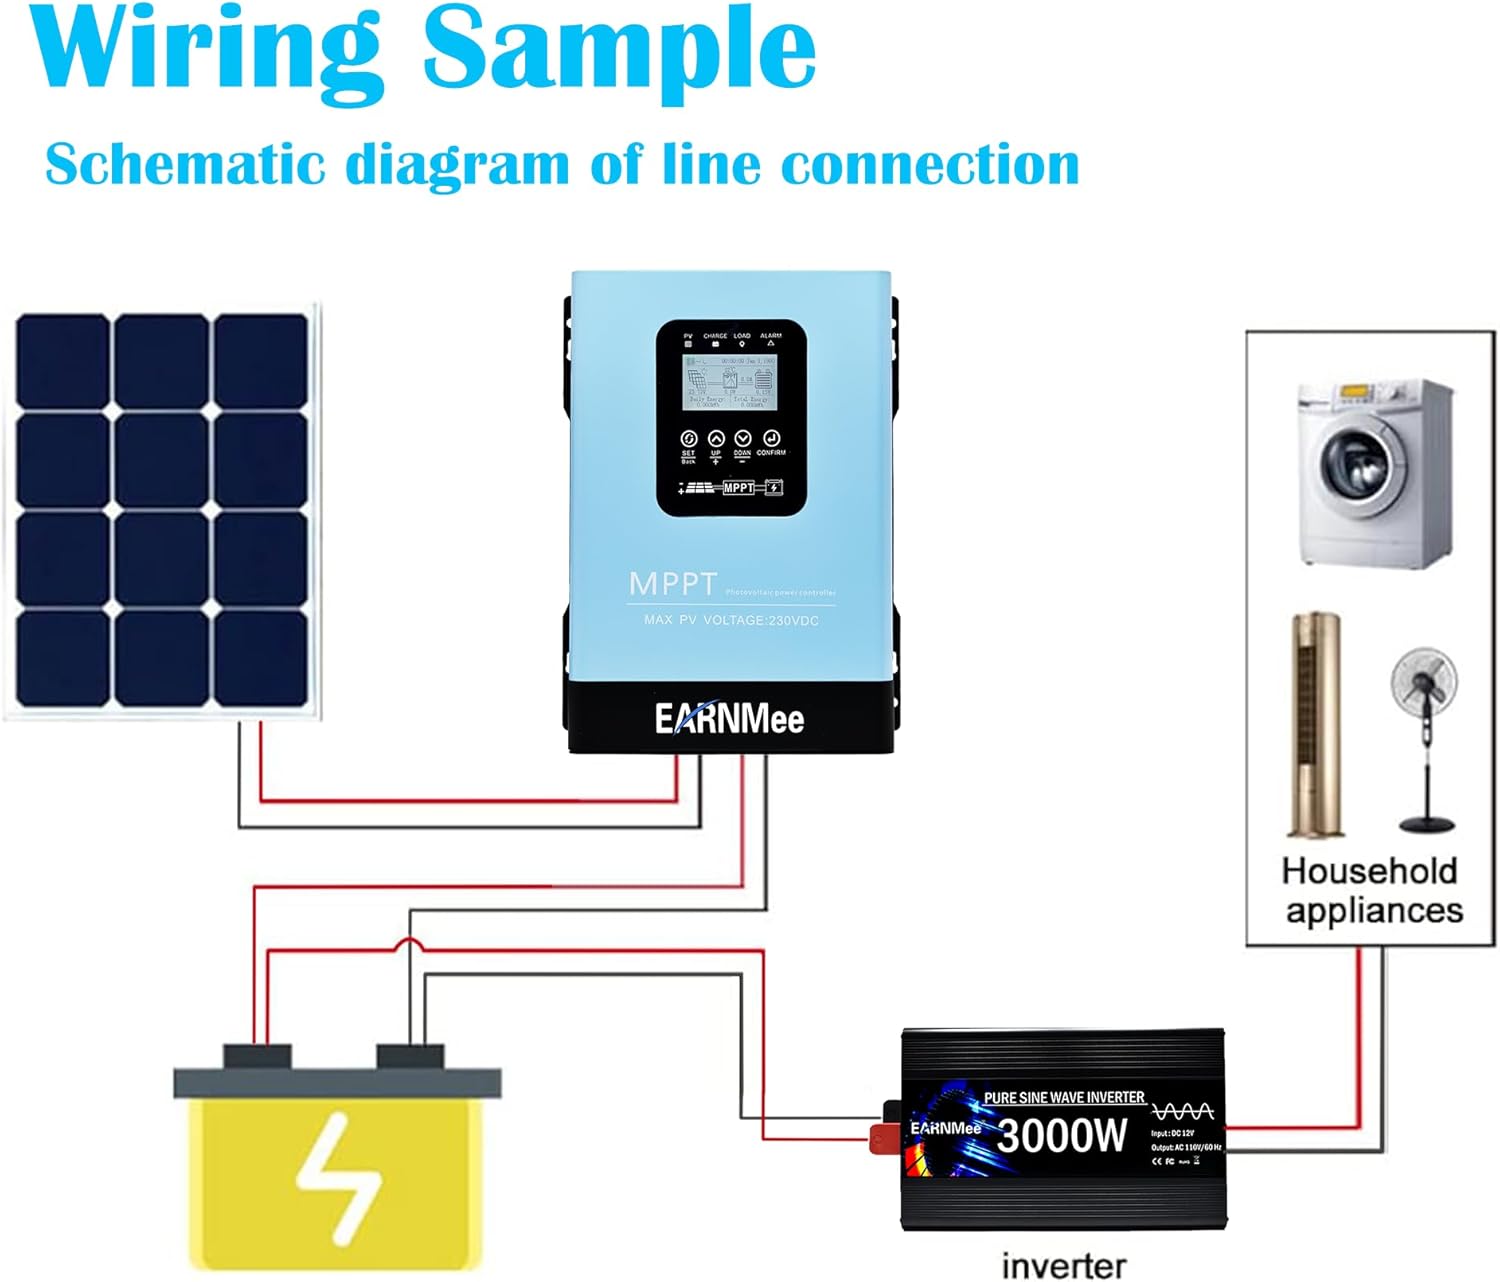
Figure 5: Wiring sample illustrating the connection of solar panels, battery, inverter, and household appliances to the MPPT solar charge controller.
Video 2: Demonstration of wiring connections for the 30A/60A/120A MPPT Solar Charge Controller. This video shows the process of connecting the battery and solar panels. (Source: MYAMi Store, Seller)
Video 3: Quick Installation Wiring Guide for PowMr MPPT controllers, demonstrating the steps for connecting wires. (Source: Spring Mirror, Seller)
6. Operating Instructions
The controller's LCD provides real-time system information and allows for parameter adjustments. Refer to Figure 4 for LCD interface details.
6.1 Basic Operation
- Power On: After connecting the battery and solar panels, the controller will power on automatically.
- Main Interface: The LCD will display key parameters such as PV voltage, charging current, battery voltage, and load status. The display cycles automatically every 5 seconds.
- Manual Navigation: Use the "UP" and "DOWN" buttons to manually cycle through different display screens and parameters.
6.2 Parameter Settings
To enter the setup program, long-press the "PV/SET" button. Use the "UP" and "DOWN" buttons to navigate through settings and "ENTER" to confirm changes. If no operation is performed for 10 seconds, the controller will automatically exit and save the parameters.
- Battery Type Selection (Setting 05): Choose your battery type (AGM, Flooded, LiFePO4, User). For custom settings, select "USE" and adjust parameters in Settings 26 and 27.
- Maximum Charging Current (Setting 02): Configure the maximum charging current. This controller supports up to 140A.
- Boost Charging Voltage (Setting 26): Set the voltage for the boost charging stage.
- Float Charging Voltage (Setting 27): Set the voltage for the float charging stage.
- Over-Temperature Auto Restart (Setting 07): Enable or disable automatic restart after an over-temperature shutdown.
- Battery Equalization Function (Setting 30): Enable or disable battery equalization for flooded lead-acid or user-defined battery types. This function helps resolve chemical imbalances.
- Equalization Voltage (Setting 31): Configure the voltage for the equalization process.
- Equalization Duration (Setting 32): Define how long the equalization process will last.
- Equalization Delay Time (Setting 34): Set the delay time before equalization extends if the voltage target is not met.
- Equalization Frequency (Setting 35): Determine how often automatic equalization will occur.
- Manual Equalization Control (Setting 36): Manually start or stop the equalization process.
- Date and Time Settings (Settings 81-85): Set the year, month, day, hour, and minute.
- Clear Energy Data (Setting 86): Clear cumulative power generation data (daily, monthly, gross).
Video 4: Setting Guide for POW-48140A MPPT Controller, demonstrating how to navigate and adjust various parameters. (Source: Y-SOLAR, Seller)
Video 5: MPPT Solar Charging Controller operation demonstration, showing display cycling and basic parameter interaction. (Source: OOYCYOO, Seller)
7. Maintenance
Regular maintenance ensures the longevity and optimal performance of your solar charge controller.
- Visual Inspection: Periodically inspect the controller for any visible damage, loose connections, or signs of overheating.
- Cleanliness: Keep the controller clean and free from dust and debris. Use a dry cloth to wipe the exterior. Ensure ventilation openings are not blocked.
- Connection Checks: Annually, check all electrical connections for tightness. Loose connections can cause overheating and damage.
- Battery Inspection: For flooded batteries, check electrolyte levels and top up with distilled water if necessary. Keep battery terminals clean and free of corrosion.
- Environmental Conditions: Ensure the operating environment remains within the specified temperature and humidity ranges.
8. Troubleshooting
If you encounter issues with your controller, refer to the following common troubleshooting steps. For persistent problems, contact technical support.
| Problem | Possible Cause | Solution |
|---|---|---|
| Controller not powering on | No battery connection or incorrect polarity; battery voltage too low. | Check battery connections and polarity. Ensure battery voltage is above minimum operating threshold. |
| No charging current from PV | PV array not connected; insufficient sunlight; PV voltage too low/high; PV polarity reversed. | Check PV connections and polarity. Ensure adequate sunlight. Verify PV voltage is within controller's operating range. |
| Battery not fully charged | Incorrect battery type setting; insufficient PV power; high load consumption. | Verify battery type setting. Check PV array size and sunlight conditions. Reduce load if necessary. |
| Over-temperature alarm | Poor ventilation; high ambient temperature; excessive load. | Improve ventilation around the controller. Reduce ambient temperature or load. |
| Load not working | Load disconnected; load overcurrent; battery low voltage disconnect. | Check load connections. Reduce load. Charge battery. |
9. Warranty and Support
EARNMee is committed to delivering top-quality products and exceptional service. We perform quality checks on all MPPT Solar Charge Controllers before shipment to ensure you receive a product in good condition.
For immediate assistance with installation, troubleshooting, or any other inquiries, please contact our 24/7 technical support team via email. Refer to your product packaging or purchase documentation for specific contact details.


