
1. Introduction
Welcome to the user manual for your Radiomaster TX16S MKII MAX Radio Controller. This advanced radio control system is designed for precision and versatility, featuring AG01 Hall Gimbals and support for both ExpressLRS and Multi-Protocol 4in1 modules. It comes pre-installed with EdgeTX firmware, offering a responsive touch screen interface for easy configuration and control.
This manual provides essential information for setting up, operating, maintaining, and troubleshooting your TX16S MKII MAX to ensure optimal performance and longevity.
2. Package Contents
Before proceeding, please verify that all items listed below are included in your package:
- 1 * TX16S Mark II Max Radio Controller
- 1 * 18650 Tray
- 1 * USB-C Cable
- 1 * Screen Protector
- 1 pair of flat grips
3. Setup
3.1 Battery Installation
The TX16S MKII MAX uses 18650 batteries (not included). Insert the batteries into the provided 18650 tray, ensuring correct polarity. Then, place the tray into the battery compartment located at the rear of the controller. The redesigned battery cover allows for improved access.
3.2 Initial Charging
Connect the supplied USB-C cable to the USB-C port on the controller and to a suitable USB power source. The optimized charge IC supports up to 2.2A internal USB-C charge current. The internal circuitry includes reverse-polarity protection for safe charging.
3.3 Powering On/Off
To power on the controller, press and hold the power button until the screen illuminates. To power off, press and hold the power button again until the shutdown prompt appears, then confirm.
3.4 Firmware Updates
The radio supports firmware upgrades via USB-C (online) or SD card (offline). Refer to the official Radiomaster website or EdgeTX documentation for detailed instructions on updating your firmware.
4. Operating the Controller
4.1 Controller Layout
Familiarize yourself with the various controls and indicators on your TX16S MKII MAX:
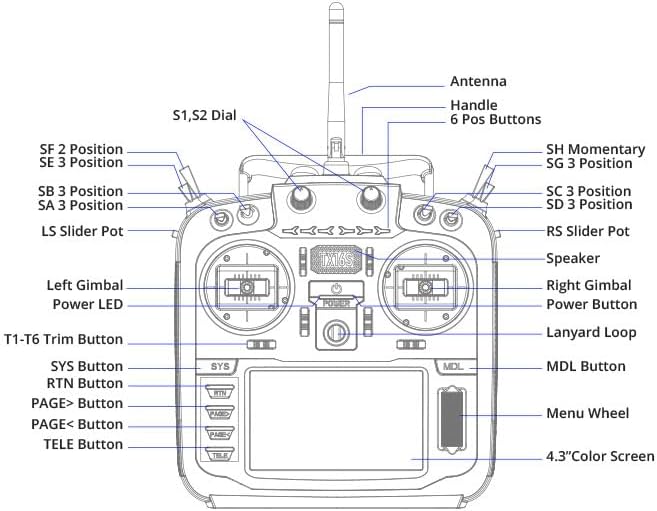
Figure 1: Diagram illustrating the front panel layout of the Radiomaster TX16S MKII MAX, labeling key components such as gimbals, switches, buttons, and the display.
- Antenna: For signal transmission.
- Handle: For carrying the controller.
- S1, S2 Dial: Improved knobs with clear center detents for precise adjustments.
- 6 Pos Buttons: Six programmable position buttons.
- SF, SE, SB, SA Switches: 2-position and 3-position switches for various functions.
- SH Momentary, SG Switches: Momentary and 3-position switches.
- LS/RS Slider Pot: Improved sliders with smoother feel and better center detents.
- Left/Right Gimbal: AG01 CNC Hall Gimbals for precise control.
- Power LED: Indicates power status.
- Power Button: For turning the unit on/off.
- Lanyard Loop: For attaching a neck strap.
- T1-T6 Trim Button: Trim adjustments for gimbals.
- SYS Button: System menu access.
- RTN Button: Return button.
- PAGE> / PAGE< Button: Navigation buttons.
- TELE Button: Telemetry access.
- MDL Button: Model menu access.
- Menu Wheel: For menu navigation and selection.
- 4.3" Color Screen: TFT full-colour touch display for interface interaction.
4.2 Gimbals and Controls
The TX16S MKII MAX features AG01 CNC Hall Gimbals, known for their precision. These gimbals have front-accessible tension and travel adjustment screws, allowing for easy fine-tuning to your preference. The improved S1/S2 knobs and LS/RS sliders also feature clear center detents for enhanced tactile feedback.
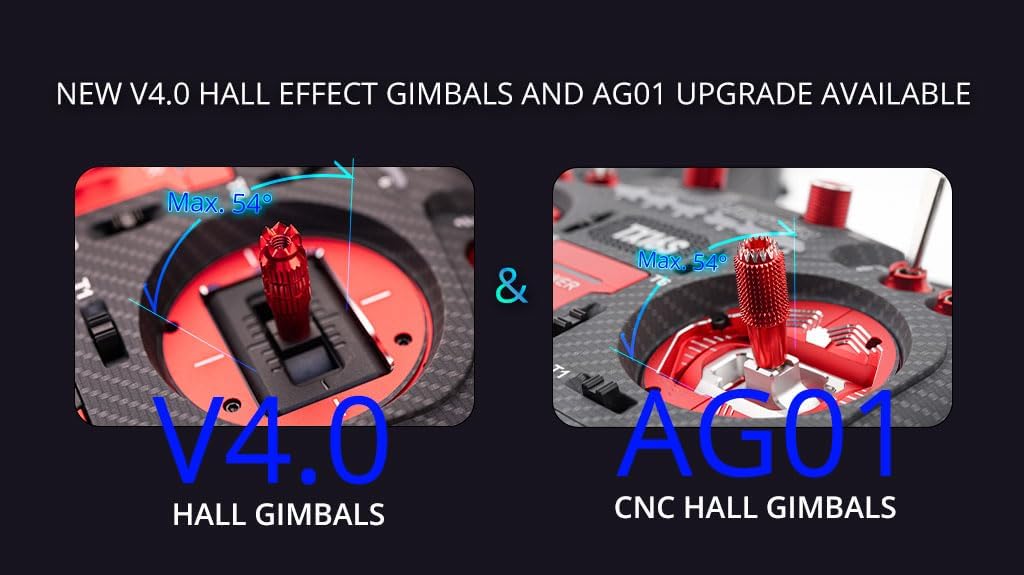
Figure 2: Visual comparison highlighting the V4.0 Hall Gimbals and the AG01 CNC Hall Gimbals, emphasizing their range of motion and precision.

Figure 3: Image showcasing the improved S1/S2 knobs with center detents and the responsive 4.3-inch IPS color touch display for programming.
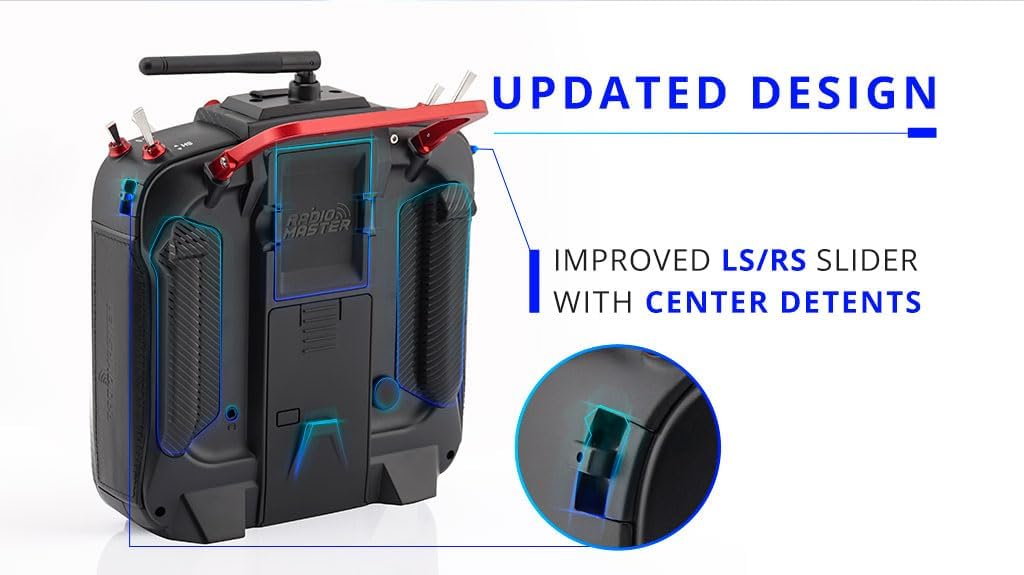
Figure 4: Rear view of the controller highlighting the updated design and improved LS/RS sliders with center detents.
4.3 Display and Navigation
The 4.3-inch TFT full-colour touch display with a resolution of 480 * 272 allows for intuitive navigation through the EdgeTX firmware. Use the touch screen, menu wheel, and page buttons to access and configure settings, models, and telemetry data.
4.4 External Module Bay
The JR-compatible module bay supports external modules such as Team Black Sheep MicroTX modules. The internal 4-in-1 multi-protocol module or ELRS module allows you to switch between internal RF and external modules via software, eliminating the need for physical module swapping.
5. Maintenance
5.1 General Care
Keep your TX16S MKII MAX clean and free from dust and debris. Use a soft, dry cloth for cleaning. Avoid exposing the controller to extreme temperatures, moisture, or direct sunlight for prolonged periods.
5.2 Battery Care
Always use appropriate 18650 batteries and ensure they are charged using the integrated USB-C charging system or an external charger designed for 18650 cells. Do not overcharge or deeply discharge batteries. Store the controller with batteries at a moderate charge level if not used for extended periods.
5.3 Gimbal Maintenance
The AG01 Hall Gimbals are designed for durability. If adjustments are needed, use appropriate tools for the front-accessible tension and travel screws. Avoid applying excessive force. Keep the gimbal area clean to prevent interference with movement.
6. Troubleshooting
6.1 Power Issues
- Controller does not power on: Ensure batteries are correctly installed and fully charged. Check the USB-C cable and power source if charging.
- Short battery life: Verify battery health and consider replacing old batteries. Ensure the controller is fully charged before use.
6.2 Connectivity Problems
- No signal to receiver: Confirm the internal module (4in1 or ELRS) is correctly configured and bound to your receiver. Check antenna connection.
- External module not working: Ensure the external module is properly seated in the JR bay and selected in the radio's software settings.
6.3 Display or Control Issues
- Unresponsive touch screen: Restart the controller. Ensure the screen protector is properly applied and not interfering.
- Gimbal or switch malfunction: Check for physical obstructions. If issues persist, contact support.
7. Specifications
| Feature | Detail |
|---|---|
| Size | 287x129x184mm |
| Weight | 750g (without battery) |
| Transmission Frequency | 2.400GHz-2.480GHz |
| Transmitter Module | Internal 4-in-1 multi-protocol (CC2500 CYRF6936 A7105 NRF2401) OR Internal ELRS (SX1280) |
| SD Card | 256MB by default, 8GB maximum |
| Antenna Gain | 2db (transmit power adjustable) |
| Working Current | 400mA |
| Working Voltage | 6.6-8.4v DC |
| Radio Firmware | EdgeTX (default) |
| Module Firmware | Multiprotocol-Module (4IN1) OR ExpressLRS (ELRS) |
| Channels | Up to 16 channels (depending on the receiver) |
| Display | 4.3-inch TFT full-colour touch display with a resolution of 480 * 272 |
| Gimbal | AG01 CNC Hall sensor |
| Module Bay | JR compatible module bay |
| Upgrade Method | Supports USB-C online / SD card offline upgrade |
| Product Dimensions | 8 x 6 x 4 inches |
| Manufacturer Recommended Age | 18 years and up |
| Manufacturer | Greathobby RC |
8. Warranty Information
Specific warranty details for the Radiomaster TX16S MKII MAX Radio Controller are typically provided by the manufacturer or the seller at the time of purchase. Please refer to your purchase documentation or contact the retailer/manufacturer directly for comprehensive warranty terms and conditions.
9. Support
For further assistance, technical support, or additional resources, please visit the official Radiomaster website or contact your authorized dealer. Online communities and forums dedicated to EdgeTX and Radiomaster products can also be valuable sources of information and peer support.