1. Introduction
The CMSTEDCD USB C Docking Station with KVM Switch, Model JHS-US-SW524, is designed to enhance your workspace efficiency. This device allows you to control two computers and two monitors using a single set of keyboard and mouse, facilitating seamless switching between work and personal computers. It functions as a 12-in-1 multifunction docking station, providing a variety of ports including Gigabit Ethernet, USB 3.2, USB-C, and SD/microSD card slots for convenient data transfer and peripheral connectivity.
This docking station supports resolutions up to 4K@60Hz, offering both dual display docking mode (two monitors output different images) and dual display mirroring mode (two monitors output the same image). EDID emulation helps maintain display settings and prevents icon rearrangement when switching between systems.

Figure 1: CMSTEDCD USB C Docking Station (Model JHS-US-SW524) with included cables.
2. Setup Instructions
Follow these steps to set up your CMSTEDCD USB C Docking Station:
- Power Connection: Connect the provided DC12V power adapter to the 'DC12V' port on the docking station and plug it into a power outlet. Ensure the power switch is in the 'OFF' position before connecting.
- Computer Connection:
- Locate the 'PC1 IN' and 'PC2 IN' USB-C ports on the back panel of the docking station.
- Use the provided USB-C to USB-C cables to connect these ports to the USB-C ports on your laptops or computers.
- Important: The USB-C port on your laptop must support video transmission and USB control protocols for full functionality.
- Monitor Connection:
- Connect your monitors to the 'HDMI OUT A' and 'HDMI OUT B' ports on the docking station using HDMI cables.
- For 4K@60Hz resolution, ensure your computer, monitor, and HDMI cables all support 4K@60Hz.
- Peripheral Connection:
- Connect your keyboard, mouse, and other USB devices to the available USB 3.2 and USB-C ports on the docking station.
- Insert SD or microSD cards into the respective slots for data access.
- Connect an Ethernet cable to the 'LAN IN' port for wired network access.
- Power On: Flip the 'ON/OFF' switch on the docking station to the 'ON' position.
3. Operating Instructions
3.1 Switching Between Computers
The docking station offers two methods for switching between connected computers:
- Manual Button Switch: Press the 'Select' button located on the front panel of the docking station to switch between PC1 and PC2.
- Computer Controller: Use the included computer controller (wired remote) to switch between computers. This allows you to place the docking station out of sight for a cleaner desk setup.
Note: Keyboard shortcuts (hotkeys) are not supported for switching.
3.2 Display Modes
The docking station supports various display configurations:
- Dual Display Docking Mode: Each monitor displays a different image, extending your desktop across two screens.
- Dual Display Mirroring Mode: Both monitors display the same image.
Important Considerations:
- macOS only supports mirror mode for external displays through this device.
- EDID emulation helps prevent resolution and icon rearrangement when switching, simplifying your workflow.
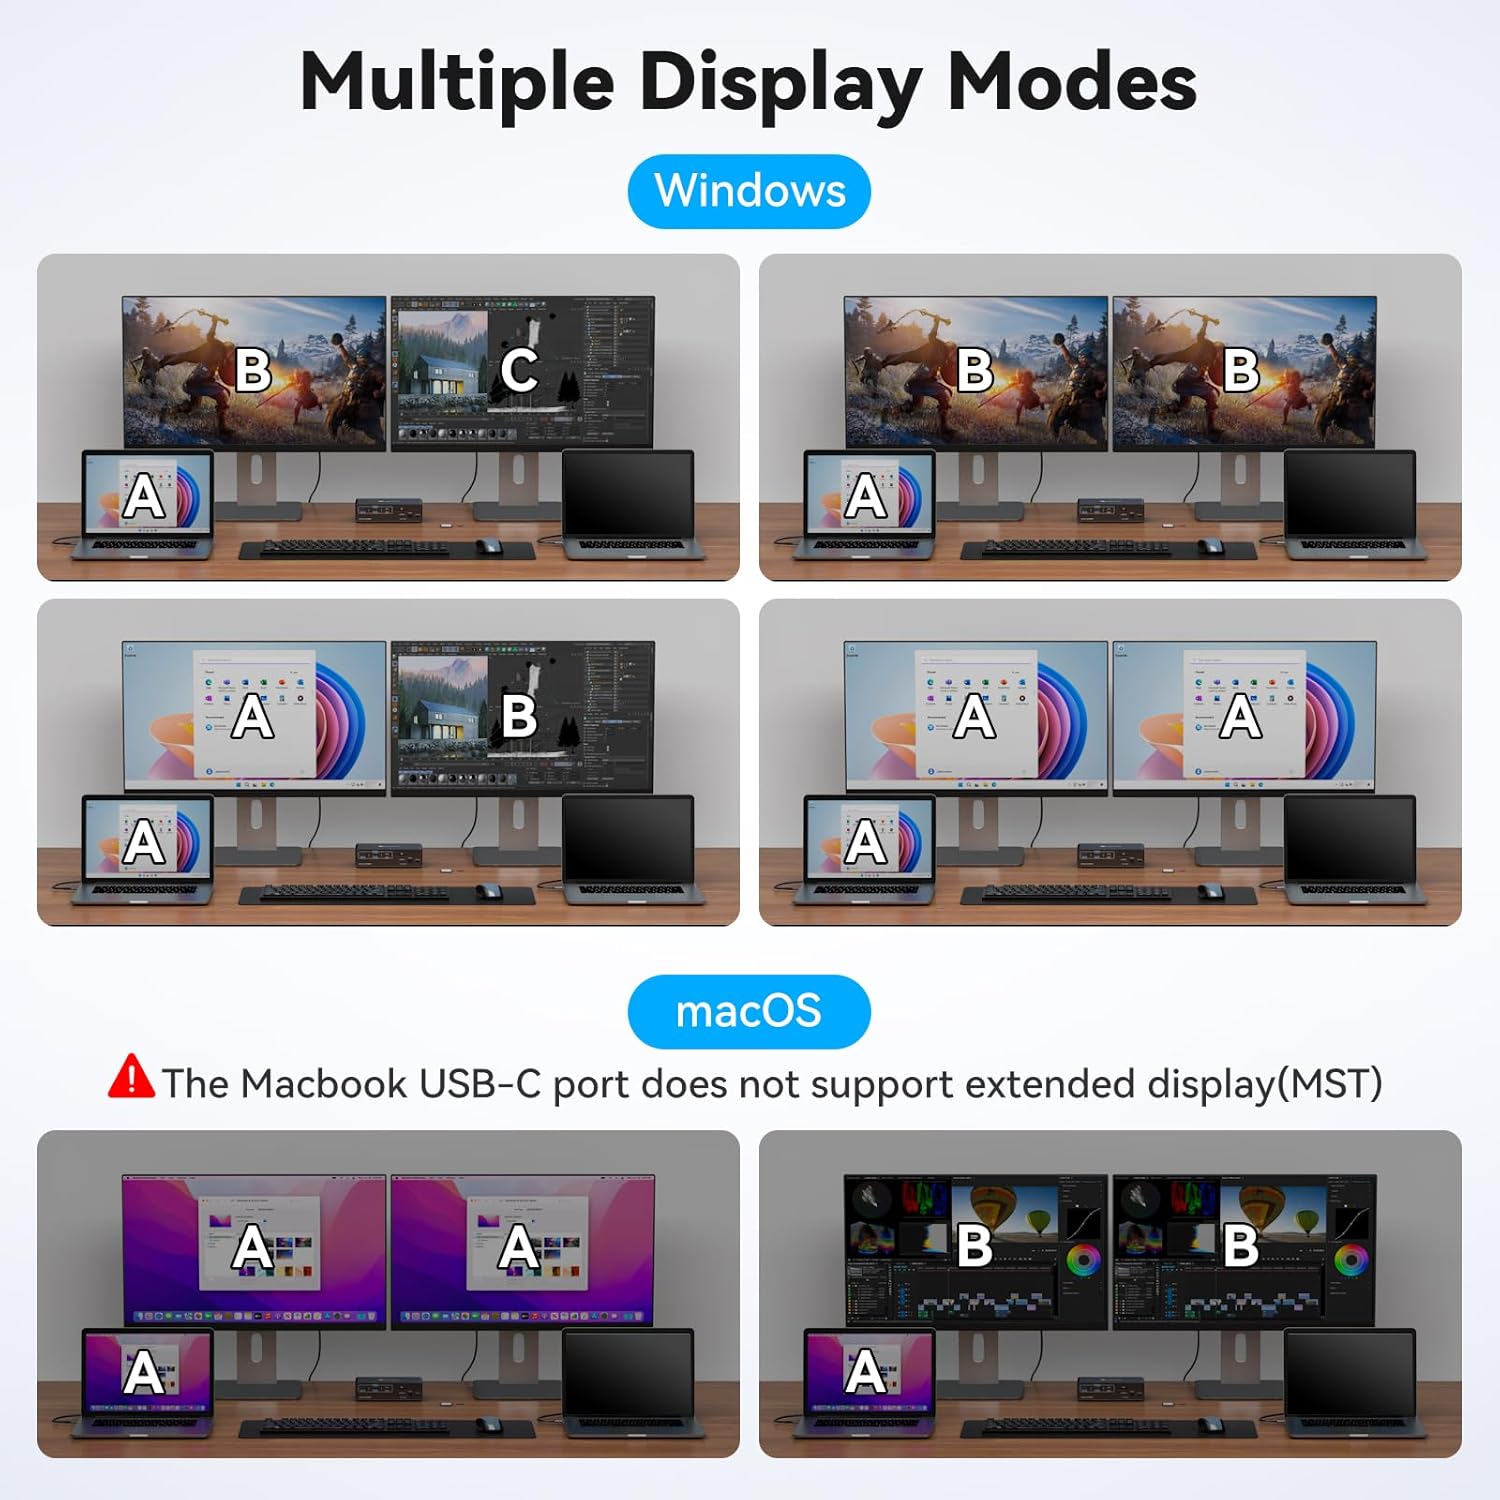
Figure 2: Illustration of various display configurations supported by the docking station for Windows and macOS.
3.3 Network and USB Data Transfer
- The 1G Gigabit Ethernet port provides high-speed wired network access.
- Note: The network connection follows the current channel switching and cannot be used by two computers simultaneously.
- The USB-C port on the front panel is for data transfer only and does not support Power Delivery (PD) charging or video streaming.

Figure 3: The 1G Gigabit Ethernet port provides high-speed network connectivity.
4. Maintenance
To ensure the longevity and optimal performance of your docking station, follow these maintenance guidelines:
- Keep the device in a clean, dry environment, away from direct sunlight, excessive heat, and moisture.
- Avoid blocking the ventilation slots on the sides of the device to prevent overheating.
- Clean the exterior with a soft, dry cloth. Do not use liquid cleaners or abrasive materials.
- Handle cables and connectors gently to prevent damage.
5. Troubleshooting
If you encounter issues with your docking station, refer to the following common problems and solutions:
- No Display or Incorrect Resolution:
- Ensure all HDMI and USB-C cables are securely connected.
- Verify that your computer's USB-C port supports video transmission.
- Confirm that your monitors and cables support the desired resolution (e.g., 4K@60Hz).
- Check your computer's display settings to ensure the external monitors are detected and configured correctly (extended or mirrored).
- If using macOS, remember it only supports mirror mode for external displays through this device.
- Try power cycling the docking station and connected devices.
- Peripherals (Keyboard/Mouse) Not Responding:
- Ensure the USB cables for your peripherals are firmly connected to the docking station.
- Confirm the docking station is switched to the correct computer (PC1 or PC2).
- Try connecting the peripherals directly to the computer to rule out device issues.
- No Network Connection:
- Verify the Ethernet cable is securely connected to both the docking station and your router/modem.
- Ensure the docking station is switched to the computer you intend to use the network with, as the network cannot be shared simultaneously.
- Check your computer's network settings.
- USB-C Front Port Not Charging or Displaying Video:
- The USB-C port on the front panel is designed for data transfer only. It does not support Power Delivery (PD) charging or video output.
6. Specifications
| Brand | CMSTEDCD |
| Model | JHS-US-SW524 |
| Dimensions (L x W x H) | 1.68 x 1.22 x 0.46 cm (Product); 17 x 12 x 5 millimeters (Item) |
| Weight | 599 g |
| Material | Metal |
| Video Output | 2 x HDMI (up to 4K@60Hz) |
| Computer Input | 2 x USB-C (PC1 IN, PC2 IN) |
| USB Ports | USB 3.2, USB-C (data only) |
| Ethernet | 1 x Gigabit Ethernet (1000Mbps) |
| Card Reader | SD, MicroSD |
| Power Input | DC12V |
| Switching Method | Manual Button, External Controller |
| Operating Voltage | 12 Volts (DC) |
| Current Rating | 1.5 Amps |
7. Warranty and Support
This product comes with a 24-month warranty from the date of purchase. If you encounter any issues or require technical assistance within this period, please contact CMSTEDCD customer support. We are committed to providing technical support, product replacement, or refund services as applicable.
For support, please refer to the contact information provided with your purchase or visit the official CMSTEDCD website.


