
Introduction
Thank you for choosing the LUMLLSAJI 184 LED Solar Motion Lights. This product is designed to provide efficient and reliable outdoor lighting for various applications such as gardens, patios, paths, porches, and driveways. Featuring a high-efficiency solar panel, motion sensing capabilities, and multiple operating modes, these lights offer a convenient and energy-saving security solution. Please read this manual thoroughly before installation and use to ensure optimal performance and longevity of your solar lights.
What's in the Box
- 184 LED Solar Motion Light Unit(s)
- Solar Panel(s) with 20-foot cord
- Mounting Hardware (screws and anchors)
- User Manual
Specifications
| Feature | Detail |
|---|---|
| Brand | LUMLLSAJI |
| Model Name | Solar Flood Lights |
| Power Source | Solar Powered |
| Light Source Type | LED |
| Number of Light Sources | 184 |
| Light Color | White |
| Material | Acrylonitrile Butadiene Styrene |
| Water Resistance Level | IP65 Waterproof |
| Special Feature | Motion Sensor |
| Product Dimensions | 6.3"L x 5.9"W x 10"H |
| Item Weight | 1.92 pounds |
| Installation Type | Surface Mount |
| Included Components | Mounting Hardware |
Setup and Installation
Follow these steps to properly install your solar motion lights:
- Choose a Location: Select an outdoor location for the solar panel that receives at least 4-5 hours of direct sunlight daily. The light unit can be installed in a desired area, even if it's shaded, thanks to the 20-foot connecting cord.
- Install Mounting Brackets: Use the provided mounting hardware (screws and anchors) to securely attach the two clamp plates to your chosen surface (wall, eaves, pole). Ensure the plates are oriented correctly as indicated.
- Mount the Light and Solar Panel: Slide the light unit and the solar panel into their respective installed clamp plates. The ball-mounted bracket allows for adjustment of the angle to optimize light direction and solar panel sun exposure.
- Connect the Power Cord: Connect the waterproof power cord from the solar panel to the light unit. Ensure the connection is firm and secure to prevent water ingress.
- Select Operating Mode: Locate the switch on the light unit and select your desired operating mode (see 'Operating Modes' section for details).

Figure 1: Installation steps for the solar motion light.

Figure 2: High-efficiency solar panel for optimal charging.
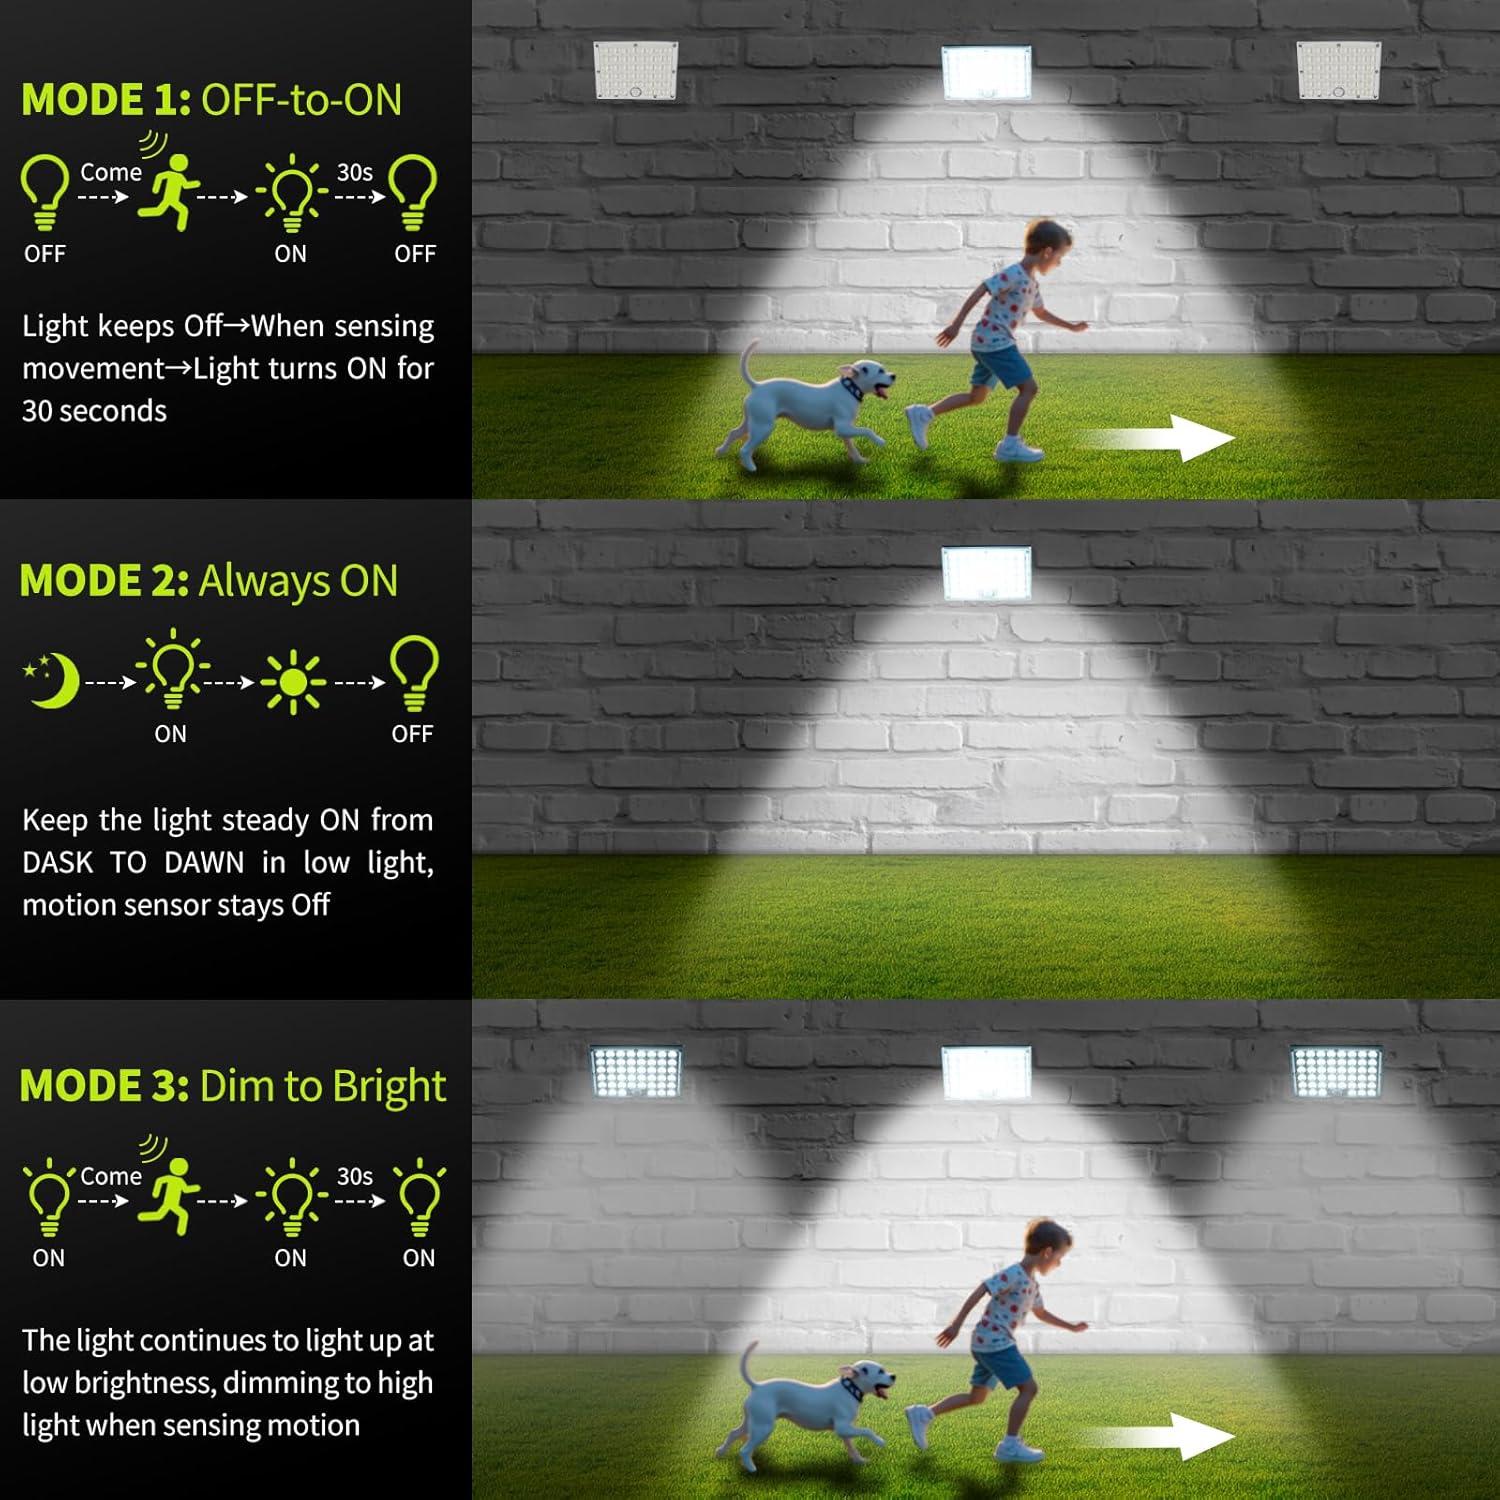
Figure 3: Product dimensions and all-weather durability features.
Operating Modes
The LUMLLSAJI Solar Motion Lights offer three distinct operating modes to suit your lighting needs:
- Mode 1: Motion Sensor Activated (OFF-to-ON)
The light remains OFF until motion is detected. Upon sensing movement, the light turns ON at full brightness for approximately 30 seconds, then turns OFF again. This mode is ideal for security and energy conservation. - Mode 2: Dusk-to-Dawn Low Light (Always ON)
The light automatically turns ON at a low brightness level from dusk until dawn. The motion sensor is inactive in this mode, providing continuous ambient lighting throughout the night. - Mode 3: Dim to Bright with Motion Boost
The light stays ON at a low brightness level from dusk until dawn. When motion is detected, the light temporarily boosts to full brightness for approximately 30 seconds, then returns to its dim state. This mode combines ambient lighting with enhanced security.

Figure 4: Mode 1 operation - Motion activated.

Figure 5: Mode 2 operation - Continuous low light.

Figure 6: Mode 3 operation - Dim with motion boost.
Maintenance
To ensure the optimal performance and longevity of your solar motion lights, follow these maintenance guidelines:
- Clean Solar Panel: Regularly wipe the solar panel with a soft, damp cloth to remove dust, dirt, leaves, or snow. A clean panel ensures maximum sunlight absorption and efficient charging.
- Check Connections: Periodically inspect the waterproof connection between the solar panel and the light unit to ensure it remains secure and free from damage.
- Battery Care: Allow the solar panel to receive full sunlight exposure for several days before initial use to ensure the internal battery is fully charged.
- Environmental Considerations: While the lights are IP65 waterproof and designed for all-weather durability, extreme conditions may temporarily affect performance. Ensure the solar panel is not obstructed by overhanging branches or structures.
Troubleshooting
If you encounter issues with your LUMLLSAJI Solar Motion Lights, please refer to the following common problems and solutions:
- Light does not turn on or stays dim:
- Ensure the solar panel is placed in direct sunlight for at least 4-5 hours daily to allow for full charging.
- Verify that the waterproof connector between the solar panel and the light is securely fastened. A loose connection can prevent proper operation.
- Check the selected operating mode. Some modes require motion detection to activate full brightness, or provide only dim light.
- Clean the solar panel regularly to remove dust, dirt, or debris that may obstruct sunlight absorption.
- Motion sensor is not detecting movement:
- Ensure the light is in Mode 1 or Mode 3, as Mode 2 does not utilize the motion sensor.
- Verify that the motion sensor lens is clean and unobstructed.
- Confirm the light is installed within the recommended detection range (typically 5-8 meters).
- Light duration is shorter than expected:
- Insufficient sunlight exposure during the day will result in a shorter illumination time at night. Relocate the solar panel to an area with more direct sunlight.
- Cold temperatures can affect battery performance, leading to reduced operating time.
Warranty and Support
For warranty information or technical support, please refer to the documentation included with your product or contact LUMLLSAJI customer service directly. Keep your purchase receipt as proof of purchase.