1. Introduction
This manual provides comprehensive instructions for the XYGStudy RP2350A USB Mini Development Board. It covers product features, setup, operation, maintenance, troubleshooting, and detailed specifications to help you effectively use this dual-core microcontroller board.
2. Product Overview
The RP2350A USB Mini Development Board is based on the Raspberry Pi RP2350A dual-core and dual-architecture microcontroller. It operates at a flexible clock frequency of up to 150 MHz, offering robust performance for various embedded applications. The board features a compact design with a USB Type-C connector for modern connectivity and a castellated module for direct soldering to carrier boards.
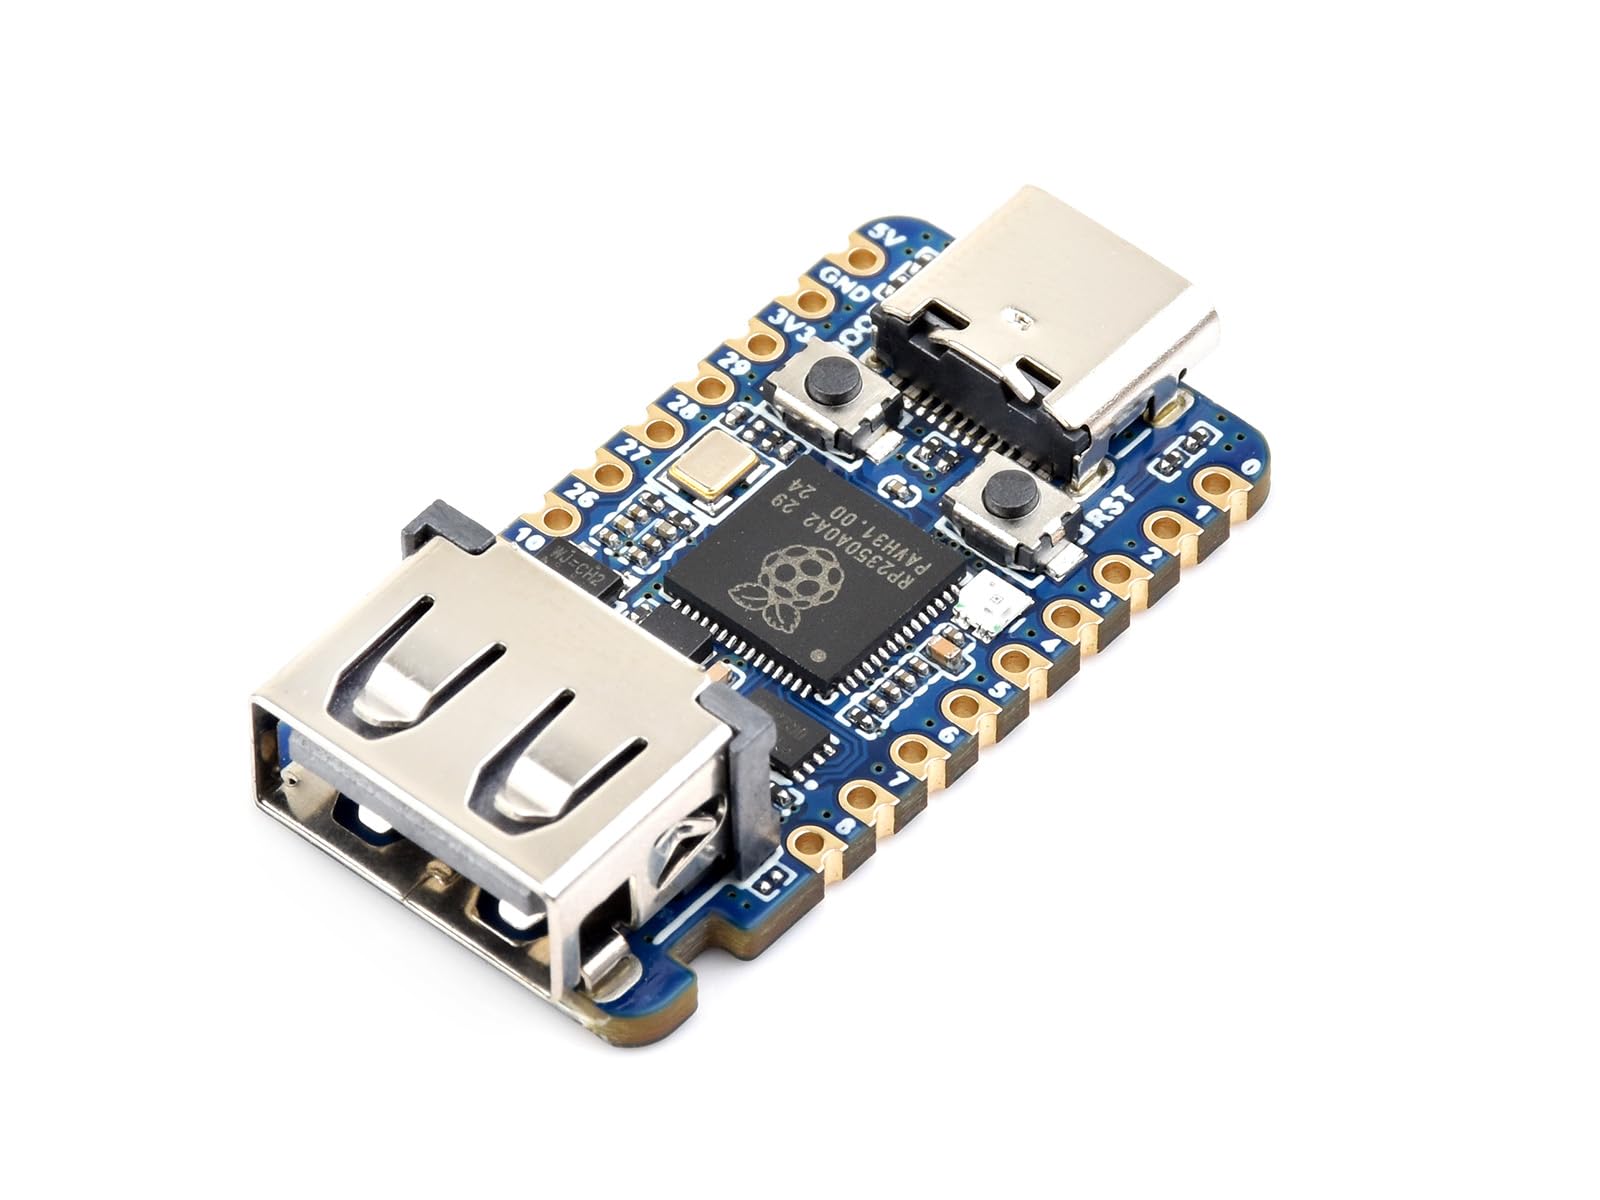
Image 2.1: The RP2350A USB Mini Development Board, showcasing its compact size and key features like the USB Type-C port and castellated edges.
3. Features
- Microcontroller: RP2350A, designed by Raspberry Pi, featuring a unique dual-core and dual-architecture design.
- Processor Cores: Dual-core Arm Cortex-M33 processor and dual-core Hazard3 RISC-V processor.
- Operating Frequency: Flexible clock running up to 150 MHz.
- Memory: 520KB of SRAM and 2MB of onboard Flash memory.
- Connectivity: USB Type-C connector for power and data, USB 1.1 with device and host support.
- Expansion: Onboard 1x USB Type A expansion port via PIO, compatible with USB 2.0/1.1 transmission.
- GPIO: 15 multi-function GPIO pins for flexible development and integration.
- Peripherals: 2x SPI, 2x I2C, 2x UART, 4x 12-bit ADC, 14x controllable PWM channels.
- Additional Features: Low-power sleep and dormant modes, drag-and-drop programming via USB mass storage, temperature sensor, accelerated floating-point libraries on-chip, 12x Programmable I/O (PIO) state machines for custom peripheral support.
- Form Factor: Castellated module allows direct soldering to carrier boards.

Image 3.1: Visual representation of the RP2350A's dual-core, dual-architecture design, highlighting its processing capabilities.

Image 3.2: Detailed pinout diagram showing the 15 multi-function GPIO pins and their various capabilities, including power, ground, ADC, SPI, UART, I2C, and PWM.
4. What's in the Box
The package contains the following items:
- RP2350-USB-A Mini Development Board x1

Image 4.1: The RP2350A USB Mini Development Board, representing the contents of the package.
5. Setup
Follow these steps to set up your RP2350A USB Mini Development Board:
- Connect to Computer: Use a USB Type-C cable to connect the RP2350A board to your computer. The board will typically power on automatically.
- Enter Bootloader Mode (if needed): To upload new firmware, press and hold the BOOT button while connecting the board to your computer, then release the BOOT button. The board should appear as a mass storage device (e.g., RPI-RP2).
- Install Drivers (if necessary): For some operating systems or specific development environments, you might need to install drivers. Refer to the official Raspberry Pi documentation for RP2350A for detailed instructions.
- Prepare Development Environment: Install a suitable Integrated Development Environment (IDE) such as Visual Studio Code with the Pico C/C++ SDK, or the Arduino IDE.

Image 5.1: A detailed view of the RP2350A board, showing the USB Type-C connector (8), BOOT button (2), and Reset button (3) which are crucial for initial setup and programming.
6. Operating Instructions
The RP2350A board supports various methods for programming and operation:
- Drag-and-Drop Programming: In bootloader mode, the board appears as a USB mass storage device. You can simply drag and drop a compiled
.uf2firmware file onto this drive. The board will automatically reboot and run the new firmware. - C/C++ SDK: Utilize the official Raspberry Pi C/C++ SDK for advanced development. This allows for comprehensive control over the microcontroller's features. Resources and tutorials are available from Raspberry Pi.
- Arduino IDE: The RP2350A can be programmed using the Arduino IDE, providing a familiar and accessible environment for many developers. Ensure you have the correct board support package installed in the Arduino IDE.
- GPIO Usage: Connect external components to the 15 multi-function GPIO pins as per your project requirements. Refer to the pinout diagram (Image 3.2) for pin assignments and capabilities.
- USB Type A Expansion: The onboard USB Type A port can be used for connecting USB 2.0/1.1 compatible devices, expanding the board's functionality.
7. Maintenance
To ensure the longevity and optimal performance of your RP2350A USB Mini Development Board, follow these maintenance guidelines:
- Handle with Care: Avoid dropping the board or subjecting it to physical shock.
- Keep Dry: Protect the board from moisture and liquids.
- Cleanliness: Keep the board free from dust and debris. Use a soft, dry brush or compressed air for cleaning.
- Static Electricity: Always handle the board in an anti-static environment to prevent damage from electrostatic discharge (ESD).
- Power Supply: Use a stable and appropriate 5V power supply via the USB Type-C port.
8. Troubleshooting
If you encounter issues with your RP2350A board, consider the following troubleshooting steps:
- Board Not Detected:
- Ensure the USB Type-C cable is securely connected and functional.
- Try a different USB port on your computer.
- Attempt to enter bootloader mode (hold BOOT button while connecting USB) to see if it appears as a mass storage device.
- Firmware Upload Failure:
- Verify that the
.uf2file is valid and not corrupted. - Ensure the board is in bootloader mode before dragging and dropping the file.
- Check your development environment settings if using an IDE.
- Verify that the
- Program Not Running:
- After uploading firmware, the board should automatically reboot. If not, press the RESET button.
- Review your code for errors.
- Check power supply stability.
- Peripheral Issues:
- Double-check wiring connections to GPIO pins.
- Verify pin assignments in your code against the pinout diagram.
- Ensure external components are correctly powered and functioning.
9. Specifications

Image 9.1: A comprehensive list of the RP2350A board's specifications, including processor details, memory, and peripheral capabilities.
| Feature | Detail |
|---|---|
| Microcontroller | Raspberry Pi RP2350A |
| Processor Architecture | Dual-core Arm Cortex-M33 + Dual-core Hazard3 RISC-V |
| Operating Frequency | Up to 150 MHz |
| SRAM | 520KB |
| Flash Memory | 2MB (onboard) |
| USB Interface | USB Type-C (programming), USB 1.1 (device/host) |
| USB Expansion Port | 1x USB Type A (PIO, compatible with USB 2.0/1.1) |
| GPIO Pins | 15 multi-function |
| Peripherals | 2x SPI, 2x I2C, 2x UART, 4x 12-bit ADC, 14x PWM, Temperature sensor, 12x PIO state machines |
| Dimensions (approx.) | 33.00 mm x 17.50 mm |
| Weight | 0.004 kg |
Image 9.2: Detailed outline dimensions of the RP2350A board, indicating its physical size in millimeters.
10. Warranty
The XYGStudy RP2350A USB Mini Development Board comes with a 1-Year Warranty from the date of purchase. This warranty covers manufacturing defects under normal use. Please retain your proof of purchase for warranty claims.
11. Support
For additional resources, technical assistance, or any questions regarding your RP2350A USB Mini Development Board, please contact XYGStudy directly via Amazon message. We will provide further documentation and support as needed.