1. Product Overview
The Vikye A78SD3 Computer Motherboard is designed to support AM3 interface processors, specifically for the Richland Series APU. It features 2 channel DDR3 memory support, PCIe X16 graphics card slot, and multiple connectivity options for a versatile computing experience.
Key Features:
- Strong Compatibility: Supports Richland series APU processors and 2 channel DDR3 memory up to 16GB.
- High Definition Experience: Equipped with HDMI and VGA video outputs, 100Mbps Ethernet, and 5.1 channel sound for multimedia tasks.
- Large Storage Capacity: Features 4 Serial ATA 3.0 ports for connecting multiple storage devices.
- Stable Performance: Multi-phase power design ensures stable operation.
- Versatile Interface Expansion: Includes 4 USB 2.0 ports and 4 Serial ATA 3.0 ports for peripheral connectivity.
2. Package Contents
Upon opening the package, ensure all the following items are present:
- 1 x A78SD3 Computer Motherboard
- 1 x I/O Baffle
- 1 x Serial ATA Cable
- 1 x User Manual (this document)
3. Motherboard Layout and Components
Familiarize yourself with the various components and ports on the A78SD3 motherboard.

Figure 3.1: Overview of the A78SD3 Motherboard with key components labeled, including 24-pin ATX Power Connector, 2 Channel DDR3 Memory Slots, Serial ATA 2.0 Ports, Keyboard and Mouse Ports, HDMI/VGA Ports, USB 2.0 Ports, Network Port, 4-pin CPU Independent Power Connector, and PCIe X16 Slot.

Figure 3.2: Detailed view of the 2 Channel DDR3 Memory Slots, highlighting the dual-channel architecture for memory installation.
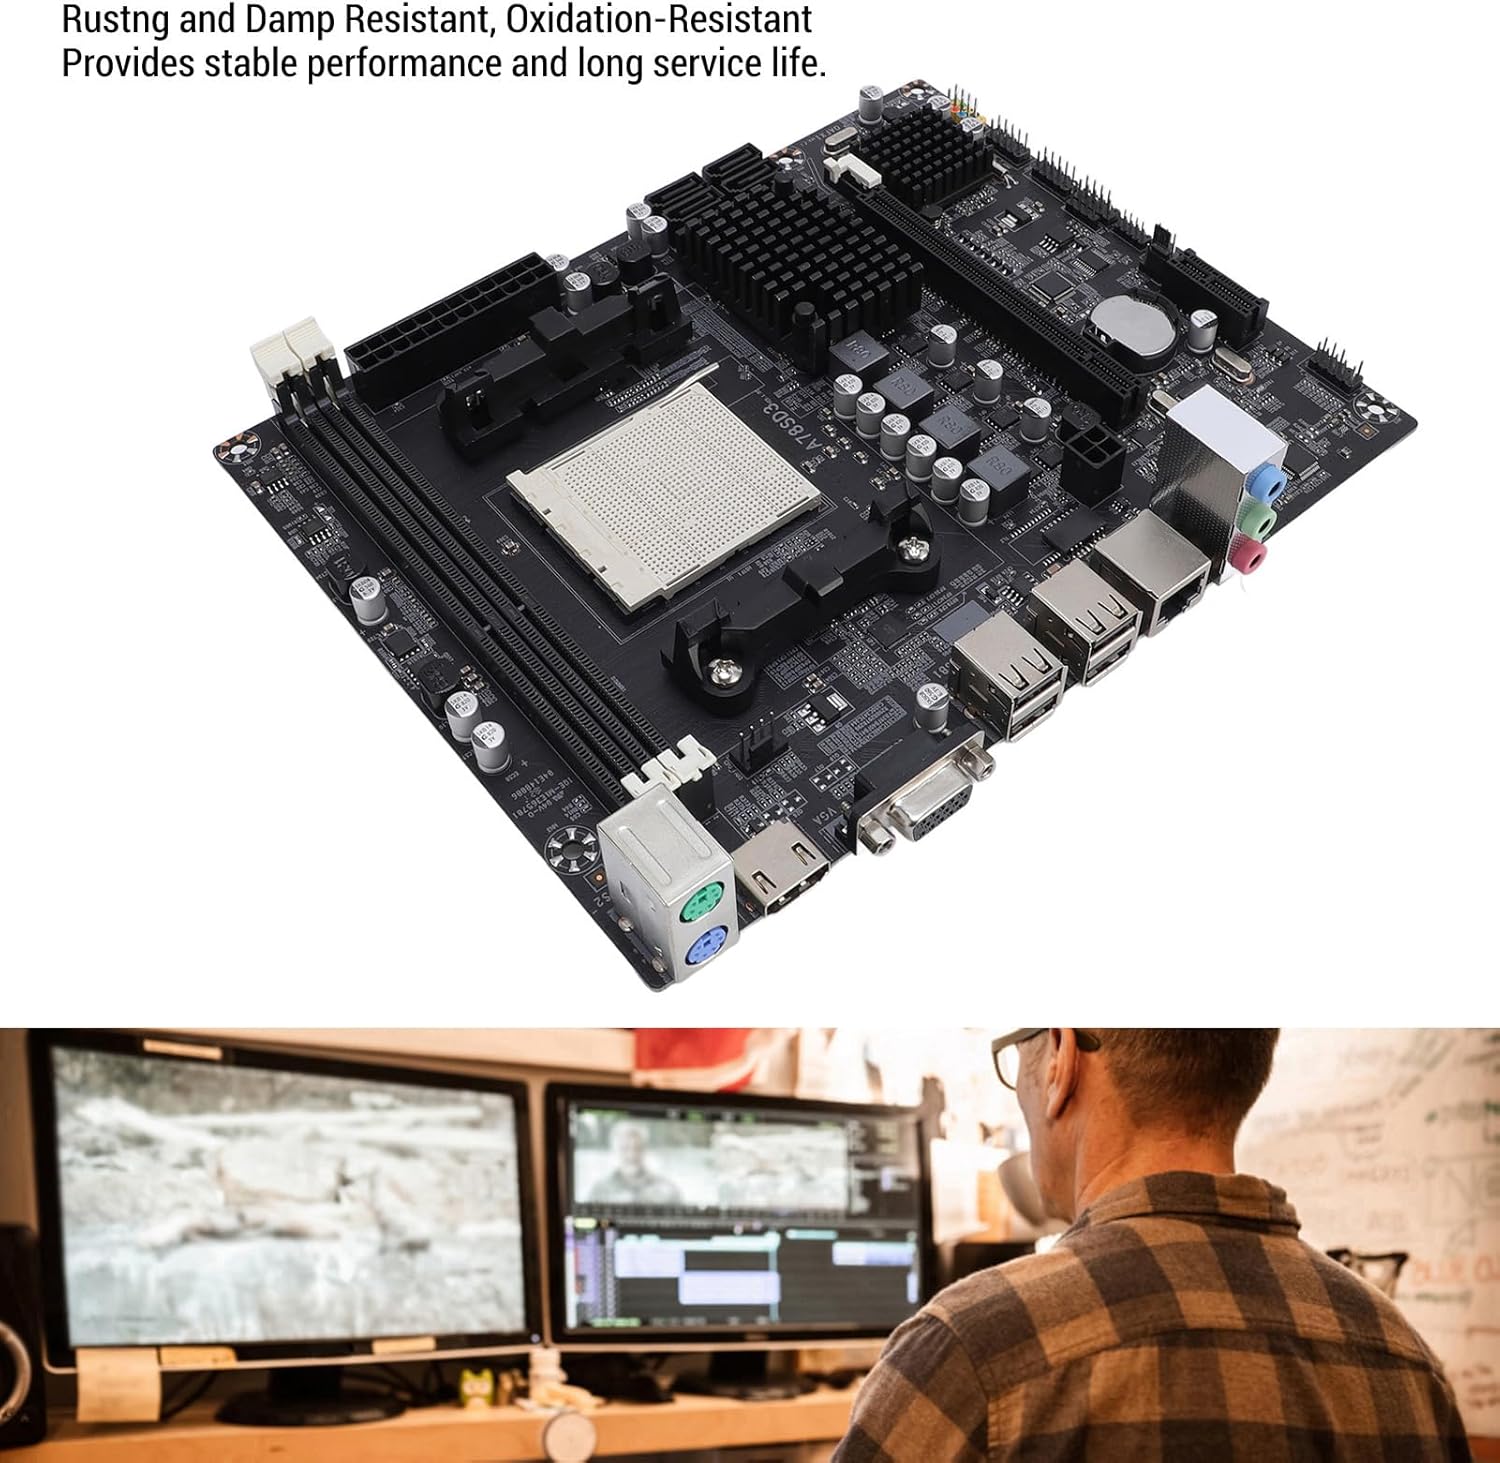
Figure 3.3: Image of the A78SD3 Motherboard, emphasizing its rust and damp resistant properties for stable performance and extended service life.

Figure 3.4: A clear top-down perspective of the A78SD3 Motherboard, showcasing the CPU socket, memory slots, and various ports.

Figure 3.5: The A78SD3 Motherboard shown alongside a user engaged in computer work, illustrating its application in a desktop setup.

Figure 3.6: The A78SD3 Motherboard presented with an abstract blue light background, symbolizing its role in high-speed data processing.

Figure 3.7: Image displaying the dimensions of the A78SD3 Motherboard, measuring approximately 17cm x 21.3cm (6.7in x 8.4in).
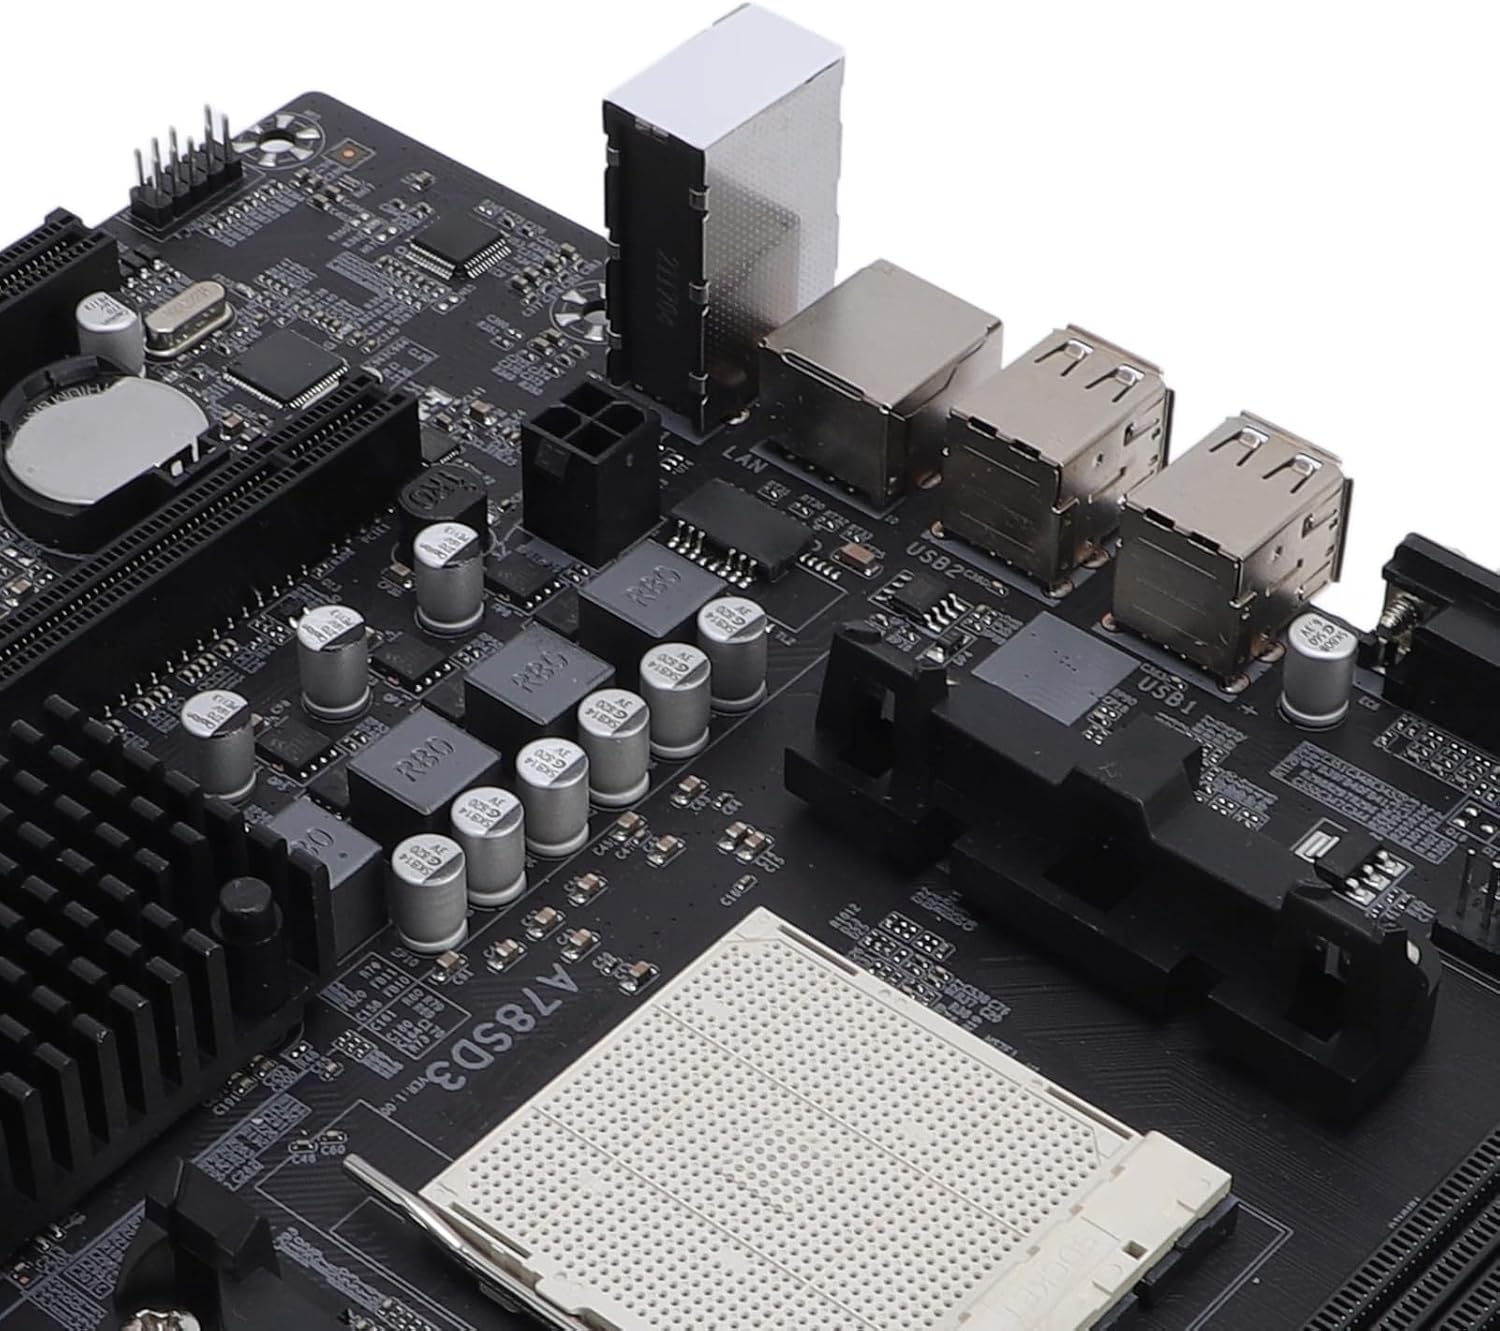
Figure 3.8: Close-up view of the CPU socket and adjacent I/O ports, including VGA and USB ports, on the A78SD3 Motherboard.
4. Setup and Installation
The A78SD3 motherboard is designed for DIY installation. Follow general motherboard installation procedures for your computer case and components.
- Prepare the Case: Ensure your computer case is ready for motherboard installation, with appropriate standoffs installed.
- Install I/O Shield: Insert the provided I/O baffle into the rear opening of your computer case.
- Mount Motherboard: Carefully align the motherboard with the standoffs and I/O shield, then secure it with screws.
- Install CPU: Open the CPU socket lever, align your AM3 processor with the socket, gently place it, and close the lever.
- Install CPU Cooler: Attach your compatible CPU cooler according to its manufacturer's instructions.
- Install Memory (RAM): Open the clips on the DDR3 memory slots. Align your DDR3 memory modules and press them firmly into the slots until the clips lock into place. This motherboard supports 2 x DDR3 slots, up to 16GB total (8GB per stick).
- Install Graphics Card: Insert your PCIe X16 graphics card into the designated slot and secure it.
- Connect Storage Devices: Use the provided Serial ATA cable to connect your storage devices (HDDs/SSDs) to the 4 Serial ATA 3.0 ports on the motherboard.
- Connect Power: Connect the 24-pin ATX power connector and the 4-pin CPU power connector from your power supply unit to the motherboard.
- Connect Peripherals: Connect front panel connectors (power button, reset, USB, audio), USB 2.0 devices, HDMI/VGA display, Ethernet cable, and audio devices to the appropriate ports.
Note: Always refer to your CPU, RAM, and other component manuals for specific installation instructions. Ensure proper grounding to prevent electrostatic discharge (ESD) damage.
Installation Video Guide:
Video 4.1: An installation guide demonstrating the process of setting up a motherboard, including connecting cables and installing components. This video is provided by the seller, Jututaih.
5. Operating Instructions
Once all components are correctly installed and connected, power on your system. The motherboard will initiate the boot process. You may need to access the BIOS/UEFI settings to configure boot order, memory timings, and other system parameters.
- BIOS/UEFI Access: Typically, press the DEL or F2 key during startup to enter the BIOS/UEFI setup utility.
- Driver Installation: After installing your operating system, install the necessary drivers for the motherboard's chipset, integrated graphics (if used), network, and audio components. These are usually provided on a support CD or available for download from the manufacturer's website.
- System Monitoring: Utilize system monitoring software to keep track of CPU temperature, fan speeds, and other vital system statistics to ensure optimal performance and stability.
6. Maintenance
Proper maintenance can extend the lifespan and ensure the stable operation of your motherboard and overall system.
- Dust Removal: Regularly clean dust from inside your computer case, especially from heatsinks and fans, using compressed air. Ensure the system is powered off and unplugged before cleaning.
- BIOS/UEFI Updates: Periodically check the manufacturer's website for BIOS/UEFI updates. Updates can improve compatibility, stability, and performance. Follow update instructions carefully to avoid system damage.
- Component Checks: Ensure all cables (power, SATA, data) are securely connected. Check for any loose components or signs of physical damage.
7. Troubleshooting
If you encounter issues with your A78SD3 motherboard, consider the following troubleshooting steps:
- No Power/No Boot:
- Verify all power connections (24-pin ATX, 4-pin CPU) are firmly seated.
- Ensure the power supply unit (PSU) is functional and switched on.
- Check front panel power button connections to the motherboard.
- No Display:
- Confirm the monitor is connected to the correct video output (HDMI or VGA) on the motherboard or dedicated graphics card.
- Reseat the graphics card and memory modules.
- Test with a different monitor or cable if possible.
- System Instability/Crashes:
- Check CPU and GPU temperatures to ensure they are within safe operating limits.
- Verify memory modules are correctly installed and compatible. Run a memory diagnostic tool.
- Ensure all drivers are up to date.
- Peripheral Not Detected:
- Try connecting the peripheral to a different port.
- Install or update drivers for the peripheral.
- Check BIOS/UEFI settings to ensure the port is enabled.
If problems persist, consult the manufacturer's support resources or a qualified technician.
8. Specifications
| Feature | Detail |
|---|---|
| Item Type | A78SD3 Computer Motherboard |
| Material | PCB |
| Main Chipset | for RS780 Series |
| Network Card Chip | Integrated 100Mbps Ethernet |
| Sound Chip | Integrated 6 Channel Sound Chip |
| Processor Support | AM3 Interface for Richland Series APU Processors |
| CPU Socket | AM3 |
| Memory Type | DDR3 1600/1333/1066MHz |
| Memory Slots | 2 x DDR3 |
| Max Memory Capacity | 16GB (Maximum 8GB per stick) |
| Expansion Slots | 1 x PCI-E X16 Graphics Card Slot, 1 x COM Serial Port Header |
| Internal USB Headers | 2 x USB 2.0 Headers |
| Storage Ports | 4 x Serial ATA 3.0 Ports |
| Rear I/O Interfaces | PS/2 (Keyboard/Mouse), 1 x RJ45 Ethernet, 1 x VGA, 1 x HDMI Output, 4 x USB 2.0, Sound Interfaces |
| Motherboard Size | Approx. 17x21.3cm / 6.7x8.4in |
| CMOS Battery | 1 x CR2032L (240mAh) |
| Power Connectors | 4 Pin and 24 Pin Power Connector |
| Power Supply Mode | 4 Phase |
9. Warranty and Support
For warranty information and technical support, please refer to the documentation provided with your purchase or visit the official Vikye website. Keep your proof of purchase for warranty claims.
For further assistance, you may contact the seller, Zhaojou, through the Amazon platform.