
Introduction
The Wonrabai ESP32-S3 2-inch Capacitive Touch Display Development Board is a compact and high-performance microcontroller unit (MCU) designed for various embedded applications. It integrates an ESP32-S3R8 Xtensa 32-bit LX7 dual-core processor, a 2-inch IPS capacitive touchscreen, and comprehensive connectivity options including 2.4GHz Wi-Fi and Bluetooth 5 (LE). This board is ideal for projects requiring a small display with touch input, wireless communication, and robust processing capabilities.
Key Features:
- Integrated 2-inch Capacitive Touch Display: Features a 240 x 320 resolution, 262K color IPS panel for excellent display performance and wide viewing angles.
- Powerful Processor: Equipped with an ESP32-S3R8 Xtensa 32-bit LX7 dual-core processor, operating up to 240MHz.
- Wireless Connectivity: Supports 2.4GHz Wi-Fi (802.11 b/g/n) and Bluetooth 5 (LE) with an onboard antenna.
- Memory: Built-in 512KB SRAM and 384KB ROM, with onboard 8MB PSRAM and an external 16MB Flash memory.
- USB Type-C: Includes a Type-C connector for power supply, program downloading, and debugging.
- Display and Touch Drivers: Built-in ST7789T3 display driver and CST816D capacitive touch chip, utilizing SPI and I2C communication respectively.
- 6-axis IMU: Onboard QMI8658 6-axis IMU (3-axis accelerometer and 3-axis gyroscope).
- Battery Management: Onboard 3.7V MX1.25 Lithium battery recharge/discharge header.
- Storage Expansion: Onboard TF card slot for external storage of pictures or files.
- GPIO Pins: Adapting 22 x GPIO pins for flexible configuration.
- Camera Interface: Onboard camera interface, compatible with mainstream cameras such as OV2640 and OV5640 for image and video acquisition (camera module not included in this version).
What's in the Box
- ESP32-S3-Touch-LCD-2 Development Board x 1
Product Overview

Figure 1: Overview of the ESP32-S3-Touch-LCD-2 Development Board with its main features and LCD parameters.

Figure 2: Detailed pin definitions and identification of key onboard components including the ESP32-S3R8, W25Q128 Flash, QMI8658 IMU, Type-C port, and TF card slot.
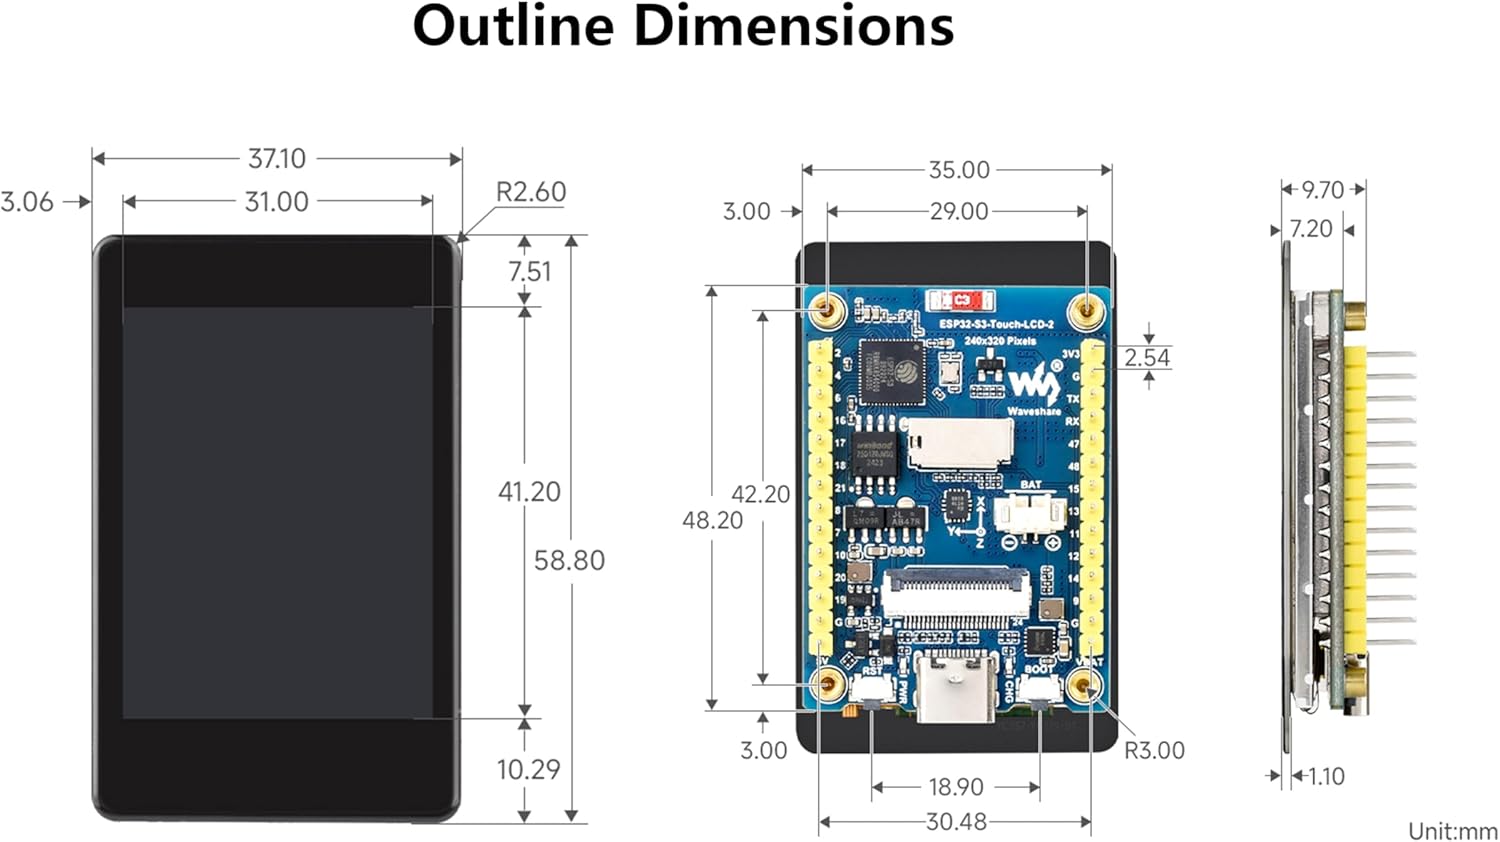
Figure 3: Mechanical outline dimensions of the development board, useful for integration into custom enclosures or projects.
Setup
- Initial Inspection: Carefully unbox the ESP32-S3-Touch-LCD-2 development board and inspect it for any physical damage.
- Connect to Computer: Use a standard USB Type-C cable to connect the board to your computer. This connection provides power and enables communication for programming and debugging.
- Driver Installation: Depending on your operating system, you may need to install specific USB-to-serial drivers (e.g., CP210x or CH340 drivers) if the board is not automatically recognized. Refer to the online tutorial for specific driver links.
- Development Environment Setup: Install a suitable Integrated Development Environment (IDE) such as Arduino IDE or ESP-IDF.
- Board Support Package: Within your chosen IDE, install the necessary board support packages for ESP32-S3.
- Upload First Program: Load a basic example program (e.g., a 'Hello World' for the display or a Wi-Fi scan) to verify the board's functionality.
Operating
The ESP32-S3-Touch-LCD-2 board is designed for flexible operation, supporting various applications from IoT to human-machine interfaces. Its operation is primarily controlled through programmed firmware.
Display and Touch Functionality:
- The 2-inch IPS capacitive touchscreen allows for direct user interaction. Your firmware will interpret touch inputs and update the display accordingly.
- Utilize the ST7789T3 display driver and CST816D touch chip libraries within your development environment to control the display and read touch events.
Wireless Communication:
- The integrated Wi-Fi and Bluetooth capabilities enable the board to connect to networks, other devices, and cloud services.
- Refer to the ESP-IDF or Arduino documentation for examples on implementing Wi-Fi and Bluetooth functionalities in your code.
Powering the Board:
- The board can be powered via the USB Type-C port.
- For portable applications, a 3.7V Lithium battery can be connected to the MX1.25 header. The onboard circuitry manages battery charging and discharging.

Figure 4: Example of the ESP32-S3-Touch-LCD-2 board in operation, connected to a laptop.
Maintenance
- Cleaning: Use a soft, dry cloth to clean the display and board. Avoid abrasive materials or harsh chemicals.
- Storage: Store the board in a cool, dry environment, away from direct sunlight and extreme temperatures.
- Handling: Handle the board by its edges to avoid touching sensitive components. Static electricity can damage electronic components, so use anti-static precautions when handling.
- Software Updates: Regularly check for updates to the ESP-IDF framework, Arduino core for ESP32, and relevant libraries to ensure optimal performance and security.
Troubleshooting
- Board Not Powering On: Ensure the USB Type-C cable is securely connected to both the board and a powered USB port. If using a battery, verify it is charged and correctly connected.
- Computer Not Recognizing Board: Check if the necessary USB-to-serial drivers are installed. Try a different USB port or cable.
- Display Not Working: Verify that the display is correctly connected to the board. Ensure your code initializes the ST7789T3 display driver correctly and that the backlight pin is enabled.
- Touchscreen Unresponsive: Confirm that the CST816D touch chip is correctly initialized in your firmware and that the I2C communication is functioning.
- Firmware Upload Failure: Ensure the correct board and port are selected in your IDE. Try holding down the BOOT button while pressing and releasing the RST button before uploading.
- Wi-Fi/Bluetooth Connectivity Issues: Double-check your network credentials and ensure the antenna is not obstructed. Verify that your code correctly implements the Wi-Fi or Bluetooth protocols.
Specifications
| Feature | Detail |
|---|---|
| Processor | ESP32-S3R8 Xtensa 32-bit LX7 Dual-core |
| Main Frequency | Up to 240MHz |
| Display Size | 2-inch |
| Display Type | IPS Capacitive Touchscreen |
| Resolution | 240 x 320 pixels |
| Display Colors | 262K |
| Display Driver IC | ST7789T3 |
| Touch Driver IC | CST816D |
| SRAM | 512KB |
| ROM | 384KB |
| PSRAM | 8MB |
| Flash Memory | 16MB |
| Wi-Fi Standard | 2.4GHz (802.11 b/g/n) |
| Bluetooth Standard | Bluetooth 5 (LE) |
| IMU | QMI8658 6-axis (Accelerometer & Gyroscope) |
| Charging Interface | MX1.25 for 3.7V Lithium battery |
| Data/Power Interface | USB Type-C |
| Storage Expansion | TF Card Slot |
| GPIO Pins | 22 |
| Camera Interface | Compatible with OV2640/OV5640 (Camera module not included) |
| Operating System | FreeRTOS |
| Item Weight | 0.32 ounces |
| Product Dimensions | 0.04 x 0.79 x 1.57 inches |
Warranty and Support
This product comes with a standard manufacturer's warranty. For detailed warranty information, technical support, and access to online tutorials and development resources, please visit the official Wonrabai website or refer to the provided online tutorial link: n9.cl/is8qy7. Ensure you have your product model number (ESP32-S3-Touch-LCD-2) ready when contacting support.