
Enventor 76604L
Enventor Mini Circular Saw Model 76604L User Manual
Model: 76604L
1. Introduction
This manual provides essential information for the safe operation, setup, maintenance, and troubleshooting of your Enventor 5.8A 4-1/2" Mini Circular Saw, Model 76604L. Please read this manual thoroughly before using the tool to ensure proper function and to prevent injury.
2. Safety Instructions
WARNING: Read all safety warnings, instructions, illustrations, and specifications provided with this power tool. Failure to follow all instructions listed below may result in electric shock, fire, and/or serious injury.
- Work Area Safety: Keep your work area clean and well-lit. Cluttered or dark areas invite accidents. Do not operate power tools in explosive atmospheres, such as in the presence of flammable liquids, gases, or dust.
- Electrical Safety: Power tool plugs must match the outlet. Never modify the plug in any way. Avoid body contact with earthed or grounded surfaces.
- Personal Safety: Always wear eye protection, hearing protection, and a dust mask. Dress properly; avoid loose clothing or jewelry. Secure long hair.
- Tool Use and Care: Do not force the power tool. Use the correct power tool for your application. Disconnect the plug from the power source before making any adjustments, changing accessories, or storing power tools.
- Specific Circular Saw Safety:
- Keep hands away from the cutting area and the blade.
- Do not reach underneath the workpiece.
- Adjust the cutting depth to the thickness of the workpiece.
- Never hold the workpiece in your hands or across your leg while cutting. Secure the workpiece to a stable platform.
- Check the lower guard for proper closing before each use.
- Always use blades of the correct size and type for the material being cut.
3. Product Components
Familiarize yourself with the parts of your Enventor Mini Circular Saw:

This image displays the key components of the Enventor Mini Circular Saw, including the Depth Clamp Lever, Dust Extraction Port, Rip Guide Locking Screw, Angle Locking Lever, Spindle Lock Button, Ergonomic Slim Grip Handle, Laser, Lock-off Button, Switch Trigger, Base Plate, Blade Clamp, and Aluminum Alloy Guard.
- Depth Clamp Lever: Adjusts and locks the cutting depth.
- Dust Extraction Port: Connects to a vacuum adapter for dust collection.
- Rip Guide Locking Screw: Secures the rip guide for parallel cuts.
- Angle Locking Lever: Adjusts and locks the cutting angle (bevel).
- Spindle Lock Button: Engages to lock the spindle for blade changes.
- Ergonomic Slim Grip Handle: Provides comfortable and secure handling.
- Laser: Projects a laser line for precise cutting guidance.
- Lock-off Button: A safety feature that prevents accidental starting.
- Switch Trigger: Activates the saw when pressed.
- Base Plate: Supports the saw on the workpiece.
- Blade Clamp: Secures the saw blade.
- Aluminum Alloy Guard: Protects the blade during operation.
4. Setup
4.1. Blade Installation and Replacement
Always disconnect the saw from the power source before changing blades.

This image illustrates the four steps for safely replacing the saw blade on the Enventor Mini Circular Saw.
- Press and hold the spindle lock button.
- Use the provided inner hexagon spanner wrench to loosen and remove the blade bolt.
- Carefully remove the lower protective cover, then remove the old saw blade and press plate. Install the new blade, ensuring the teeth are oriented correctly for cutting.
- Reinstall the press plate and bolt, then tighten the bolt counter-clockwise with the inner hexagon wrench while holding the spindle lock button.
4.2. Dust Collection Setup
To maintain a clean workspace and reduce airborne dust, connect the vacuum adapter to the dust extraction port.

This image shows the dust port on the saw connected to a vacuum adapter, ready for dust extraction.
- Locate the dust extraction port on the saw.
- Attach the provided vacuum adapter firmly to the port.
- Connect a shop vacuum hose to the vacuum adapter.
4.3. Rip Guide Installation
The rip guide assists in making straight, parallel cuts.
- Slide the rip guide into the slot on the base plate.
- Adjust the guide to the desired cutting width.
- Tighten the rip guide locking screw to secure it in place.
5. Operating Instructions
5.1. Powering On/Off
- To start the saw, press the lock-off button, then squeeze the switch trigger.
- To stop the saw, release the switch trigger.
5.2. Adjusting Cutting Depth
The cutting depth can be adjusted for different material thicknesses.

This image illustrates how to adjust both the cutting depth (up to 1-11/16" at 90°) and the cutting angle (up to 1-1/8" at 45°).
- Loosen the depth clamp lever.
- Adjust the base plate to achieve the desired cutting depth. For optimal safety and cut quality, the blade should extend approximately 1/8 inch (3mm) below the workpiece.
- Tighten the depth clamp lever securely.
5.3. Adjusting Cutting Angle (Bevel)
The saw allows for bevel cuts from 0° to 45°.
- Loosen the angle locking lever.
- Tilt the base plate to the desired angle (0° to 45°).
- Tighten the angle locking lever securely.
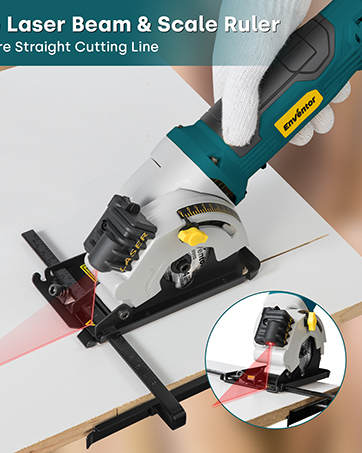
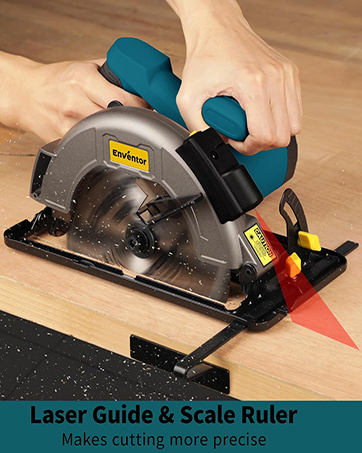
5.4. Using the Laser Guide
The integrated laser guide provides a visual line for accurate cuts.

This image shows the laser guide activated, projecting a red line onto the material to indicate the cutting path.
- Ensure the laser is clean and unobstructed.
- Align the projected laser line with your desired cut line on the workpiece.
- Proceed with the cut, keeping the laser aligned for precision.
5.5. Multi-Material Cutting
The Enventor Mini Circular Saw is designed for cutting various materials with the appropriate blade.

Cutting thin metal with the appropriate blade.

Cutting a wood board using a wood-specific blade.
Cutting ceramic tile with a diamond blade.
Cutting plastic material.
Always select the correct blade for the material you are cutting:
- 24T Carbide Blade: For wood and wood-based materials.
- 60T HSS Blade: For wood and soft metals.
- Diamond Blade: For tile, stone materials, cement, and drywall.
6. Maintenance
Regular maintenance ensures the longevity and safe operation of your saw.
- Cleaning: After each use, clean the saw with a dry cloth. Remove any dust or debris from the ventilation openings, blade guard, and base plate. Do not use water or chemical cleaners.
- Blade Inspection: Regularly inspect blades for sharpness, cracks, or damage. Replace dull or damaged blades immediately.
- Cord Inspection: Check the power cord for any cuts, fraying, or damage. Do not use the saw if the cord is damaged.
- Storage: Store the saw in a dry, secure location out of reach of children.
7. Troubleshooting
If you encounter issues with your saw, refer to the following common problems and solutions:
| Problem | Possible Cause | Solution |
|---|---|---|
| Saw does not start | No power supply; Lock-off button not pressed; Damaged cord/plug | Check power connection; Ensure lock-off button is pressed before trigger; Inspect cord for damage. |
| Poor cutting performance / Rough cuts | Dull or incorrect blade; Incorrect cutting depth; Saw forced too quickly | Replace blade or use correct blade type; Adjust cutting depth; Allow saw to work at its own pace. |
| Excessive vibration | Loose blade; Damaged blade; Motor issue | Tighten blade bolt; Replace damaged blade; Contact customer support if motor issue suspected. |
| Laser guide not visible | Dirty laser lens; Bright ambient light | Clean laser lens; Use in lower light conditions if possible. |
8. Specifications
Technical specifications for the Enventor Mini Circular Saw Model 76604L:

This image provides the physical dimensions of the Enventor Mini Circular Saw: 16.54"L x 10.63"H x 5.12"W, and a weight of 8.05 lbs (3.65 kg).
- Model: 76604L
- Power: 5.8A (705W)
- No-Load Speed: 3500 RPM
- Voltage: 120 Volts
- Blade Diameter: 4-1/2 inches (115mm)
- Max Cutting Depth (90°): 1-11/16 inches (42.8mm)
- Max Cutting Depth (45°): 1-1/8 inches (28mm)
- Product Dimensions: 10"L x 5"W x 15"H (as per product listing, note discrepancy with image)
- Item Weight: 8.12 pounds
- Special Features: Depth Adjustment, Ergonomic Handle, Laser Guide, Dust Collection Port
9. Package Contents
Upon opening your package, you should find the following items:

This image displays the complete package contents, including the saw, various blades, rip guide, wrench, and vacuum adapter.
- 1 x Enventor 5.8A Mini Circular Saw
- 2 x 4-1/2" 24T Carbide Blades (for woodcuts)
- 2 x 4-1/2" 60T HSS Blades (for wood and soft-metal cuts)
- 2 x 4-1/2" Diamond Blades (for tile cuts)
- 1 x Wrench
- 1 x Rip Guide
- 1 x Vacuum Adapter
- 1 x User Manual (this document)
10. Warranty and Support
For warranty information, product support, or to purchase replacement parts, please contact Enventor customer service. Refer to the contact details provided with your purchase documentation or visit the official Enventor website.
Related documents76604L

Ask a question about this manual
Ask about setup, troubleshooting, compatibility, parts, safety, or missing instructions. Manuals+ will review the question and use this page’s manual context to help answer it.