1. Introduction
Thank you for choosing the Paragon Safes Electronic Drop Safe. This manual provides essential information for the proper installation, operation, and maintenance of your new safe. Designed for both home and business use, this safe offers secure storage for cash, documents, and other valuables with the convenience of a digital keypad and the reliability of manual override keys. Please read this manual thoroughly before using the safe to ensure optimal security and functionality.
2. Important Safety Information
- Do not store the manual override keys inside the safe. Keep them in a secure, separate location.
- Ensure the safe is mounted securely to a floor or wall to prevent unauthorized removal.
- Replace batteries promptly when the low battery indicator appears to avoid being locked out.
- Keep the safe door closed and locked when not in use.
- This safe is designed for security against theft, not fire or water damage.
3. Package Contents
Please check the package to ensure all items are present:
- Electronic Drop Safe Unit
- Manual Override Keys (2)
- Fixing Bolts (for mounting)
- User Manual (this document)
Note: 4 AA R6 batteries are required for operation and are included with the safe.
4. Product Overview
Familiarize yourself with the main components of your Paragon Safes Electronic Drop Safe.
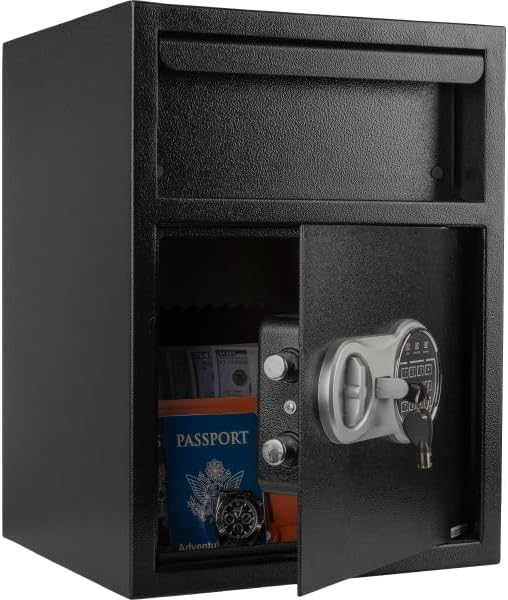
Front view of the Paragon Safes Electronic Drop Safe, illustrating the deposit slot at the top and the main door with the digital keypad and manual override lock.

An annotated view of the safe, pointing out key components such as the 11-gauge solid powder-coated steel construction, drop slot, automatic locks, concealed inside hinges, and the location for batteries and reset button.
Key Components:
- Deposit Slot: For quick and secure drops of cash or small items without opening the main door.
- Digital Keypad: Used for programming and entering access codes.
- Manual Override Lock: Provides emergency access with the physical keys.
- Battery Compartment: Located inside the safe door, holds 4 AA batteries.
- Reset Button: Used for resetting codes, located inside the battery compartment.
- Concealed Hinges: Enhance security by preventing prying.
5. Setup and Installation
5.1. Battery Installation
- Open the safe door using one of the manual override keys (refer to Section 6.4 if needed).
- Locate the battery compartment on the inside of the safe door.
- Remove the battery cover.
- Insert 4 new AA R6 batteries, ensuring correct polarity (+/-).
- Replace the battery cover. You should hear a beep, indicating successful installation.
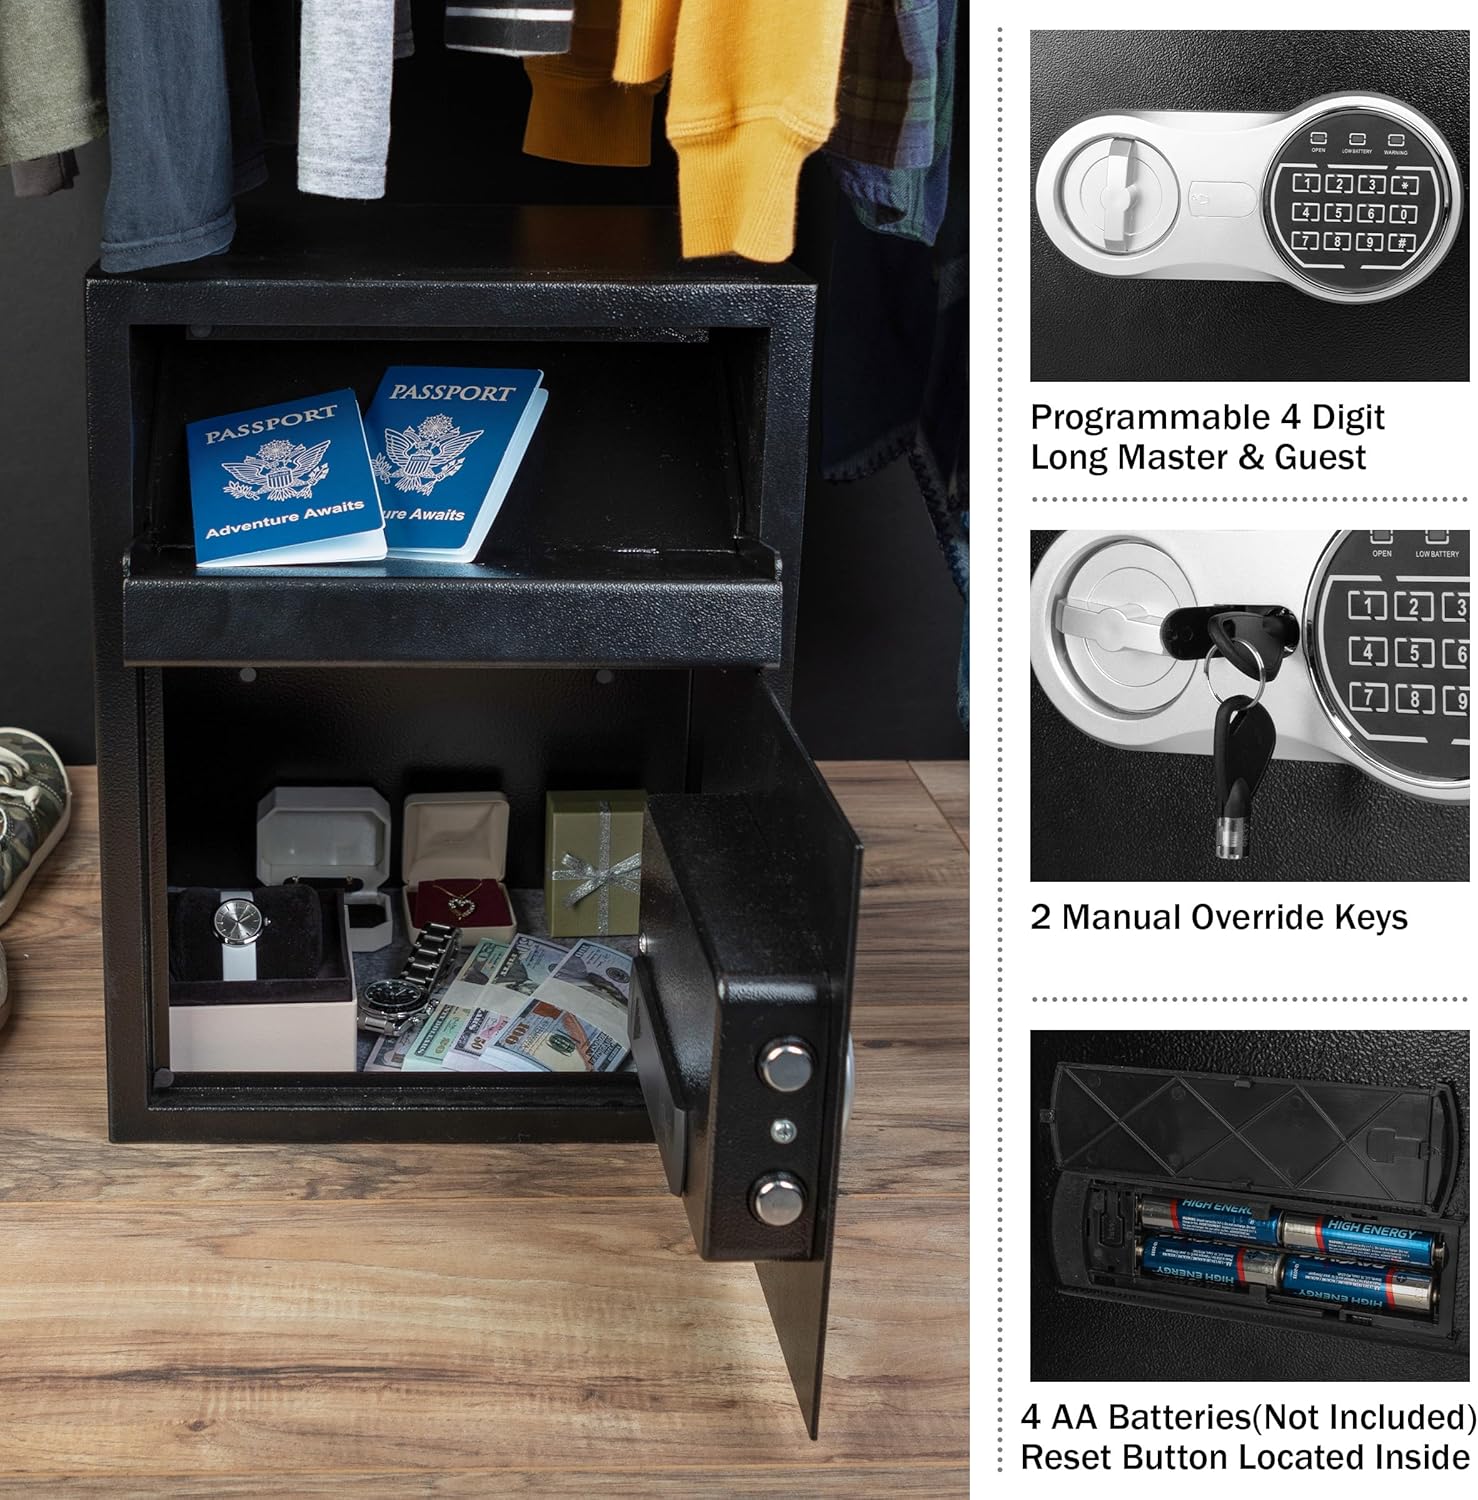
This image highlights the digital keypad for electronic access, the two manual override keys for emergency entry, and the internal battery compartment requiring 4 AA batteries.
5.2. Mounting the Safe
For enhanced security, it is highly recommended to mount the safe to a floor or wall.
- Choose a suitable location for mounting, ensuring it is a solid surface.
- Mark the desired drilling points through the pre-drilled holes inside the safe.
- Drill pilot holes into the wall or floor using an appropriate drill bit (not included).
- Align the safe with the drilled holes.
- Secure the safe using the provided fixing bolts. Tighten firmly.
6. Operating Instructions
6.1. Opening the Safe for the First Time
Upon initial setup, use one of the manual override keys to open the safe. Insert the key into the lock, turn it clockwise, and then turn the handle to open the door.
6.2. Programming a User Code
The safe allows for a 4-digit user code.
- With the safe door open, press the red reset button located inside the battery compartment. The yellow indicator light on the keypad will illuminate.
- Enter your desired 4-digit user code on the keypad.
- Press the "A" or "B" button to confirm. The yellow light will turn off, and a beep will sound.
- Test the new code with the door open before closing it.
6.3. Programming a Master Code
The safe also supports a 4-digit master code for additional security or administrative access.
- With the safe door open, press the red reset button twice. The yellow indicator light will illuminate.
- Enter your desired 4-digit master code on the keypad.
- Press the "A" or "B" button to confirm. The yellow light will turn off, and a beep will sound.
- Test the new master code with the door open before closing it.
6.4. Opening with the Digital Keypad
- Enter your 4-digit user or master code.
- Press the "A" or "B" button. The green indicator light will illuminate.
- Within 5 seconds, turn the handle clockwise to open the safe door.
6.5. Using Manual Override Keys
In case of forgotten codes or battery failure, the manual override keys provide emergency access.
- Locate the manual override lock cover on the keypad panel.
- Remove the cover.
- Insert one of the manual override keys into the lock.
- Turn the key clockwise and simultaneously turn the handle to open the safe door.
- Once open, replace batteries if needed and reprogram your code.
6.6. Automatic Lock and Alarm Features
- Incorrect Entry Alarm: After 3 incorrect code entries, the built-in alarm will sound for 20 seconds.
- Extended Alarm: After 3 additional incorrect entries (total of 6), the alarm will sound for a longer duration, indicating repeated attempted unauthorized access.
- Automatic Locking: The safe automatically locks when the door is closed and the handle is turned counter-clockwise.
7. Maintenance
- Cleaning: Wipe the safe exterior with a soft, damp cloth. Avoid abrasive cleaners or solvents.
- Battery Replacement: Replace batteries annually or when the low battery indicator light illuminates. Always use 4 new AA R6 alkaline batteries.
- Key Storage: Ensure manual override keys are stored in a secure location away from the safe.
8. Troubleshooting
| Problem | Possible Cause | Solution |
|---|---|---|
| Safe does not open with code. | Incorrect code entered; low batteries. | Re-enter code carefully. Replace batteries. Use manual override key. |
| Keypad does not respond. | Dead batteries; keypad malfunction. | Replace batteries. If issue persists, use manual override key and contact support. |
| Alarm sounds frequently. | Multiple incorrect code entries. | Ensure correct code is used. If alarm is false, check for keypad damage. |
| Door will not close/lock. | Obstruction; mechanism misalignment. | Check for items blocking the door. Ensure handle is fully turned to lock position. |
9. Specifications

Detailed diagram displaying the external and internal dimensions of the safe, including the deposit slot size. External dimensions are 13.5" (L) x 11.75" (W) x 18" (H).
| Feature | Detail |
|---|---|
| Brand | Paragon Lock & Safe |
| Model Number | 83-DT5931-1 |
| External Dimensions (L x W x H) | 13.5" x 11.75" x 18" |
| Interior Dimensions (L x W x H) | 10" x 10" x 16.5" |
| Deposit Slot Dimensions (L x W) | 8.75" x 6" |
| Weight | 33 lbs (16.44 kg) |
| Material | 11-Gauge Solid Powder-Coated Steel |
| Lock Type | Electronic Combination Lock with Manual Override |
| Power Source | 4 x AA R6 Batteries (included) |
| Mounting Type | Floor Mount / Wall Mount |
| Color | Black |
10. Warranty and Support
Paragon Safes is committed to providing quality products. For warranty information, product support, or to purchase replacement parts, please visit the official Paragon Lock & Safe website or contact their customer service department. Please retain your proof of purchase for warranty claims.
Important: Ensure you purchase genuine Paragon Safes products. Only products from authorized sellers are guaranteed.


