RAINPOT RM Dashcam User Manual
Model: RM
Introduction
Thank you for purchasing the RAINPOT RM Dashcam. This 2025 Upgraded Front & Rear Dashcam is designed to provide comprehensive video surveillance for your vehicle, featuring 1080p recording, 24-hour night vision, HDR, loop recording, and motion detection. This manual will guide you through the installation, operation, and maintenance of your new dashcam.
Safety Information
- Ensure the dashcam is securely mounted and does not obstruct the driver's view or interfere with vehicle controls.
- Do not operate the dashcam while driving. Adjust settings only when the vehicle is safely parked.
- Use only the provided charging cable and accessories to prevent damage or fire.
- Avoid exposing the dashcam to extreme temperatures or direct sunlight for prolonged periods.
- Keep the lens clean for optimal recording quality.
Package Contents

Image: RAINPOT RM Dashcam with its components, including the main unit, 32GB memory card, charging cable, and suction cup mount.
Please check the box for the following items:
- RAINPOT RM Dashcam Unit (Front and Interior Cameras)
- 32GB Memory Card
- Charging Cable (Cigarette Lighter Adapter)
- Suction Cup Mount
- User Manual (This Document)
Product Overview

Image: Detailed view of the RAINPOT RM Dashcam highlighting its various ports and controls, including the TF card slot, charging port, microphone, and control buttons.
Familiarize yourself with the main components and controls of your dashcam:
- Front Camera Lens: Captures the road ahead in 1080p HD.
- Interior Camera Lens: Records the vehicle's cabin, featuring infrared LED fill lights for night vision.
- 3.16-inch IPS Screen: Displays live view, playback, and menu options.
- TF Card Slot: For inserting the memory card (32GB card included).
- Charging Port: Connects to the vehicle's cigarette lighter for power.
- MIC: Built-in microphone for audio recording.
- Control Buttons (Switch, UP, Down, MODE, RESET): Used for navigation and settings adjustment.
- Speakers: For audio playback.

Image: Dimensions of the RAINPOT RM Dashcam, showing its compact size and screen measurements.
Setup and Installation
- Insert Memory Card: Gently insert the provided 32GB memory card into the TF card slot until it clicks into place. Ensure the card is inserted correctly.
- Mount the Dashcam: Attach the suction cup mount to a clean, dry area on your windshield, ideally near the rearview mirror, ensuring it does not obstruct your view. Secure the dashcam unit to the mount.
- Connect Power: Plug the charging cable into the dashcam's charging port and then into your vehicle's 12V cigarette lighter socket. Route the cable neatly to avoid interference with driving.
- Power On: The dashcam will typically power on automatically when the vehicle's ignition is turned on. If not, press the Power button.
- Initial Setup: Upon first use, you may need to set the date, time, and language. Follow the on-screen prompts using the control buttons.
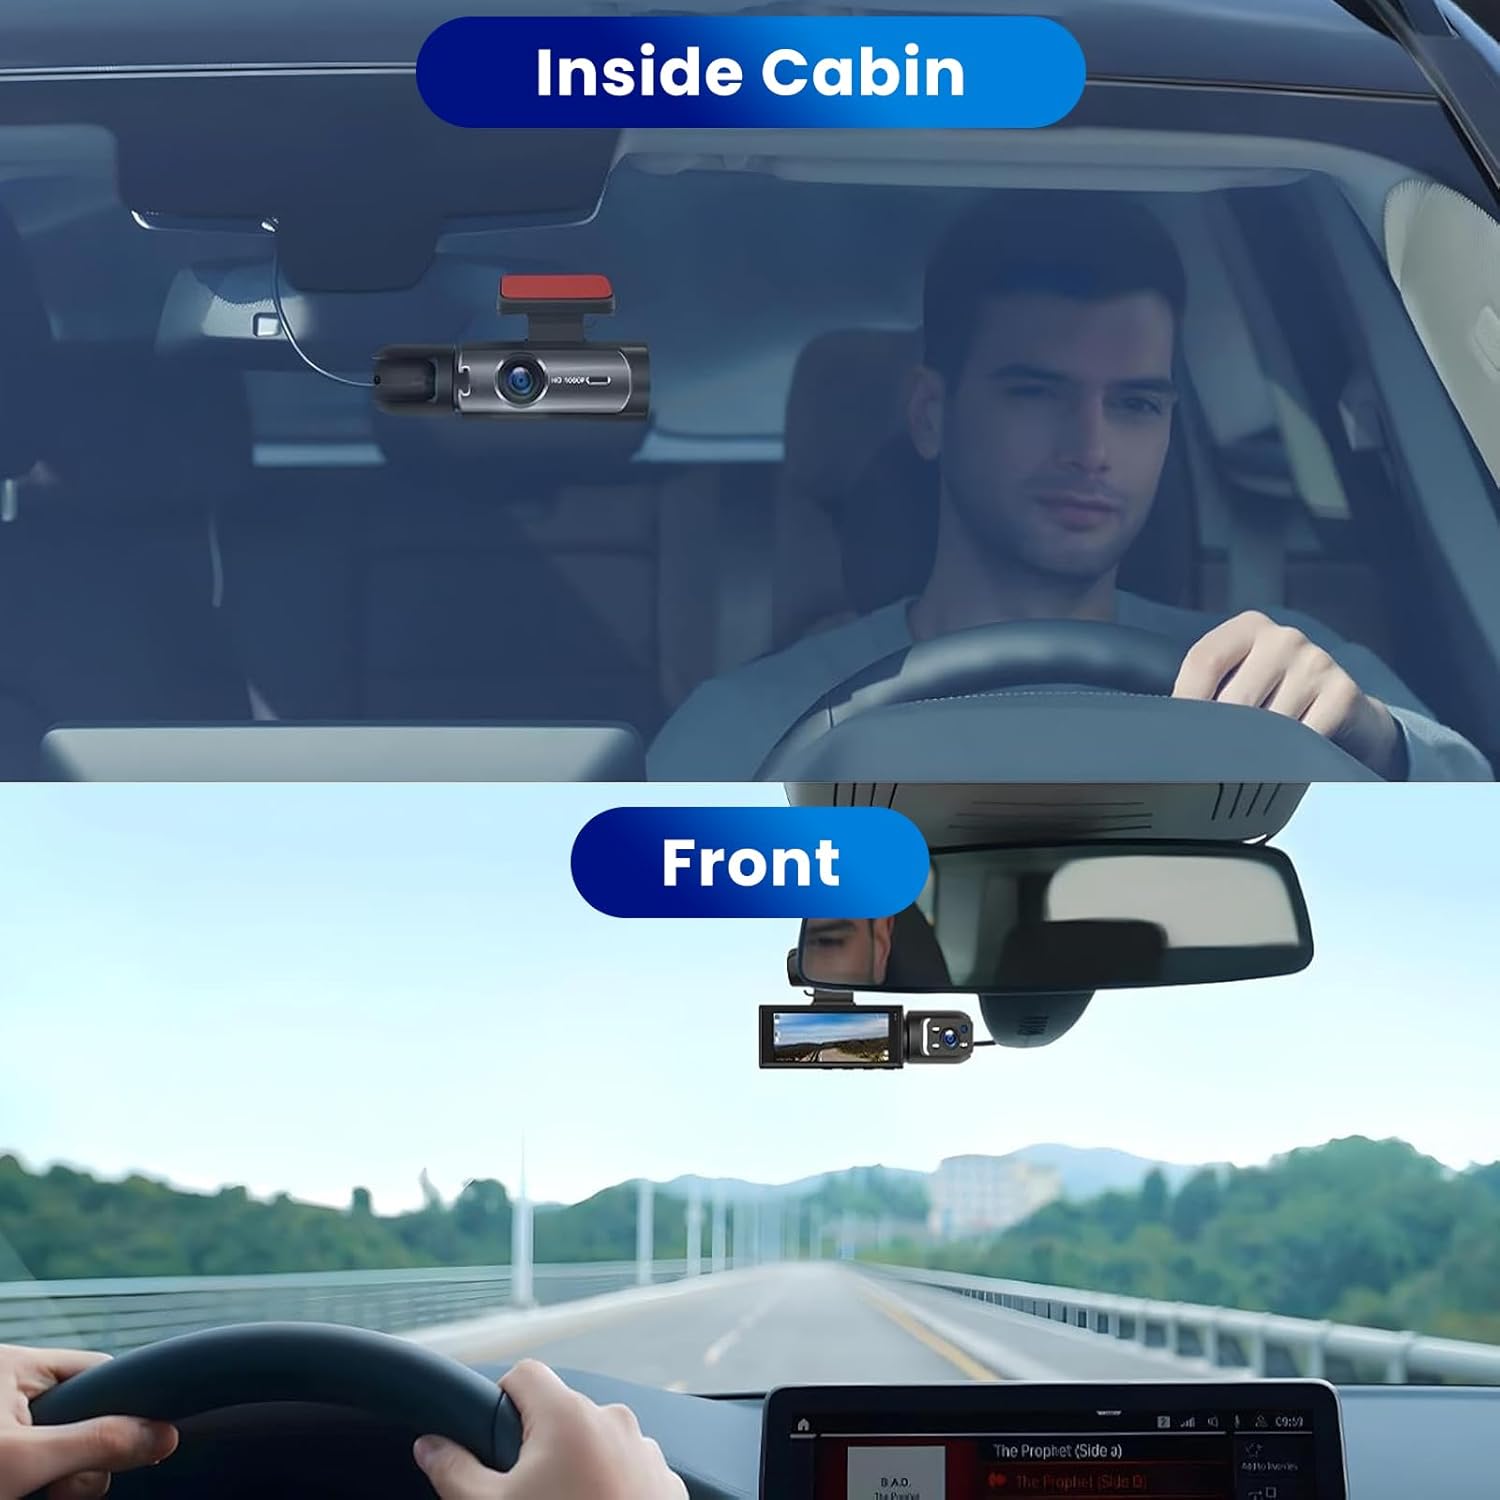
Image: Example installation showing the dashcam mounted on the windshield, providing both interior cabin and front road views.
Operating Instructions
Basic Recording
Once powered on, the dashcam will automatically begin recording. The screen will display the live view from both cameras.

Image: Dashcam display indicating active recording with various feature icons, including 1080p HD, dual recording, loop recording, and night vision.
Screen Switching Modes
The dashcam supports multiple display modes on its 3.16-inch IPS screen. Use the "MODE" button or on-screen touch controls (if applicable) to switch between views:

Image: Visual representation of the five available screen display modes, allowing users to switch between front, interior, or combined views.
Night Vision Function
The dashcam features enhanced night vision. The front camera optimizes performance in low-light conditions, while the interior-facing camera uses 3 infrared LED fill lights to capture clear footage of the driver and passengers even in complete darkness.

Image: Demonstration of the dashcam's super night vision capability, showing clear recordings of both the vehicle's interior and the external environment in low light.
Loop Recording
The dashcam automatically records in a continuous loop. When the memory card is full, the oldest footage will be overwritten by new recordings. This ensures continuous operation without manual intervention.
G-Sensor (Gravity Sensor)
The built-in G-sensor detects sudden movements or impacts (e.g., collisions, emergency braking). When triggered, it automatically locks the current video segment, preventing it from being overwritten by loop recording. These locked files are stored in a separate folder.

Image: Explanation of the G-sensor (Gravity Sensor) function, which automatically locks and protects video files during sudden impacts or collisions.
24H Parking Monitor
When the vehicle is parked, the dashcam can automatically turn on and start recording if a collision or bump is detected. For continuous 24-hour parking monitoring with time-lapse function, a separate step-down cable connected directly to the car battery is required (not included). The dashcam will power off when the engine is turned off unless this external power source is provided.
Playback
To view recorded videos, stop recording (if active) and enter playback mode via the menu. You can browse and play back files directly on the dashcam screen.
Maintenance
- Clean the Lens: Regularly wipe the camera lenses with a soft, lint-free cloth to ensure clear video quality.
- Memory Card Management: Format the memory card periodically (e.g., once a month) to maintain optimal performance and prevent data corruption. Back up any important files before formatting.
- Firmware Updates: Check the manufacturer's website (Rainpot) for any available firmware updates to improve performance or add new features.
- Storage: When not in use for extended periods, store the dashcam in a cool, dry place away from direct sunlight.
Troubleshooting
Dashcam not powering on:
- Ensure the charging cable is securely connected to both the dashcam and the vehicle's cigarette lighter socket.
- Check if the vehicle's 12V power outlet is functioning.
- Try a different charging cable if available.
Recording stops unexpectedly:
- The memory card might be full. Check if loop recording is enabled.
- Format the memory card.
- Ensure the memory card is a high-speed (Class 10 or higher) card.
Video quality is poor/blurry:
- Clean the camera lenses.
- Ensure the protective film (if any) has been removed from the lenses.
- Check if the resolution settings are set to 1080p.
Dashcam freezes or becomes unresponsive:
- Press the RESET button (if available, refer to Product Overview image) using a small pin or paperclip.
- Disconnect and reconnect the power cable.
Specifications
| Feature | Detail |
|---|---|
| Model Name | RM |
| Video Capture Resolution | 1080p |
| Display Screen Size | 3.16 inches IPS |
| Special Features | Night Vision, Loop Recording, Motion Detection, G-Sensor, HDR |
| Connectivity Technology | HDMI (for output) |
| Mounting Type | Dashboard Mount (Suction Cup) |
| Product Dimensions | 5.9"D x 4.3"W x 2.76"H |
| Included Components | Charging Cable, 32GB Memory Card |
| Manufacturer | Rainpot |
Warranty and Support
Your RAINPOT RM Dashcam is covered by a manufacturer's warranty. Please refer to the warranty card included in your package for specific terms and conditions. For technical support, troubleshooting assistance, or warranty claims, please contact Rainpot customer service through the retailer where you purchased the product or visit the official Rainpot website.
Manufacturer: Rainpot


