DM25TEQ/L-1.1/20
DM25TEQ/L-1.1/20 Roller Blinds Tubular Motor Kit
User Instruction Manual
1. Product Overview
This manual provides detailed instructions for the installation, operation, and maintenance of the DM25TEQ/L-1.1/20 Roller Blinds Zebra Tubular Motor Kit. This AC 100V-240V smart motor is designed to convert existing roller shades into motorized units, suitable for 1.5-inch (38mm) shade tubes.
The kit includes the DM25TEQ roller blinds motor, a handheld controller, and 38mm tube brackets. It offers a convenient solution for automating your window treatments without the need for frequent charging, as it connects directly to the power supply.

Figure 1: Components of the DM25TEQ/L-1.1/20 Roller Blinds Tubular Motor Kit, including the motor, handheld remote, and mounting brackets.
2. Safety Information
Please read all safety warnings and instructions carefully before installation and operation to prevent injury or damage. Keep this manual for future reference.
- Ensure the power supply is disconnected before any installation or maintenance work.
- Do not allow children to play with the motor or controller.
- Do not expose the motor to water or extreme temperatures.
- Only use the motor with shade tubes of the specified diameter (1.5 inches / 38mm).
- If any unusual noise or smell occurs, immediately disconnect power and contact support.
3. Package Contents
Verify that all items are present in the package:
- 1 x DM25TEQ Roller Blinds Tubular Motor
- 1 x Handheld Controller
- 1 set x 38mm Tube Brackets
4. Setup and Installation
Follow these steps to install your tubular motor and convert your roller shades to motorized operation.
4.1. Measure Your Shade Tube
Before installation, it is crucial to measure your existing roller shade tube to ensure compatibility. This motor is designed for tubes with an outer diameter (OD) of 1.5 inches (38mm).
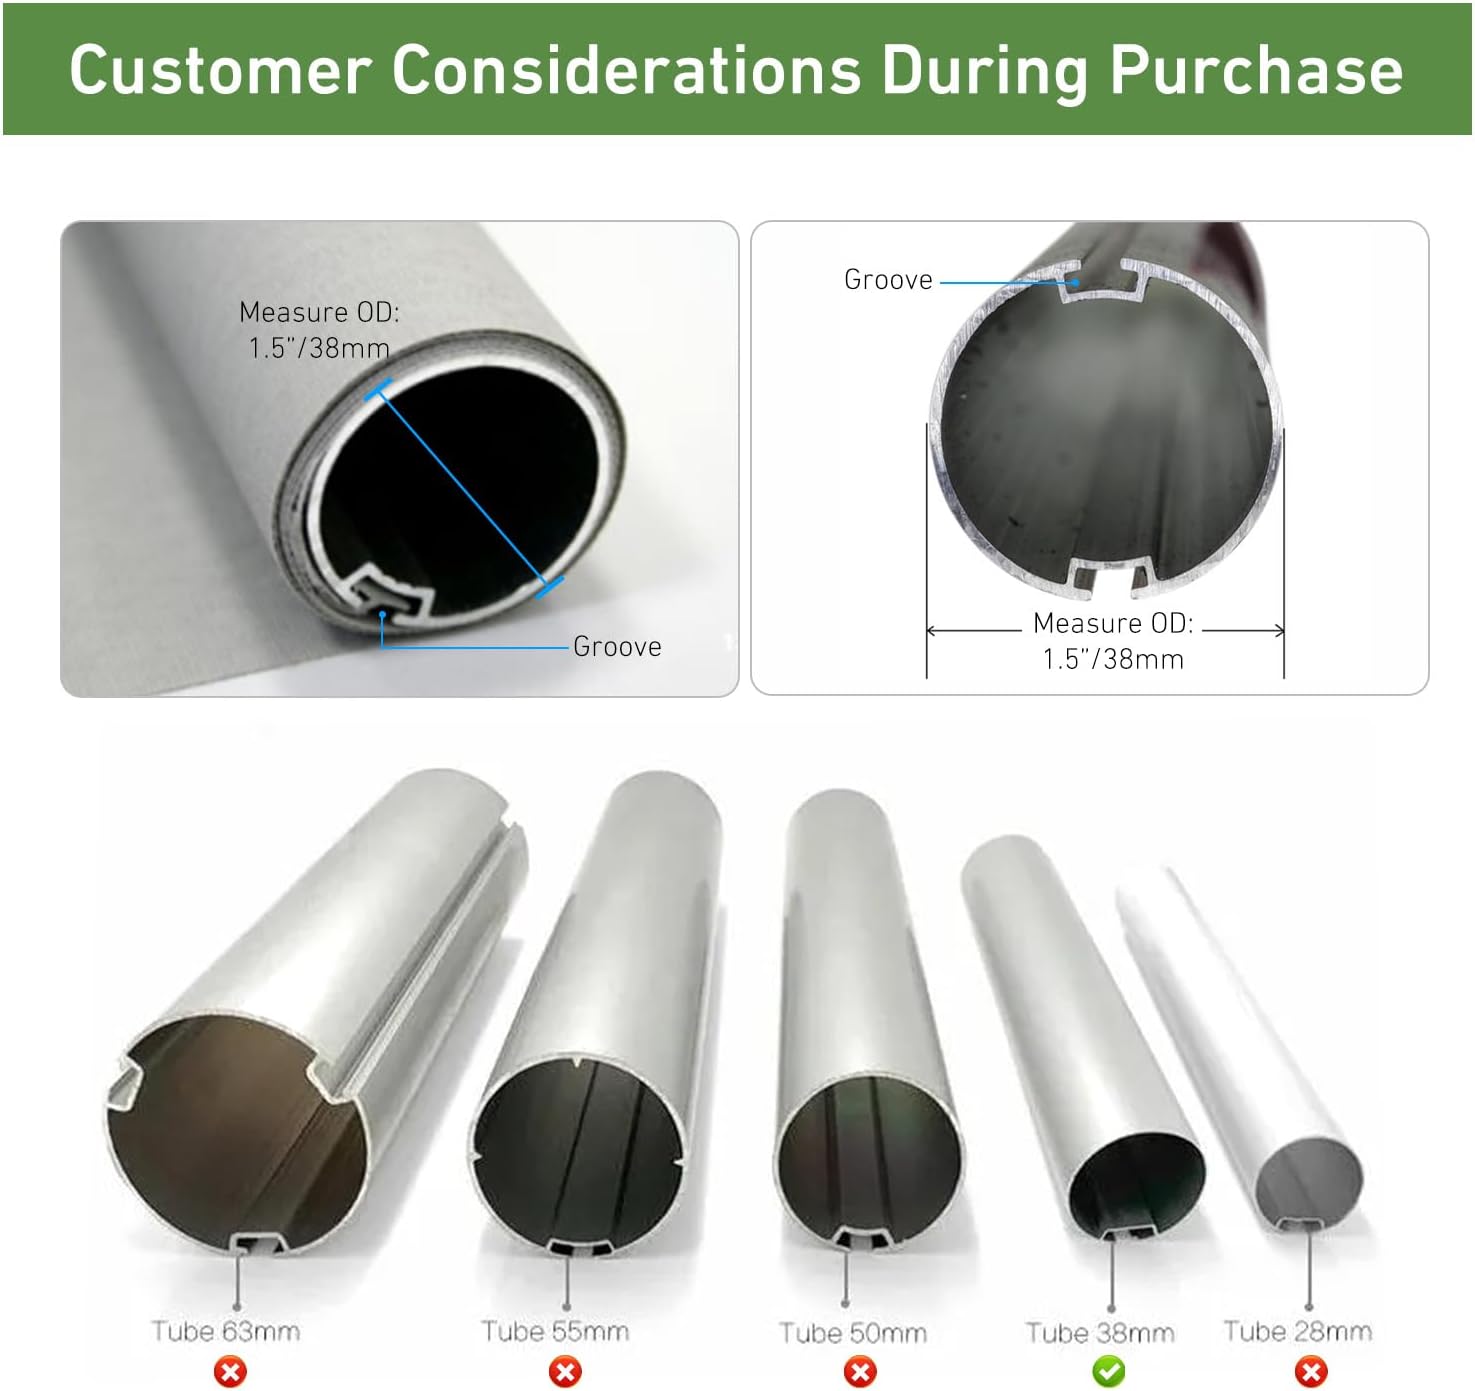
Figure 2: Guide for measuring the outer diameter (OD) of your shade tube and examples of compatible (38mm) and incompatible tube sizes.
4.2. Motor Installation Steps
Once you have confirmed your tube size, proceed with the following installation steps:
- Remove the Chain Drive: Carefully remove the existing chain drive mechanism from your roller shade.
- Measure Shade Tube Size: Use a steel ruler or caliper to accurately measure the inner diameter (ID) and outer diameter (OD) of your shade tube. Ensure the OD is 1.5 inches (38mm).
- Insert the Motor: Insert the DM25TEQ tubular motor into the shade tube. Ensure it fits snugly and is properly aligned.
- Hang Shade and Program: Re-hang the shade with the motor installed. Connect the motor to power and proceed to program the motor using the handheld controller.
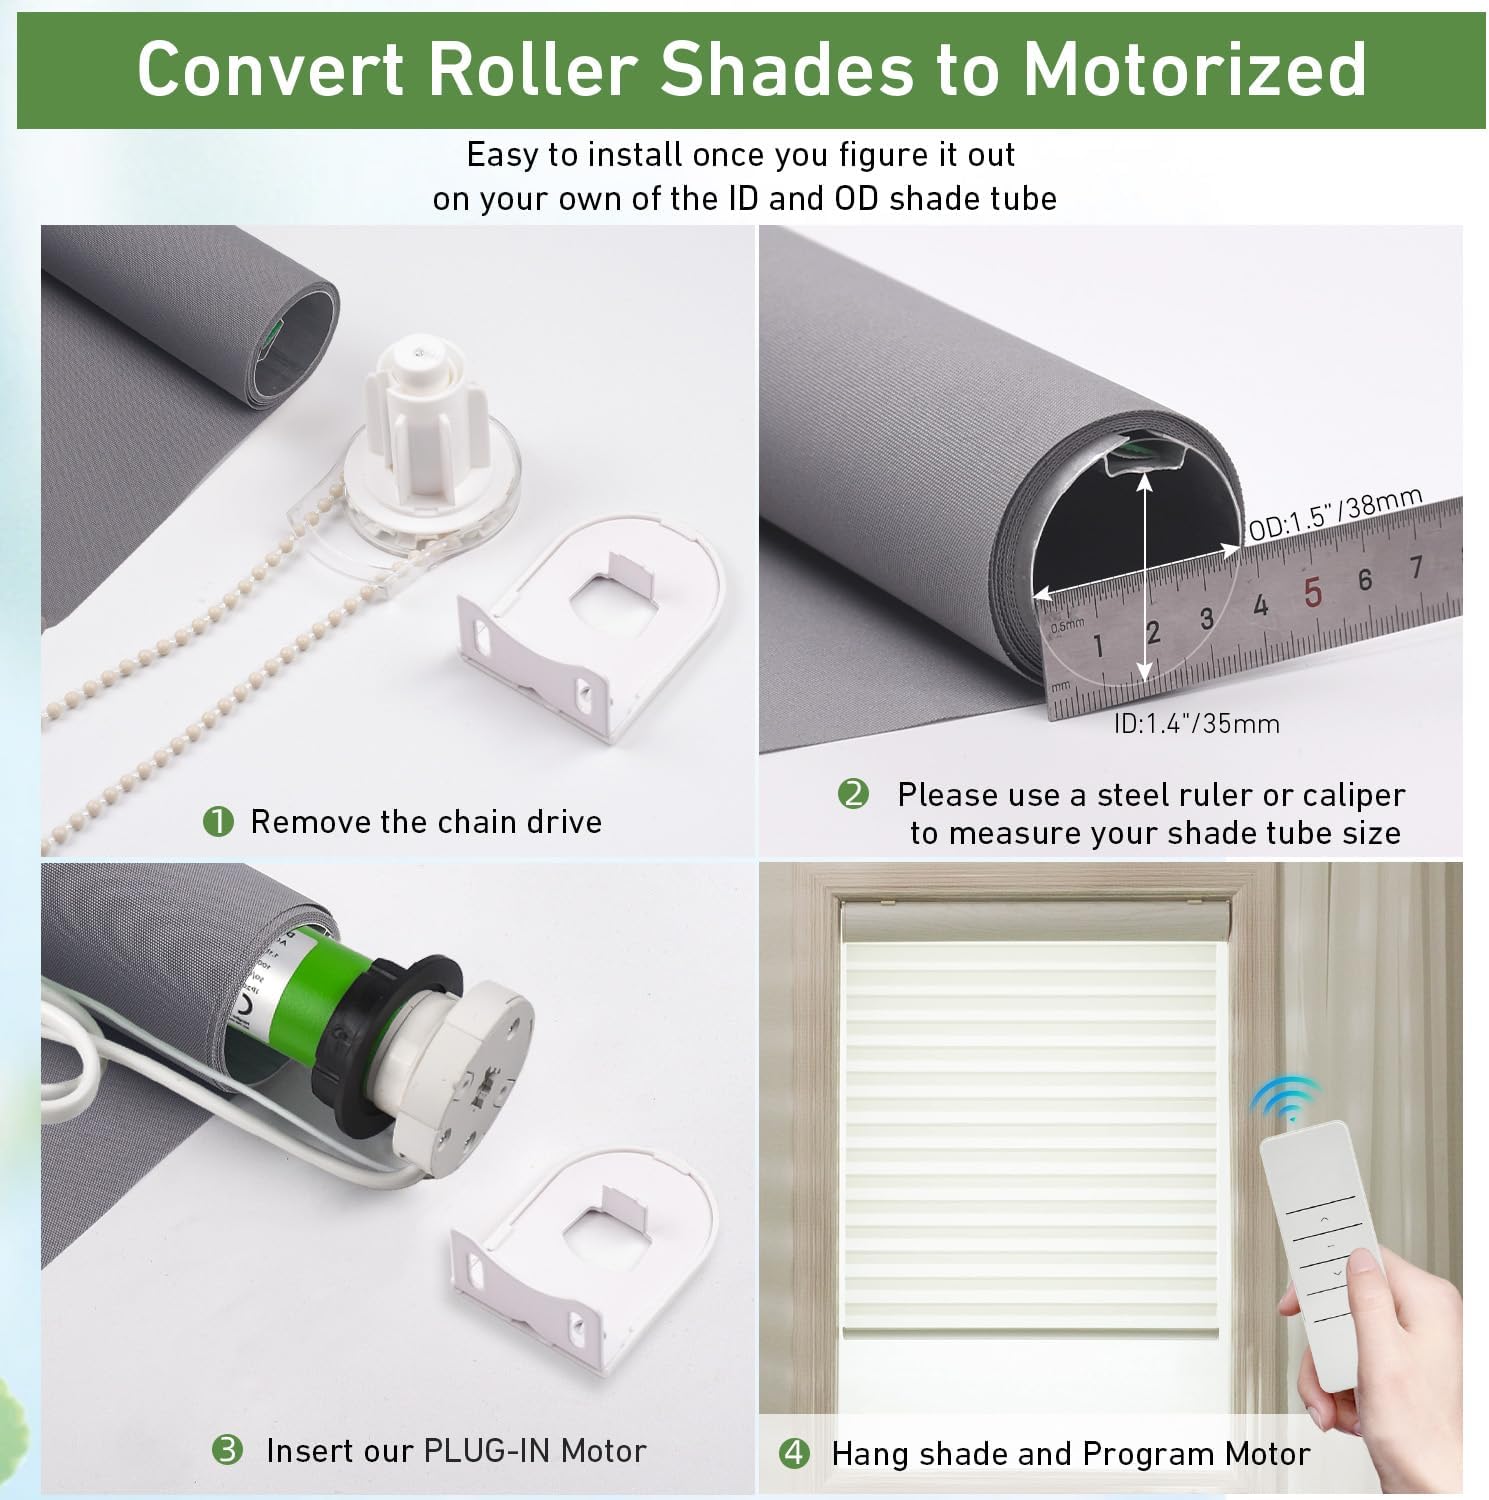
Figure 3: Visual guide for converting roller shades to motorized operation, from removing the chain to inserting the motor and hanging the shade.
4.3. Power Connection
The DM25TEQ motor is a plug-in solution, designed for direct connection to an AC 110-240V power supply. No battery charging is required.

Figure 4: Illustration of the plug-in power solution for the motor, highlighting its direct AC power connection and potential for smart home integration (Smart Bridge and voice assistants not included).
5. Operating Instructions
The motor can be controlled via the included handheld controller. It also supports integration with smart home systems for voice and app control (Smart Bridge and voice assistants sold separately).
5.1. Handheld Controller Operation
The handheld controller allows you to easily operate your motorized shades and set opening and closing limits.
- Up Button: Raises the shade.
- Down Button: Lowers the shade.
- Stop Button: Stops the shade at its current position.
- Setting Limits: Refer to the specific instructions provided with your handheld controller for detailed steps on setting the upper and lower limits of the shade's travel. This typically involves pressing a combination of buttons to enter programming mode, moving the shade to the desired position, and confirming the limit.

Figure 5: Overview of multiple control methods for the motorized shades, including the handheld remote, voice control via smart assistants, and app control (requires additional smart bridge).
6. Maintenance
The DM25TEQ tubular motor requires minimal maintenance. Follow these guidelines to ensure longevity:
- Cleaning: Wipe the motor and controller with a dry, soft cloth. Do not use abrasive cleaners or solvents.
- Inspection: Periodically check the power cable for any signs of damage. Ensure the mounting brackets are secure.
- Avoid Obstructions: Ensure the shade path is clear of any obstructions that could impede the motor's movement.
7. Troubleshooting
If you encounter issues with your motor, refer to the following common problems and solutions:
| Problem | Possible Cause | Solution |
|---|---|---|
| Motor does not respond to controller. | No power; Controller battery low; Controller not paired. | Check power connection; Replace controller battery; Re-pair controller with motor (refer to controller manual). |
| Shade stops unexpectedly. | Obstruction; Overheating. | Remove any obstructions; Allow motor to cool down if it has been running continuously. |
| Shade does not reach desired limits. | Limits not set correctly. | Re-program the upper and lower limits using the handheld controller. |
| Motor makes unusual noise. | Improper installation; Internal issue. | Ensure motor is securely installed and tube is aligned; If noise persists, contact customer support. |
8. Specifications
Detailed specifications for the DM25TEQ/L-1.1/20 Tubular Motor:
| Feature | Specification |
|---|---|
| Model | DM25TEQ/L-1.1/20 |
| Voltage | AC100-240V 50/60Hz |
| Torque | 1.1Nm |
| Current | 0.19A |
| Speed | 28rpm |
| Protection Rating (IP) | IP20 |
| Motor Tube Diameter | 1.5 inches / 38mm |
| Product Dimensions | 18.9"L x 1.97"W |
| Material | Metal |
| Operation Mode | Automatic |
| Control Type | Handheld Controller |
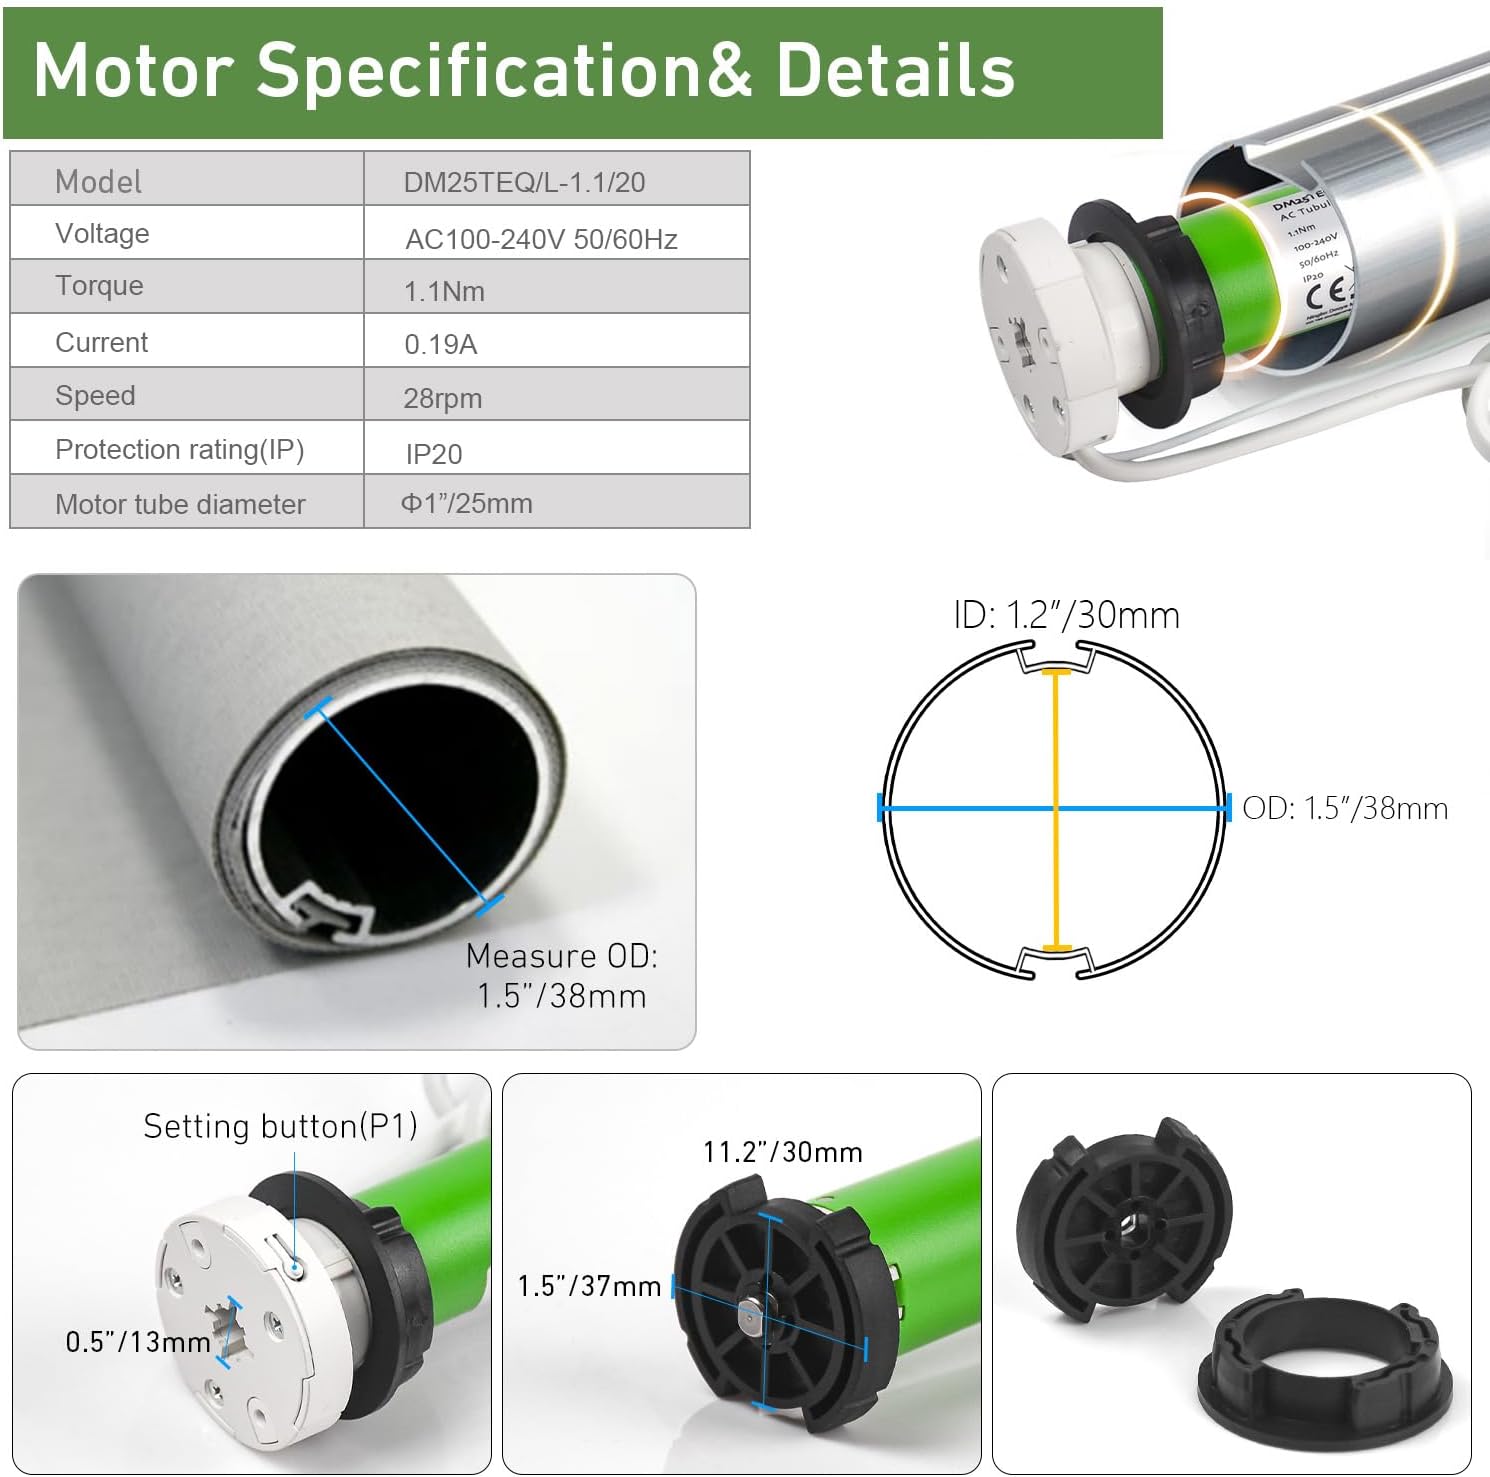
Figure 6: Detailed motor specifications and dimensional drawings for the DM25TEQ/L-1.1/20 motor.
9. Warranty and Support
For warranty information, please refer to the terms and conditions provided at the time of purchase or contact your retailer. This product is manufactured by VeroModa.
For technical support or further assistance, please contact the seller or manufacturer directly. When contacting support, please have your product model number (DM25TEQ/L-1.1/20) and purchase details ready.
Related Documents - DM25TEQ/L-1.1/20
 |
Zemismart Smart Tubular Motor Installation & Operation Guide Comprehensive guide for installing and operating Zemismart Smart Tubular Motors (ZM25TQ series). Covers specifications, Tuya App setup, remote pairing, limit settings, motor direction, and resetting procedures for automated blinds and curtains. |
 |
Joydeco Cordless Zebra Roller Shade Installation Instructions Step-by-step installation guide for Joydeco Cordless Zebra Roller Shades, covering inside and outside mount methods with component lists and required tools. |
 |
Select Blinds MOTION Motorized Window Coverings User Manual Comprehensive user manual for Select Blinds MOTION Li-ion tubular motors (CM-01/02, CM-03/05) and MOTION Wi-Fi bridge (CM-20), detailing installation, operation, features, and smart home integration. |
 |
Motorized Shades Installation Manual - Zshine Comprehensive installation manual for Zshine motorized shades, covering product view, tools needed, step-by-step installation, motor and remote functions, programming, and frequently asked questions. Suitable for electric roller shades with standard roll, valance, and zebra blinds. |
 |
Automate Manual Shade Retrofit Guide: Motorize Your Roller Shades Comprehensive guide from Automate by Rollease Acmeda on how to retrofit manual roller shades with motors. Learn about assessment, motor selection, compatibility, and installation. |
 |
Rollease Acmeda AUTOMATE Li-ion 1.1 Tubular Motor Specifications and Features Detailed specifications, features, dimensions, and compatible accessories for the Rollease Acmeda AUTOMATE Li-ion 1.1 DC tubular motor, designed for automated shade solutions. |