1. Introduction
The GTGUARD ClearView X350 is a high-performance thermal imaging riflescope designed for hunting, surveillance, and tactical applications. It features a 384×288 thermal detector, a 1024×768 HD Micro-OLED display, and a 35mm lens, providing clear and detailed thermal imagery in various environmental conditions. This manual provides essential information for the safe and effective operation, setup, and maintenance of your device.
2. Safety Information
Please read all safety warnings and instructions carefully before using the GTGUARD ClearView X350 Thermal Riflescope. Failure to follow these instructions may result in injury or damage to the device.
- Eye Safety: Never look directly at intense light sources through the device, as this may cause eye damage.
- Firearm Safety: Always follow standard firearm safety rules. Ensure the firearm is unloaded and pointed in a safe direction before mounting or adjusting the scope.
- Battery Safety: Use only specified CR123A batteries. Do not mix old and new batteries, or different types of batteries. Dispose of batteries properly.
- Environmental Conditions: Avoid exposing the device to extreme temperatures, direct sunlight for prolonged periods, or corrosive liquids.
- Maintenance: Do not attempt to disassemble or repair the device yourself. Refer all servicing to authorized personnel.
3. Package Contents
Verify that all items are present in the package:
- 1 x GTGUARD ClearView X350 Thermal Rifle Scope
- Battery Charger
- USB-C to BNC Cable
- User Manual (this document)
- Waterproof Case
- Mounting Accessories (e.g., screws, hex key)

Figure 3.1: Included accessories for the GTGUARD ClearView X350.
4. Product Overview
The GTGUARD ClearView X350 is designed for ease of use and durability. Familiarize yourself with the main components and controls:

Figure 4.1: GTGUARD ClearView X350 Thermal Riflescope.

Figure 4.2: Thermal scope mounted on a rifle, showing controls.
Key Components:
- Objective Lens: Front lens for thermal detection.
- Eyepiece/Diopter Adjustment: For adjusting focus to your eye.
- Control Buttons: Power, menu, zoom, and navigation buttons.
- Battery Compartment: Houses the CR123A batteries.
- Mounting Interface: For attaching to a rifle.
- USB-C Port: For charging and data transfer.
5. Setup
5.1 Battery Installation and Charging
- Locate the battery compartment on the device.
- Open the compartment cover.
- Insert four CR123A batteries, ensuring correct polarity (+/-).
- Close the battery compartment cover securely.
- To charge, connect the battery charger to a power source and insert the batteries into the charger. The device itself can also be powered via USB-C, but for extended use, fully charged external batteries are recommended.
5.2 Mounting the Riflescope
The GTGUARD ClearView X350 is designed to be mounted on a rifle using the provided mounting bracket.
- Ensure the firearm is unloaded and safe.
- Attach the mounting bracket to your rifle's rail system according to the bracket's instructions.
- Securely attach the thermal riflescope to the mounting bracket using the provided screws and tools.
- Adjust the position of the scope for optimal eye relief and comfortable viewing.
5.3 Initial Power On
Press and hold the Power button until the display illuminates. The device will perform a self-check and then display the thermal image.
6. Operating Instructions
6.1 Power On/Off
- Power On: Press and hold the Power button for approximately 3 seconds.
- Power Off: Press and hold the Power button for approximately 3 seconds until the shutdown prompt appears, then confirm.
6.2 Focus Adjustment
- Objective Lens Focus: Rotate the objective lens ring to achieve a sharp image of distant objects. This is a manual focus from 50m to infinity.
- Diopter Adjustment: Rotate the eyepiece ring to adjust the clarity of the display for your individual eyesight.
6.3 Menu Navigation and Display Settings
Use the control buttons to navigate the on-screen menu. Typically, one button activates the menu, and others are used for up/down selection and confirmation.
- Brightness/Contrast: Adjust these settings in the menu to optimize image visibility based on ambient light conditions.
6.4 Color Palettes
The ClearView X350 offers multiple color palettes to enhance target detection and identification. Access these options through the menu.
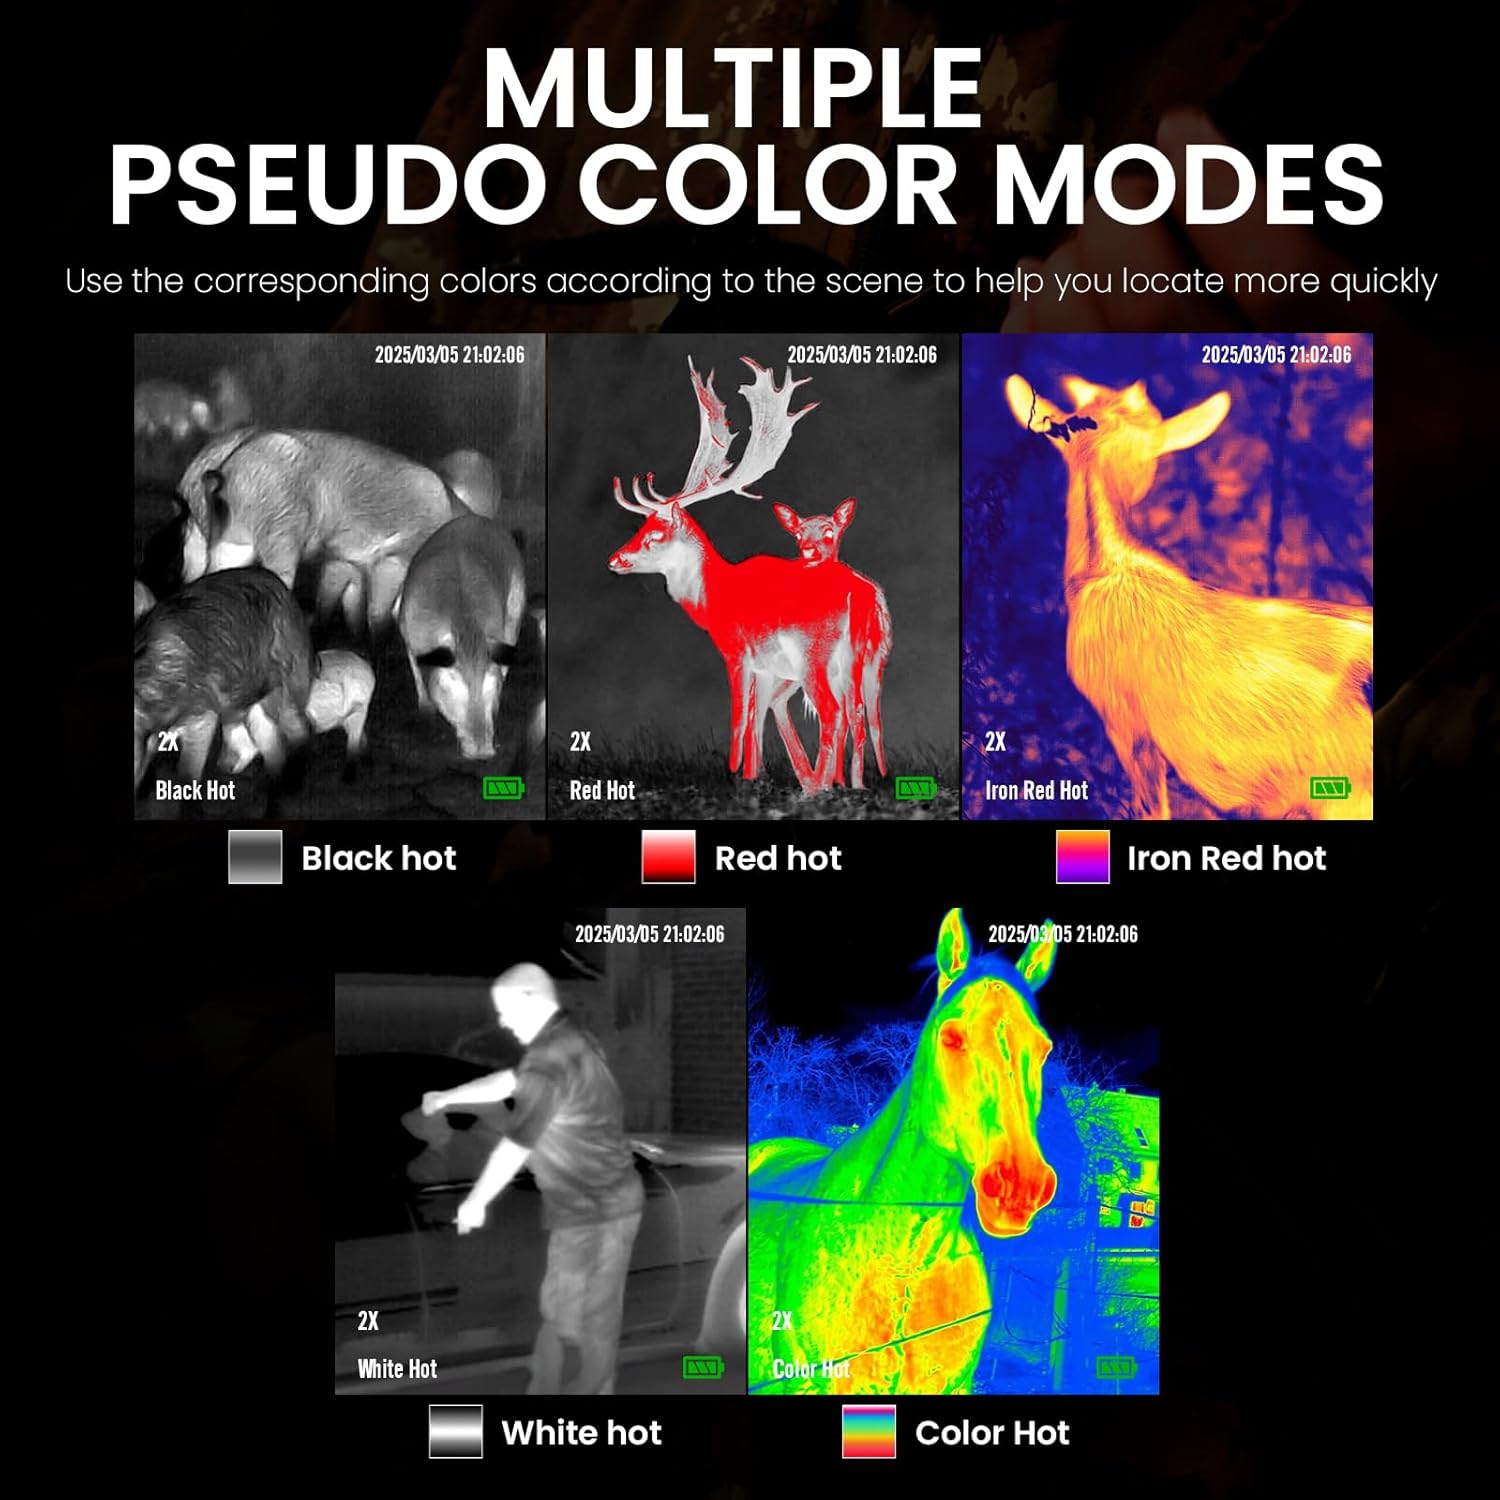
Figure 6.1: Multiple pseudo color modes.
- Black Hot: Hot objects appear black.
- White Hot: Hot objects appear white.
- Red Hot: Highlights hottest areas in red.
- Iron Red Hot: A gradient of colors from black to red to yellow for temperature differentiation.
- Color Hot: Provides a full spectrum of colors for detailed temperature visualization.
6.5 Digital Zoom
The device supports digital zoom to magnify the image. Use the designated zoom button to cycle through available magnification levels (e.g., 1x, 2x, 4x).
6.6 Reticle Management
The ClearView X350 offers 22 types of reticles with various firearm types, differentiation line styles, and colors. These can be customized to suit different hunting requirements.

Figure 6.2: Reticle types and customization options.
Access the reticle settings in the menu to select your preferred reticle pattern and color.
6.7 Photo and Video Recording
The device includes 64GB of built-in EMMC storage for capturing photos and videos.

Figure 6.3: Capturing moments with the thermal scope.
- Capture Photo: Press the designated Photo button to take a still image.
- Record Video: Press the designated Video button to start/stop video recording.
- Access Files: Connect the device to a computer via USB-C or use the Wi-Fi feature to access recorded media.
6.8 Wi-Fi Connectivity
The ClearView X350 features Wi-Fi connectivity, allowing you to connect to a smartphone or tablet app for live streaming, remote control, and media management. Refer to the specific app instructions for pairing and usage.
7. Maintenance
7.1 Cleaning
- Lens Cleaning: Use a soft, lint-free cloth specifically designed for optical lenses. Gently wipe the objective and eyepiece lenses. Do not use abrasive materials or harsh chemicals.
- Body Cleaning: Wipe the device body with a soft, damp cloth. Avoid getting moisture into ports or battery compartments.
7.2 Storage
When not in use, store the thermal riflescope in its waterproof case in a cool, dry place, away from direct sunlight and extreme temperatures. Remove batteries if storing for extended periods.
7.3 Battery Care
- Always use the recommended CR123A batteries.
- Charge batteries fully before each use for optimal performance and 10+ hours of continuous operation.
- If the device will not be used for a long time, remove the batteries to prevent leakage.
8. Troubleshooting
If you encounter issues with your GTGUARD ClearView X350, refer to the following common problems and solutions:
- Device not powering on: Check battery installation and ensure batteries are fully charged.
- Image unclear/blurry: Adjust both the objective lens focus and the eyepiece diopter. Ensure lenses are clean.
- Short battery life: Ensure batteries are fully charged. Extreme cold can reduce battery performance. Consider replacing old batteries.
- Buttons unresponsive: Try restarting the device. If the issue persists, contact customer support.
- Wi-Fi connection issues: Ensure the device's Wi-Fi is enabled and you are within range. Check your smartphone app for specific connection instructions.
9. Specifications
| Feature | Specification |
|---|---|
| Brand | GTGUARD |
| Model Name | GTGUARD ClearView X 350 |
| Detector Resolution | 384×288 |
| Display Resolution | 1024×768 HD Micro-OLED |
| Lens Diameter | 35 mm |
| Magnification Maximum | 4 x |
| Field Of View | 12.5 Degrees × 10 Degrees |
| Focus Type | Manual (50m to infinity) |
| Refresh Rate | 60 Hz |
| Storage | Built-in 64GB EMMC |
| Battery Type | 4 x CR123A |
| Battery Life | Over 10 hours |
| Water Resistance | IP67 |
| Operating Temperature | -40°C to 55°C |
| Item Weight | 1.2 Pounds |
| Material | Aluminum |
| Compatible Devices | Rifle |
| Night Vision | Yes |
| Reticle Type | Crosshair/Dot (22 types) |
10. Warranty and Support
The GTGUARD ClearView X350 Thermal Riflescope comes with a 1-Year Manufacturer Warranty.
For technical support, warranty claims, or service inquiries, please refer to the contact information provided on the GTGUARD official website or your point of purchase. Please have your product model and purchase date available when contacting support.


