
1. Introduction
The GIGABYTE B840M D2H Motherboard is designed to support AMD Ryzen 9000, 8000, and 7000 Series Processors, offering a robust platform for personal computing. This motherboard features a 5+2+2 phases VRM solution, supports DDR5 memory up to 7600MHz, and includes multiple high-speed connectivity options such as PCIe 4.0 M.2 slots and 2.5GbE LAN. This manual provides essential information for setting up, operating, and maintaining your motherboard.
2. Key Features
- X3D Turbo Mode: Enhances gaming performance.
- AMD Socket AM5: Supports AMD Ryzen 9000 / 8000 / 7000 Series Processors.
- Digital 5+2+2 Phases VRM: Provides stable power delivery.
- Dual Channel DDR5: Two DIMM slots with AMD EXPO Memory Module Support for high-speed memory.
- EZ-Latch: PCIe x16 Slot with Quick Release Design for easy component installation.
- Friendly UI: Multi-Theme, AIO Fan Control, and Q-Flash Auto Scan in BIOS and Software.
- Ultra-Fast Storage: Two M.2 slots, including one PCIe 4.0 x4 for high-speed NVMe SSDs.
- Fast Networking: Integrated 2.5GbE LAN for high-speed internet connectivity.
3. Specifications
| Feature | Specification |
|---|---|
| Brand | GIGABYTE |
| Model Name | B840M D2H |
| CPU Socket | Socket AM5 |
| Compatible Processors | AMD Ryzen 7000 Series, AMD Ryzen 8000 Series, AMD Ryzen 9000 Series |
| Chipset Type | AMD B840 |
| RAM Memory Technology | DDR5 |
| Memory Clock Speed | 7600 MHz |
| Memory Slots Available | 2 |
| Ram Memory Maximum Size | 128 GB |
| Graphics Card Interface | PCI Express |
| Total PCIe Ports | 2 |
| Total M.2 Slots | 2 (1x PCIe 4.0 x4, 1x PCIe 3.0 x4) |
| Total SATA Ports | 4 |
| Total USB Ports | 6 (various generations) |
| Number of Ethernet Ports | 1 (2.5GbE) |
| Total Number of HDMI Ports | 1 |
| Main Power Connector Type | 24-Pin |
| Platform | Windows 10, Windows 11 |
| Item Weight | 940 g |
| Item Dimensions (L x W x H) | 9.61" x 9.61" x 1.38" |
4. Setup and Installation
Before beginning installation, ensure your system is powered off and unplugged. Always handle the motherboard by its edges to avoid static discharge. Refer to the official GIGABYTE manual for detailed, step-by-step instructions specific to your motherboard model.
4.1 Unpacking and Inspection
Carefully remove the motherboard from its packaging. Inspect for any visible damage during shipping. Ensure all accessories listed in the packing contents are present.
4.2 CPU Installation
Locate the Socket AM5 on the motherboard. Open the CPU retention mechanism. Align the triangular mark on the CPU with the mark on the socket, then gently place the CPU into the socket. Close the retention mechanism to secure the CPU. Do not force the CPU into the socket.

Image: Top-down view of the GIGABYTE B840M D2H Motherboard, highlighting the central Socket AM5 for CPU installation and the two DDR5 DIMM slots.
4.3 CPU Cooler Installation
Install your compatible CPU cooler according to its manufacturer's instructions. Ensure proper thermal paste application and secure mounting for effective heat dissipation.
4.4 Memory (RAM) Installation
Open the clips on both ends of the DDR5 DIMM slots. Align the notch on the memory module with the key in the slot. Press down firmly on both ends of the memory module until the clips snap into place. Install memory modules in the recommended slots for dual-channel operation, typically indicated in the full manual.
4.5 Motherboard Mounting
Install the I/O shield into your computer case. Align the motherboard with the standoffs in the case and carefully place it. Secure the motherboard with screws, ensuring not to overtighten.

Image: Angled view of the GIGABYTE B840M D2H Motherboard, providing a comprehensive look at its layout, including the M.2 slots, PCIe slots, and various headers.
4.6 Connecting Power and Peripherals
Connect the 24-pin ATX power connector and the 8-pin CPU power connector from your power supply to the motherboard. Connect SATA drives, front panel headers (power button, reset, USB, audio), and any other necessary cables. Install your graphics card into the primary PCIe x16 slot and secure it.
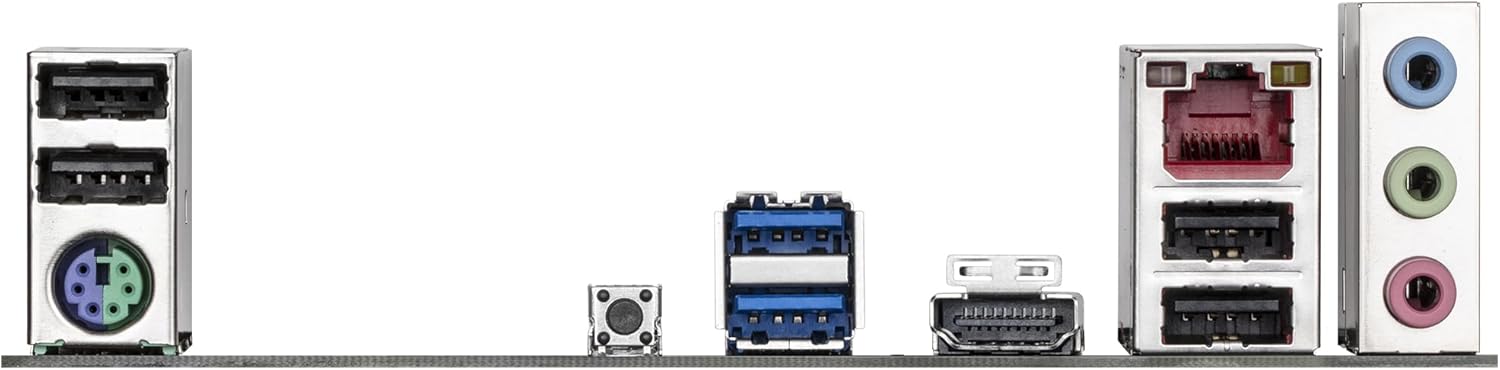
Image: Rear I/O panel of the GIGABYTE B840M D2H Motherboard, displaying the available ports including USB, 2.5GbE LAN, HDMI, and audio jacks for external device connections.
5. Operating Instructions
5.1 Initial Boot and BIOS/UEFI Setup
After assembly, connect a monitor, keyboard, and mouse. Power on your system. Press the designated key (usually DEL or F2) during startup to enter the BIOS/UEFI setup utility. Here you can configure boot order, system time, and other advanced settings. Save and exit to continue booting.
5.2 Operating System Installation
Insert your operating system installation media (USB drive or DVD). Follow the on-screen prompts to install your preferred operating system (e.g., Windows 10, Windows 11). Ensure all necessary drivers are installed after the OS installation for optimal performance.
5.3 Driver Installation
Install the latest drivers for your motherboard's chipset, LAN, audio, and other components from the GIGABYTE official website. This ensures proper functionality and performance of all hardware.
5.4 BIOS Updates (Q-Flash)
The motherboard supports Q-Flash for convenient BIOS updates. Download the latest BIOS version from the GIGABYTE website, save it to a USB flash drive, and follow the Q-Flash utility instructions in the BIOS to update. Ensure stable power during the update process.
6. Maintenance
Regular maintenance helps ensure the longevity and stable operation of your motherboard and PC components.
- Dust Cleaning: Periodically clean dust from inside your PC case, especially around fans, heatsinks, and motherboard components, using compressed air. Ensure the system is powered off and unplugged before cleaning.
- Cable Management: Ensure cables are neatly routed to improve airflow and prevent interference.
- BIOS/Driver Updates: Keep your BIOS and drivers updated to the latest versions from the GIGABYTE website to benefit from performance improvements, bug fixes, and security updates.
- Check Connections: Occasionally check that all power and data cables are securely connected to the motherboard and components.
7. Troubleshooting
If you encounter issues, consider the following basic troubleshooting steps. For complex problems, consult the GIGABYTE support website or a qualified technician.
- No Power/No POST:
- Verify all power cables (24-pin ATX, 8-pin CPU) are securely connected.
- Ensure the power supply is functional and switched on.
- Reseat RAM modules. Try booting with only one RAM stick.
- Reseat the graphics card.
- Clear CMOS (refer to the full manual for jumper location).
- System Instability/Crashes:
- Check CPU and GPU temperatures.
- Ensure all drivers are up to date.
- Run memory diagnostic tools to check RAM integrity.
- Verify power supply stability.
- Peripheral Not Detected:
- Ensure the peripheral is correctly connected.
- Check device manager for driver issues.
- Try a different port or cable.
8. Warranty and Support
The GIGABYTE B840M D2H Motherboard is manufactured by GIGABYTE. For detailed warranty information, technical support, driver downloads, and the latest BIOS updates, please visit the official GIGABYTE website. You can also find additional resources and FAQs there.
GIGABYTE Official Store: Visit the GIGABYTE Store on Amazon


