1. Important Safety Instructions
Please read this manual carefully before operating the appliance and keep it for future reference. Failure to follow these instructions may result in electric shock, fire, or serious injury.
- Always connect the appliance to a grounded power outlet.
- Do not operate the appliance with a damaged cord or plug.
- Do not immerse the appliance, cord, or plug in water or other liquids.
- Keep the appliance away from heat sources and direct sunlight.
- Ensure proper ventilation around the unit; do not block air inlets or outlets.
- This appliance is for indoor use only.
- Unplug the appliance before cleaning or performing any maintenance.
2. Product Overview
The BRITEC Dehumidifier + WiFi Air Purifier is an innovative appliance designed to improve indoor air quality by effectively removing excess moisture and purifying the air. It features a HEPA H13 filter to capture fine particles, pollen, bacteria, and viruses.
2.1. Components and Features

Figure 2.1: Front view of the BRITEC Dehumidifier. This image shows the sleek white design of the unit with a black top panel and a digital display.
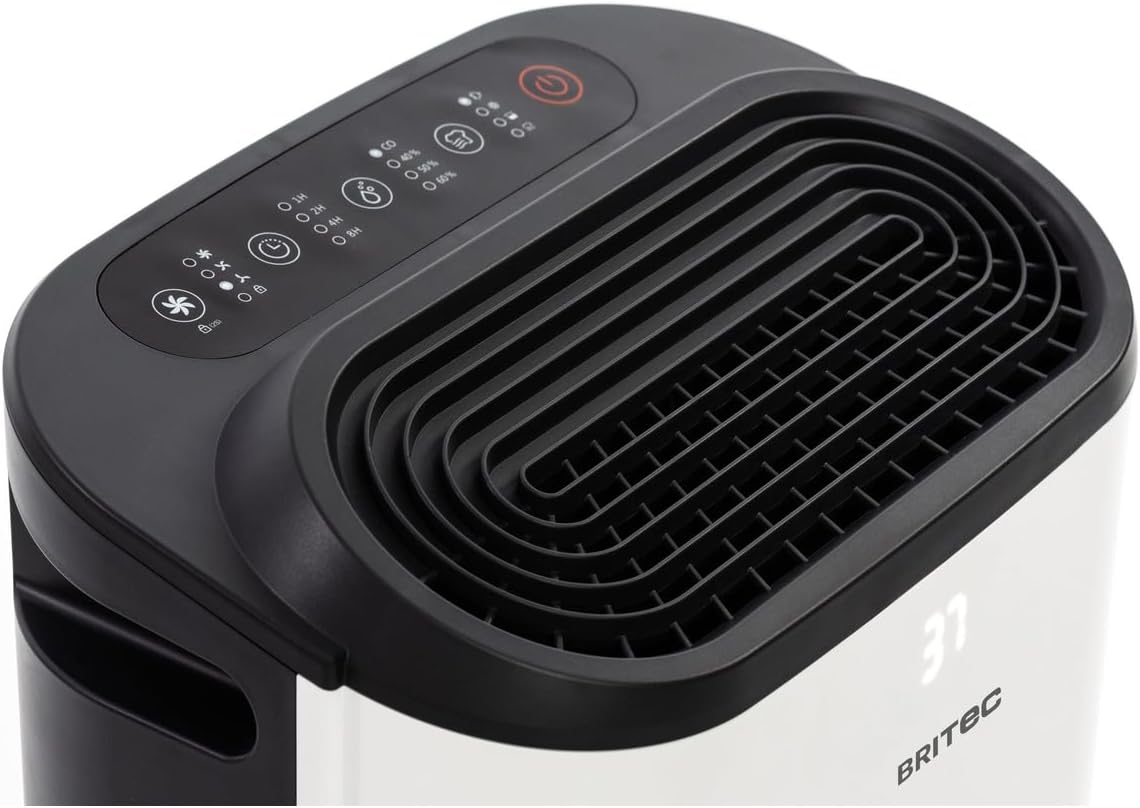
Figure 2.2: Top view of the dehumidifier, highlighting the control panel and air outlet grille. The control panel features various buttons for mode selection, timer, fan speed, and power.

Figure 2.3: Diagram illustrating the main external components. Labels indicate the Ventilation Outlet, Front Display, and Control Panel.
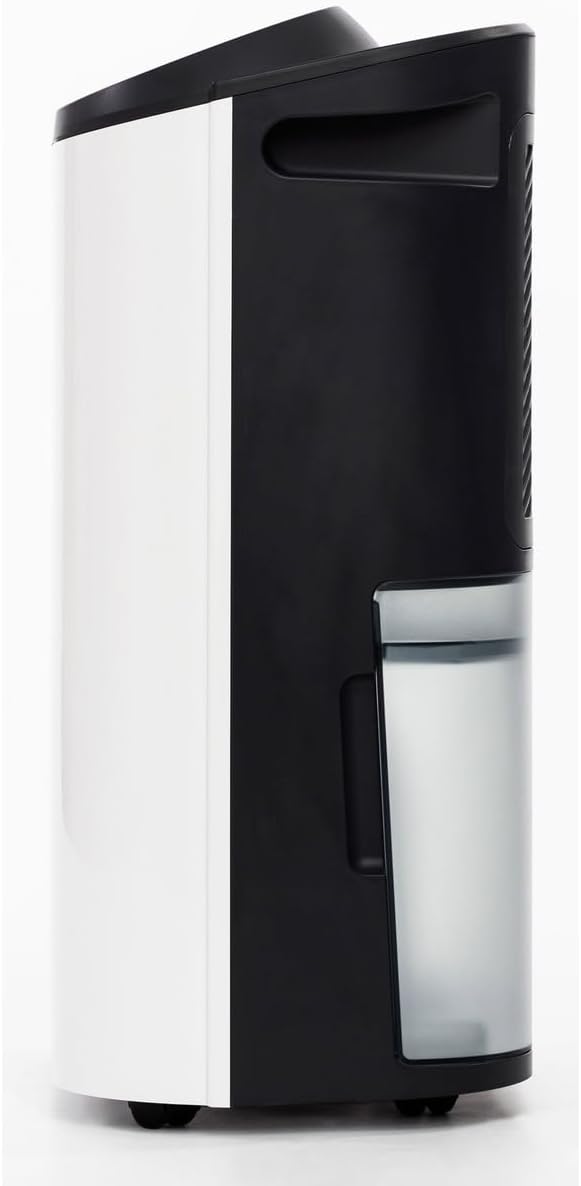
Figure 2.4: Side view of the dehumidifier, showing the transparent water collection tank. The tank is designed for easy removal and emptying.

Figure 2.5: Rear view of the dehumidifier, showing the air intake grille and the water tank in place. This is where the air is drawn in for filtration and dehumidification.

Figure 2.6: Diagram of the rear components. Labels point to the Carry Handle, Filtration area, Continuous Drainage outlet, Removable 2.3L Tank, and Wheels for easy mobility.

Figure 2.7: Diagram illustrating the dual filter system. It shows the HEPA13 Filter and the Dust Filter, which work together to purify the air.
3. Setup
3.1. Unpacking
- Carefully remove the dehumidifier from its packaging.
- Remove all packing materials, including any tape or protective films.
- Inspect the unit for any signs of damage. If damaged, do not operate and contact customer support.
3.2. Placement
- Place the dehumidifier on a firm, level surface.
- Ensure there is at least 20 cm (8 inches) of space around the unit for proper airflow.
- Do not place the unit near heat-generating appliances or in direct sunlight.
- For optimal performance, place the unit in the center of the room where dehumidification is needed.
3.3. Power Connection
Plug the power cord into a grounded electrical outlet. Ensure the voltage matches the specifications of the unit.
3.4. WiFi Setup (Tuya App)
- Download the 'Tuya Smart' app from your smartphone's app store (iOS or Android).
- Register or log in to your Tuya account.
- Ensure your dehumidifier is plugged in and powered on.
- In the Tuya app, tap '+' to add a device.
- Follow the on-screen instructions to connect your dehumidifier to your home WiFi network. This typically involves putting the device into pairing mode (refer to the control panel section for specific button presses if needed).
- Once connected, you can control the dehumidifier remotely via the app.
4. Operating Instructions
4.1. Control Panel Overview
The control panel on the top of the unit allows you to manage all functions. The LED display shows current humidity levels or settings.
4.2. Power On/Off
- Press the Power button (symbol: circle with vertical line) to turn the unit on or off.
4.3. Mode Selection
Press the Mode button (symbol: usually a fan or water drop icon) to cycle through available modes:
- Dehumidification Mode: Removes moisture from the air.
- Air Purification Mode: Operates the fan and filter without active dehumidification.
- Drying Mode: Designed to help dry laundry faster.
4.4. Humidity Setting
In Dehumidification Mode, press the Humidity button (symbol: often a % sign or up/down arrows) to set your desired humidity level (e.g., 40%, 50%, 60%). The unit will operate until the set humidity is reached.
4.5. Timer Function
Press the Timer button (symbol: clock icon) to set a delay for the unit to turn on or off (up to 24 hours). Each press typically increases the time by one hour.
4.6. Fan Speed
Press the Fan Speed button (symbol: fan icon with varying bars) to adjust the fan speed (e.g., Low, Medium, High). A lower fan speed results in quieter operation.
5. Maintenance
Regular maintenance ensures optimal performance and extends the lifespan of your dehumidifier.
5.1. Emptying the Water Tank
- When the water tank is full, the unit will automatically stop operating and an indicator light will illuminate.
- Carefully pull out the water tank from the side of the unit.
- Empty the collected water.
- Slide the empty tank back into the unit until it clicks into place. The unit will resume operation.
5.2. Continuous Drainage Setup
For continuous operation without emptying the tank, you can set up continuous drainage:
- Locate the continuous drainage outlet at the back of the unit (refer to Figure 2.6).
- Connect a suitable drainage hose (not included) to this outlet.
- Ensure the hose is sloped downwards to allow water to drain by gravity into a floor drain or larger container.
5.3. Cleaning/Replacing Filters
The unit uses a HEPA H13 filter and a dust filter (refer to Figure 2.7). Regular cleaning is essential.
- Turn off and unplug the dehumidifier.
- Remove the rear grille to access the filters.
- Carefully remove the dust filter and the HEPA H13 filter.
- Clean the dust filter with a vacuum cleaner or wash it gently with warm water and mild detergent. Allow it to air dry completely before reinserting.
- The HEPA H13 filter cannot be washed. It should be replaced every 6-12 months, depending on usage and air quality.
- Reinsert the filters and replace the grille.
5.4. Cleaning the Unit
- Wipe the exterior of the unit with a soft, damp cloth.
- Do not use abrasive cleaners or solvents.
- Clean the air inlets and outlets regularly to prevent dust buildup.
6. Troubleshooting
| Problem | Possible Cause | Solution |
|---|---|---|
| Unit does not turn on | No power; Power cord not plugged in; Power outlet faulty. | Check power connection; Try a different outlet; Check circuit breaker. |
| No dehumidification | Room temperature too low; Air filter clogged; Humidity setting too high; Water tank full. | Ensure room temp is above 5°C; Clean/replace filter; Lower humidity setting; Empty water tank. |
| Unit is noisy | Unit not on a level surface; Air filter clogged; Obstruction in fan. | Place on a level surface; Clean/replace filter; Check for obstructions. |
| Water tank full indicator on, but tank is empty | Water tank not properly inserted; Float switch stuck. | Reinsert tank correctly; Gently shake tank to free float switch. |
7. Specifications
| Feature | Specification |
|---|---|
| Brand | BRITEC |
| Model Number | BRI629036 |
| Dehumidification Capacity | 12-16 L/day (depending on version) |
| Air Purification | HEPA H13 Filter (removes up to 99.97% of microparticles) |
| Noise Level | 36 dB |
| Recommended Room Size | 15 to 45 m² |
| Water Tank Capacity | Mobile water reservoir (approx. 2.3L) |
| Connectivity | WiFi (Tuya App) |
| Timer | Up to 24 hours |
| Weight | 14.01 kg |
8. Warranty and Support
This BRITEC product is covered by a manufacturer's warranty. Please refer to the warranty card included with your purchase for specific terms and conditions, including the warranty period and coverage details.
8.1. Customer Support
If you encounter any issues or have questions regarding your dehumidifier, please contact the retailer or the manufacturer's customer support. Keep your purchase receipt and model number (BRI629036) ready when contacting support.


