
1. Introduction
This manual provides detailed instructions for the installation, operation, and maintenance of your GIGABYTE H610M K V2 Motherboard. This motherboard supports Intel 12th, 13th, and 14th Generation Core processors, features DDR5 memory support, a PCIe 3.0 M.2 slot, and 1GbE LAN. Please read this manual thoroughly before beginning installation to ensure correct setup and optimal performance.
2. Safety Information
Always observe the following safety precautions when handling the motherboard and other computer components:
- Disconnect the power cord from the wall outlet before touching any components.
- Wear an anti-static wrist strap to prevent electrostatic discharge (ESD) damage.
- Handle the motherboard by its edges to avoid touching sensitive components.
- Ensure proper ventilation within your PC case to prevent overheating.
- Keep the motherboard away from moisture and extreme temperatures.
3. Product Overview
Familiarize yourself with the layout and key components of the GIGABYTE H610M K V2 Motherboard.
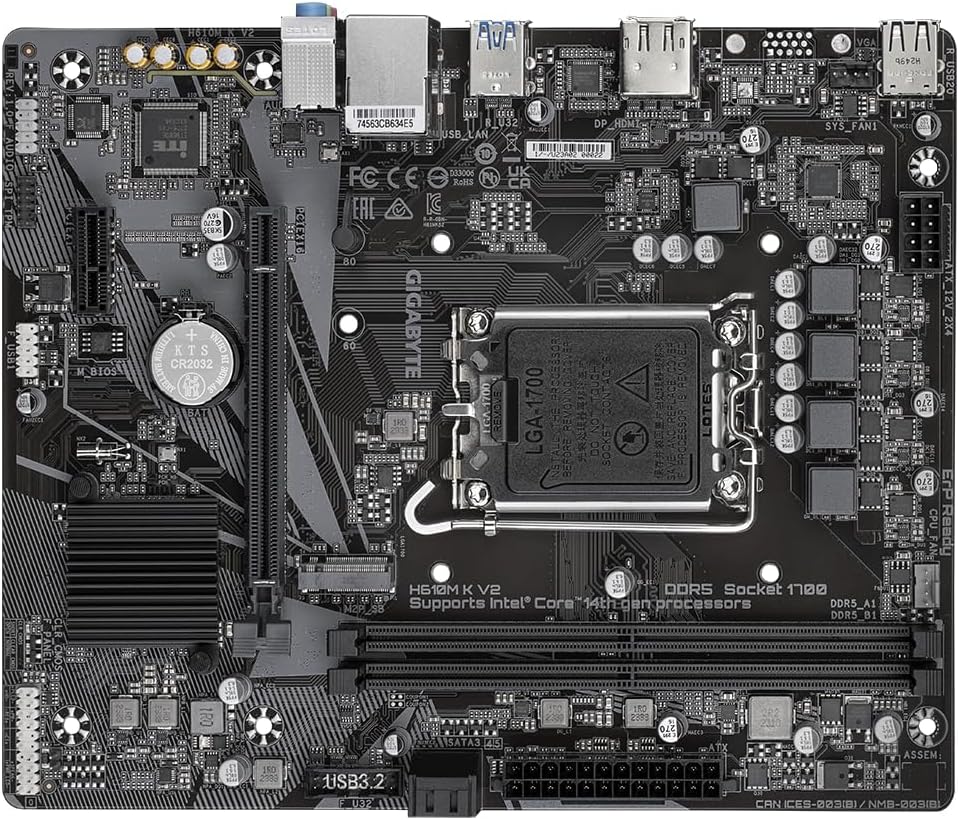
Figure 3.1: Top-down view of the GIGABYTE H610M K V2 Motherboard, highlighting the LGA 1700 CPU socket, DDR5 DIMM slots, PCIe slot, and various headers.

Figure 3.2: Rear I/O panel of the GIGABYTE H610M K V2 Motherboard, showing USB ports, LAN port, audio jacks, and video outputs.
Key Components:
- LGA 1700 CPU Socket: Supports Intel 12th, 13th, and 14th Gen processors.
- DDR5 DIMM Slots: Two slots for dual-channel DDR5 memory, supporting up to 5600MHz.
- PCIe 3.0 x16 Slot: For graphics cards.
- PCIe 3.0 x4 M.2 Slot: For NVMe SSDs.
- SATA 6Gb/s Ports: Four ports for storage devices.
- USB 3.2 Gen 1 Ports: High-speed USB connectivity.
- 1GbE LAN Port: For wired network connectivity.
- Audio Jacks: For audio input and output.
4. Setup and Installation
Follow these steps carefully to install your motherboard and its components.
4.1 CPU Installation
- Locate the LGA 1700 CPU socket.
- Open the CPU socket lever and lift the load plate.
- Carefully align the CPU with the socket, ensuring the triangular mark on the CPU matches the mark on the socket. Do not force the CPU into place.
- Lower the load plate and secure it with the lever.
- Install the CPU cooler according to its manufacturer's instructions.
4.2 Memory (RAM) Installation
- Locate the two DDR5 DIMM slots.
- Open the clips at both ends of the DIMM slot.
- Align the notch on the DDR5 memory module with the notch in the DIMM slot.
- Insert the memory module firmly into the slot until the clips snap into place.
- For dual-channel operation, install memory modules into both available slots.
4.3 M.2 SSD Installation
- Locate the PCIe 3.0 x4 M.2 slot.
- Remove the M.2 screw and standoff from the motherboard.
- Insert the M.2 SSD into the slot at a 30-degree angle.
- Gently push down the M.2 SSD and secure it with the screw and standoff.
4.4 Graphics Card Installation
- Locate the PCIe 3.0 x16 slot.
- Remove the corresponding expansion slot cover from your PC case.
- Align your graphics card with the PCIe slot and press down firmly until it clicks into place.
- Secure the graphics card to the case with a screw.
- Connect any necessary PCIe power cables from your power supply to the graphics card.
4.5 Power Connections
- 24-pin ATX Power Connector: Connect the main 24-pin power cable from your power supply to the motherboard.
- 8-pin CPU Power Connector (ATX_12V_2X4): Connect the 8-pin CPU power cable from your power supply to the connector near the CPU socket.
4.6 Front Panel Connections
Connect the cables from your PC case's front panel to the corresponding headers on the motherboard. Refer to the motherboard's silkscreen labels for correct orientation.
- F_PANEL: Power button, reset button, HDD LED, power LED.
- F_USB1/F_USB2: Front USB 2.0 ports.
- F_USB32_G1: Front USB 3.2 Gen 1 ports.
- F_AUDIO: Front panel audio jacks.
4.7 SATA Device Connections
Connect your SATA storage devices (HDDs, SSDs) to the SATA 6Gb/s ports on the motherboard using SATA data cables. Connect power cables from your power supply to these devices.
5. Operating Instructions
Once all components are installed, you can proceed with initial setup and operating system installation.
5.1 BIOS/UEFI Setup
- Power on your computer.
- Press the DEL key repeatedly during startup to enter the BIOS/UEFI setup utility.
- Configure boot order, enable/disable features, and adjust system settings as needed. Save changes before exiting.
5.2 Driver Installation
After installing your operating system, install the necessary drivers for optimal performance. Drivers can be found on the GIGABYTE support website for your specific motherboard model.
- Chipset Drivers
- LAN Drivers
- Audio Drivers
- Graphics Drivers (for integrated graphics or discrete GPU)
5.3 Operating System Installation
Insert your operating system installation media (USB drive or DVD) and follow the on-screen instructions to install Windows 10 or Windows 11.
6. Maintenance
Proper maintenance ensures the longevity and stable operation of your motherboard.
6.1 BIOS Updates
Periodically check the GIGABYTE website for BIOS updates. BIOS updates can improve system stability, add support for new CPUs, or fix bugs. Use GIGABYTE's Q-Flash utility or other recommended methods for updating the BIOS.
6.2 Cleaning
Dust accumulation can lead to overheating and component failure. Regularly clean the inside of your PC case using compressed air. Ensure the system is powered off and unplugged before cleaning.
7. Troubleshooting
If you encounter issues, refer to the following common troubleshooting steps.
7.1 No Power
- Ensure the power supply is switched on and connected correctly to the motherboard (24-pin ATX and 8-pin CPU).
- Check that the power button cable from the case is correctly connected to the F_PANEL header.
- Test the power supply with another system or a power supply tester.
7.2 No Display
- Verify that the monitor is connected to the correct video output (either the motherboard's integrated graphics port or the discrete graphics card).
- Reseat the graphics card and memory modules.
- If using a discrete graphics card, ensure it has adequate power connected from the PSU.
- Try booting with only one RAM stick.
7.3 System Instability / Crashes
- Check CPU and GPU temperatures. Ensure cooling solutions are properly installed.
- Run memory diagnostic tools to check for faulty RAM.
- Ensure all drivers are up to date.
- Reset BIOS settings to default.
8. Specifications
Detailed technical specifications for the GIGABYTE H610M K V2 Motherboard.
| Feature | Specification |
|---|---|
| Brand | GIGABYTE |
| Model Name | H610M K V2 |
| CPU Socket | LGA 1700 |
| Compatible Processors | Intel Core i3/i5/i7/i9 12th/13th/14th Gen, Intel Celeron, Intel Pentium Gold |
| Chipset Type | Intel H610 |
| RAM Memory Technology | DDR5 |
| Memory Clock Speed | Up to 5600 MHz |
| Memory Slots Available | 2 |
| Ram Memory Maximum Size | 128 GB |
| Graphics Card Interface | PCI Express |
| Total PCIe Ports | 1 (PCIe 3.0 x16) |
| M.2 Slots | 1 (PCIe 3.0 x4) |
| Total SATA Ports | 4 |
| Total USB Ports | 6 (Rear I/O) + Front Panel Headers |
| Number of Ethernet Ports | 1 (1GbE LAN) |
| Total Number of HDMI Ports | 1 |
| Main Power Connector Type | 24-Pin |
| Platform | Windows 10, Windows 11 |
| Item Dimensions L x W x H | 7.28"L x 8.9"W x 1.38"H |
| Item Weight | 0.5 Kilograms |
9. Warranty Information
GIGABYTE motherboards typically come with a limited manufacturer's warranty. For specific warranty terms, conditions, and duration, please refer to the warranty card included with your product or visit the official GIGABYTE website. Keep your proof of purchase for warranty claims.
10. Support
For further assistance, driver downloads, BIOS updates, or additional documentation, please visit the official GIGABYTE support website:
You can also contact GIGABYTE customer service for technical support.


