1. Introduction
The L6AS0F7 4K 60Hz 6x2 HDMI Matrix Switch allows you to connect up to six HDMI source devices to two HDMI displays. It can independently switch any of the six input sources to either of the two output displays. This device supports 4K@60Hz resolution, HDMI 2.0, and includes optical and R/L stereo audio extraction for enhanced audio flexibility. It is designed for various applications such as home theater, conference rooms, and educational environments.
2. Package Contents
- 1 x L6AS0F7 4K 60Hz 6x2 HDMI Matrix Switch
- 1 x 5V DC Power Adapter (US Plug)
- 1 x IR Remote Control
- 1 x User Manual
3. Product Overview
Familiarize yourself with the various ports, indicators, and controls on your HDMI Matrix Switch.
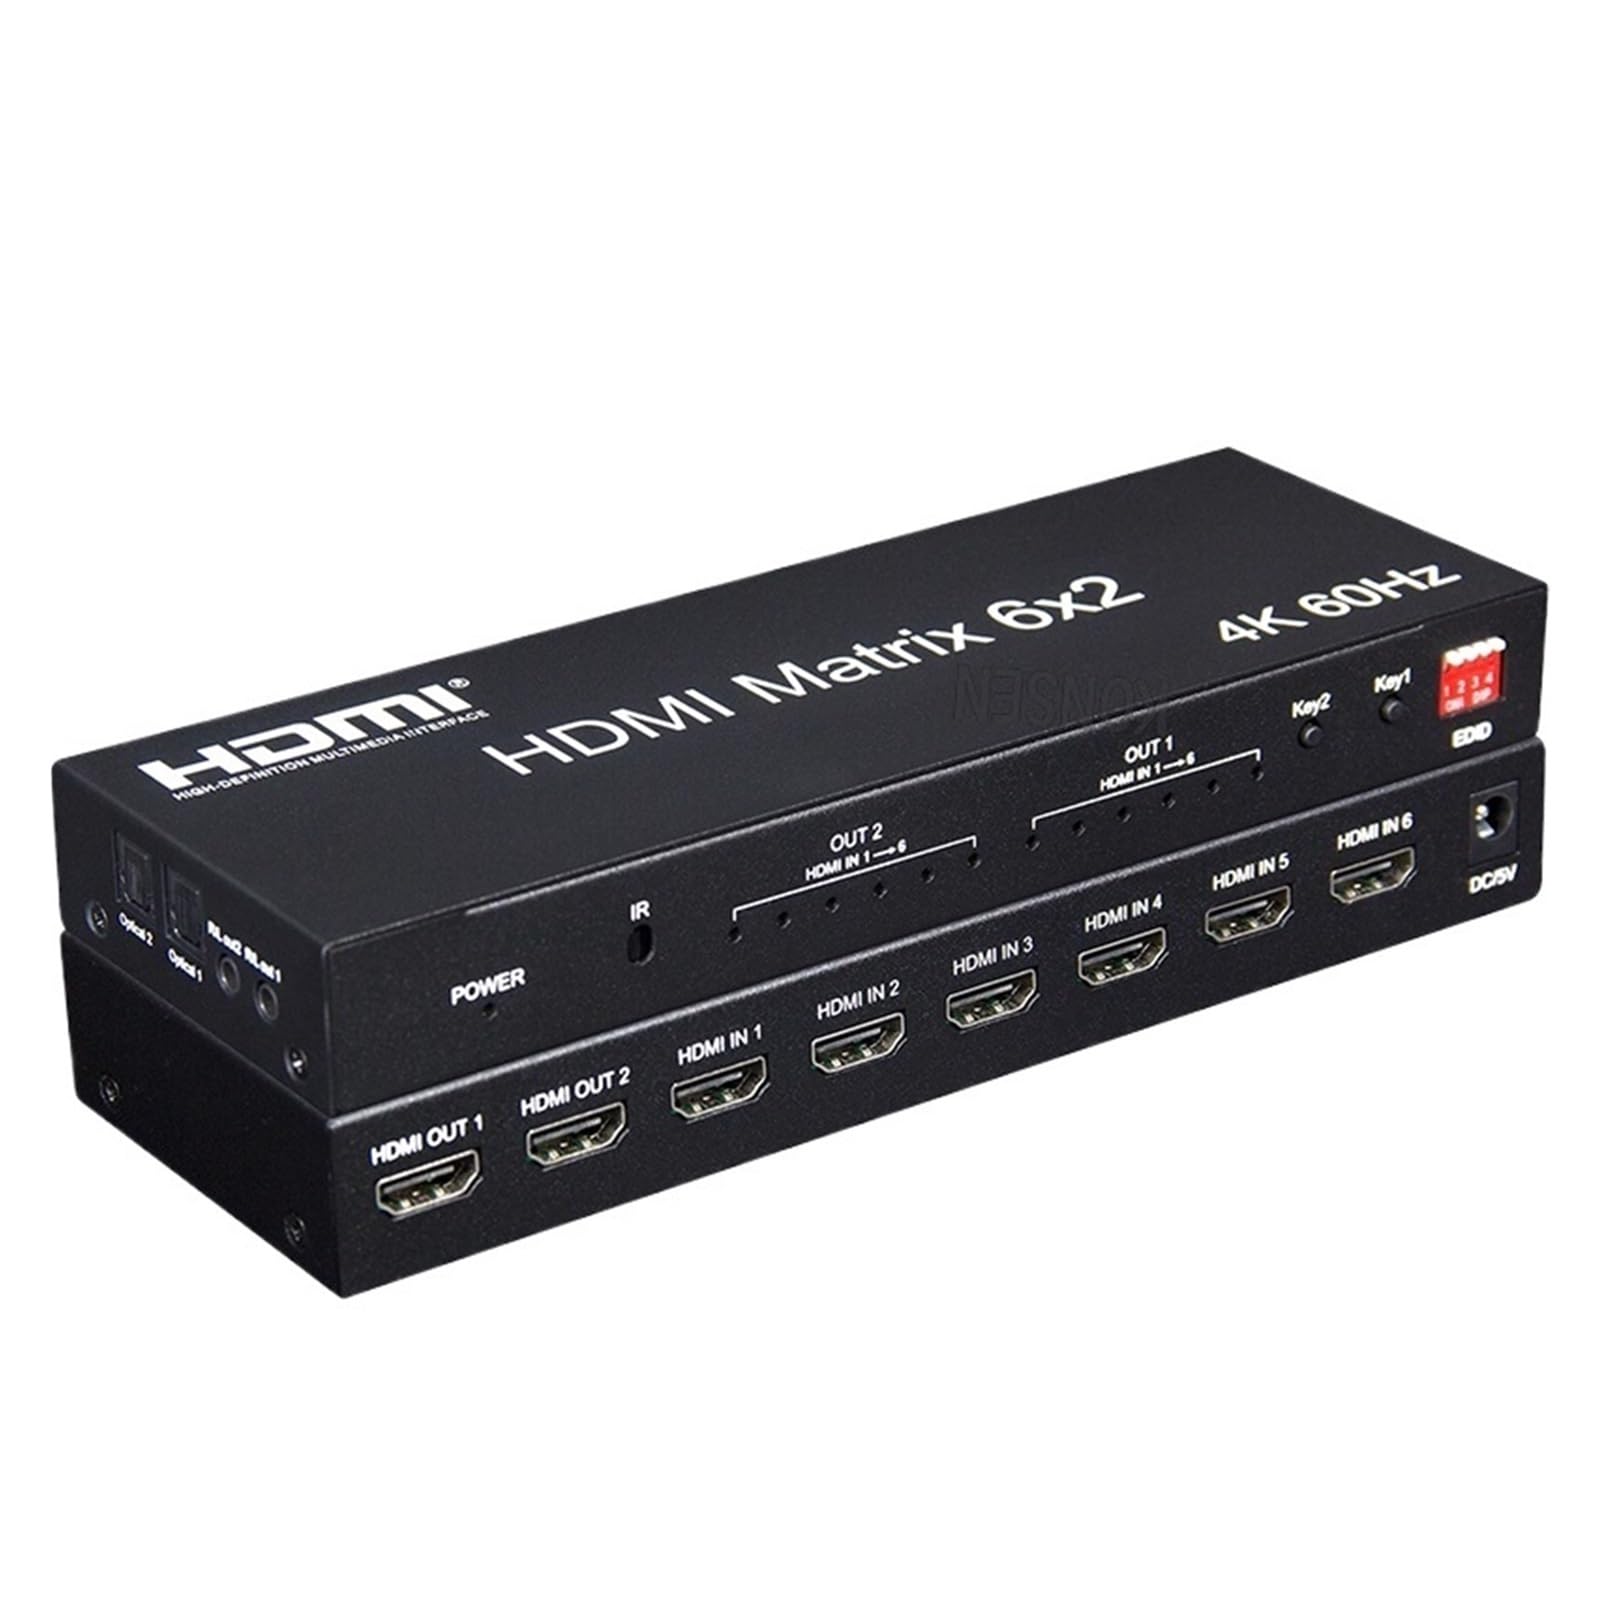
Figure 1: Front, Rear, and Side Panels of the L6AS0F7 HDMI Matrix Switch, along with the IR Remote Control.
3.1 Front Panel
- POWER LED: Illuminates when the device is powered on.
- IR: Infrared remote signal receiver. Point the remote control here for operation.
- OUT 1 HDMI IN 1-6 Indicators: LEDs indicating which HDMI input (1-6) is currently selected for Output 1.
- OUT 2 HDMI IN 1-6 Indicators: LEDs indicating which HDMI input (1-6) is currently selected for Output 2.
- Key1: Button to switch between HDMI inputs 1-6 for Output 1.
- Key2: Button to switch between HDMI inputs 1-6 for Output 2.
- EDID DIP Switch: A set of 4 DIP switches for EDID management. Refer to Section 5.3 for configuration details.
3.2 Rear Panel
- HDMI OUT 1: Connects to your first HDMI display device.
- HDMI OUT 2: Connects to your second HDMI display device.
- HDMI IN 1-6: Connect up to six HDMI source devices (e.g., Blu-ray player, game console, PC).
- DC/5V: Power input port. Connect the provided 5V DC power adapter here.
3.3 Side Panel (Audio Outputs)
- Optical 1-2: Digital optical audio outputs for Output 1 and Output 2.
- R/L Out 1-2: Analog R/L stereo audio outputs for Output 1 and Output 2.
3.4 IR Remote Control
- OUT1 Buttons (1-6): Selects the HDMI input (1-6) for Output 1.
- OUT2 Buttons (1-6): Selects the HDMI input (1-6) for Output 2.
4. Setup Instructions
Follow these steps to set up your L6AS0F7 HDMI Matrix Switch:
- Power Off Devices: Ensure all HDMI source devices and displays are powered off before making connections.
- Connect HDMI Sources: Connect your HDMI source devices (e.g., Blu-ray player, game console, streaming box) to the HDMI IN 1-6 ports on the rear panel of the matrix switch using high-quality HDMI cables.
- Connect HDMI Displays: Connect your HDMI display devices (e.g., TV, monitor, projector) to the HDMI OUT 1 and HDMI OUT 2 ports on the rear panel of the matrix switch using high-quality HDMI cables.
- Connect Audio Devices (Optional): If you wish to extract audio, connect your audio receiver or soundbar to the Optical 1/2 or R/L Out 1/2 ports on the side panel.
- Connect Power: Plug the 5V DC power adapter into the DC/5V port on the rear panel of the matrix switch, then plug the adapter into a power outlet. The POWER LED on the front panel should illuminate.
- Power On Devices: Power on your HDMI displays first, then power on your HDMI source devices.
5. Operating Instructions
5.1 Switching Inputs
You can switch HDMI inputs using either the front panel buttons or the IR remote control.
Using Front Panel Buttons:
- Press the Key1 button repeatedly to cycle through HDMI inputs 1-6 for Output 1. The corresponding OUT 1 LED will indicate the selected input.
- Press the Key2 button repeatedly to cycle through HDMI inputs 1-6 for Output 2. The corresponding OUT 2 LED will indicate the selected input.
Using IR Remote Control:
- To select an input for Output 1, press the desired input number button (1-6) under the OUT1 section on the remote.
- To select an input for Output 2, press the desired input number button (1-6) under the OUT2 section on the remote.
5.2 Audio Extraction
The matrix switch can extract audio from the selected HDMI input for each output independently.
- Optical Output: Connect an optical cable from the Optical 1 or Optical 2 port to your audio receiver or soundbar for digital audio.
- R/L Stereo Output: Connect RCA cables from the R/L Out 1 or R/L Out 2 ports to your analog audio system for stereo audio.
5.3 EDID Management
The EDID (Extended Display Identification Data) DIP switches allow you to configure the EDID settings to ensure compatibility between your source devices and displays. Incorrect EDID settings can lead to display issues or lack of audio/video. Refer to the table below for common EDID configurations. It is recommended to try different settings if you encounter compatibility problems.
| DIP Switch Position (1-4) | Setting | Description |
|---|---|---|
| 1: ON, 2: ON, 3: ON, 4: ON | Copy OUT1 EDID | The matrix switch copies the EDID from the display connected to HDMI OUT 1. |
| 1: OFF, 2: ON, 3: ON, 4: ON | 4K@60Hz 2.0CH | Forces 4K@60Hz resolution with 2-channel audio. |
| 1: ON, 2: OFF, 3: ON, 4: ON | 4K@60Hz 5.1CH | Forces 4K@60Hz resolution with 5.1-channel audio. |
| 1: OFF, 2: OFF, 3: ON, 4: ON | 4K@60Hz 7.1CH | Forces 4K@60Hz resolution with 7.1-channel audio. |
| ... (Other combinations may exist, refer to product specific documentation if provided) | ... | ... |
Note: After changing EDID settings, it is recommended to power cycle the matrix switch and all connected devices for the changes to take effect.
6. Troubleshooting
If you encounter issues with your HDMI Matrix Switch, refer to the following common problems and solutions:
- No Picture/Signal:
- Ensure all HDMI cables are securely connected to both the source devices, the matrix switch, and the displays.
- Verify the matrix switch is powered on and the POWER LED is illuminated.
- Confirm the correct input is selected for the corresponding output on the matrix switch (check front panel LEDs or use remote).
- Try a different HDMI cable.
- Adjust the EDID DIP switch settings (refer to Section 5.3) and power cycle all devices.
- Test the source device directly connected to the display to rule out source or display issues.
- No Audio:
- Check audio connections (HDMI, Optical, R/L) and ensure they are secure.
- Verify the audio settings on your source device and display are correctly configured for the output.
- Adjust the EDID DIP switch settings to ensure the correct audio format is being passed (e.g., 2.0CH, 5.1CH, 7.1CH).
- Ensure your audio receiver/soundbar is set to the correct input.
- Intermittent Signal/Flickering:
- Use high-quality, certified HDMI 2.0 cables, especially for 4K@60Hz signals.
- Ensure cable lengths are within recommended limits for 4K signals.
- Try power cycling all devices (source, matrix switch, display).
- Check for electromagnetic interference from other electronic devices.
- Remote Control Not Working:
- Ensure there are no obstructions between the remote and the IR receiver on the matrix switch.
- Check and replace the remote control batteries if necessary.
- Ensure you are pointing the remote directly at the IR receiver.
7. Specifications
| Feature | Specification |
|---|---|
| HDMI Version | HDMI 2.0 |
| HDCP Version | HDCP 2.2 |
| Max Resolution | 4K@60Hz (YUV 4:4:4) |
| Video Bandwidth | 18Gbps |
| HDMI Inputs | 6 |
| HDMI Outputs | 2 |
| Audio Outputs | 2 x Optical (SPDIF), 2 x R/L Stereo |
| Power Supply | DC 5V |
| Control Methods | Front Panel Buttons, IR Remote Control |
| Operating Temperature | 0°C to 40°C (32°F to 104°F) |
| Storage Temperature | -20°C to 60°C (-4°F to 140°F) |
| Relative Humidity | 20% to 90% RH (non-condensing) |
| Dimensions (L x W x H) | Approx. 1.18 x 0.79 x 0.39 inches (Product dimensions, not package) |
| Weight | Approx. 1.76 ounces |
8. Maintenance
To ensure the longevity and optimal performance of your HDMI Matrix Switch:
- Keep the device in a cool, dry, and well-ventilated area, away from direct sunlight, heat sources, and moisture.
- Avoid placing heavy objects on top of the device.
- Clean the device with a soft, dry cloth. Do not use liquid or aerosol cleaners.
- Do not attempt to open or service the device yourself. Refer all servicing to qualified personnel.
9. Safety Information
- Read all instructions carefully before operating the device.
- Use only the provided power adapter. Using an incorrect power adapter may damage the device and void the warranty.
- Do not expose the device to water or excessive humidity.
- Keep the device away from flammable materials.
- Ensure proper ventilation to prevent overheating.
10. Warranty and Support
This product comes with a standard manufacturer's warranty. For specific warranty terms and conditions, please refer to the documentation included with your purchase or contact the retailer. For technical support or assistance, please reach out to the product manufacturer or your point of purchase.