1. Introduction
Thank you for choosing the BioloMix CG210 Conical Burr Coffee Grinder. This manual provides essential information for the safe operation, maintenance, and troubleshooting of your new appliance. Please read it thoroughly before first use and retain it for future reference.

Image 1.1: The BioloMix CG210 Conical Burr Coffee Grinder with its various components and accessories, including the bean hopper, control panel, portafilter holder, and cleaning brush.
2. Safety Instructions
To ensure safe operation, always follow these basic safety precautions:
- Read all instructions before using the appliance.
- Do not immerse the appliance, power cord, or plug in water or other liquids.
- Close supervision is necessary when any appliance is used by or near children.
- Unplug from outlet when not in use, before assembling or disassembling parts, and before cleaning.
- Avoid contact with moving parts.
- Do not operate any appliance with a damaged cord or plug, or after the appliance malfunctions or has been damaged in any manner.
- The use of attachments not recommended or sold by the manufacturer may cause fire, electric shock, or injury.
- Do not use outdoors.
- Do not let cord hang over edge of table or counter, or touch hot surfaces.
- Do not place on or near a hot gas or electric burner, or in a heated oven.
- Check the bean hopper for the presence of foreign objects before use.
- This appliance is for household use only.
3. Product Overview
3.1 Components
The BioloMix CG210 coffee grinder includes the following main components and accessories:
- Main Unit (Motor Base)
- Bean Hopper with Lid
- Conical Burrs (Upper and Lower)
- Control Panel with LCD Display
- Grind Outlet
- Magnetic Dosing Cup (45g capacity)
- Portafilter Holders (51-53mm and 54-58mm)
- Cleaning Brush
- Bellow Blower (for anti-clogging)

Image 3.1: Overview of the BioloMix CG210 coffee grinder and its included accessories, such as the cleaning brush, bellow blower, portafilter holders, user manual, and magnetic dosing cup.
4. Setup
- Unpacking: Carefully remove all components from the packaging. Retain packaging for future storage or transport.
- Cleaning: Before first use, clean the bean hopper, lid, magnetic dosing cup, and portafilter holders with warm soapy water. Rinse thoroughly and dry completely. Use the cleaning brush to remove any dust from the burrs.
- Assemble Hopper: Place the bean hopper onto the main unit. Rotate it clockwise until it locks into place. Ensure it is securely seated.
- Fill Beans: Open the hopper lid and pour whole coffee beans into the hopper. Do not overfill. Close the lid securely.

Image 4.1: Illustration of filling coffee beans into the bean hopper and securing the lid.
- Connect Power: Plug the power cord into a grounded electrical outlet.
5. Operating Instructions
5.1 Adjusting Grind Size
The BioloMix CG210 offers 48 precise grind settings, allowing you to customize the coarseness for various brewing methods. Rotate the bean hopper to adjust the grind size. Finer settings are suitable for espresso, while coarser settings are for French Press or drip coffee.
- Settings 0-12: Ideal for Espresso.
- Settings 12-28: Suitable for Drip Coffee and Pour Over.
- Settings 28-48: Recommended for French Press.

Image 5.1: Visual guide to the 48 grind settings, indicating appropriate ranges for French Press, Drip Pour Over, and Espresso.

Image 5.2: Demonstrates rotating the bean hopper to select the desired grind size.
5.2 Using the Control Panel
The grinder features an intuitive LCD touch screen display for easy operation.

Image 5.3: The easy-touch display showing options for cup selection (2-12 cups), time adjustment (1-40 seconds), and start/pause buttons.
- Cup Selection: Press the "Cup" icon to select the number of cups (2-12). The grinder will automatically adjust the grinding time.
- Time Selection: Press the "Time" icon to manually set the grinding duration from 1 to 40 seconds in 0.5-second increments using the '+' and '-' buttons.
- Start/Pause: Press the "Play/Pause" button to start or pause the grinding process.

Image 5.4: Illustrates the final step of selecting grind parameters and initiating the grinding process.
5.3 Grinding Methods
The grinder supports two methods for collecting ground coffee:
- Magnetic Dosing Cup: Place the magnetic dosing cup under the grind outlet. This cup has a 58mm diameter mouth for easy transfer to a portafilter.
- Direct to Portafilter: Attach the appropriate portafilter holder (51-53mm or 54-58mm) to the grinder. Insert your portafilter into the holder.

Image 5.5: Shows the two grinding methods: into the 45g magnetic anti-static cup and directly into a 51/58mm espresso portafilter.
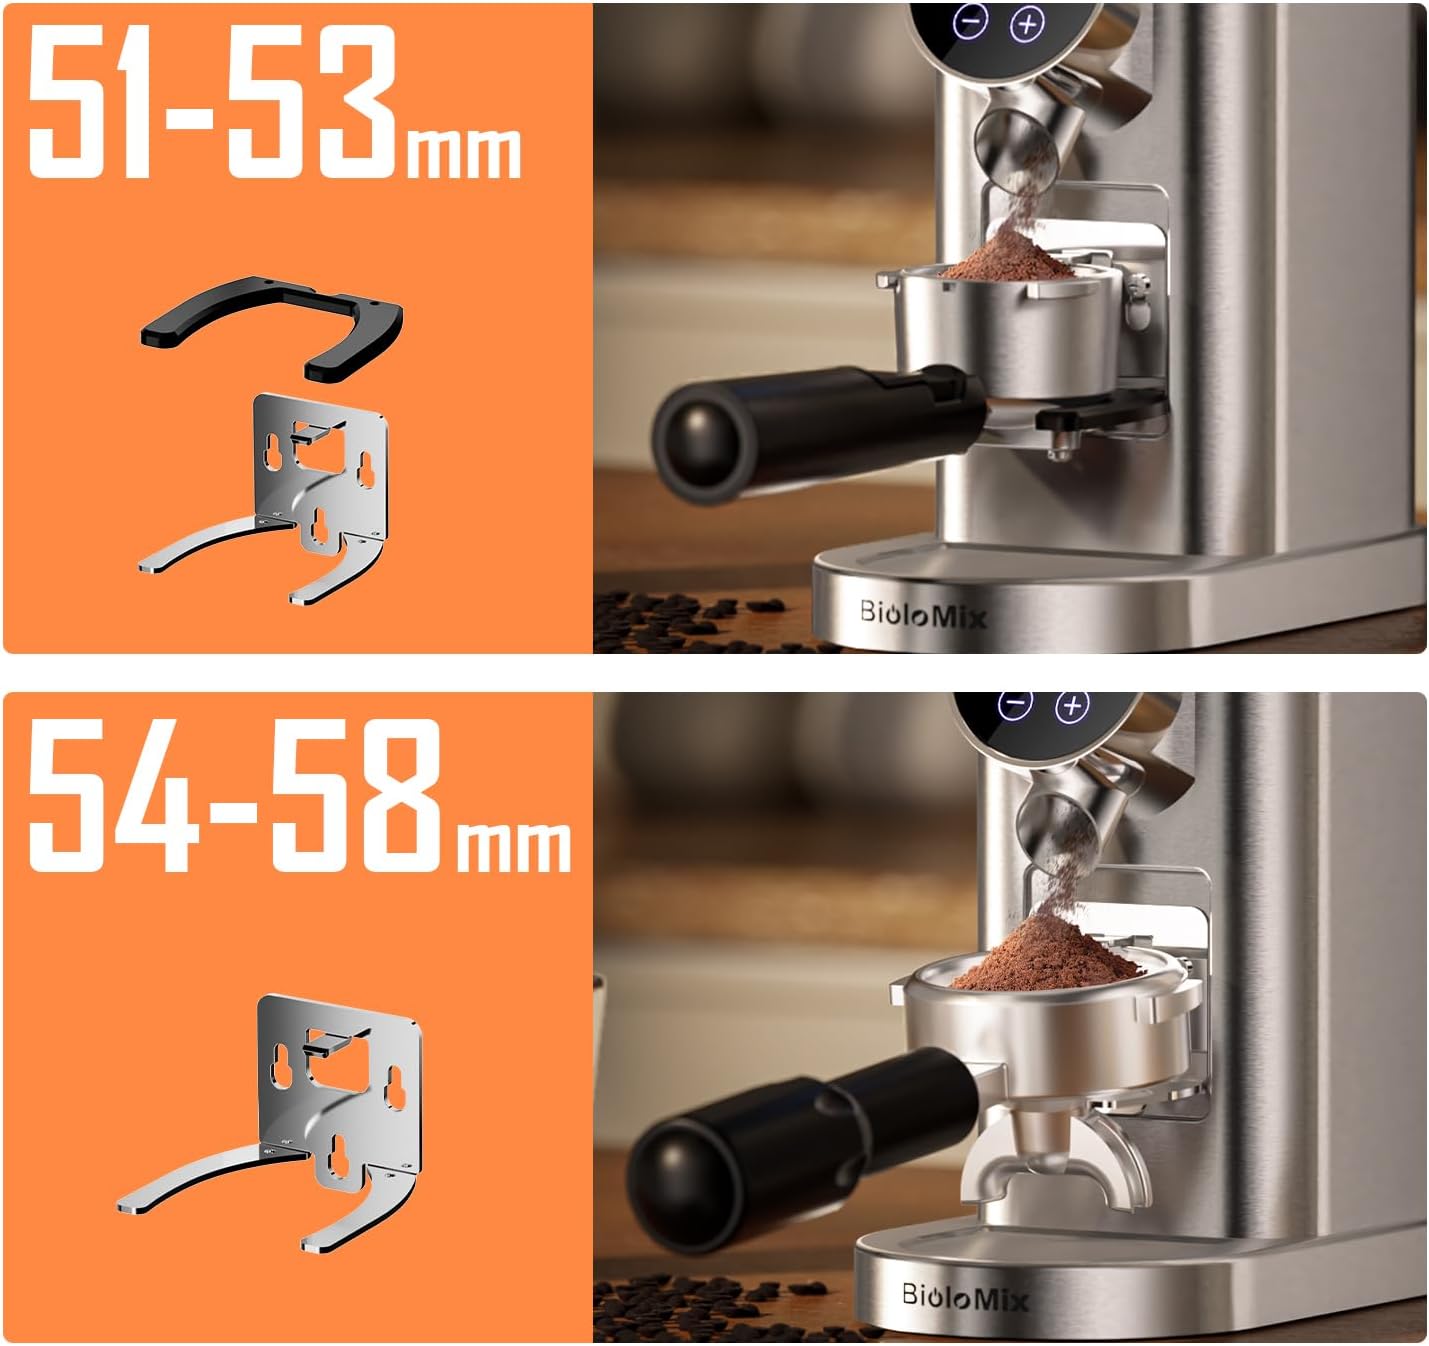
Image 5.6: Illustrates the two sizes of portafilter holders provided for compatibility with various portafilters.

Image 5.7: Depicts the choice between using the magnetic anti-static cup or attaching a portafilter for grinding.
6. Cleaning and Maintenance
Regular cleaning ensures optimal performance and extends the life of your grinder.
- Unplug: Always unplug the grinder from the power outlet before cleaning.
- Empty Hopper: Remove any remaining coffee beans from the hopper.
- Remove Hopper: Rotate the bean hopper counter-clockwise to unlock and remove it.
- Clean Burrs: Use the provided cleaning brush to remove coffee grounds from the upper and lower conical burrs. The upper burr can be removed for deeper cleaning by lifting it out.

Image 6.1: A detailed view of the conical burrs, highlighting their role in consistent grinding.

Image 6.2: Demonstrates the use of the internal cleaning brush to remove residual grounds from the burrs.
- Anti-Clogging Function (Bellow Blower): After grinding, place the bellow blower on top of the hopper and press down firmly. This action forces air through the grinding chamber to clear residual coffee powder, preventing clogs.

Image 6.3: The bellow blower mechanism for efficient cleaning of residual coffee grounds.
- Wipe Exterior: Wipe the exterior of the grinder with a damp cloth. Do not use abrasive cleaners or immerse the main unit in water.
- Clean Accessories: Wash the bean hopper, lid, magnetic dosing cup, and portafilter holders with warm soapy water. Rinse and dry thoroughly.
7. Troubleshooting
| Problem | Possible Cause | Solution |
|---|---|---|
| Grinder does not start. | Not plugged in; Hopper not correctly installed; Power outage. | Ensure the power cord is securely plugged in. Check if the bean hopper is locked into place. Verify power supply. |
| Coffee beans are not grinding. | No beans in hopper; Hopper not locked; Burrs clogged. | Add coffee beans. Ensure hopper is locked. Clean burrs using the brush and bellow blower. |
| Grind is inconsistent or too coarse/fine. | Incorrect grind setting; Burrs dirty or damaged. | Adjust the grind setting according to your brewing method. Clean the burrs thoroughly. If burrs are damaged, contact customer support. |
| Coffee grounds are static and messy. | Static electricity build-up. | The grinder features anti-static technology. Ensure the magnetic dosing cup is used correctly. Humidity can affect static; try grinding in a more humid environment if possible. |
| Grinder clogs frequently. | Residual coffee grounds; Oily beans. | Use the bellow blower after each use to clear residual grounds. Clean burrs regularly. For very oily beans, more frequent cleaning may be required. |
8. Specifications
- Model: CG210
- Brand: Biolomix
- Color: Black
- Product Dimensions: 7.8"L x 16"W x 9.4"H
- Item Weight: 5.58 pounds
- Grind Settings: 48 Precise Settings
- Timer: Digital, 1-40 seconds (0.5-second increments)
- Cup Selection: 2-12 cups
- Burr Type: Conical Burr
- Special Features: Anti-Static Design, Anti-Clogging Function (Bellow Blower), LCD Screen Display
9. Warranty and Support
Biolomix products are manufactured with quality and reliability in mind. For warranty information, technical support, or service inquiries, please refer to the warranty card included with your product or visit the official Biolomix website. Please have your model number (CG210) and purchase date available when contacting support.
You can visit the Biolomix Store on Amazon for more information and product offerings.


