
Albott SAC011
Albott 12000 BTU Mini Split Air Conditioner Heat Pump User Manual
Model: SAC011
1. Product Overview
The Albott 12000 BTU Mini Split Air Conditioner Heat Pump is a versatile and energy-efficient system designed to provide year-round comfort for spaces up to 750 sq. ft. It combines cooling, heating, dehumidifying, and fan functions, all controlled by an intuitive remote. Key features include an inverter compressor for energy savings, whisper-quiet operation, and a self-cleaning function for easy maintenance.

Figure 1.1: Complete Albott Mini Split Air Conditioner Heat Pump system and included accessories.
2. Safety Information
Always read and understand all safety warnings and instructions before installing or operating this appliance. Failure to follow these instructions may result in electric shock, fire, property damage, or personal injury.
- Ensure the power supply matches the unit's requirements (220V).
- Installation must be performed by a qualified professional.
- Do not install near heat sources, steam sources, or in areas with flammable/explosive gases or corrosive gases.
- Ensure proper grounding to prevent electric shock.
- Keep the area around the indoor and outdoor units clear of obstructions.
- Wear appropriate personal protective equipment (PPE) during installation, especially when working at heights.
3. What's in the Box
Your Albott Mini Split Air Conditioner Heat Pump package includes the following components:
- Indoor unit
- Instruction manual
- Batteries
- Remote control
- Hanging plate for the back of the indoor unit
- Drain pipe for inner unit
- Installation dimension drawing
- 14.76 Ft communication wires
- Outdoor unit
- Wall sleeve
- Putty
- Copper connection pipe - air pipe
- Copper connection pipe - liquid pipe
- 8.2 Ft power cord
- Tape
4. Installation Guide
For a comprehensive visual guide, please refer to the official installation video below. This section provides a step-by-step summary.
Video 4.1: Detailed Installation for Split Air Conditioner.
4.1. Preparation Before Installation
Before beginning installation, ensure the environment is suitable. Avoid locations near heat or steam sources, or areas with flammable/corrosive gases. Ensure no obstructions around the unit's inlet and outlet. Gather all necessary tools and materials, including a hole saw, multimeter, pipe cutter, hex wrenches, refrigerant, torque wrench, adjustable wrench, tape measure, safety belt, flaring tool, brackets, level, Phillips screwdriver, electroprobe, vacuum pump, pliers, and copper tubing.
4.2. Indoor Unit Installation
- Select Installation Location: The wall for the indoor unit must be hard, flat, and firm to prevent vibration and noise. Ensure adequate clearance: >15cm to ceiling, >20cm to obstacles on sides, and 230-260cm from the floor.
- Fix Mounting Plate: Place the mounting plate on the wall and use a level to ensure it is horizontal. Select at least 5 screw positions and punch holes in the wall. Use expansion screw kits to firmly fix the plate. Do not use nails.
- Drill Wall Hole: Determine where the pipe will go through the wall. Drill a wall hole inclined outward by 5-10 degrees, with a diameter of 60-80mm. Use an anti-dust bag to avoid dust. Avoid wires, plumbing, and gas lines.
- Install Connection Cable: Pass the power cable out from the back of the indoor unit and fix it on the terminal board. Fix the cable with a clamp.
- Knock-out Panel: According to the piping direction, remove the knock-out panel with a knife and remove burrs to prevent the drain pipe from being broken.
- Connect Refrigerant Piping: Use both hands to turn the pipe in the desired direction to avoid deforming or rupturing the tube. Aim at the pipe center, tighten the taper nut with fingers, then tighten with two wrenches. Refer to the torque table for specific pipe sizes.
- Install Drain Hose: Connect the drain hose with the water outlet pipe and fix it firmly with adhesive tape. The length should be more than 5cm to prevent water leakage.
- Wrap the Piping: Wrap refrigerant piping, wires, and the drain pipe with wrapping tape.
- Mount Indoor Unit: Put the refrigerant piping out of the wall hole. Put the indoor unit on the mounting plate. Push the lower part of the indoor unit until a 'click' sound is heard to make sure the indoor unit is firmly fixed to the wall.
- Pipe Protecting Ring and Putty: To protect piping and wires, a pipe protecting ring shall be installed sealed with putty.
4.3. Outdoor Unit Installation
- Select Installation Location: The outdoor unit must be installed in a firm and flat place to prevent vibration and noise. Ensure adequate clearance: >20cm to top obstruction, >30cm to side obstructions, >10cm air in side, and >200cm air out side. If installing at a higher place, wear a safety belt and helmet.
- Install Outdoor Unit Bracket: Use a level to ensure the bracket is horizontal and vertical. Use at least 6 expansion bolts to make sure the brackets are fixed firmly on the wall.
- Fix Outdoor Unit: Place the outdoor unit onto the installed brackets. Use 4 screws to fix the feet of the outdoor unit to the brackets.
- Connect Refrigerant Piping: Remove the nut from the stop valves. Aim at the pipe center of the stop valve, tighten the taper nut with fingers, then tighten with two wrenches. Refer to the torque table for specific pipe sizes. Screw on the 2 caps.
- Fix Cables: Remove the electrical box cover. Fix cables to the terminal board according to the wiring diagram on the E-parts cover. Must follow the wiring diagram inside the box cover. Use a clamp to fix the cables. Put the electrical box cover back.
4.4. Vacuumizing and Refrigerant Charging
- Vacuumize: Before vacuuming, check all the nuts of the indoor and outdoor unit are tightened. Connect the stop valve, charging hose, manifold valve, and vacuum pump as shown in the diagram. Turn on the handle Lo to vacuumize. Vacuumize for at least 15 minutes, making sure the value on the pressure gauge is ≤0.1MPa.
- Pressure Test: Keep the pressure for 3-5 minutes after vacuumizing, make sure pressure springback ≤0.05MPa.
- Open Valves: Open the 1/4 liquid valve and remove the charging hose. Open all the liquid valves and gas valves. Screw all the caps and tighten up.
5. Operating Modes and Features
Your Albott Mini Split AC offers multiple modes for optimal comfort and efficiency.

Figure 5.1: Key features of the Albott Mini Split Air Conditioner.
- Cooling Mode: Provides powerful cooling to quickly lower room temperature.
- Heating Mode: Functions as a heat pump to efficiently warm your space.
- Dehumidifying Mode: Reduces humidity levels for a more comfortable environment.
- Fan Mode: Circulates air without heating or cooling.
- Sleep Mode: Adjusts temperature and fan speed for quiet, comfortable nighttime operation.
- 24-Hour Timer: Program the unit to turn on or off at specific times.
- Auto Swing: Automatically adjusts airflow direction for even distribution.
- Remote Control: Adjust all settings from up to 30 feet away.

Figure 5.2: Remote control for the Albott Mini Split AC.
6. Maintenance
Regular maintenance ensures optimal performance and longevity of your unit.
6.1. Self-Cleaning Technology
The unit features a 135°F self-cleaning function that helps remove dust buildup. The system will remind you every 500 hours to activate the self-cleaning cycle, which runs for 30 minutes.

Figure 6.1: Illustration of the self-cleaning process.
6.2. Detachable Dust Filter
The top-removable, washable filter is easy to clean, trapping dust and particles for fresher air circulation and enhanced durability of internal components.

Figure 6.2: Detachable dust filter for easy removal and cleaning.
7. Troubleshooting
If you encounter issues with your Albott Mini Split AC, refer to the following common problems and solutions. For persistent issues, contact customer support.
- Unit not turning on: Check power supply, circuit breaker, and ensure the remote control batteries are not depleted.
- Insufficient cooling/heating: Verify temperature settings, ensure filters are clean, check for obstructions around units, and confirm windows/doors are closed.
- Unusual noises: Check for loose parts or debris in the fan. If a grinding or loud metallic noise occurs, turn off the unit immediately and contact support.
- Water leakage from indoor unit: Ensure the drain hose is properly sloped and not clogged. Never put the end of the drain hose in standing water.
- Error Codes: Refer to the specific error code in the main manual for detailed troubleshooting steps. For example, an E2 code might indicate a faulty temperature sensor.
8. Specifications
Detailed technical specifications for the Albott 12000 BTU Mini Split Air Conditioner Heat Pump:
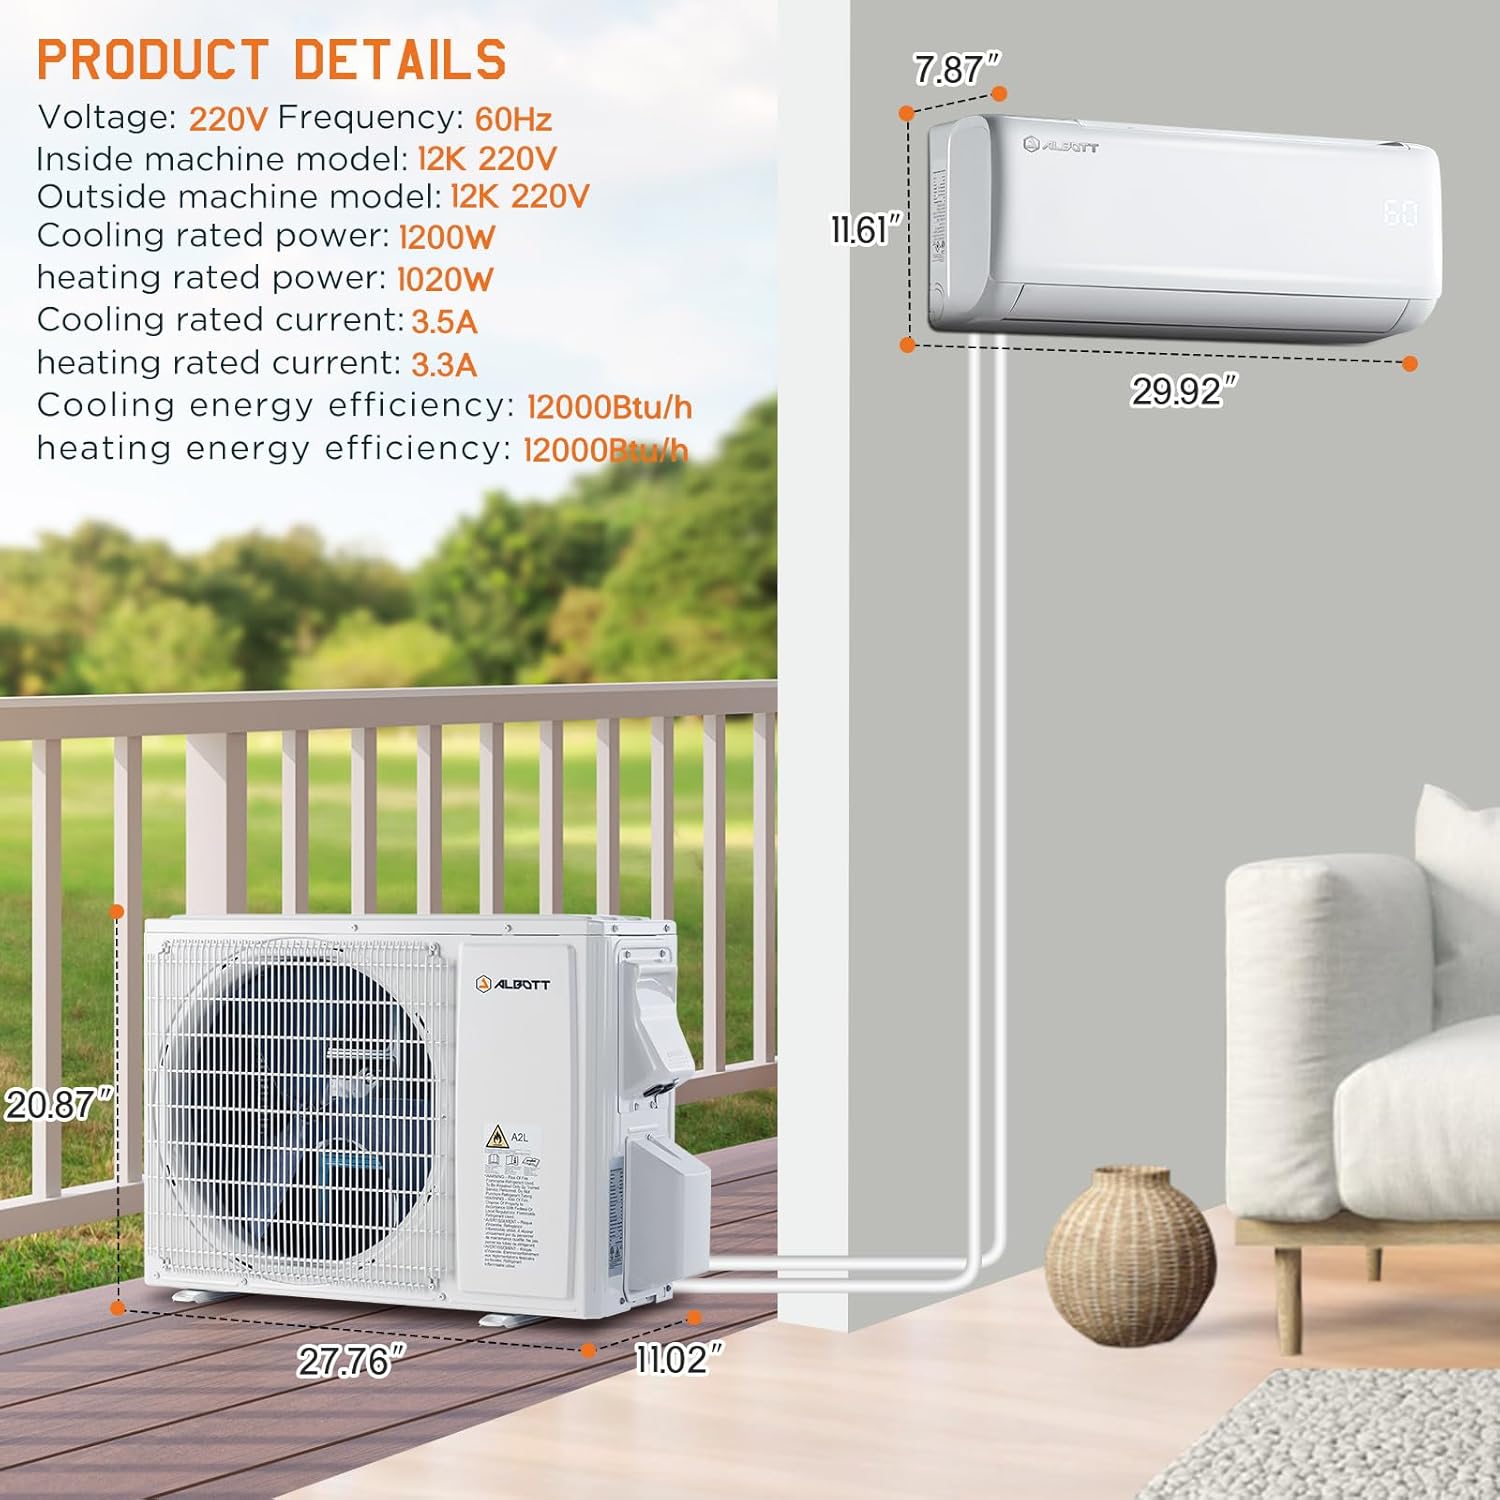
Figure 8.1: Product dimensions and electrical details.
| Attribute | Value |
|---|---|
| Brand Name | Albott |
| Model Info | SAC011 |
| Item Weight | 24 pounds |
| Product Dimensions | 29.92 x 11.61 x 7.9 inches |
| Capacity | 750 Cubic Feet |
| Noise | 29 dB |
| Installation Type | Split System |
| Special Features | Inverter Compressor, Heating & Cooling Function, 4 Way Swing, Fast Cooling, Auto Clean |
| Color | White |
| Voltage | 220 Volts |
| Wattage | 1200 watts |
| Batteries Included? | Yes |
| Batteries Required? | Yes |
| Battery Cell Type | Alkaline |
| Floor Area | 750 Square Feet |
| Cooling Power | 12000 British Thermal Units |
| Seasonal Energy Efficiency Ratio (SEER) | 18.5 |
9. Warranty and Support
Your Albott Mini Split Air Conditioner Heat Pump comes with peace of mind through our comprehensive warranty and dedicated support.
- Compressor Warranty: 5 years
- Parts Warranty: 8 years
For technical assistance, troubleshooting, or warranty claims, please contact Albott Customer Support. Have your model number (SAC011) and purchase date ready for faster service.
Albott Customer Support:
- Website: Visit the Albott Store on Amazon
- Email: support@albott.com (Example)
- Phone: 1-800-XXX-XXXX (Example)
Ask a question about this manual
Ask about setup, troubleshooting, compatibility, parts, safety, or missing instructions. Manuals+ will review the question and use this page’s manual context to help answer it.