1. Introduction
This manual provides comprehensive instructions for the installation, operation, and maintenance of your MYPIN Magnetic Solar Wireless Backup Camera System. Please read this manual thoroughly before using the product to ensure proper function and safety. This system is designed to enhance visibility and safety for various vehicles, including RVs, campers, trailers, and trucks.
2. Package Contents
Verify that all items listed below are included in your package. If any items are missing or damaged, please contact customer support.
- 7-inch HD Wireless Monitor
- Magnetic Solar Wireless Backup Camera
- Monitor Power Cable (for cigarette lighter socket)
- Type-C Charging Cable for Camera
- Fast Charger
- Monitor Mounting Bracket (Dashboard Mount)
- Monitor Suction Cup Mount (Windshield Mount)
- User Manual
3. Product Overview
3.1 System Components
The MYPIN Wireless Backup Camera System consists of two main components: the 7-inch HD monitor and the magnetic solar-powered wireless camera.

Figure 3.1: System Components and Wireless Signal Transmission. The image displays the 7-inch monitor and the solar-powered camera, illustrating their wireless connection and range, with an RV in the background.
3.2 Monitor Features
- 7-inch HD Display: Provides a clear and detailed view.
- Split-Screen Modes: Supports dual and quad-screen viewing for multiple cameras (additional cameras sold separately, ASIN: B0FJXTWV22).
- Image Flip Function: Allows for 4 types of image adjustments (normal, mirror, horizontal flip, vertical flip).
- DVR Loop Recording: Built-in system for continuous recording, supporting up to 128GB SD card (not included).
- Parking Guidelines: Selectable on/off grid lines for parking assistance.
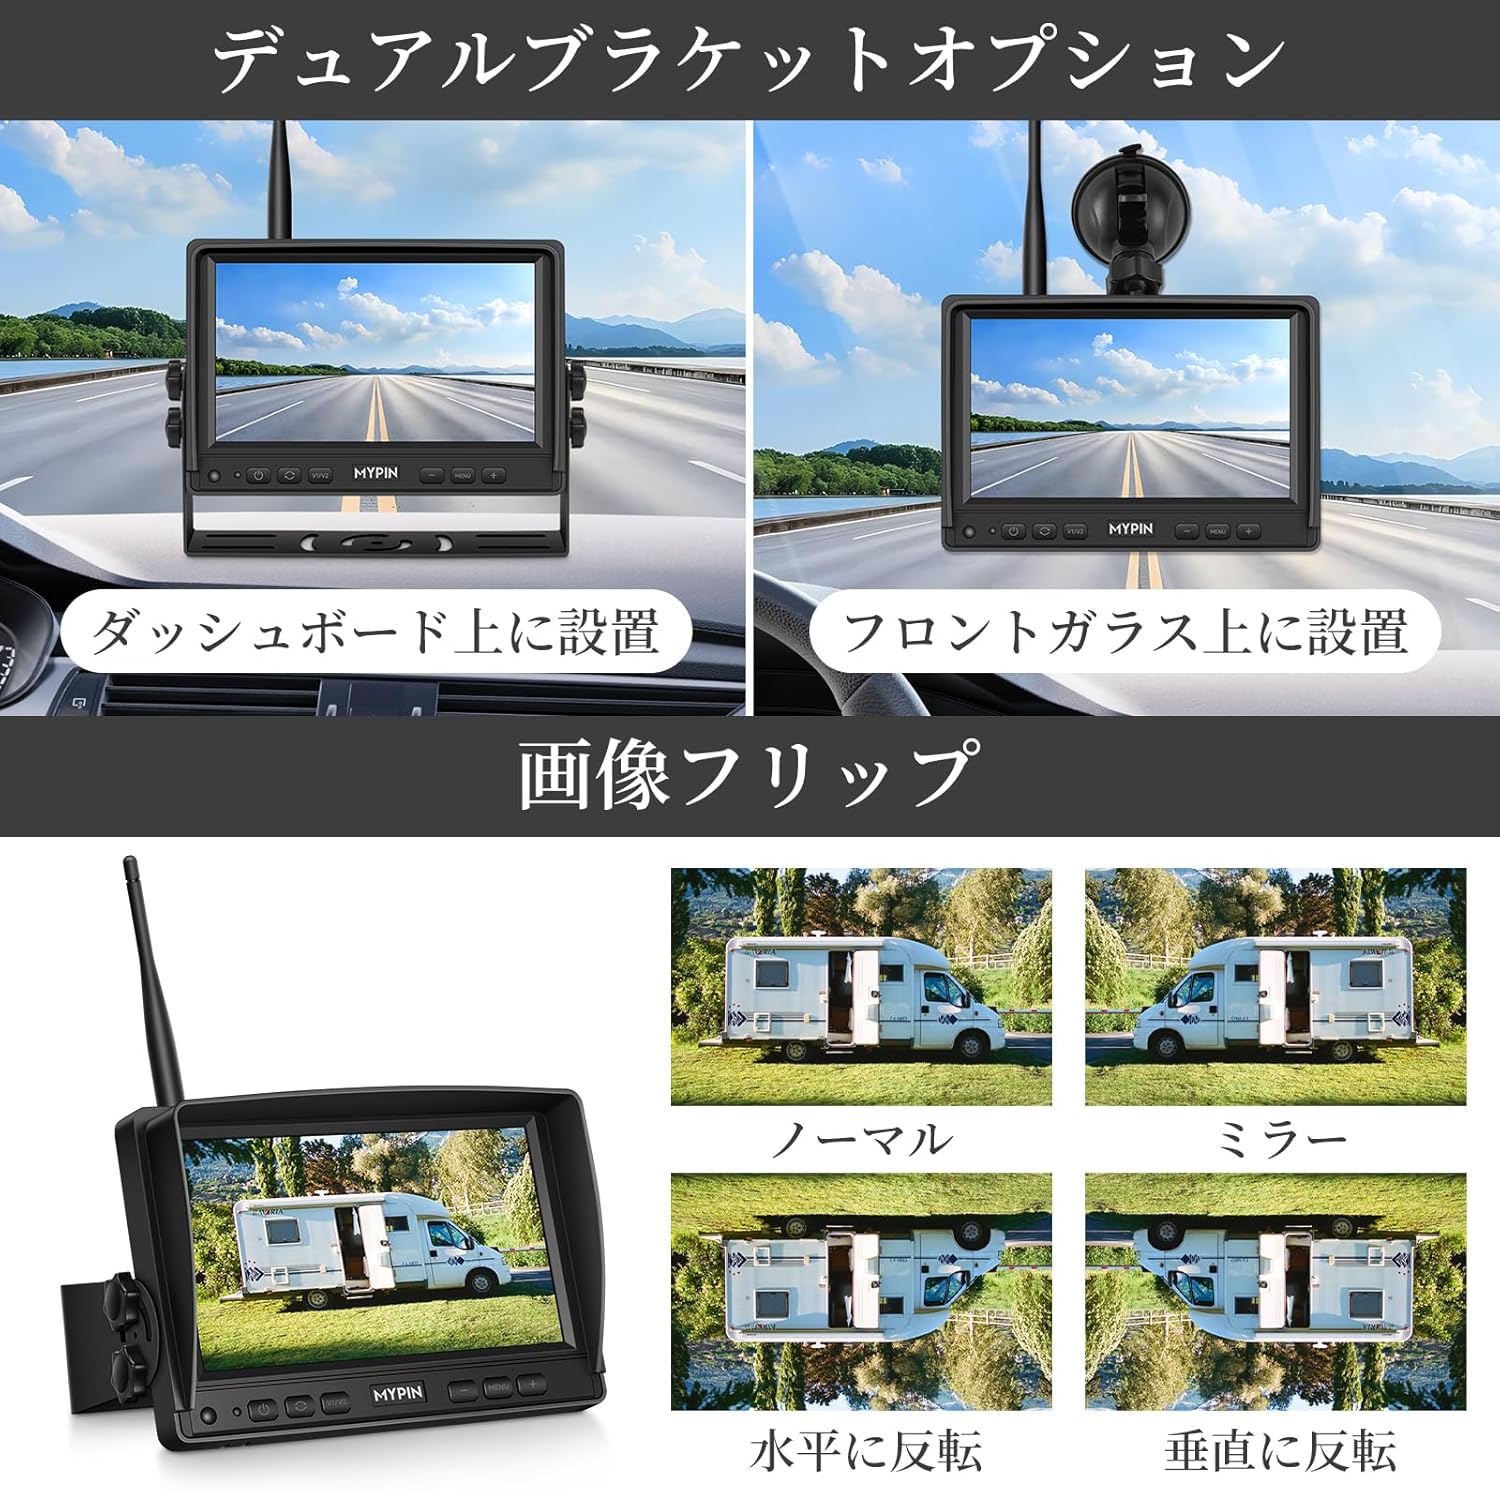
Figure 3.2: Monitor Mounting Options and Image Flip Functionality. This image demonstrates how the monitor can be mounted on the dashboard or windshield, and shows the different image orientation options available.
3.3 Camera Features
- 1080P HD Resolution: Delivers clear and sharp video.
- 140° Wide Angle View: Provides a broad field of vision.
- Solar Powered: Integrated solar panel for continuous charging during daylight.
- 9900mAh Battery: High-capacity rechargeable battery for extended operation.
- Strong Magnetic Base: Allows for easy, drill-free attachment to metal surfaces.
- Super Night Vision: Equipped with 6 infrared LEDs and an automatic light sensor for clear images in low-light conditions.
- IP69 Waterproof: Durable design for all-weather use.
- Adjustable Angle: Camera angle can be adjusted for optimal viewing.

Figure 3.3: Camera Features. This image highlights the camera's IP69 waterproof rating, 9900mAh battery, solar charging capability, Type-C charging port, and its adjustable viewing angle.
4. Setup
4.1 Charging the Camera
The camera is equipped with a 9900mAh rechargeable battery and a solar panel for continuous charging. Before first use, it is recommended to fully charge the camera using the provided Type-C charging cable and fast charger.
- Connect the Type-C cable to the camera's charging port.
- Connect the other end to the fast charger and plug it into a power outlet.
- The camera will also charge automatically when exposed to sunlight via its solar panel.
4.2 Mounting the Camera
The camera features a strong magnetic base for easy, drill-free installation on any metal surface of your vehicle.
- Choose a suitable metal surface at the rear of your vehicle (e.g., trailer, RV, truck) that provides a clear view.
- Ensure the surface is clean and dry.
- Place the camera firmly onto the chosen metal surface. The strong magnets will secure it in place.
- Adjust the camera's angle to achieve the desired viewing perspective.

Figure 4.1: Camera Installation and Monitor Power Connection. This image illustrates the magnetic attachment of the camera to a vehicle, the adjustment of its angle, and the connection of the monitor to the vehicle's cigarette lighter socket.
4.3 Mounting the Monitor
The monitor offers two mounting options: dashboard mount and suction cup windshield mount.
- Dashboard Mount: Attach the dashboard bracket to the monitor and place it on a flat, stable surface on your dashboard.
- Windshield Mount: Attach the suction cup mount to the monitor. Clean the desired area on your windshield, press the suction cup firmly, and engage the lever to secure it.
4.4 Connecting the Monitor
Power the monitor by plugging the provided power cable into your vehicle's cigarette lighter socket.
- Insert the small end of the power cable into the monitor's power input port.
- Plug the larger end into the vehicle's 12V cigarette lighter socket.
- The monitor will power on automatically when the vehicle's ignition is turned on (or when the cigarette lighter socket receives power).
5. Operating Instructions
5.1 Power On/Off
The monitor powers on automatically when connected to a powered cigarette lighter socket. To manually turn the monitor on or off, press the power button located on the monitor's front panel.
5.2 Monitor Display Modes
The 7-inch monitor supports various display modes, including single camera view, dual-screen, and quad-screen (if multiple cameras are connected).
- Press the MENU button to access settings.
- Use the + or - buttons to navigate through display modes.
- Press the OK button to confirm your selection.

Figure 5.1: Monitor Split-Screen Modes. This image displays the various screen configurations available on the monitor, including full screen, dual screen, quad screen, and H-split screen.
5.3 Image Flip Function
Adjust the camera image orientation as needed for your specific mounting position.
- Access the image settings via the MENU button.
- Select from 4 available flip modes: Normal, Mirror, Horizontal Flip, Vertical Flip.
5.4 DVR Loop Recording
The system features a built-in DVR for continuous loop recording. An SD card (up to 128GB, not included) is required for recording.
- Insert a compatible SD card into the monitor's SD card slot.
- The system will automatically begin recording when powered on.
- When the SD card is full, older unprotected video segments will be overwritten automatically.
- In case of an accident or sudden impact, the G-sensor will automatically protect the current video segment from being overwritten.

Figure 5.2: Continuous Loop Recording. This diagram shows the system's loop recording functionality, where video footage from various vehicle types is continuously recorded and older files are overwritten when the SD card is full.
5.5 Night Vision
The camera is equipped with 6 infrared LEDs and an automatic light sensor to provide clear night vision.
- The camera automatically switches to night vision mode in low-light conditions.
- Images will be displayed in HD quality even in complete darkness.

Figure 5.3: High-Quality Night Vision. This image compares daytime and nighttime views captured by the camera, highlighting its superior night vision capabilities.
5.6 Parking Guidelines
Adjustable parking guidelines can be enabled or disabled to assist with parking maneuvers.
- Access the settings menu to toggle parking guidelines on or off.
- The guidelines provide visual cues for distance and trajectory.
Figure 5.4: Parking Guidelines. This image shows the monitor displaying parking guidelines, making it easier to maneuver a trailer into a parking spot.
5.7 Remote Operation
The system allows for convenient remote operation by simply turning the monitor on or off. This eliminates the need to frequently access the camera for control.
6. Maintenance
6.1 Cleaning
- Regularly clean the camera lens and monitor screen with a soft, damp cloth to ensure clear visibility.
- Avoid using abrasive cleaners or solvents that may damage the surfaces.
6.2 Battery Care
- Ensure the camera's solar panel is kept clean and unobstructed to maximize charging efficiency.
- For prolonged storage, fully charge the camera battery and store it in a cool, dry place. Recharge periodically to maintain battery health.
6.3 Waterproof Rating
The camera has an IP69 waterproof rating, making it highly durable and resistant to water and dust ingress. However, avoid submerging the camera in water for extended periods.
7. Troubleshooting
If you encounter issues with your MYPIN Wireless Backup Camera System, refer to the following common problems and solutions:
| Problem | Possible Cause | Solution |
|---|---|---|
| No image on monitor | Monitor not powered; Camera battery low; Signal interference; Camera not paired. | Check monitor power connection; Charge camera battery; Move camera/monitor to reduce interference; Re-pair camera (refer to pairing instructions in full manual). |
| Image freezing or flickering | Weak signal; Interference; Distance too far. | Ensure camera and monitor are within range (up to 320ft in open areas); Minimize obstructions between camera and monitor; Check for other wireless devices causing interference. |
| Poor night vision quality | Camera lens dirty; IR LEDs obstructed. | Clean camera lens; Ensure IR LEDs are not blocked. |
| Loop recording not working | No SD card inserted; SD card full and protected; SD card incompatible. | Insert a compatible SD card (up to 128GB); Format the SD card; Replace with a new SD card if corrupted. |
| Camera falling off | Surface not metal; Surface dirty/uneven; Extreme vibration. | Ensure mounting surface is metal; Clean and dry the surface; Consider additional securing methods if experiencing extreme vibrations. |
8. Specifications
| Feature | Detail |
|---|---|
| Brand | MYPIN |
| Model Number | CE0386 |
| Monitor Size | 7 inches |
| Camera Resolution | 1080P HD |
| Camera Angle of View | 140 degrees |
| Optical Sensor Technology | CMOS |
| Optical Sensor Size | 1/3 inch |
| Wireless Transmission Range | Up to 320 feet (open area) |
| Camera Battery Capacity | 9900mAh |
| Charging Methods | Solar, Type-C |
| Waterproof Rating | IP69 |
| DVR Support | Loop Recording, G-sensor |
| Memory Card Support | Up to 128GB SD card (not included) |
| Product Dimensions (Camera) | Approx. 11.94 x 7.87 x 9.40 cm |
| Package Dimensions | 26.8 x 20.7 x 10.8 cm |
| Weight | 1.9 kg (package) |
9. Warranty and Support
9.1 Warranty Information
This product comes with a standard manufacturer's warranty. Please refer to the warranty card included in your package or contact MYPIN customer support for specific warranty terms and conditions.
9.2 Customer Support
For technical assistance, troubleshooting, or any questions regarding your MYPIN Magnetic Solar Wireless Backup Camera System, please contact our customer support team. Contact details can typically be found on the product packaging or the official MYPIN website.


