
1. Product Overview
The Alloxity F273704 Propane Heater Hose is designed to connect a 5-100 lb propane tank to various 1 lb portable propane appliances. This 12-foot hose provides flexibility in appliance placement and eliminates the need for disposable 1 lb propane bottles. It features durable construction with brass fittings, weather-resistant PVC, highly tensile cotton braiding, and an anti-corrosion PVC tube.
Compatibility: This hose is compatible with Weber Q grills, Coleman camping stoves, Blackstone 17" & 22" griddles (requires a regulator, not included), and Buddy heaters.

Image 1.1: The Alloxity F273704 Propane Heater Hose, illustrating the POL 1 connector for 5-100 lb tanks and the CGA 600 outlet for 1 lb appliances, along with its 12-foot length.
2. Safety Information
WARNING: Propane is a flammable gas. Improper use can lead to fire, explosion, serious injury, or death. Always follow these safety guidelines.
- Outdoor Use Only: This product is designed for outdoor use with proper ventilation. Never use propane appliances or this hose indoors, in enclosed spaces, or in areas without adequate airflow.
- Leak Detection: Always perform a leak test before each use and after any connection changes. Apply a soapy water solution to all connections. Bubbles indicate a leak. If a leak is detected, turn off the gas supply immediately and do not use the appliance until the leak is repaired.
- Connection Security: Ensure all connections are hand-tightened securely. Do not overtighten.
- Inspection: Regularly inspect the hose for cuts, abrasions, kinks, or damage. Do not use a damaged hose.
- Clearance: Keep the propane tank and hose away from heat sources, open flames, and combustible materials.
- Children and Pets: Keep children and pets away from propane tanks and operating appliances.
- Proposition 65 Warning: This product contains chemicals known to the State of California to cause cancer and birth defects or other reproductive harm.
3. Setup Instructions
Follow these steps to safely connect your Alloxity propane hose:
- Prepare the Propane Tank: Ensure your 5-100 lb propane tank is upright and on a stable, level surface. Confirm the tank valve is in the closed position.
- Connect to Propane Tank (POL 1 Connector):
Locate the POL 1 connector end of the hose (the larger fitting with a black handwheel). Thread this connector onto the propane tank's outlet valve. Hand-tighten firmly. No tools are typically required for this connection.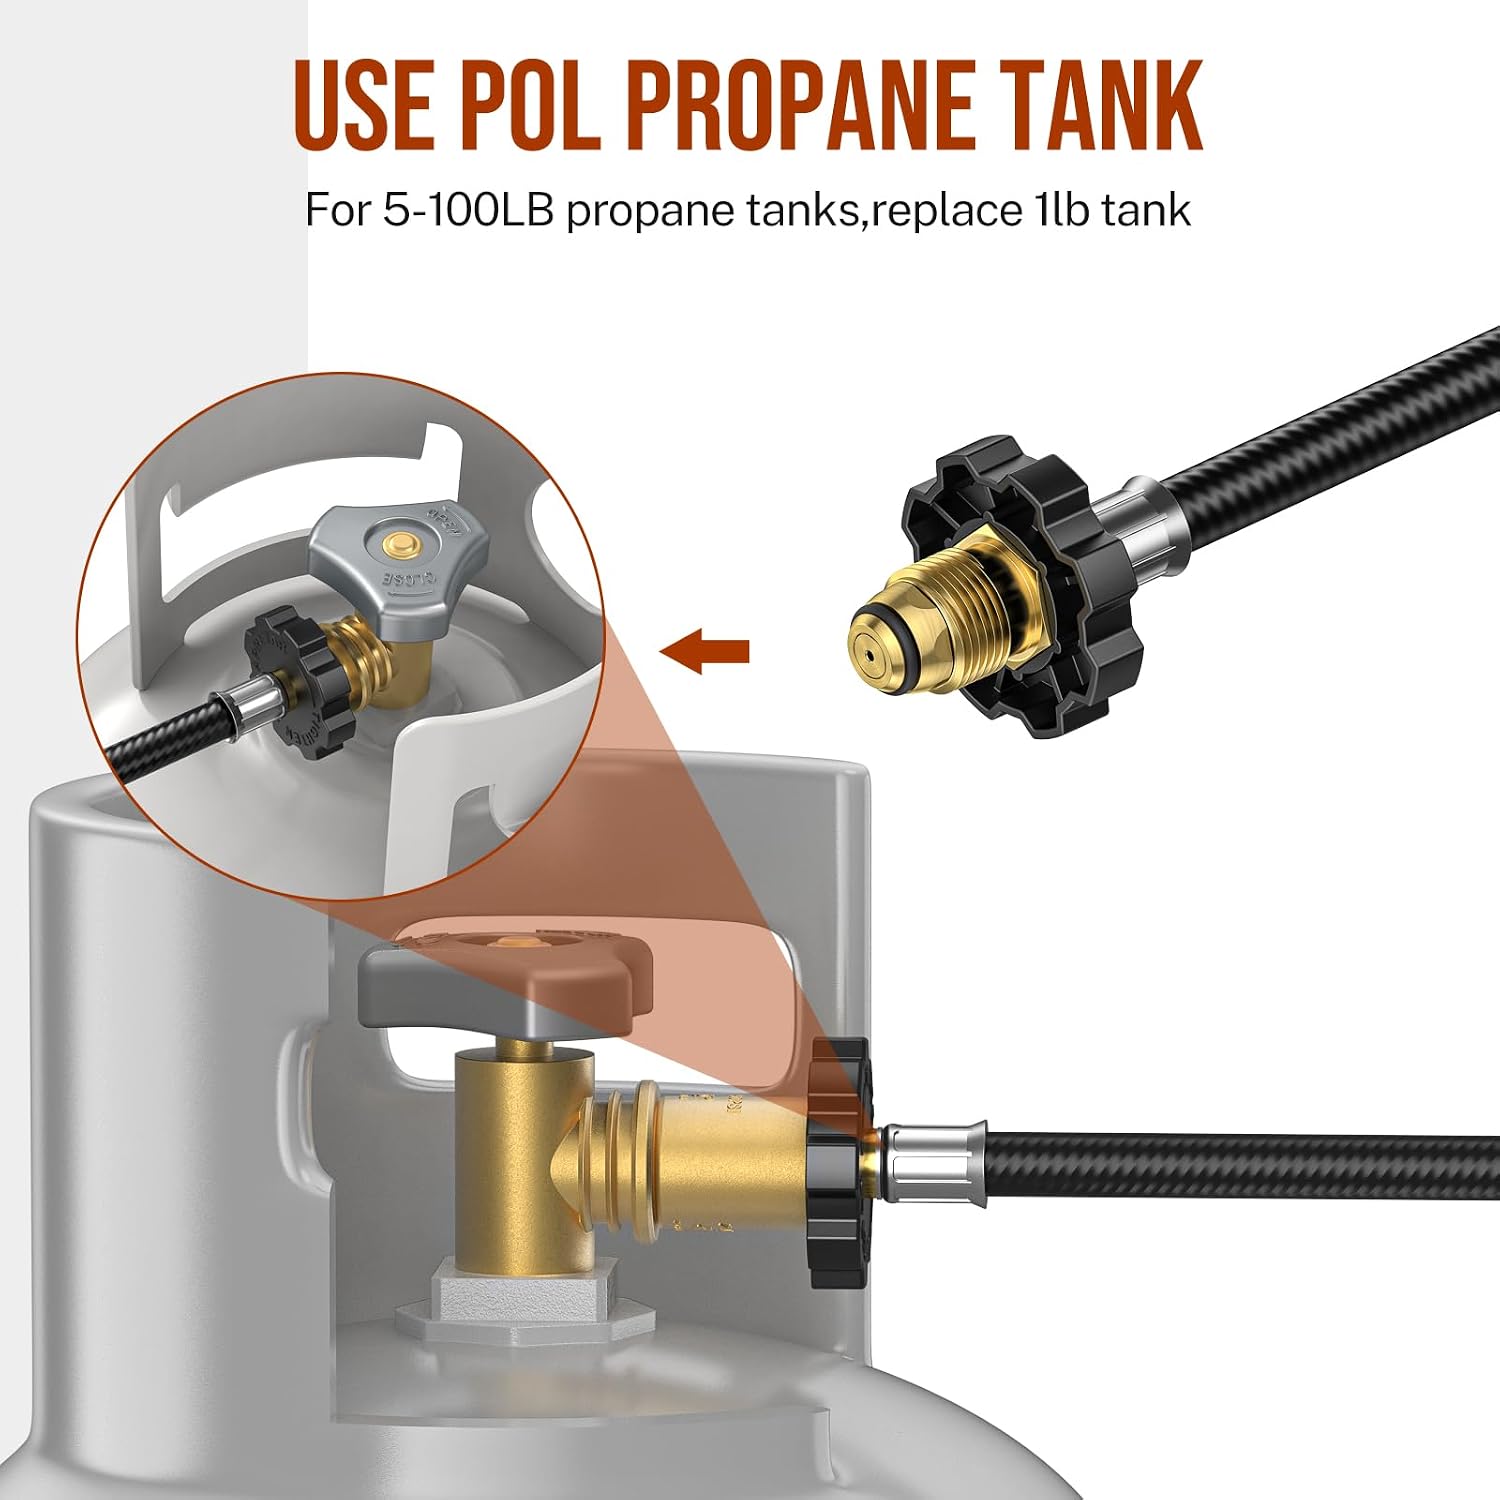
Image 3.1: Demonstrates connecting the POL 1 connector of the hose to a 5-100 lb propane tank.
- Connect to 1 lb Appliance (CGA 600 Outlet):
Locate the CGA 600 outlet end of the hose (the smaller brass fitting). Thread this connector onto the 1 lb appliance's inlet. Hand-tighten firmly. For some appliances like Blackstone griddles, an additional regulator may be required (not included).
Image 3.2: Illustrates connecting the CGA 600 outlet of the hose to a 1 lb LP appliance, such as a Buddy heater.
- Perform a Leak Test:
After all connections are made, slowly open the propane tank valve. Apply a soapy water solution (mix dish soap and water) to all connections. If bubbles appear, close the tank valve immediately, re-tighten the connection, and re-test. Do not proceed if a leak is detected.
4. Operating Instructions
Once the hose is securely connected and a leak test has been performed:
- Ensure the appliance's control knob is in the 'OFF' position.
- Slowly open the main valve on the 5-100 lb propane tank.
- Follow the operating instructions for your specific propane appliance to ignite and use it.
- Always operate propane appliances outdoors in a well-ventilated area.
- When finished, turn off the appliance's control knob first, then close the valve on the propane tank.

Image 4.1: Examples of typical applications for the Alloxity propane hose, including heaters, griddles, and grills.
5. Maintenance
Proper maintenance ensures the longevity and safe operation of your propane hose.
- Regular Inspection: Before each use, visually inspect the entire length of the hose for any signs of damage, such as cuts, cracks, kinks, or excessive wear. Check the brass fittings for corrosion or damage.
- Cleaning: If the hose becomes dirty, wipe it clean with a damp cloth. Do not use harsh chemicals or abrasive cleaners.
- Storage: When not in use, disconnect the hose from both the tank and the appliance. Store the hose in a cool, dry place, away from direct sunlight, extreme temperatures, and corrosive materials. Avoid kinking or bending the hose sharply during storage.
6. Troubleshooting
If you encounter issues with your propane hose, consider the following:
- No Gas Flow:
- Ensure the propane tank valve is fully open.
- Check that the hose connections are tight.
- Verify the propane tank contains sufficient fuel.
- Inspect the hose for severe kinks or blockages.
- Gas Leak Detected (Bubbles during leak test):
- Immediately close the propane tank valve.
- Re-tighten all connections by hand.
- Repeat the leak test. If bubbles persist, the hose or connections may be faulty. Do not use and contact support.
- Appliance Not Igniting:
- Ensure the appliance's igniter is functioning correctly.
- Confirm the appliance's control knob is set to the ignition position.
- Check if the appliance requires a separate regulator (e.g., Blackstone griddles).
7. Specifications
| Brand | Alloxity |
| Model Number | F273704 |
| Material | Brass, Enhanced Rubber, Nylon |
| Color | Black |
| Product Dimensions (L x W) | 144 inches (12 feet) x 1 inch |
| Item Weight | 0.71 Kilograms |
| Maximum Pressure | 350 Pound per Square Inch |
8. Support
For expert assistance with installation, product inquiries, or troubleshooting not covered in this manual, please contact Alloxity customer support. We are committed to resolving your questions promptly.
Please refer to your purchase documentation for specific contact details or visit the Alloxity official website.