
Introduction
This manual provides comprehensive instructions for the Samsung Odyssey G5 32-inch Curved Gaming Monitor (Model: LS32CG552ELMZD). This monitor is designed to enhance your gaming and viewing experience with its advanced features. Please read this manual carefully before using the product to ensure proper operation and to maximize its performance.
Key features of your monitor include:
- QHD Resolution: Experience enhanced realism with 1.7 times the pixel density of Full HD, revealing incredible detail and sharper images.
- 165Hz Refresh Rate & 1ms Response Time (MPRT): Enjoy ultra-smooth gameplay with minimal lag and motion blur, allowing for quick reactions.
- 1000R Curvature: Immerse yourself in vivid scenes with a screen curvature that fills your peripheral vision.
- HDR10 Support: Witness fascinating graphics with a wide range of tones, bringing game scenes to life with deep blacks, luminous whites, and detailed resolution.
- AMD FreeSync: Maintain synchronization between your monitor and graphics card to reduce image tearing and stuttering for a super-fluid gaming experience.
- Eye Saver Mode & Flicker Free Mode: Play for longer periods with reduced eye strain. Eye Saver Mode minimizes blue light, and Flicker Free Mode reduces irritating screen flicker.
Setup Instructions
1. Unpacking the Monitor
Carefully remove all components from the packaging. Ensure all parts listed in the packing contents are present. Keep the packaging materials for future transport or service needs.
2. Assembling the Stand
- Place the monitor face down on a soft, clean cloth to prevent scratches.
- Attach the stand neck to the monitor panel. Ensure it clicks securely into place.
- Attach the stand base to the stand neck and tighten the screw at the bottom of the base.

Rear view of the monitor, illustrating the stand attachment area and VESA mounting points.

Side view of the monitor, demonstrating the available tilt adjustment for optimal viewing angles.
3. Connecting Cables
Connect the necessary cables to your monitor and computer/device. Ensure the monitor is powered off before making connections.
- Power Cable: Connect the power cable to the monitor's power input and then to a wall outlet.
- DisplayPort (DP) Cable: For optimal performance, especially for 165Hz refresh rate and FreeSync, connect the DisplayPort cable from your computer's graphics card to the monitor's DP IN port.
- HDMI Cable: Alternatively, connect an HDMI cable from your computer or gaming console to one of the monitor's HDMI IN ports.

Detailed view of the monitor's input ports, showing HDMI IN, DisplayPort IN, and a Service port.
4. Initial Power On
After connecting all cables, press the power button on the monitor. The monitor will automatically detect the input source. If no signal is detected, ensure your computer is on and the correct input source is selected on the monitor.
Operating Instructions
1. Power On/Off
Press the power button, usually located on the bottom center or rear of the monitor, to turn the monitor on or off.
2. On-Screen Display (OSD) Menu Navigation
The monitor features a joystick-style button for navigating the OSD menu. Press the joystick to open the menu, then move it up/down/left/right to select and adjust settings. Press again to confirm selections.
3. Picture Settings
- Brightness/Contrast: Adjust these settings to suit your viewing environment.
- Color: Customize color temperature, gamma, and saturation.
- HDR (High Dynamic Range): Enable HDR10 for compatible content to experience a wider range of colors and contrast.
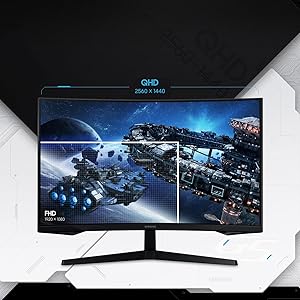
Visual comparison highlighting the increased detail provided by QHD resolution (2560x1440) compared to FHD (1920x1080).
4. Game Settings
- Refresh Rate: Set to 165Hz for the smoothest gaming experience. Ensure your graphics card and cable support this rate.
- Response Time (MPRT): Adjust for minimal motion blur.
- AMD FreeSync: Enable this feature in the OSD menu and on your AMD graphics card settings to eliminate screen tearing and stuttering.
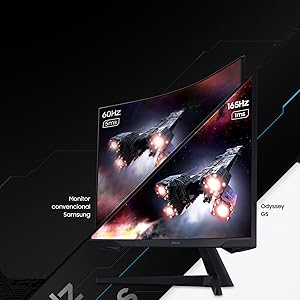
Demonstration of the difference between a conventional 60Hz/5ms monitor and the Odyssey G5's 165Hz/1ms performance.
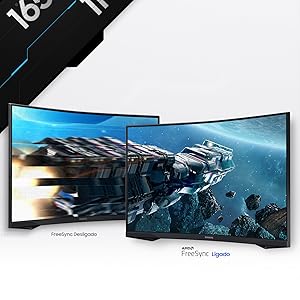
Visual comparison of screen tearing with FreeSync disabled versus a smooth image with FreeSync enabled.
5. Eye Comfort Features
- Eye Saver Mode: Activate this mode to reduce blue light emissions, which helps minimize eye fatigue during extended use.
- Flicker Free Mode: This technology reduces screen flicker, providing a more comfortable viewing experience.
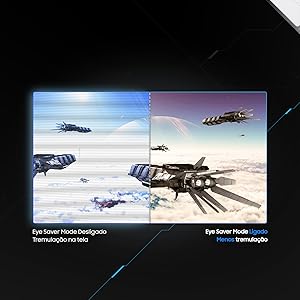
Illustration of how Eye Saver Mode reduces screen flicker for improved visual comfort.
6. Input Source Selection
Use the OSD menu to manually select the input source (HDMI 1, HDMI 2, DisplayPort) if the monitor does not automatically switch to the active input.
Maintenance
1. Cleaning the Screen
Gently wipe the screen with a soft, lint-free cloth. For stubborn marks, lightly dampen the cloth with water or a specialized screen cleaner. Never spray liquid directly onto the screen.
2. Cleaning the Casing
Wipe the monitor casing with a soft, dry cloth. Avoid using abrasive cleaners or solvents, as these can damage the finish.
3. Storage
If storing the monitor for an extended period, disconnect all cables and pack it in its original packaging to protect it from dust and physical damage. Store in a cool, dry place.
Troubleshooting
1. No Power
- Ensure the power cable is securely connected to both the monitor and a working power outlet.
- Check if the power outlet is functional by plugging in another device.
2. No Signal
- Verify that the video cable (DisplayPort or HDMI) is securely connected to both the monitor and your computer/device.
- Ensure your computer/device is powered on and outputting a signal.
- Select the correct input source on the monitor using the OSD menu.
- Try a different video cable or port if available.
3. Image Issues (Flickering, Distorted, Dead Pixels)
- Flickering: Ensure Flicker Free Mode is enabled. Check your graphics card drivers for updates.
- Distorted Image: Adjust the resolution and refresh rate settings on your computer to match the monitor's native resolution (2560x1440) and desired refresh rate (up to 165Hz).
- Dead Pixels: While rare, a small number of dead or stuck pixels may be considered normal for LCD technology. If the issue is significant, contact customer support.
4. AMD FreeSync Not Working
- Ensure FreeSync is enabled in both the monitor's OSD menu and your AMD graphics card control panel.
- Verify that you are using a DisplayPort cable that supports the required bandwidth for your resolution and refresh rate. Older or lower-quality cables may cause issues.
Specifications
| Feature | Specification |
|---|---|
| Brand | Samsung |
| Model Name | Monitor Samsung Odyssey G5 32 |
| Model Number | LS32CG552ELMZD |
| Screen Size | 32 Inches |
| Resolution | QHD (2560 x 1440 Pixels) |
| Refresh Rate | 165 Hz |
| Response Time | 1 Millisecond (MPRT) |
| Curvature | 1000R |
| Aspect Ratio | 16:9 |
| Contrast Ratio | 1000:1 |
| Viewing Angle | 178 Degrees |
| HDMI Ports | 2 |
| DisplayPort | Yes (DP IN) |
| Power Consumption | 59 Watt |
| Special Features | Height Adjustment, Tilt Adjustment, Eye Care, Curved |
| Adaptive Sync | FreeSync |
| Color | Black |
Warranty Information
This Samsung Odyssey G5 monitor comes with a 1-year manufacturer's warranty. Please retain your proof of purchase for warranty claims. The warranty covers manufacturing defects under normal use. For detailed terms and conditions, please refer to the warranty card included with your product or visit the official Samsung support website.
Customer Support
For further assistance, technical support, or service inquiries, please visit the official Samsung support website or contact their customer service. You can find more information and resources on the Samsung Brand Store or the main Samsung website for your region.


