1. Introduction
The SEAFLO 12V 13D Series 1100GPH Livewell/Baitwell Pump is designed to provide continuous water circulation, maintaining a healthy environment for live bait and catch in marine livewell and baitwell tanks. This pump ensures a steady supply of oxygen-rich water, crucial for extended fishing trips. Please read this manual thoroughly before installation and operation to ensure proper use and longevity of the product.
2. Safety Precautions
Always observe the following safety guidelines to prevent injury or damage to the pump and vessel:
- Disconnect power before installing, servicing, or performing any maintenance on the pump.
- Ensure the power source is a 12V DC system. Connecting to an incorrect voltage will damage the pump and void the warranty.
- This pump is fully submersible and ignition-protected, designed for safe operation underwater and in enclosed compartments.
- Do not run the pump dry for extended periods, as this can cause overheating and damage.
- Use appropriate marine-grade wiring and connectors for all electrical connections to prevent corrosion and ensure safety.
- Ensure all hose connections are secure and leak-free.
3. Product Components
The SEAFLO 13D Series Livewell/Baitwell Pump typically includes the following components:
- Pump Body with Motor
- Quick-Release Strainer Base
- Discharge Fittings (typically two, for various hose sizes)
- Wiring Leads (12V DC)
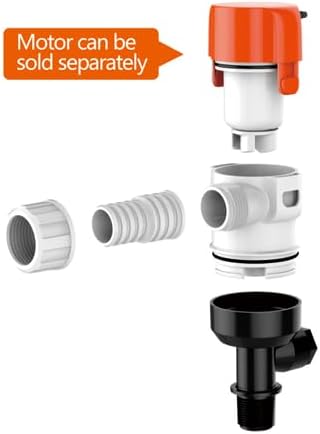
Image 3.1: Exploded view of the pump showing its main components, including the motor, pump body, and quick-release strainer base. The motor can be sold separately for replacement.
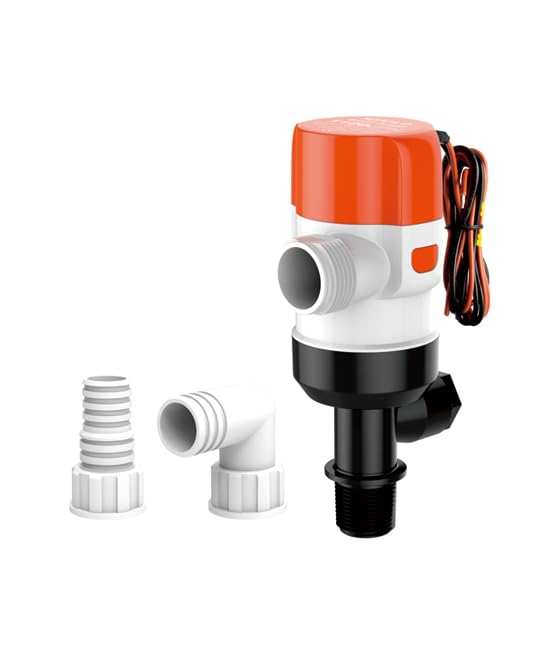
Image 3.2: Assembled view of the SEAFLO 13D Series 1100GPH Livewell/Baitwell Pump, featuring its orange and white housing with wiring leads.
4. Specifications
| Feature | Detail |
|---|---|
| Model Number | SFBP1-G1100-13D |
| Brand | SEAFLO |
| Flow Rate | 1100 Gallons Per Hour (GPH) |
| Voltage | 12 Volts DC |
| Power Source | Corded Electric |
| Style | Submersible |
| Material | Plastic, Polypropylene (PP) |
| Color | Orange |
| Item Weight | 1.2 pounds |
| Protection | Ignition-Protected, Anti-Airlock |
| Outlet | 360-Degree Adjustable |
5. Installation Guide
Follow these steps for proper installation of your livewell/baitwell pump:
5.1 Mounting
- Choose a suitable location in your livewell or baitwell tank that allows the pump to be fully submerged during operation.
- Ensure the mounting surface is clean and flat.
- Secure the quick-release strainer base to the bottom of the tank using appropriate marine-grade fasteners (not included).
- Align the pump body with the strainer base and snap it into place. Ensure it is firmly seated.
5.2 Wiring
- Connect the pump's positive (+) wire (typically brown or red) to a 12V DC fused power source. The fuse should be rated appropriately for the pump's current draw (refer to pump specifications or packaging).
- Connect the pump's negative (-) wire (typically black) to a reliable ground connection.
- Use marine-grade, heat-shrink butt connectors or similar waterproof connections to prevent corrosion.
- Ensure all wiring is routed safely, away from sharp edges or moving parts, and secured with cable ties.
5.3 Hose Connections
- Attach the appropriate discharge hose to the pump's outlet port. The 360-degree adjustable outlet allows for flexible hose routing.
- Secure the hose with a marine-grade hose clamp to prevent leaks.
- Route the discharge hose to your livewell or baitwell inlet, ensuring a smooth path without kinks or sharp bends that could restrict water flow.
- Ensure the discharge outlet is positioned to create optimal water circulation within the tank.
6. Operation
To operate your SEAFLO Livewell/Baitwell Pump:
- Ensure the livewell/baitwell tank is filled with water, fully submerging the pump.
- Activate the pump via its dedicated switch on your vessel's electrical panel.
- Verify that water is flowing from the discharge outlet into the tank, indicating proper operation.
- The pump is designed for continuous operation to maintain water quality. Monitor your bait/catch and water conditions regularly.
- The anti-airlock protection feature helps ensure uninterrupted water flow, even in choppy conditions.
7. Maintenance
Regular maintenance ensures optimal performance and extends the life of your pump:
7.1 Cleaning the Strainer Base
- Disconnect power to the pump.
- Twist and pull the pump body upwards to detach it from the quick-release strainer base.
- Remove any debris, weeds, or foreign objects from the strainer and impeller area.
- Rinse the strainer base and pump body with fresh water.
- Reattach the pump body to the strainer base, ensuring it clicks securely into place.
7.2 General Care
- Periodically inspect all wiring and connections for signs of corrosion or damage.
- Check hoses for kinks, cracks, or blockages.
- Ensure the pump is always fully submerged when operating to prevent dry running.
- For winterization, remove the pump, clean it thoroughly, and store it in a dry, frost-free location.
8. Troubleshooting
If you encounter issues with your pump, refer to the following table:
| Problem | Possible Cause | Solution |
|---|---|---|
| Pump does not run | No power, blown fuse, loose wiring, faulty switch | Check power supply, inspect fuse, tighten connections, test switch. |
| Low or no water flow | Clogged strainer/impeller, airlock, kinked hose, pump not fully submerged | Clean strainer/impeller, ensure pump is submerged, check hose for obstructions. |
| Pump runs but no water | Airlock, pump not fully submerged, impeller damaged | Ensure pump is submerged, check for air pockets, inspect impeller for damage. |
| Excessive noise/vibration | Debris in impeller, loose mounting, worn bearings | Clean impeller, check mounting screws, contact support if bearings are suspected. |
If the problem persists after attempting these solutions, please contact SEAFLO customer support.
9. Warranty and Support
For warranty information, technical assistance, or to purchase replacement parts, please contact SEAFLO customer support through their official website or the retailer where the product was purchased. Keep your proof of purchase for warranty claims.


