1. Introduction
The PARKVISION BK-BR2 Bicycle Rear View Camera Recorder is designed to enhance cycling safety and provide recording capabilities for various bicycle types. This system features a 4.3-inch 1080P monitor, a wide-angle camera, and an 8000mAh battery for extended use. It supports loop recording to capture your rides and offers flexible mounting options for both front and rear views.
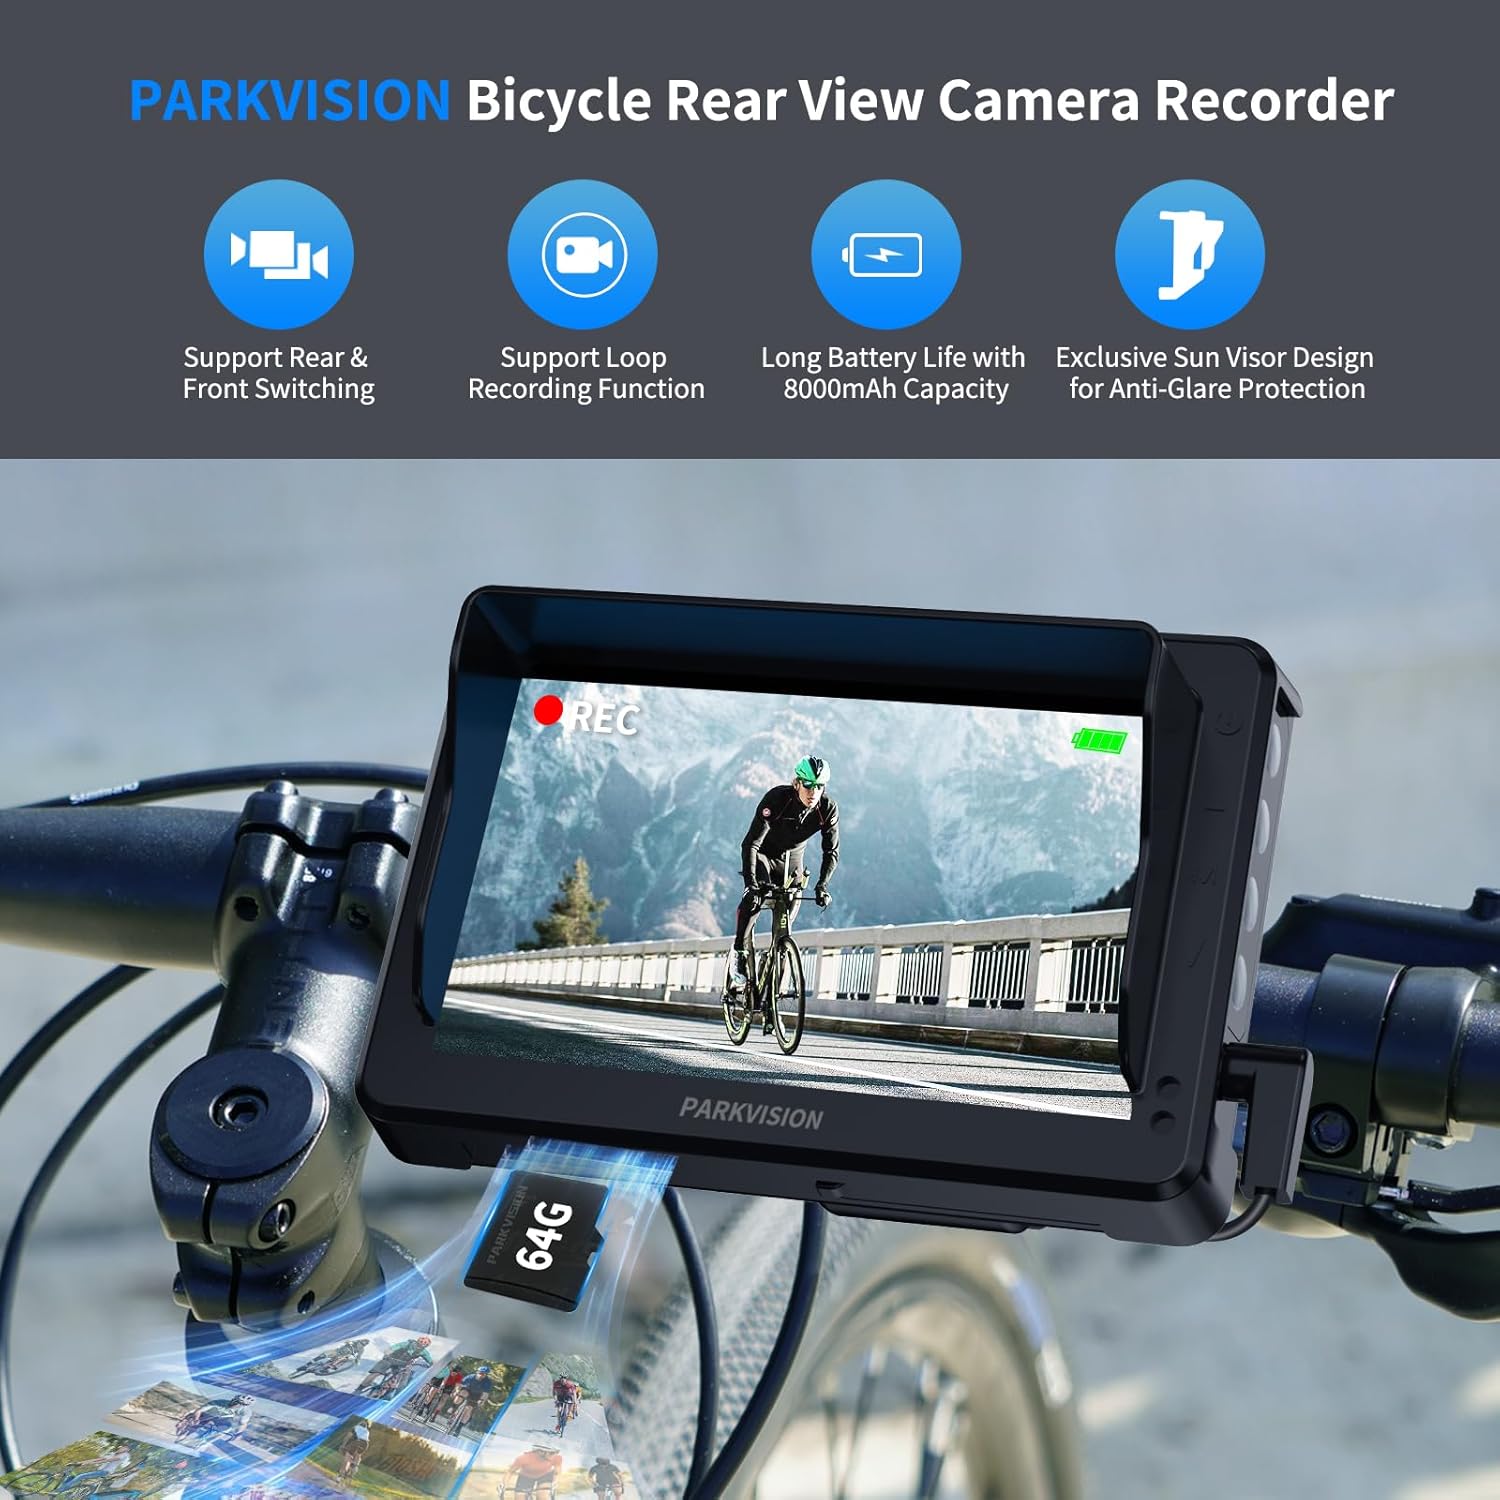
Image 1.1: PARKVISION BK-BR2 Bicycle Rear View Camera Recorder in use.
2. Key Features
- HD 1080P Camera & 4.3-inch Monitor: Provides clear, high-definition video with a 110° wide-angle view to eliminate blind spots. The 4.3-inch monitor offers optimal visibility.
- Loop Recording: Automatically overwrites the oldest files when the 64GB TF card (included) is full, ensuring continuous recording. Supports up to 128GB.
- Long-Lasting Battery: Equipped with an 8000mAh high-capacity battery, offering up to 9 hours of operation per charge with Type-C fast charging.
- All-Weather Protection: Features an IP68 waterproof housing and shockproof nylon stand for stable performance in rain or rough terrain.
- Switchable Front/Rear Monitoring: Allows switching between front view (road monitoring) and rear view (blind spot coverage) based on camera installation.
- Smart Auto-Dim: The monitor automatically adjusts brightness based on ambient light conditions for improved visibility day or night.
- Universal Compatibility & Easy Installation: Fits 17-38mm seatposts and 18-42mm handlebars. Features a 360° rotatable ball joint for optimal angle adjustment. Detachable display for anti-theft protection.
3. What's in the Box
Verify that all components are present in the package:
- 1 x 4.3-inch Monitor
- 1 x Camera
- 1 x Visor
- 1 x Display Connector
- 1 x Knob
- 1 x Gasket
- 1 x Instructions (this manual)
- Hook & Loop Tape
- 1 x Type-C Cable
- 1 x Display Stand
- 1 x 64GB TF Card
- Various mounting screws and zip ties

Image 3.1: Package contents.
4. Setup and Installation
The PARKVISION BK-BR2 system is designed for quick and tool-free installation. Follow these steps for proper setup:
- Mount the Camera: Attach the camera to your bicycle's seatpost (17-38mm) or handlebar (18-42mm) using the provided bracket. The 360° rotatable ball joint allows for optimal angle adjustment. Ensure the camera has a clear view of the area you wish to monitor.
- Mount the Monitor: Secure the 4.3-inch monitor to your handlebar using the appropriate clamp. The display is detachable for easy removal when leaving your bike unattended.
- Connect Components: Connect the camera to the monitor using the provided cable. Ensure connections are secure.
- Insert TF Card: Insert the included 64GB TF card into the designated slot on the monitor.
- Charge the Device: Before first use, fully charge the device using the Type-C charging cable.
Compatibility Notes: This system is compatible with mountain bikes, road bikes, e-bikes, scooters, and hybrids. It is not suitable for bicycles with luggage racks, flat and thick handlebars, flat and stout seatposts, or rear passenger seats higher than the seatpost.
Video 4.1: Unboxing and initial setup of the PARKVISION BK-BR2 system, demonstrating how to connect the camera and monitor.

Image 4.2: Examples of incompatible installations.
5. Operation
5.1 Power On/Off
To turn on the device, press and hold the power button located on the monitor. To turn off, press and hold the power button again.
5.2 Menu Navigation and Settings
Press the 'M' key on the monitor to enter the settings menu. Use the arrow buttons to navigate through options such as Display Set, Video Set, and Photo Set. Press 'M' again to confirm selections.
5.3 Off Screen Recording
The device features an 'Off Screen Recording' option to conserve battery life while still recording. To configure this:
- From the main screen, press the 'M' key to enter the settings menu.
- Navigate to 'Display Set' and select it.
- Choose 'Off Screen Recording' to enter its configuration.
- Select 'Off' if you do not want the screen to turn off automatically. Alternatively, choose 1min, 3min, or 5min for automatic screen-off after the selected duration.
- Press the 'M' key to confirm your setting.

Image 5.1: Configuring 'Off Screen Recording' settings.
5.4 Loop Recording
The system continuously records video. When the TF card is full, the oldest files are automatically overwritten to make space for new recordings. This ensures you always have the most recent footage available.
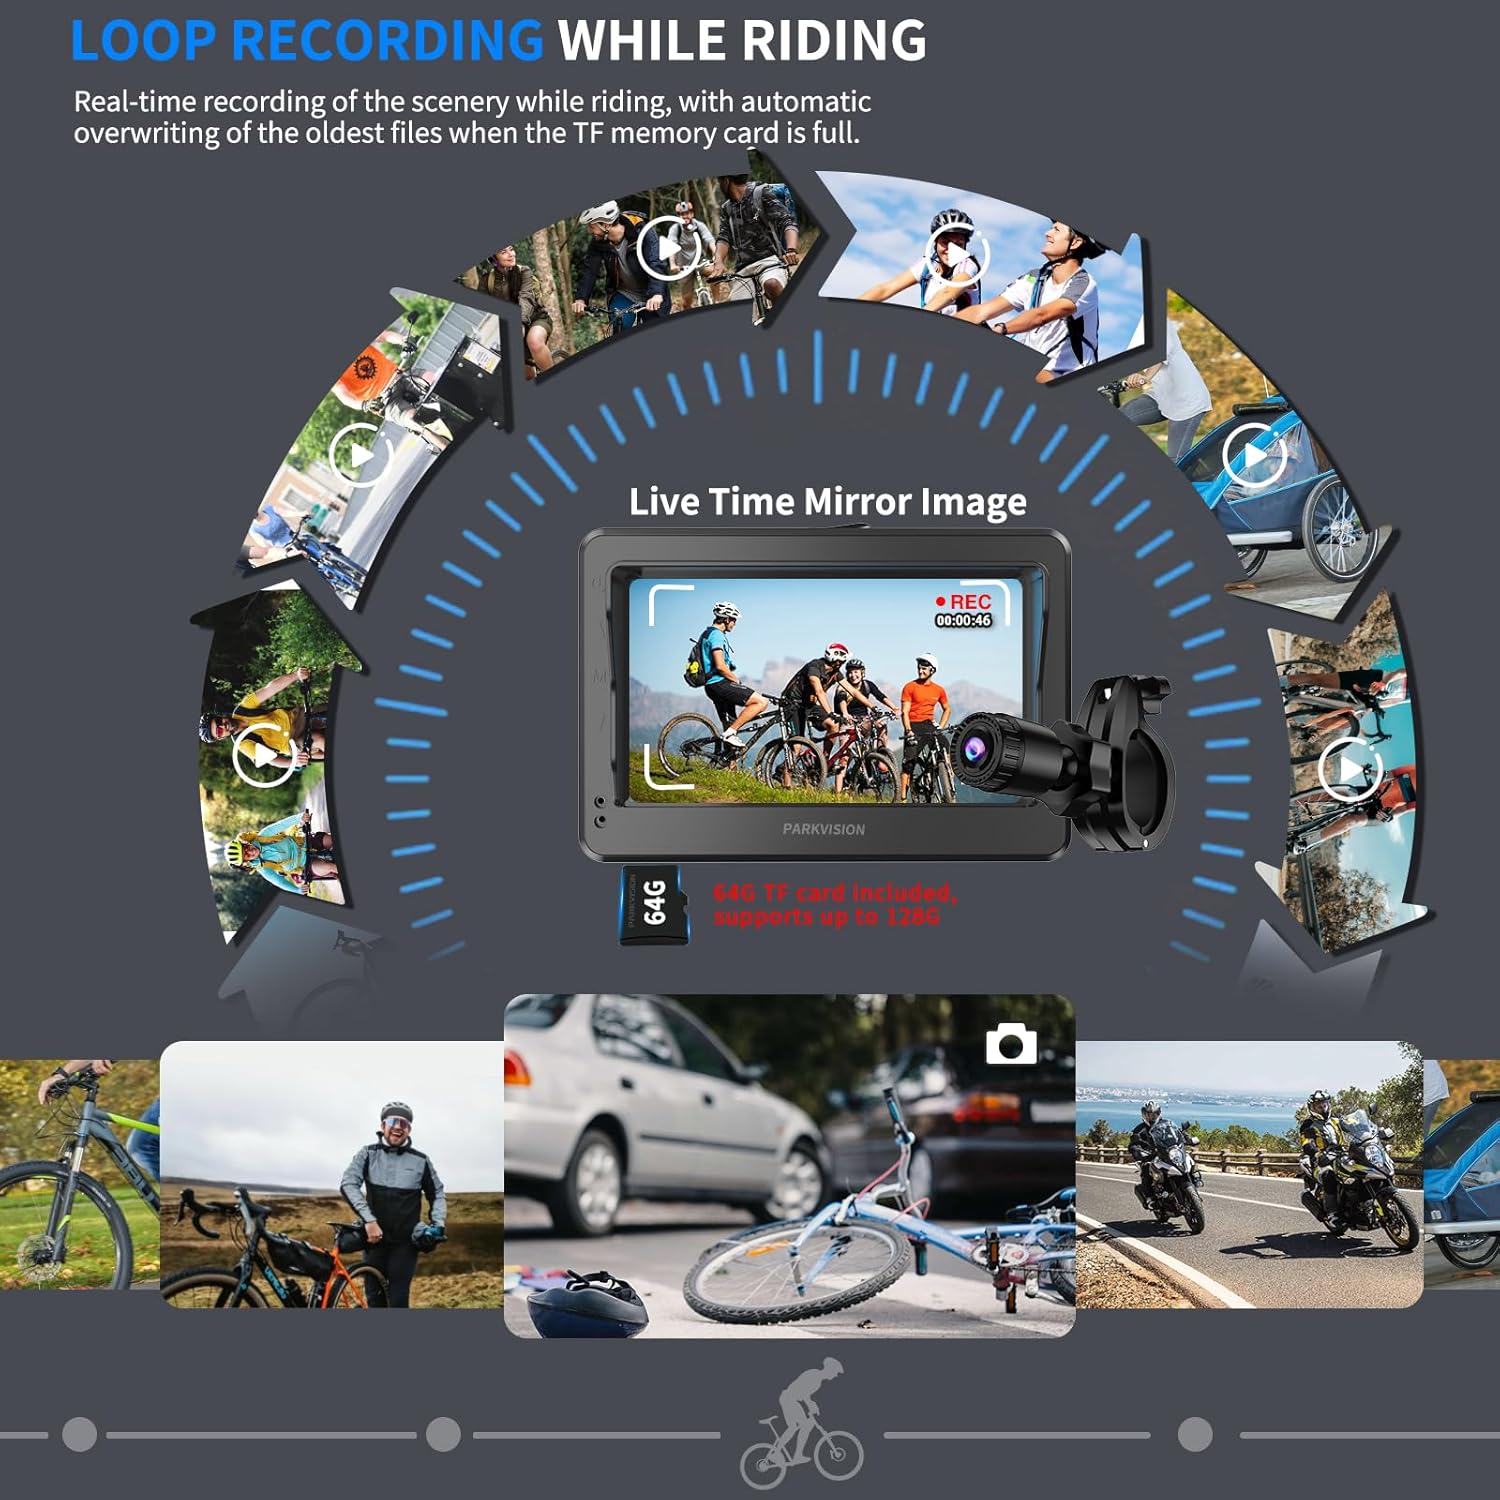
Image 5.2: Loop Recording in action.
5.5 Switching Front/Rear View
Depending on your camera's installation position, you can switch between front-facing and rear-facing views on the monitor. This allows for versatile monitoring of your surroundings.

Image 5.3: Positive & Mirror Adjustment Function.
5.6 Smart Auto-Dim & Night Vision
The monitor automatically adjusts its brightness to suit ambient light conditions, ensuring clear visibility during the day and preventing glare at night. The camera also provides enhanced night vision for safe riding in low-light environments.

Image 5.4: Super Night Vision capability.
Video 5.5: Demonstrates the auto-dimming screen and night vision capabilities of the camera system.
6. Maintenance
6.1 Charging the Battery
The device uses a Type-C port for charging. Connect the provided Type-C cable to the monitor and a suitable power source. The 8000mAh battery provides up to 9 hours of runtime.

Image 6.1: Battery capacity and charging information.
6.2 Weather Resistance
The camera and monitor are designed with IP68 waterproof housing, making them resistant to rain and dust. However, avoid prolonged submersion in water.
6.3 TF Card Management
The included 64GB TF card is pre-installed. For optimal performance, periodically back up important footage and format the card through the device's settings menu.
7. Troubleshooting
- Screen Turns Off During Recording: If the screen turns off while riding, check the "Off Screen Recording" setting in the Display Set menu. Ensure it is set to "Off" if you want the screen to remain on continuously.
- No Video Footage: Ensure the TF card is properly inserted and has sufficient space. Check that loop recording is enabled if you expect continuous recording.
- Poor Image Quality: Ensure the camera lens is clean and free from dirt or smudges. Check for any protective films that might still be on the screen or lens.
- Device Not Powering On: Ensure the battery is charged. Connect the device to a power source using the Type-C cable and try again.
8. Specifications
| Feature | Specification |
|---|---|
| Brand Name | PARKVISION |
| Item Model Number | 726597469074 |
| Screen Size | 4.3 Inches |
| Video Capture Resolution | 1080p |
| Photo Sensor Technology | CMOS |
| Flash Memory Type | Micro SD (64GB included, supports up to 128GB) |
| Video Capture Format | AVI |
| Supported Audio Format | Audio unsupported |
| Batteries | 1 Lithium Ion battery required (included) |
| Battery Capacity | 8000mAh |
| Special Features | Loop Recording, Smart Auto-Dim, IP68 Waterproof |
| Connectivity Technology | USB |
| Item Weight | 1.5 pounds |
| Product Dimensions | 3 x 7 x 5 inches |
9. Warranty and Support
For warranty information and technical support, please refer to the official PARKVISION website or contact their customer service directly. Keep your purchase receipt for warranty claims.


