1. Introduction
The upHere P10PARGB WT is a 1 to 9-port PWM and 5V Addressable ARGB Magnetic Fan Hub designed to centralize control of your PC case fans and RGB lighting. This hub simplifies cable management and provides synchronized lighting effects for custom PC builds. It features magnetic mounting for easy installation and is powered via a SATA connection for stable performance.

Image 1.1: The upHere P10PARGB WT Magnetic Fan Hub, a central unit for managing PC fan speed and ARGB lighting.
2. Package Contents
Please verify that all items listed below are included in your package:
- upHere P10PARGB WT Control Hub
- Remote Control
- SATA Power Supply Line
- M/B Lighting Sync Line
- PWM Signal Line
- User Manual (this document)

Image 2.1: Visual representation of the package contents, including the control hub, remote, and various connection cables.
3. Setup and Installation
3.1 Mounting the Hub
The upHere P10PARGB WT fan hub features a large magnetic back design, allowing for easy and flexible installation inside your PC case or on any iron surface. Simply place the hub in your desired location; the magnets will secure it.

Image 3.1: The magnetic back of the hub, illustrating how it can be easily attached to a metal surface within a PC case.
3.2 Connecting the Hub
Refer to the diagram below for proper connection of your fans, ARGB devices, and power supply.
- SATA Power Supply Cable: Connect the provided SATA power cable from your power supply unit (PSU) to the 'POWER IN' port on the hub. This provides power to the controller and connected devices.
- PWM Control Cable: Connect the PWM signal cable from the 'PWM IN' port on the hub to a CPU fan header or a dedicated fan header on your motherboard. This allows the motherboard to control fan speeds.
- Motherboard ARGB Sync Cable: If you wish to synchronize the hub's lighting with your motherboard's ARGB software, connect the M/B Sync cable from the 'M/B SYN' port on the hub to a 5V Addressable RGB header on your motherboard.
- Fans and ARGB Devices: Connect your PWM fans to the 'PWM1' through 'PWM9' ports and your 5V Addressable ARGB devices to the 'ARGB1' through 'ARGB9' ports. Ensure correct orientation for ARGB connectors (usually indicated by an arrow).
- Lighting Switch Interface (Optional): If not using motherboard sync, you can connect a case reset button or a dedicated lighting switch to the 'RESET' port to cycle through lighting effects.
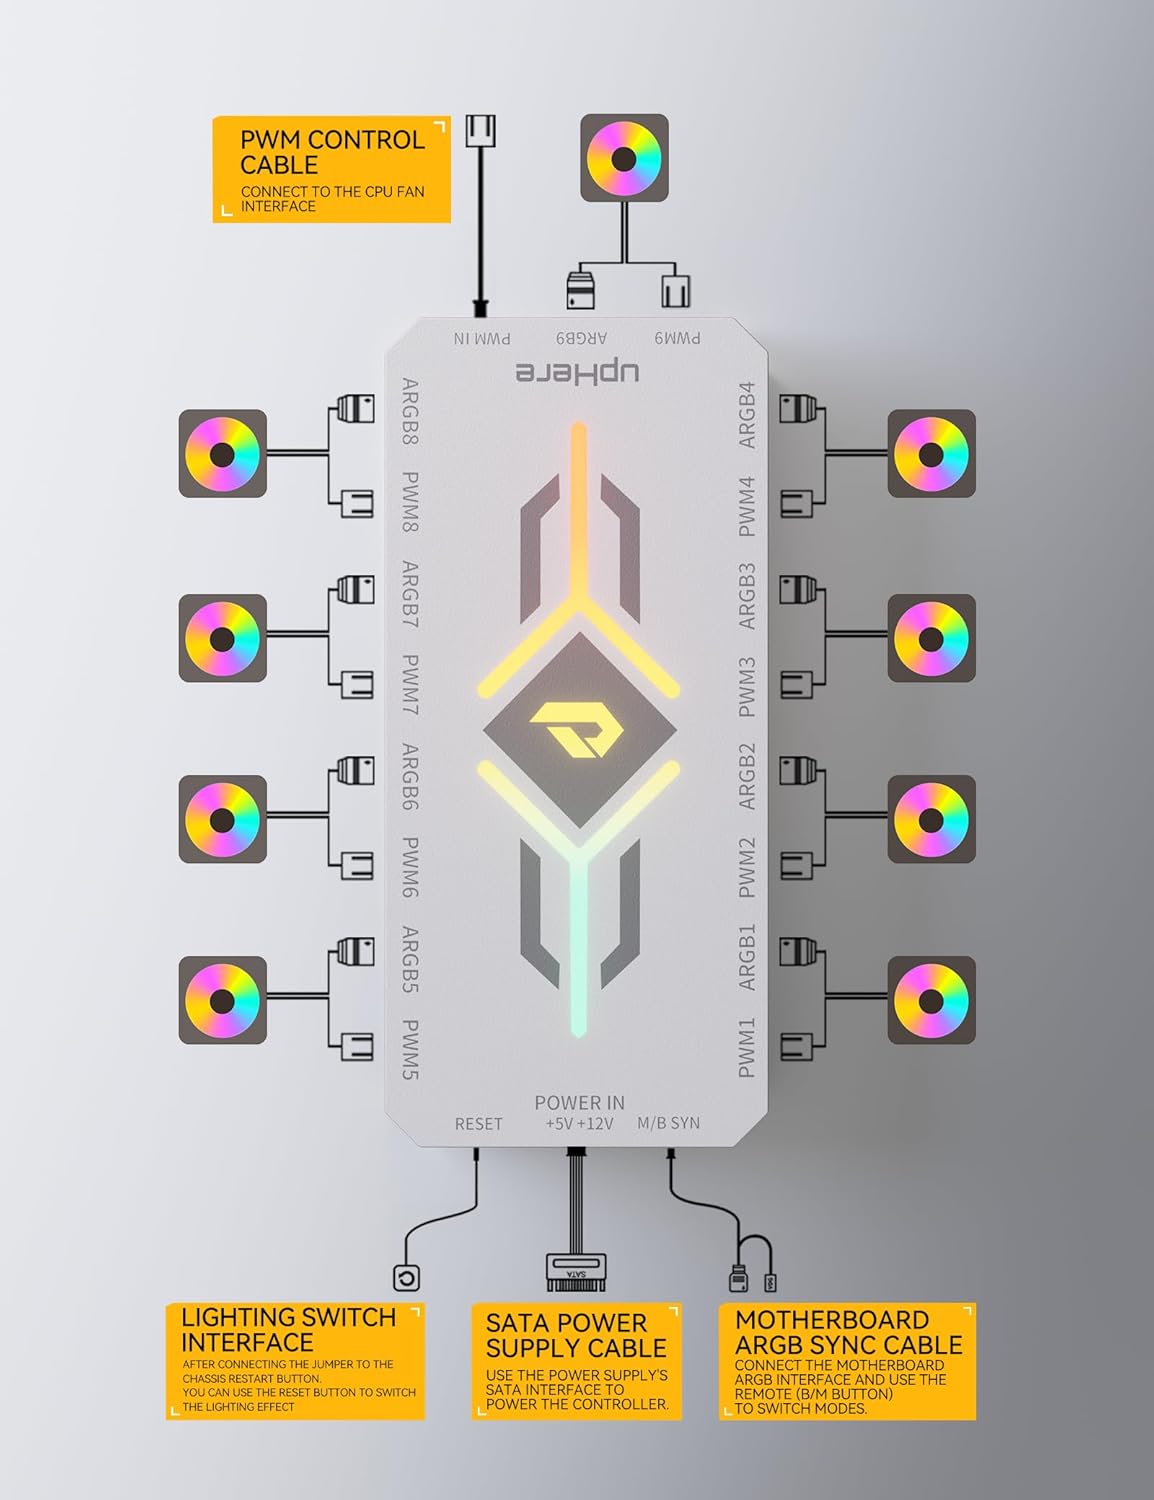
Image 3.2: Detailed diagram showing all connection points on the upHere fan hub, including PWM, ARGB, SATA power, and motherboard sync.
4. Operating Instructions
4.1 Remote Control Functions
The included remote control allows for easy adjustment of fan speed and ARGB lighting effects. Ensure the remote has a working CR2 battery (included).

Image 4.1: Diagram illustrating the buttons and functions of the P10PARGB remote control.
- ON/OFF: Powers the lighting effects on or off.
- M/B Sync: Toggles between motherboard ARGB control and remote control.
- MODE: Cycles through various lighting effects.
- LIGHTING EFFECT SWITCH: Changes the specific lighting pattern within a mode.
- LIGHT BRIGHTNESS ADJUSTMENT (+/-): Increases or decreases the brightness of the ARGB lighting.
- LIGHT SPEED CHANGE (+/-): Adjusts the speed of dynamic lighting effects.
- FAN SPEED ADJUSTMENT (+/-): Increases or decreases the fan speed.
- AUTO: Activates automatic cycle mode for lighting effects.
- M1-M4: Preset lighting modes (e.g., Full-Color Running, Colorful Gradient, Colorful Breathing, Colorful Flowing Water).
- FIXED MONOCHROME MODE (Color Buttons): Selects a solid color for the ARGB lighting.
4.2 Adjusting Fan Speed and Lighting
The hub supports five levels of light brightness adjustment and four levels of fan speed adjustment, providing flexible control over your system's aesthetics and cooling performance.

Image 4.2: Visual representation of the four fan speed settings (Stop, Slow, Medium, Fast) and five light brightness levels (20% to 100%).
- Fan Speed: Use the 'FAN' button and '+' / '-' buttons on the remote to cycle through Stop, Slow, Medium, and Fast fan speeds.
- Light Brightness: Use the 'LIGHT BRIGHTNESS ADJUSTMENT' buttons on the remote to select brightness levels from 20% to 100%.
5. Maintenance
To ensure optimal performance and longevity of your upHere fan hub:
- Keep the hub and connected components free from dust. Use compressed air for cleaning.
- Ensure all cables are securely connected. Loose connections can lead to intermittent functionality.
- Avoid exposing the hub to extreme temperatures or humidity.
- Do not attempt to disassemble the hub, as this may void the warranty.
6. Troubleshooting
If you encounter issues with your upHere fan hub, consider the following troubleshooting steps:
- No Power/Fans Not Spinning:
- Check if the SATA power cable is securely connected to both the hub and the PSU.
- Ensure your PSU is providing power.
- ARGB Lighting Not Working/Incorrect Colors:
- Verify that ARGB devices are correctly connected to the 'ARGB' ports on the hub, paying attention to the 5V orientation.
- If using motherboard sync, ensure the 'M/B SYN' cable is connected to a 5V ARGB header (not 12V RGB) and that the remote is set to M/B Sync mode.
- If using the remote, ensure the remote's battery is functional and try cycling through modes.
- Check your motherboard's ARGB software settings if using motherboard sync.
- Fan Speed Not Adjustable:
- Ensure the PWM control cable is connected from the hub to a functional PWM fan header on your motherboard.
- If using the remote, ensure it is not in M/B Sync mode and try adjusting fan speed using the dedicated buttons.
- Check your motherboard's BIOS/UEFI settings for fan control.
- Remote Control Not Responding:
- Replace the CR2 battery in the remote control.
- Ensure there are no obstructions between the remote and the hub.
7. Specifications
| Feature | Specification |
|---|---|
| Model | P10PARGB WT |
| Brand | upHere |
| Voltage | 5 Volts (DC) |
| Wattage | 5 Watts |
| Material | Plastic |
| Number of PWM Ports | 9 |
| Number of ARGB Ports | 9 |
| Power Connector | SATA |
| Control Method | Remote Control, Motherboard ARGB Sync |
| Mounting | Magnetic |
| Remote Battery Type | 1 CR2 battery (included) |
| Item Weight | 109 g |
| Package Dimensions | 15.19 x 7.9 x 3.2 cm |
8. Warranty and Support
For warranty information and technical support, please refer to the official upHere website or contact their customer service. Keep your purchase receipt for warranty claims.