1. Important Safety Information
Welding operations involve significant risks. Always prioritize safety to prevent injury or damage. Read and understand all safety warnings and instructions before operating the ARCCAPTAIN 250A MIG Welder and using the welding pliers.
- Electric Shock: Can kill. Ensure proper grounding. Do not touch live electrical parts. Wear dry welding gloves.
- Fumes and Gases: Can be hazardous to your health. Work in a well-ventilated area. Use fume extractors if necessary.
- Arc Rays: Can injure eyes and burn skin. Wear a welding helmet with appropriate shade filter. Protect exposed skin with flame-resistant clothing.
- Fire and Explosion: Welding sparks and hot metal can cause fires. Keep flammable materials away from the welding area. Have a fire extinguisher readily available.
- Hot Parts: Can cause severe burns. Allow equipment to cool before handling.
- Noise: Excessive noise can damage hearing. Wear hearing protection.
Consult local safety regulations and standards for additional requirements.
2. Product Overview and Features
The ARCCAPTAIN 250A MIG Welder is a versatile 6-in-1 welding machine designed for various applications, from home DIY to professional automotive and engineering tasks. It offers multiple welding processes and advanced digital controls for enhanced performance and ease of use. The included professional welding pliers are an essential tool for welding preparation and maintenance.

Image 2.1: The ARCCAPTAIN 250A MIG Welder and accompanying professional welding pliers. The welder is red and black with a digital display, and the pliers have red handles.
2.1. Key Features of the 250A MIG Welder
- 6-in-1 Welding Capability: Supports Gas MIG, Flux Core MIG, Lift TIG, MMA (Stick), Spot Welding, and Spool Gun welding (Spool gun and Lift TIG torch sold separately).
- Digital Control System: Features a fully digital MCU and high-integrity circuit design for improved welding stability and performance.
- Synergic & Manual MIG Modes:
- Synergic Mode: Automatically recommends current and wire feed speed based on selected wire diameter and material/gas type, ideal for beginners.
- Manual Mode: Allows for custom settings, suitable for experienced welders.
- Advanced Welding Functions: Includes adaptive crater, burn-back adjustment, and pre-flow/post-flow settings for optimized welding results.
- Material Compatibility: Suitable for welding mild steel, carbon steel, stainless steel, and aluminum.
- Efficient Cooling: Intelligent fan system speeds up heat dissipation, extending machine lifespan.

Image 2.2: A collage illustrating the six welding processes: Gas MIG, Flux Core MIG, MMA, Lift TIG, Spool Gun, and Spot Welding, highlighting the versatility of the ARCCAPTAIN 250A MIG Welder.
2.2. Features of the Professional Welding Pliers
The included ARCCAPTAIN welding pliers are a multi-functional tool designed to simplify various tasks associated with welding.
- Tough Nose Design: Effectively removes welding spatter and is easy to clean.
- Sharp Cutting Edge: Induction-hardened for efficient wire drawing and cutting.
- Spring-Loaded Handle: Provides ease of use and reduces hand fatigue.
- Anti-slip Handle: Ensures a comfortable and secure grip.
- Multi-functional: Ideal for wire cutting, tip removal and installation, nozzle removal and installation, inner and outer nozzle cleaning, fluted tips for wire drawing, hammering, and more.
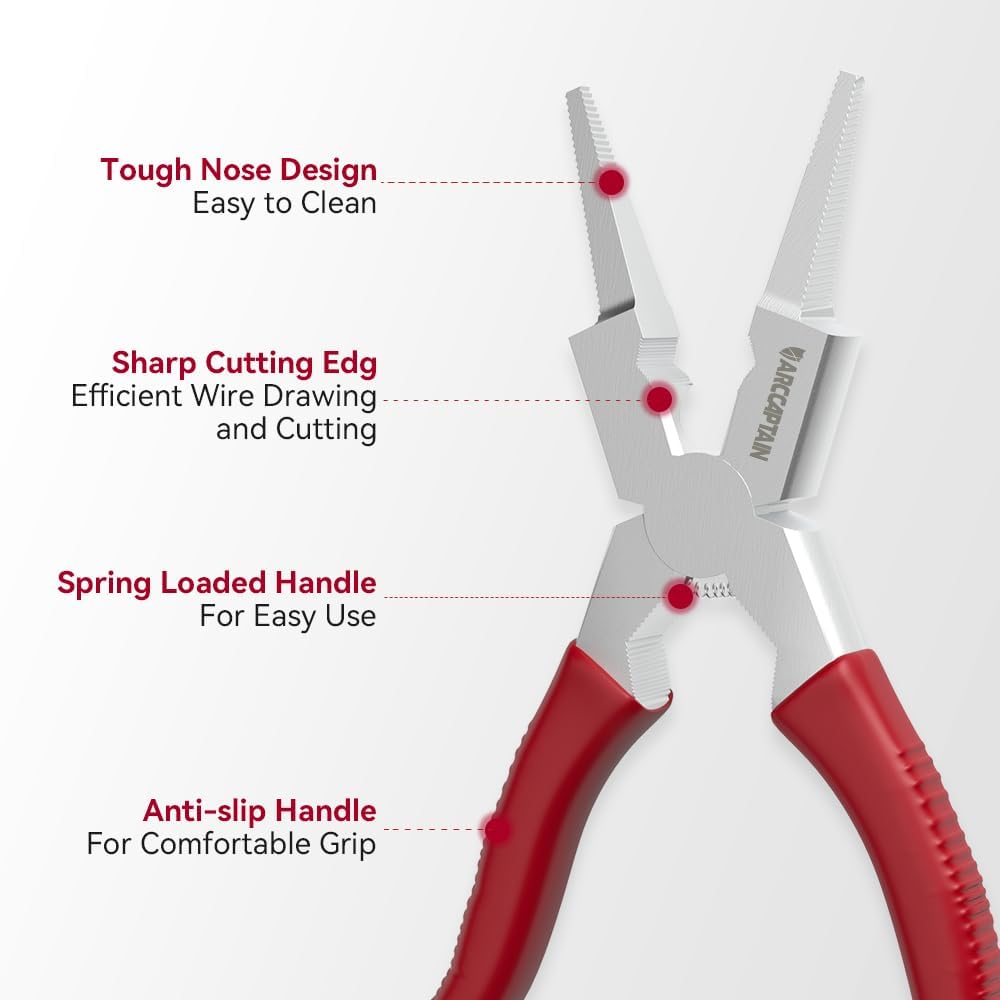
Image 2.3: An illustration detailing the features of the ARCCAPTAIN welding pliers, including its tough nose design, sharp cutting edge, spring-loaded handle, and anti-slip handle for comfortable grip.
3. Setup Instructions
3.1. Welder Setup
- Unpacking: Carefully remove the welder and all accessories from the packaging. Inspect for any shipping damage.
- Placement: Position the welder on a stable, level surface in a well-ventilated area, away from flammable materials. Ensure adequate clearance for cooling air circulation.
- Power Connection: Connect the welder to an appropriate power supply. Verify that the voltage and current ratings match the welder's requirements. Use a properly grounded outlet.
- Ground Clamp Connection: Attach the ground clamp cable to the designated terminal on the welder. Securely connect the ground clamp to the workpiece or welding table, ensuring good electrical contact.
- MIG Torch Connection: Connect the MIG torch to the appropriate connector on the front panel of the welder. Ensure it is securely fastened.
- Wire Spool Installation: Open the wire feed compartment. Install the welding wire spool onto the spindle, ensuring it rotates freely. Thread the wire through the guide and into the drive rollers. Adjust the drive roller tension according to the wire type and diameter.
- Gas Cylinder Connection (for Gas MIG): If performing Gas MIG welding, connect the gas hose from the welder to a suitable shielding gas cylinder (e.g., Argon, CO2, or Argon/CO2 mix) via a regulator. Ensure all connections are leak-free.
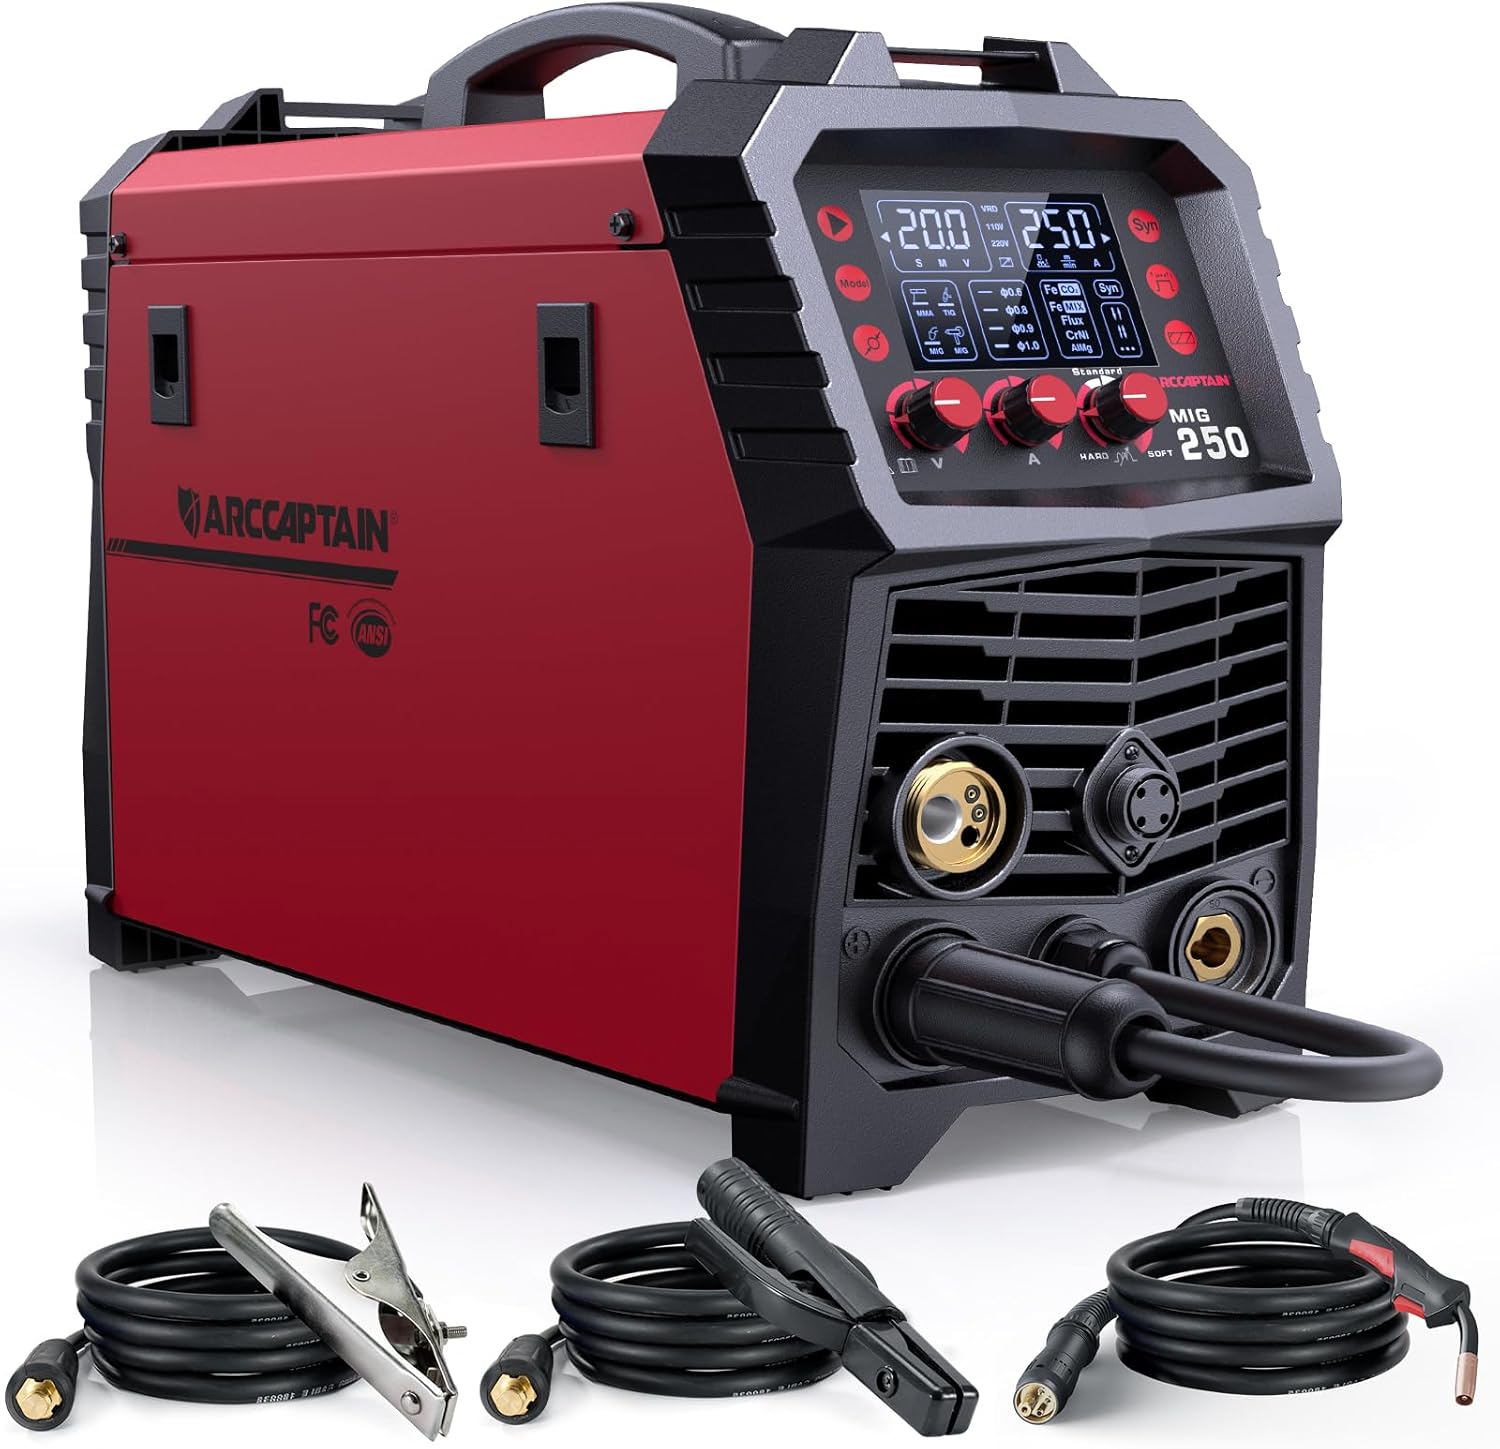
Image 3.1: The ARCCAPTAIN 250A MIG Welder shown with its primary accessories, including the ground clamp, electrode holder, and MIG torch, ready for connection.
3.2. Welding Pliers Usage
The ARCCAPTAIN welding pliers are ready for immediate use. They are designed for various tasks:
- Nozzle Removal/Installation: Use the pliers to grip and twist the MIG nozzle for removal or installation.
- Contact Tip Removal/Installation: The pliers can securely hold and twist contact tips.
- Wire Cutting: Use the sharp cutting edge to trim welding wire to the desired length.
- Spatter Removal: The tough nose design helps scrape away spatter from the nozzle.
- Wire Drawing: The fluted tips can assist in pulling welding wire.

Image 3.2: A series of close-up images demonstrating the ARCCAPTAIN welding pliers performing various functions, including cutting wire, removing a contact tip, cleaning a nozzle, and drawing wire.
4. Operating Instructions
The ARCCAPTAIN 250A MIG Welder offers multiple welding modes. Select the appropriate mode for your application.
4.1. General Operation Steps
- Power On: Turn on the main power switch of the welder. The digital display will illuminate.
- Select Welding Mode: Use the mode selection button to choose between Gas MIG, Flux Core MIG, Lift TIG, MMA, Spot, or Spool Gun.
- Adjust Parameters:
- Synergic MIG: Press the "SYN" button. Select the welding wire diameter and the gas/material type. The machine will automatically suggest optimal voltage and wire feed speed. You can fine-tune these settings if desired.
- Manual MIG/Other Modes: Manually adjust voltage, wire feed speed (for MIG), or amperage (for TIG/MMA) using the control knobs. Refer to welding charts for recommended settings based on material thickness and type.
- Prepare Workpiece: Ensure the workpiece is clean, free of rust, paint, and grease. Secure the ground clamp firmly to the workpiece.
- Begin Welding: Put on all personal protective equipment (welding helmet, gloves, protective clothing). Initiate the arc according to the selected welding process.

Image 4.1: The digital display of the ARCCAPTAIN 250A MIG Welder illustrating the steps for Synergic MIG welding: pressing "SYN", choosing wire diameter, and selecting gas/material, with automatic parameter matching.
4.2. Specific Welding Modes
- Gas MIG Welding: Requires a shielding gas (e.g., CO2, Argon/CO2 mix) to protect the weld puddle from atmospheric contamination. Ensure gas flow is set correctly.
- Flux Core MIG Welding: Uses flux-cored wire, which produces its own shielding gas, eliminating the need for an external gas cylinder. Ideal for outdoor welding or thicker materials.
- Lift TIG Welding: (Requires optional Lift TIG torch). Provides precise control for high-quality welds. Initiate the arc by gently touching the tungsten electrode to the workpiece and lifting slightly.
- MMA (Stick) Welding: Uses coated electrodes. Select appropriate electrode type and size. Adjust amperage based on electrode and material thickness.
- Spot Welding: For joining two overlapping pieces of sheet metal. Consult the manual for specific settings and technique.
- Spool Gun Welding: (Requires optional spool gun). Primarily used for welding softer wires like aluminum, as it minimizes wire feeding issues over long distances.

Image 4.2: A welder using the ARCCAPTAIN 250A MIG Welder with an attached spool gun to perform aluminum welding. The spool gun is highlighted, indicating it needs to be purchased separately.
5. Maintenance
Regular maintenance ensures the longevity and optimal performance of your ARCCAPTAIN welding equipment.
- Daily/After Each Use:
- Clean the MIG torch nozzle and contact tip using the welding pliers to remove spatter.
- Inspect cables and connections for damage or wear.
- Wipe down the welder exterior to remove dust and debris.
- Weekly/Monthly:
- Check wire feed rollers for wear and cleanliness. Clean any accumulated debris.
- Inspect the gas hose and regulator for leaks (if applicable).
- Ensure cooling fan vents are clear of obstructions.
- General:
- Store the welder in a dry, clean environment when not in use.
- Replace worn or damaged parts promptly.
- Do not attempt internal repairs unless qualified. Refer to authorized service personnel.
6. Troubleshooting
This section provides solutions to common issues you might encounter. For problems not listed here, contact ARCCAPTAIN customer support.
| Problem | Possible Cause | Solution |
|---|---|---|
| No power to welder | Power cord unplugged, circuit breaker tripped, faulty power switch. | Check power cord connection. Reset circuit breaker. Contact service if switch is faulty. |
| No arc/Poor arc starting | Poor ground connection, incorrect settings, worn contact tip, wire feed issue. | Ensure ground clamp is secure. Verify voltage/amperage settings. Replace contact tip. Check wire feed path. |
| Inconsistent wire feed | Incorrect drive roller tension, clogged liner, wrong size drive rollers, tangled wire. | Adjust drive roller tension. Clean or replace liner. Ensure correct drive rollers are installed. Untangle wire spool. |
| Excessive spatter | Incorrect voltage/wire feed speed, dirty workpiece, wrong shielding gas. | Adjust settings. Clean workpiece thoroughly. Verify correct shielding gas and flow rate. |
| Welder overheats | Exceeding duty cycle, blocked cooling vents, high ambient temperature. | Allow welder to cool down. Clear cooling vents. Work in a cooler environment if possible. |
7. Specifications
The following are general specifications for the ARCCAPTAIN 250A MIG Welder. Specific performance may vary based on operating conditions and accessories used.
- Model: ARCCAPTAIN 250A MIG Welder
- Input Voltage: 220V (Refer to product label for full range)
- Output Current: Up to 250 Amps
- Welding Processes: Gas MIG, Flux Core MIG, Lift TIG, MMA, Spot, Spool Gun
- Material Compatibility: Mild Steel, Carbon Steel, Stainless Steel, Aluminum
- Pliers Dimensions: Approximately 200mm (7.87") length, 50mm (1.96") jaw width, 125mm (4.92") handle length.

Image 7.1: A diagram illustrating the key dimensions of the ARCCAPTAIN Professional Welding Pliers, including overall length, jaw width, and handle length.
8. Warranty and Support
ARCCAPTAIN products are manufactured to high-quality standards. For warranty information, technical support, or service inquiries, please refer to the warranty card included with your product or visit the official ARCCAPTAIN website. Please have your product model and serial number ready when contacting support.
Refer to the warranty card or product packaging for specific contact information.