
1. Introduction
The Fluidmaster PRO820UK Mechanical Dual Flush Valve is designed for use in top-button activated cisterns with a 2-inch outlet. This valve is engineered to provide efficient water usage through adjustable full and partial flush volumes. Its design facilitates straightforward installation and maintenance, making it suitable for both professional and DIY applications.
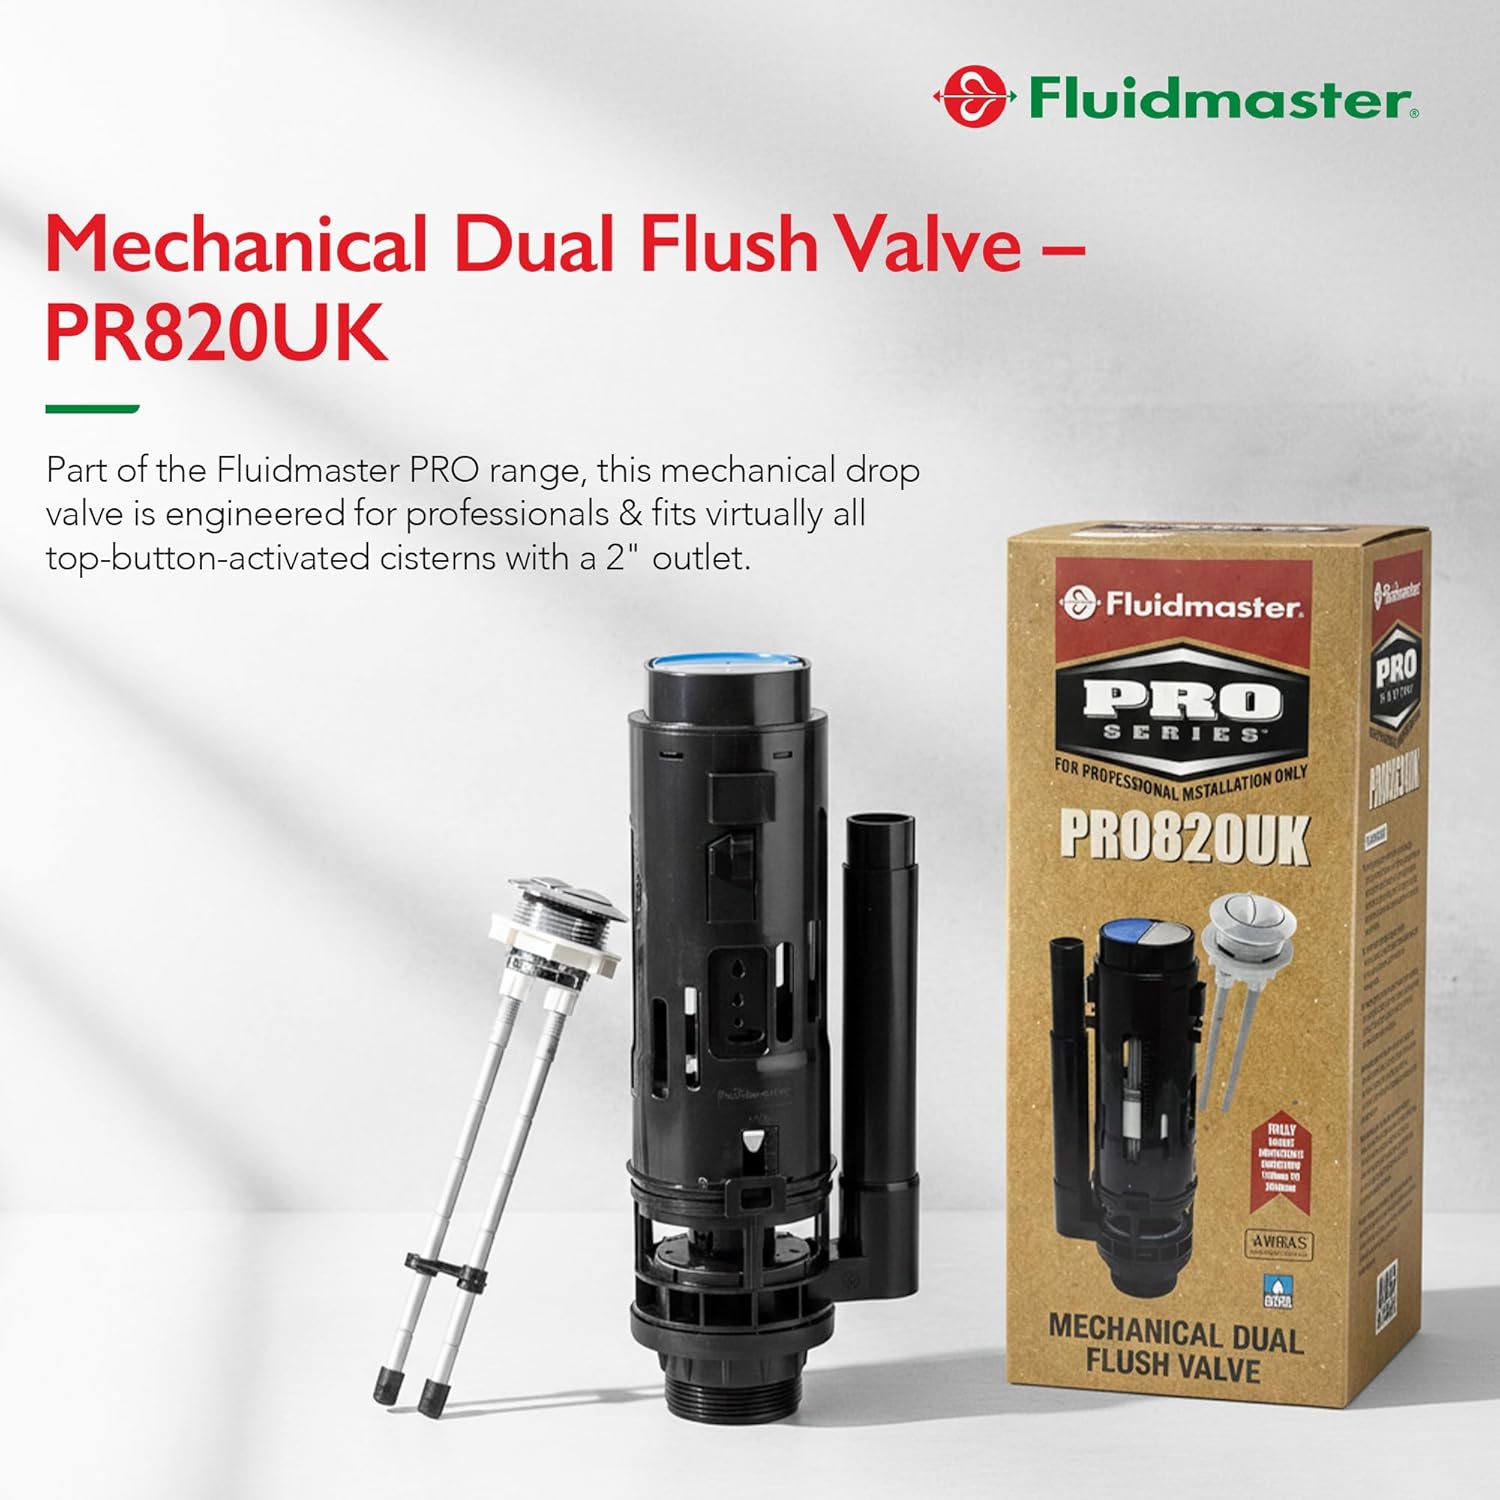
Image 1: Fluidmaster PRO820UK Mechanical Dual Flush Valve with its packaging.
2. Product Features
- Dual Flush Mechanism: Offers both full and partial flush options for water conservation.
- Adjustable Flush Volumes: Sliders allow fine-tuning of full and partial flush volumes.
- Universal Compatibility: Fits most top-button activated, close-coupled cisterns with a standard 2-inch outlet and 40mm cistern hole.
- Easy Maintenance: Twist-and-release function enables quick removal for servicing.
- Adjustable Overflow: Overflow pipe is adjustable from 170mm to 250mm.
- Trimmable Rods: Flush button rods can be trimmed to fit various cistern heights.
- Durable Construction: Features a high-quality chrome dual flush button and a long-lasting silicone seal.

Image 2: Key features of the Fluidmaster PRO820UK valve, including high performance 2" outlet, easy rod length adjustment, durable silicone seal, suitability for standard 40mm cistern holes, and twist & release for maintenance.
3. Installation Guide
3.1. Preparation
- Turn off the water supply to the toilet.
- Flush the toilet to drain the cistern.
- Disconnect the water supply line from the fill valve.
3.2. Step 1: Remove Existing Flush Valve
- Lift the tank lid and disconnect the cistern from the toilet bowl to expose the flush valve and water connections.
- Remove the large nut and washer from the bottom of the cistern.
- Carefully lift out the old flush valve, ensuring no parts remain inside the cistern that could interfere with the new installation.

Image 3: Steps 1-3 for removing the existing flush valve. This involves lifting the tank lid, disconnecting the cistern, removing the nut and washer, and lifting out the old valve.
3.3. Step 2: Install New Valve and Adjust
- Place the new flush valve into the cistern with the overflow pipe positioned opposite the inlet valve.
- Set the full flush (grey) and half flush (blue) sliders to their lowest point for initial setup. Fine-tune these later if smaller flush volumes are desired. Ensure the blue float is equal to or higher than the grey float for proper operation.
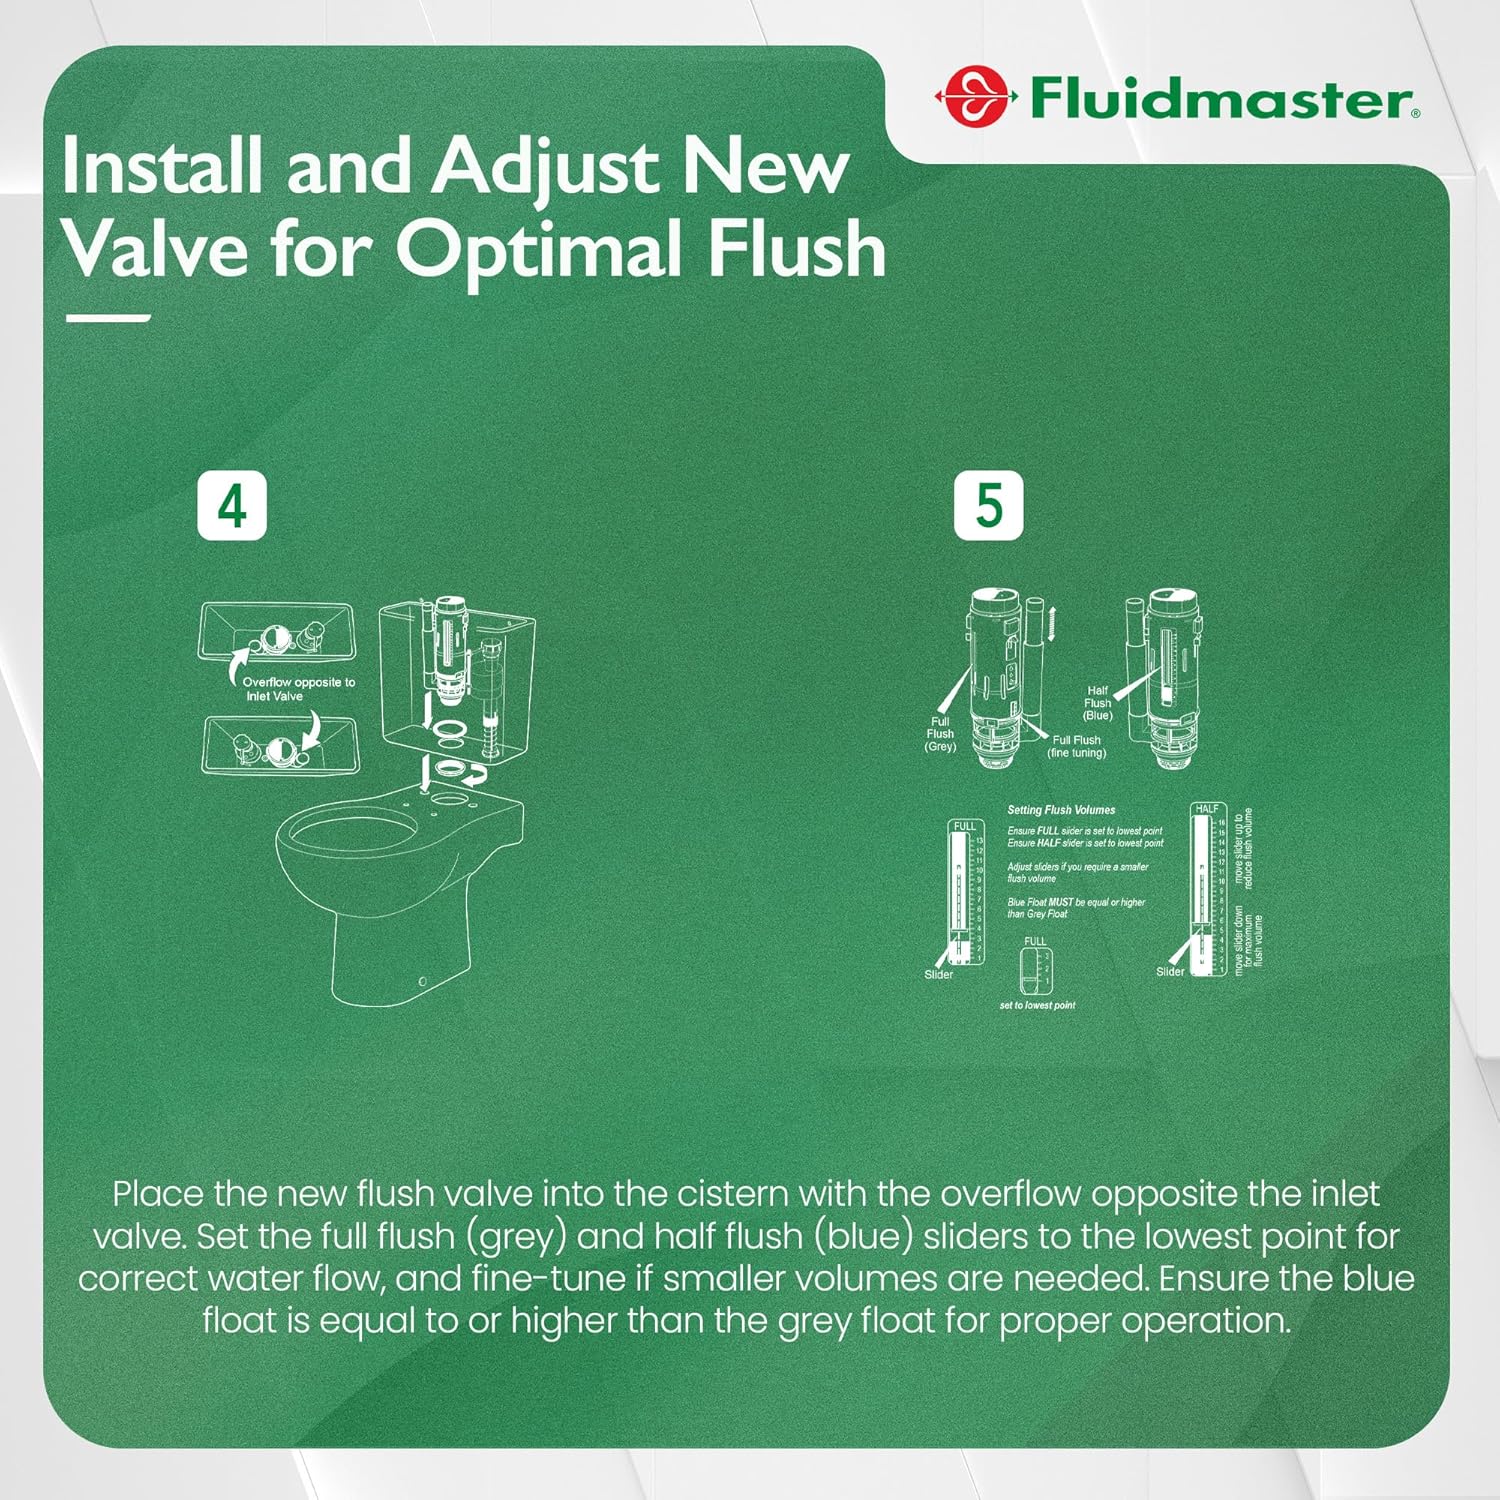
Image 4: Steps 4-5 for installing the new valve and making initial adjustments to the flush volume sliders.
3.4. Step 3: Reattach Cistern
- Secure the cistern back onto the toilet bowl using the provided bolts and gaskets.
- Turn on the water supply and set the water line. Adjust the flush valve overflow so it sits 25-32mm above the water line.
- Position and adjust the dual-flush button rods by twisting them in or out to achieve the correct height and ensure proper engagement with the valve mechanism.
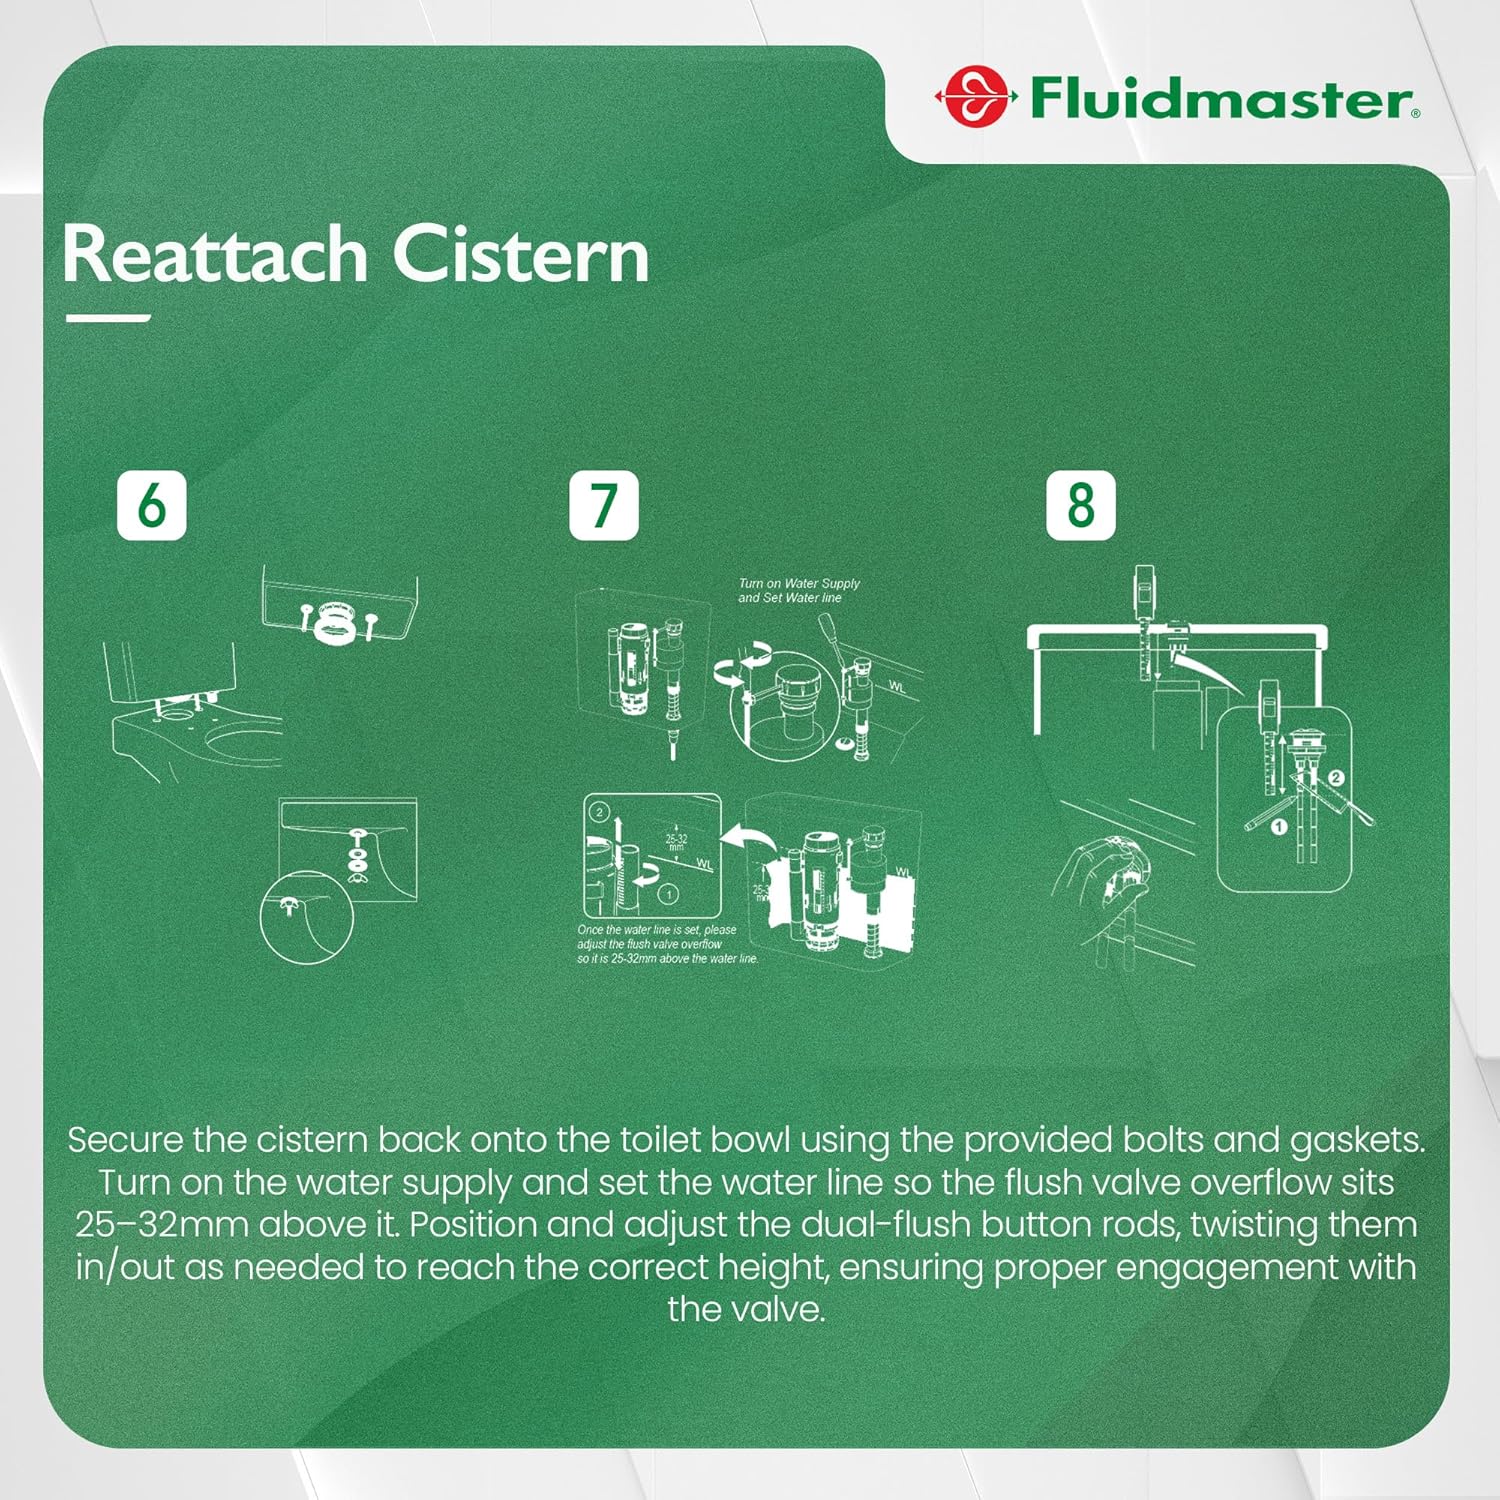
Image 5: Steps 6-8 for reattaching the cistern, adjusting the water level, and setting the flush button rods.
3.5. Step 4: Align Flush Mechanism
- Check the alignment of the flush button rods carefully.
- Ensure both the full flush (larger button side) and short flush (smaller button side) engage correctly for smooth and reliable operation.

Image 6: Steps 9-10 for aligning the flush mechanism, ensuring correct engagement of full and short flush buttons.
4. Operating Instructions
The Fluidmaster PRO820UK features a dual flush system to optimize water usage:
- Full Flush: Press the larger section of the flush button for a complete cistern emptying, suitable for solid waste.
- Partial Flush: Press the smaller section of the flush button for a reduced water flush, suitable for liquid waste.
Adjusting Flush Volumes: The valve includes adjustable sliders (grey for full flush, blue for partial flush) that allow you to fine-tune the amount of water used for each flush. Move the sliders up or down to increase or decrease the water volume as needed for your toilet's performance and water efficiency goals.
5. Maintenance
Regular maintenance ensures the longevity and optimal performance of your flush valve.
- Cleaning: Periodically inspect the valve for mineral buildup or debris. The twist-and-release function allows for easy removal of the valve from the cistern base for cleaning. Use a mild cleaner and soft brush.
- Seal Inspection: Check the silicone seal at the base of the valve for any signs of wear, cracking, or damage. A worn seal can lead to leaks. Replace the seal if necessary.
- Rod Adjustment: If flush buttons become stiff or unresponsive, check the alignment and length of the button rods.
6. Troubleshooting
If you encounter issues with your Fluidmaster PRO820UK flush valve, consider the following common problems and solutions:
- Continuous Running Water: This often indicates a problem with the seal or the flush valve not seating correctly. Check for debris under the seal or ensure the valve is properly aligned and secured.
- Incomplete Flush: Verify that the flush volume sliders are set appropriately. Adjust them to increase the water volume if the flush is insufficient. Also, check for any obstructions preventing the valve from opening fully.
- Stiff or Non-Responsive Flush Button: Ensure the flush button rods are correctly adjusted and not binding. They should move freely without excessive friction.
- Leaks from Cistern Base: This typically points to an issue with the main seal at the bottom of the cistern. Ensure the large nut is tightened securely (do not overtighten) and the washer is correctly positioned and undamaged.
For persistent issues, contact Fluidmaster customer support.
7. Specifications
| Specification | Detail |
|---|---|
| Model Number | PRO820UK |
| Valve Type | Mechanical Dual Flush Valve |
| Material | Gummi (Rubber), Chrome, Silicone |
| Item Dimensions (L x W x H) | 3.15 x 4.72 x 8.27 inches |
| Inlet Connection Size | 2 Inches |
| Outlet Connection Size | 2 Inches |
| Cistern Hole Compatibility | Standard 40mm |
8. Warranty and Support
Fluidmaster products are manufactured to high standards and are typically covered by a manufacturer's warranty against defects in materials and workmanship. Please refer to the warranty information provided with your purchase or visit the official Fluidmaster website for specific details regarding warranty terms and conditions.
For technical assistance, troubleshooting, or to inquire about replacement parts, please contact Fluidmaster customer support. You can find contact information on the Fluidmaster official website or through their brand store: