1. Introduction
Thank you for choosing the Hodozzy 1 Din Car Stereo, Model 1511W. This device features a 10.4-inch adjustable touch screen, offering seamless integration with Wireless Carplay and Android Auto. It includes Bluetooth 5.2, FM/RDS radio, and supports a rearview camera for enhanced driving safety. This manual provides essential information for installation, operation, maintenance, and troubleshooting to ensure optimal performance and user experience.
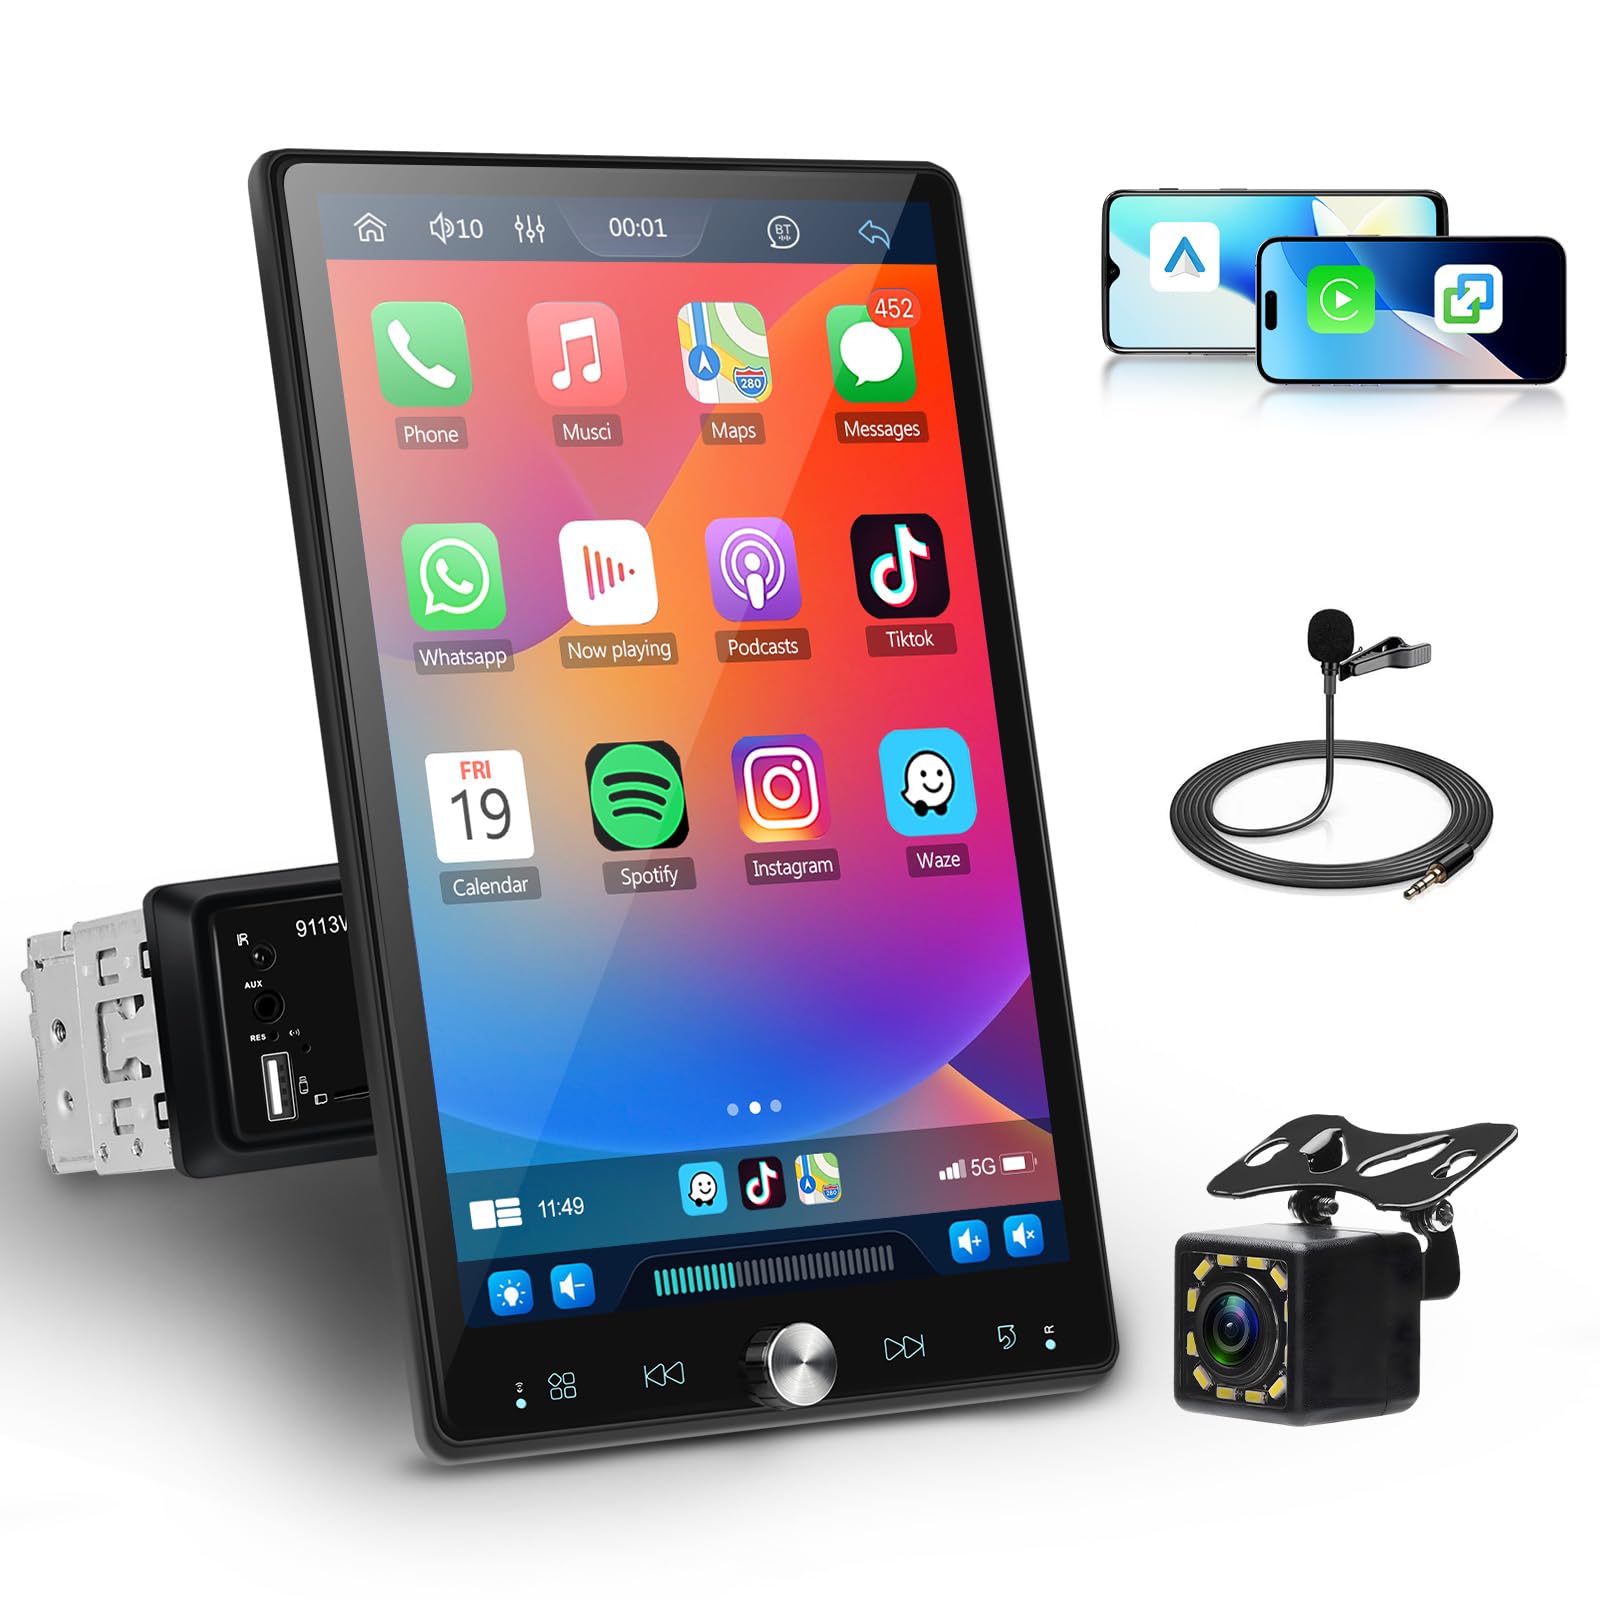
Figure 1.1: Hodozzy 1 Din Car Stereo, Model 1511W.
2. Safety Information
- Professional Installation Recommended: Due to the complexity of car electrical systems, professional installation is highly recommended to prevent damage to the unit or your vehicle.
- Power Supply: Ensure the unit is connected to a DC12V power supply. Incorrect voltage can cause damage.
- Operating Temperature: The device is designed to operate within a temperature range of -10℃ to 60℃. Avoid extreme temperatures.
- Driving Safety: Do not operate the device in a way that distracts you from driving. Always prioritize road safety.
- Wiring: Follow the wiring diagram precisely. Improper wiring can lead to malfunctions or electrical hazards.
3. Package Contents
Verify that all items are present in the package:
- 1 x Car MP5 Player (Hodozzy 1 Din Car Stereo)
- 1 x Rearview Camera
- 1 x Power Cable
- 1 x Horn Cable
- 1 x Mounting Bracket
- 1 x D-bus Cable
- 1 x User Manual
- 1 x External Microphone (MIC)

Figure 3.1: Main unit and accessories included in the package.
4. Product Specifications
| Model | 1511W |
| Screen Material | IPS |
| Voltage | DC12V |
| CPU Chip | F133 |
| Screen Size | 10.4-inch Adjustable Touch Screen |
| Screen Resolution | 1280*480 |
| Wireless Carplay & Android Auto | Supported |
| Mirror Link | Supported |
| Radio Band | FM/RDS |
| Radio Chip | QN8035 |
| Output Power | 45W*4 |
| Operating Temperature | -10℃ to 60℃ |
| Bluetooth Version | 5.2 |
| AUX Input | Supported |
| USB Ports | Dual USB (Type A) |
| TF Card Slot | Supported |
| EQ Settings | Supported |
| Steering Wheel Control (SWC) | Supported |
| Colorful Backlight | Supported |
| Reversing Input | CVBS |
| Power Amplifier Chip | TDA7388 |
| Radio Frequency | 87.5-108MHz |
| Audio Formats | MP3/WMA/WAV/APE/FLAC |
| Video Formats | RM/RMVB/AVI/MP4/MKV/3GP |
| Image Formats | JPG BMP PNG |
| Supported Languages | English, Chinese, Spanish, Portuguese, Russian, Italian, German, French, Turkish, Czech, Arabic, Polish, Hebrew |

Figure 4.1: Product dimensions and included wiring harnesses.
5. Setup
5.1. Physical Installation
The Hodozzy 1511W is a 1 Din unit designed to fit standard single-DIN openings. Use the provided mounting bracket to secure the unit in your vehicle's dashboard. Ensure adequate space for the 10.4-inch screen, which can be adjusted vertically and horizontally.

Figure 5.1: Screen adjustment capabilities and mounting options.
5.2. Wiring Connections
Connect the power cable, horn cable, and D-bus cable according to your vehicle's wiring diagram. Ensure all connections are secure to prevent electrical issues. The unit supports CVBS input for the rearview camera.
- Power Cable: Connect to the vehicle's 12V power supply (constant and accessory).
- Horn Cable: Connect to the vehicle's speaker system.
- D-bus Cable: For data communication, typically for steering wheel controls.
- Rearview Camera: Connect the camera's video output to the CVBS input on the stereo. Ensure the camera's power is connected to the reverse light circuit for automatic activation.
- External Microphone: Plug the MIC into the designated port for clear hands-free calling.
5.3. Initial Power-On
After all connections are made, turn on your vehicle's ignition. The stereo should power on automatically. Follow any on-screen prompts for initial setup, such as language selection.
6. Operating Instructions
6.1. Touch Screen Operation
The 10.4-inch IPS touch screen is highly responsive. Navigate through menus, select applications, and adjust settings by tapping or swiping. The screen can be physically adjusted for optimal viewing angles.
6.2. Wireless Carplay & Android Auto
Connect your iPhone or Android smartphone wirelessly to access Carplay or Android Auto. This allows you to use navigation, make calls, send messages, and listen to music directly from your phone's interface displayed on the stereo screen.
- Ensure your phone's Wi-Fi and Bluetooth are enabled.
- On the stereo, select the Carplay or Android Auto icon.
- Follow the on-screen instructions to pair your device.

Figure 6.1: Wireless Carplay/Android Auto and Mirror Link features.
6.3. Mirror Link
For devices not supporting wireless Carplay/Android Auto, use the Wired Mirror Link function. Connect your smartphone via USB to mirror its screen content onto the stereo display.
- Connect your phone to the stereo's USB port.
- Select the Mirror Link option on the stereo.
- Follow any prompts on your phone to allow screen mirroring.
6.4. Bluetooth Connectivity (Version 5.2)
Bluetooth 5.2 provides faster and more stable connections for hands-free calling and audio streaming.
- Pairing: Go to the Bluetooth menu on the stereo, enable Bluetooth on your phone, and search for the stereo's device name. Select it to pair.
- Hands-Free Calling: Once paired, you can make and receive calls directly through the stereo using the external microphone.
- Audio Streaming: Play music from your phone via Bluetooth.

Figure 6.2: Bluetooth, Audio Quality, Radio, and EQ functions.
6.5. FM/RDS Radio
Access FM radio stations with RDS (Radio Data System) functionality, which displays station information and traffic updates where available.
- Select the 'Radio' icon from the main menu.
- Use the touch screen to scan for stations, save presets, or manually tune.
6.6. Audio Equalizer (EQ)
Customize your audio experience using the built-in equalizer. Adjust frequency bands to suit your preferences or choose from preset EQ modes (e.g., Pop, Rock, Jazz).
- Navigate to the 'EQ' settings in the audio menu.
- Adjust sliders or select a preset.
6.7. Steering Wheel Control (SWC)
If your vehicle supports steering wheel controls, you can configure them to operate the stereo, allowing you to adjust volume, change tracks, and answer calls without taking your hands off the wheel.
- Access the 'Steering Wheel Control' settings in the system menu.
- Follow the on-screen instructions to map your vehicle's steering wheel buttons to the stereo's functions.
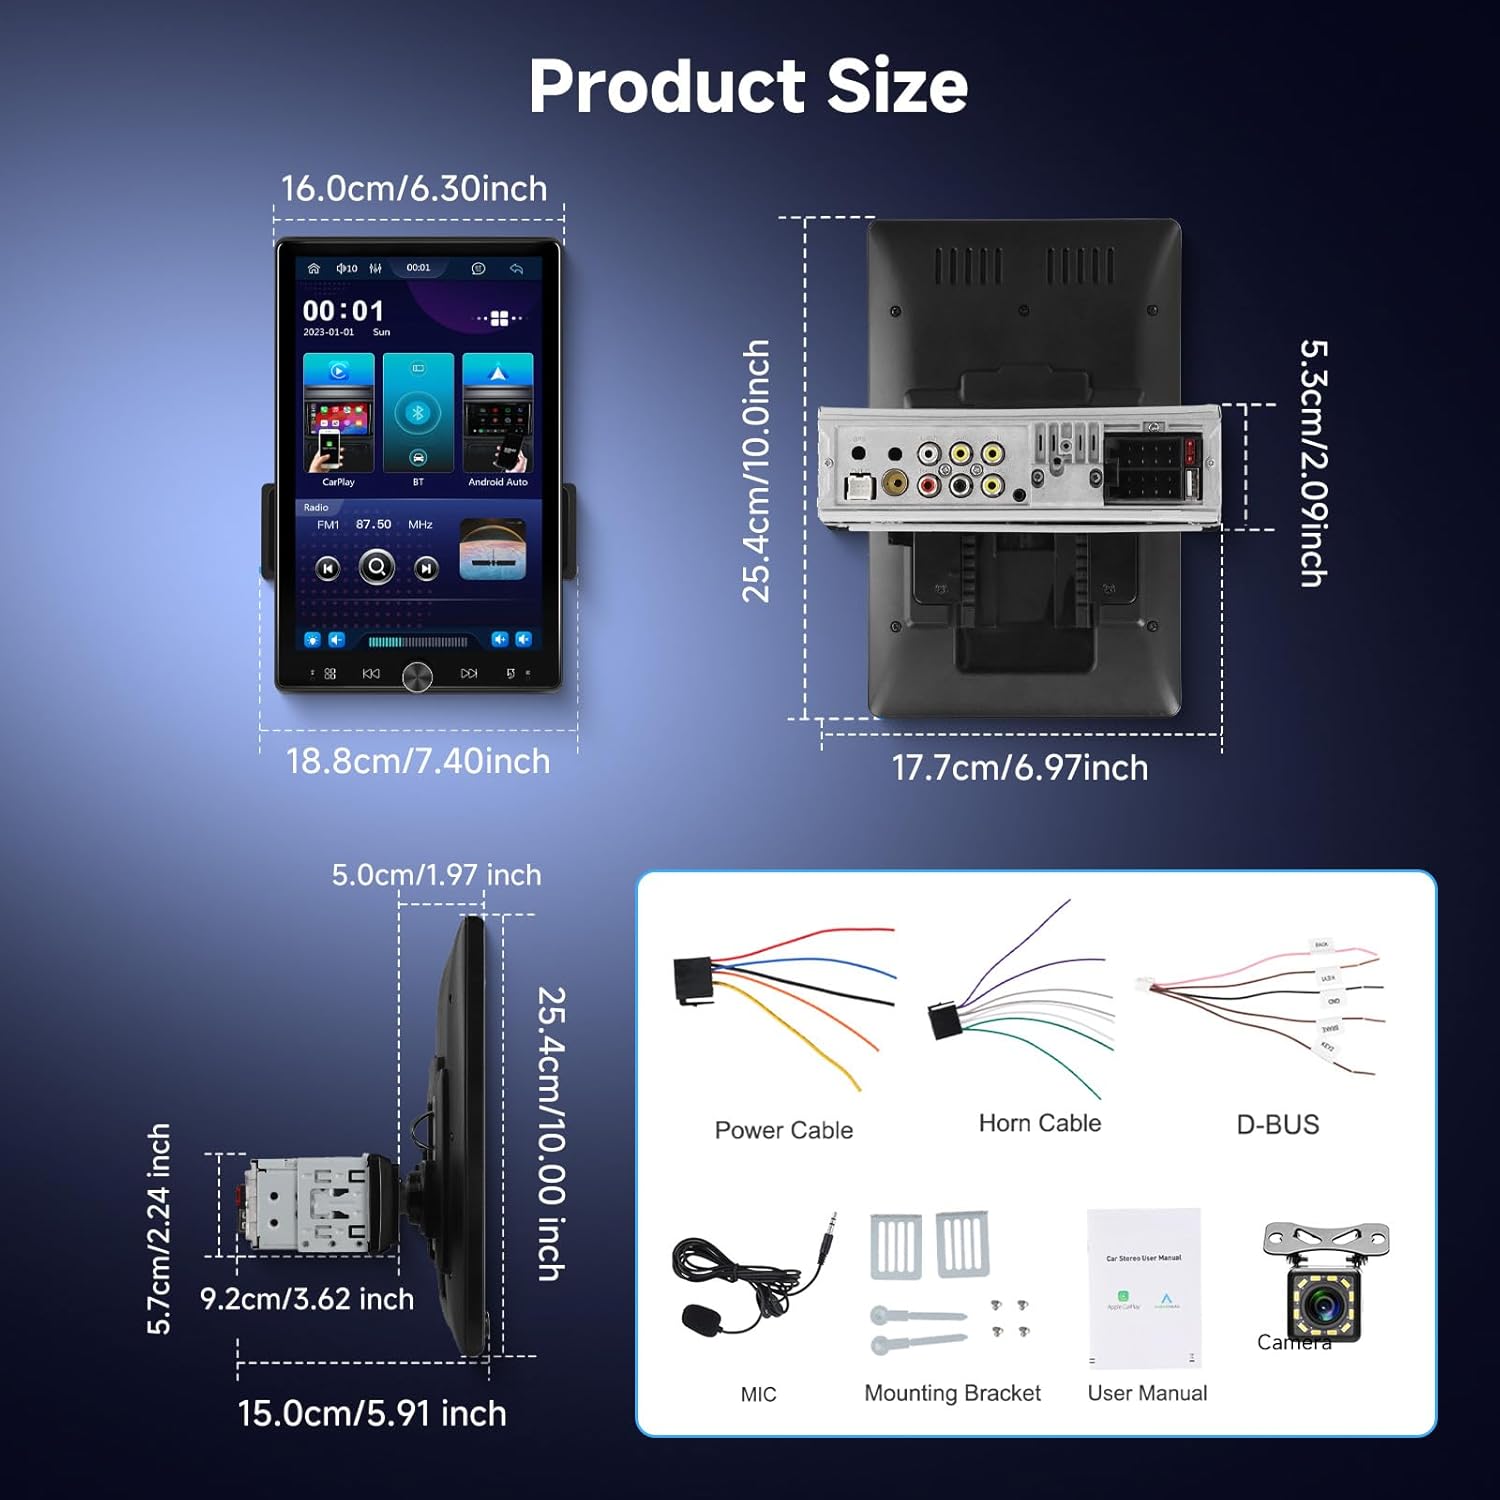
Figure 6.3: Rearview camera display and Steering Wheel Control setup.
6.8. Rearview Camera
When the vehicle is shifted into reverse, the stereo automatically displays the rearview camera feed, enhancing safety during parking and maneuvering.
- Ensure the rearview camera is correctly installed and wired to the reverse light circuit.
- The display will automatically switch to the camera view when reversing.
6.9. Input Options (AUX, USB, TF Card)
The stereo offers multiple input options for playing media.
- AUX Port: Connect external audio devices using a 3.5mm audio cable.
- Dual USB Ports: Use for media playback from USB drives, charging devices, or Wired Mirror Link. Supports various audio and video formats.
- TF Card Slot: Insert a TF (MicroSD) card for media playback.

Figure 6.4: Multiple UI options and available input ports.
7. Maintenance
- Screen Cleaning: Use a soft, lint-free cloth to clean the touch screen. Avoid abrasive cleaners or solvents.
- General Cleaning: Wipe the unit's exterior with a dry or slightly damp cloth.
- Software Updates: Check the manufacturer's website periodically for any available software updates to ensure optimal performance and new features.
- Avoid Liquids: Do not expose the unit to excessive moisture or liquids.
8. Troubleshooting
| Problem | Possible Cause | Solution |
| Unit does not power on. | Incorrect wiring, blown fuse, no power supply. | Check power cable connections, inspect vehicle fuses, ensure 12V power is supplied. |
| No sound. | Volume too low, incorrect audio source, speaker wiring issue. | Increase volume, select correct audio source, check speaker connections. |
| Bluetooth not connecting. | Bluetooth off on phone/stereo, pairing issue. | Ensure Bluetooth is enabled on both devices, unpair and re-pair, restart devices. |
| Carplay/Android Auto not working. | Incorrect connection, phone settings, app issues. | Ensure wireless connection is active or USB cable is properly connected. Check phone settings for Carplay/Android Auto permissions. |
| Rearview camera not displaying. | Camera wiring issue, incorrect input selected. | Check camera power and video signal connections. Ensure the vehicle is in reverse. |
9. Warranty and Support
The Hodozzy 1 Din Car Stereo, Model 1511W, comes with a 2-year manufacturer's warranty. This warranty covers defects in materials and workmanship under normal use.
For technical support, warranty claims, or any inquiries, please contact Hodozzy customer service. Refer to the contact information provided with your product or visit the official Hodozzy website.

Figure 9.1: Hodozzy customer support information.